Top Related Projects

Simple tool to load GLSL shaders on HTML Canvas using WebGL

Quick Overview
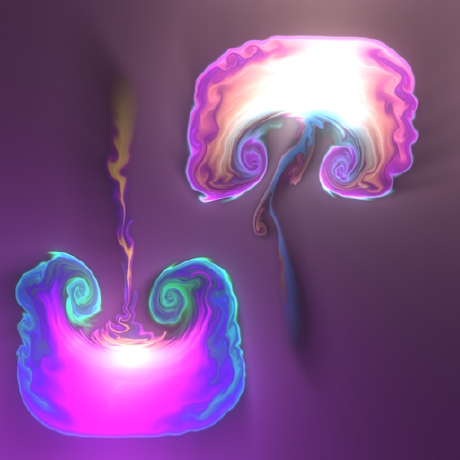
The PavelDoGreat/WebGL-Fluid-Simulation repository is a visually stunning WebGL-based fluid simulation project that allows users to interact with and manipulate a real-time fluid simulation in their web browsers. The project utilizes the power of WebGL to create a highly realistic and responsive fluid simulation that can be used in a variety of applications, such as games, visualizations, and interactive art.
Pros
- Real-time Fluid Simulation: The project provides a real-time fluid simulation that responds to user interactions, creating a dynamic and engaging experience.
- WebGL-based: By using WebGL, the project is able to leverage the power of the GPU to achieve high-performance fluid simulations that can run smoothly in modern web browsers.
- Customizable: The project allows users to customize various parameters of the fluid simulation, such as the viscosity, density, and force fields, enabling them to create unique and personalized experiences.
- Open-source: The project is open-source, allowing developers to explore the codebase, learn from it, and potentially contribute to its development.
Cons
- Complexity: The underlying implementation of the fluid simulation can be quite complex, which may make it challenging for beginners to understand and modify the code.
- Performance Limitations: While the WebGL-based approach provides good performance, the fluid simulation may still struggle on older or less powerful devices, limiting its accessibility.
- Limited Documentation: The project's documentation could be more comprehensive, making it harder for new users to get started and understand the various features and customization options.
- Lack of Tutorials: The project could benefit from more detailed tutorials and examples, which would help users better understand how to integrate the fluid simulation into their own projects.
Code Examples
Here are a few code examples from the PavelDoGreat/WebGL-Fluid-Simulation repository:
- Initializing the Fluid Simulation:
const canvas = document.getElementById('fluid-canvas');
const gl = canvas.getContext('webgl');

const fluid = new Fluid(gl, {
  size: 128,
  dt: 0.016,
  diffusion: 0.0,
  viscosity: 0.0,
  colorDiffusion: 0.0,
  fadeColor: 0.995,
  fadeSpeed: 0.995
});
This code sets up the initial parameters for the fluid simulation, including the canvas size, time step, diffusion, viscosity, and color-related settings.
- Updating the Fluid Simulation:
function update() {
  requestAnimationFrame(update);

  // Handle user input
  fluid.addSource(mouseX, mouseY, 10.0, 10.0, 1.0, 1.0, 1.0);

  // Update the fluid simulation
  fluid.step();

  // Render the fluid simulation
  fluid.render();
}

update();
This code handles the main update loop for the fluid simulation, processing user input, updating the simulation, and rendering the results.
- Adding Forces to the Fluid:
function mouseMoved(event) {
  mouseX = event.clientX;
  mouseY = event.clientY;

  // Add a force to the fluid simulation
  fluid.addSource(mouseX, mouseY, 10.0, 10.0, 1.0, 1.0, 1.0);
}

document.addEventListener('mousemove', mouseMoved);
This code listens for mouse movement events and adds a force to the fluid simulation based on the current mouse position.
Getting Started
To get started with the PavelDoGreat/WebGL-Fluid-Simulation project, follow these steps:
- Clone the repository:
git clone https://github.com/PavelDoGreat/WebGL-Fluid-Simulation.git
- Navigate to the project directory:
cd WebGL-Fluid-Simulation
-
Open the
index.htmlfile in a web browser to see the fluid simulation in action. -
To customize the simulation, you can modify the parameters in the
Fluidconstructor, such as the size, diffusion, viscosity, and color-related settings. -
To
Competitor Comparisons
Simple tool to load GLSL shaders on HTML Canvas using WebGL
Pros of glslCanvas
- Simpler and more lightweight, focused specifically on rendering GLSL shaders
- Easier to integrate into existing web projects due to its smaller scope
- Provides a straightforward API for working with GLSL shaders
Cons of glslCanvas
- Less feature-rich compared to WebGL-Fluid-Simulation, which offers a complete fluid simulation
- Limited to shader rendering, while WebGL-Fluid-Simulation provides interactive fluid dynamics
- May require additional work to achieve complex effects like those in WebGL-Fluid-Simulation
Code Comparison
WebGL-Fluid-Simulation:
const canvas = document.getElementsByTagName('canvas')[0];
resizeCanvas();
let config = {
    SIM_RESOLUTION: 128,
    DYE_RESOLUTION: 1024,
    DENSITY_DISSIPATION: 1,
    VELOCITY_DISSIPATION: 0.2,
    PRESSURE: 0.8,
    PRESSURE_ITERATIONS: 20,
    CURL: 30,
    SPLAT_RADIUS: 0.25,
    SPLAT_FORCE: 6000,
    SHADING: true,
    COLORFUL: true,
    COLOR_UPDATE_SPEED: 10,
    PAUSED: false,
    BACK_COLOR: { r: 0, g: 0, b: 0 },
    TRANSPARENT: false,
    BLOOM: true,
    BLOOM_ITERATIONS: 8,
    BLOOM_RESOLUTION: 256,
    BLOOM_INTENSITY: 0.8,
    BLOOM_THRESHOLD: 0.6,
    BLOOM_SOFT_KNEE: 0.7,
    SUNRAYS: true,
    SUNRAYS_RESOLUTION: 196,
    SUNRAYS_WEIGHT: 1.0,
}
glslCanvas:
var canvas = document.createElement('canvas');
var sandbox = new GlslCanvas(canvas);
sandbox.load(frag);
sandbox.setUniform("u_time", 1.0);
sandbox.setUniform("u_resolution", 800, 600);
Pros of GPU-Fluid-Experiments
- Utilizes GPU acceleration for improved performance
- Supports multiple rendering backends (WebGL, OpenGL, DirectX)
- Offers more advanced fluid simulation features, such as vorticity confinement
Cons of GPU-Fluid-Experiments
- Less user-friendly interface compared to WebGL-Fluid-Simulation
- Requires more setup and configuration for different platforms
- May have higher system requirements due to advanced features
Code Comparison
WebGL-Fluid-Simulation:
function updatePointer() {
    pointer.moved = pointer.x !== pointer.prevX || pointer.y !== pointer.prevY;
    pointer.prevX = pointer.x;
    pointer.prevY = pointer.y;
}
GPU-Fluid-Experiments:
function updateVelocity(dt:Float) {
    velocityRenderTarget.activate();
    velocityShader.u_dt.set(dt);
    velocityShader.u_velocity.set(velocity.readFromTexture);
    velocityShader.activate(true);
    renderQuad();
}
The code snippets show different approaches to updating simulation parameters. WebGL-Fluid-Simulation uses JavaScript for pointer tracking, while GPU-Fluid-Experiments employs Haxe for velocity updates, demonstrating the latter's more complex, GPU-oriented approach.
Convert  designs to code with AI

Introducing Visual Copilot: A new AI model to turn Figma designs to high quality code using your components.
Try Visual CopilotREADME
WebGL Fluid Simulation

References
https://github.com/mharrys/fluids-2d
https://github.com/haxiomic/GPU-Fluid-Experiments
License
The code is available under the MIT license
Top Related Projects
Simple tool to load GLSL shaders on HTML Canvas using WebGL
Convert designs to code with AI
Introducing Visual Copilot: A new AI model to turn Figma designs to high quality code using your components.
Try Visual Copilot