 expanding-collection
:octocat: ExpandingCollection is an animated material design UI card peek/pop controller. iOS library made by @Ramotion
Top Related Projects

A UICollectionViewLayout subclass that adds custom transitions/animations to the UICollectionView without effecting your existing code.

KolodaView is a class designed to simplify the implementation of Tinder like cards on iOS.
This project aims to provide a simple and customizable pull to refresh implementation. Made in Yalantis
Animated side menu with customizable UI
This component implements transition animation to crumble view-controller into tiny pieces.
Our Guillotine Menu Transitioning Animation implemented in Swift reminds a bit of a notorious killing machine.
Quick Overview
Ramotion/expanding-collection is an iOS library that provides an animated expanding collection view. It offers a unique and visually appealing way to present content in iOS applications, with cards that expand to reveal more details when tapped.
Pros
- Visually stunning and engaging user interface
- Smooth animations and transitions
- Customizable appearance and behavior
- Easy integration with existing iOS projects
Cons
- Limited to iOS platform only
- May require additional performance optimization for large datasets
- Learning curve for developers unfamiliar with custom collection views
- Potential accessibility concerns due to its highly visual nature
Code Examples
- Setting up the expanding collection view:
let expandingCollection = ExpandingCollectionView(frame: view.bounds)
view.addSubview(expandingCollection)
- Configuring the data source:
expandingCollection.dataSource = self
expandingCollection.delegate = self

func collectionView(_ collectionView: UICollectionView, numberOfItemsInSection section: Int) -> Int {
    return items.count
}

func collectionView(_ collectionView: UICollectionView, cellForItemAt indexPath: IndexPath) -> UICollectionViewCell {
    let cell = collectionView.dequeueReusableCell(withReuseIdentifier: "ExpandingCell", for: indexPath) as! ExpandingCollectionViewCell
    cell.customView = items[indexPath.row]
    return cell
}
- Handling cell expansion:
func collectionView(_ collectionView: UICollectionView, didSelectItemAt indexPath: IndexPath) {
    guard let cell = collectionView.cellForItem(at: indexPath) as? ExpandingCollectionViewCell else { return }
    cell.animateExpanding()
}
Getting Started
-
Install the library using CocoaPods:
pod 'expanding-collection' -
Import the library in your Swift file:
import expanding_collection -
Create and configure an
ExpandingCollectionView:let expandingCollection = ExpandingCollectionView(frame: view.bounds) expandingCollection.dataSource = self expandingCollection.delegate = self view.addSubview(expandingCollection) -
Implement the required
UICollectionViewDataSourceandUICollectionViewDelegatemethods to populate and interact with the collection view.
Competitor Comparisons
A UICollectionViewLayout subclass that adds custom transitions/animations to the UICollectionView without effecting your existing code.
Pros of AnimatedCollectionViewLayout
- More versatile with multiple animation styles (e.g., cubic, parallax, zoom)
- Easier to customize and extend with new animation types
- Lightweight and focused solely on collection view animations
Cons of AnimatedCollectionViewLayout
- Less visually striking compared to expanding-collection's card-based design
- Lacks additional features like detail view transitions
- May require more setup for complex layouts
Code Comparison
AnimatedCollectionViewLayout:
let layout = AnimatedCollectionViewLayout()
layout.animator = LinearCardAttributesAnimator()
collectionView.collectionViewLayout = layout
expanding-collection:
let layout = ExpandingCollectionViewLayout()
layout.itemSize = CGSize(width: 256, height: 335)
collectionView.collectionViewLayout = layout
AnimatedCollectionViewLayout offers more flexibility in animation types, while expanding-collection provides a more specific, visually appealing card-based layout out of the box. AnimatedCollectionViewLayout is better suited for developers who want to create custom animations, while expanding-collection is ideal for those seeking a ready-to-use expanding card interface with minimal setup.
KolodaView is a class designed to simplify the implementation of Tinder like cards on iOS.
Pros of Koloda
- Simpler implementation for basic card swiping functionality
- More lightweight and focused on a specific use case (Tinder-like card swiping)
- Easier to customize for simple card-based interfaces
Cons of Koloda
- Less versatile compared to the expanding collection concept
- Limited to card swiping interactions, lacking advanced layout options
- May require additional work for complex animations beyond basic swiping
Code Comparison
Koloda:
let kolodaView = KolodaView()
kolodaView.dataSource = self
kolodaView.delegate = self

func kolodaNumberOfCards(_ koloda: KolodaView) -> Int {
    return images.count
}
Expanding-collection:
let expandingCollection = ExpandingCollection(collectionViewLayout: layout)
expandingCollection.dataSource = self
expandingCollection.delegate = self

func collectionView(_ collectionView: UICollectionView, numberOfItemsInSection section: Int) -> Int {
    return items.count
}
Both repositories provide iOS UI components, but they serve different purposes. Koloda focuses on Tinder-like card swiping, while Expanding-collection offers a more complex expanding cell layout. The code comparison shows similar setup patterns, but Expanding-collection requires more configuration for its advanced features.
This project aims to provide a simple and customizable pull to refresh implementation. Made in Yalantis
Pros of Pull-to-Refresh.Rentals-iOS
- Focused on a specific UI interaction (pull-to-refresh)
- Lightweight and easy to integrate into existing projects
- Customizable animation and styling options
Cons of Pull-to-Refresh.Rentals-iOS
- Limited to pull-to-refresh functionality
- Less versatile for creating complex UI layouts
- May require additional libraries for more advanced features
Code Comparison
Pull-to-Refresh.Rentals-iOS:
let refreshControl = PullToRefresh(refreshViews: [imageView, textLabel])
tableView.addPullToRefresh(refreshControl) {
    // Refresh action
}
expanding-collection:
let expandingCollection = ExpandingCollection(cells: items)
expandingCollection.cellSize = CGSize(width: 250, height: 350)
expandingCollection.delegate = self
view.addSubview(expandingCollection)
Summary
Pull-to-Refresh.Rentals-iOS is a specialized library for implementing pull-to-refresh functionality with customizable animations. It's lightweight and easy to integrate but limited in scope. expanding-collection, on the other hand, offers a more comprehensive solution for creating expandable card-based layouts with advanced transitions and animations. While Pull-to-Refresh.Rentals-iOS is ideal for projects requiring a specific pull-to-refresh feature, expanding-collection provides greater flexibility for complex UI designs and interactions.
Animated side menu with customizable UI
Pros of Side-Menu.iOS
- Simpler implementation focused on side menu functionality
- Lightweight and easy to integrate into existing projects
- Customizable menu appearance and animations
Cons of Side-Menu.iOS
- Limited to side menu functionality, less versatile than Expanding-Collection
- Less active development and community support
- Fewer customization options for overall UI design
Code Comparison
Side-Menu.iOS:
let menuLeftNavigationController = UISideMenuNavigationController(rootViewController: YourViewController)
SideMenuManager.default.leftMenuNavigationController = menuLeftNavigationController
SideMenuManager.default.addPanGestureToPresent(toView: self.navigationController!.navigationBar)
Expanding-Collection:
let expandingViewController = ExpandingViewController()
expandingViewController.itemSize = CGSize(width: 256, height: 335)
expandingViewController.collectionView?.contentInset = UIEdgeInsets(top: 20, left: 0, bottom: 0, right: 0)
expandingViewController.delegate = self
Both repositories offer unique UI components for iOS applications. Side-Menu.iOS provides a straightforward solution for implementing side menus, while Expanding-Collection offers a more complex and visually appealing card-based interface. The choice between the two depends on the specific requirements of your project and the desired user experience.
This component implements transition animation to crumble view-controller into tiny pieces.
Pros of StarWars.iOS
- Unique and visually appealing Star Wars-themed animation
- Simpler implementation for specific use cases
- Lightweight and focused on a single animation effect
Cons of StarWars.iOS
- Less versatile compared to the more general-purpose expanding-collection
- Limited customization options for the animation
- Not actively maintained (last update was several years ago)
Code Comparison
StarWars.iOS:
override func viewDidAppear(_ animated: Bool) {
    super.viewDidAppear(animated)

    if !animated {
        self.performAnimation()
    }
}
expanding-collection:
override func viewDidLoad() {
    super.viewDidLoad()

    // registration cell
    let nib = UINib(nibName: String(describing: CollectionViewCell.self), bundle: nil)
    collectionView?.register(nib, forCellWithReuseIdentifier: String(describing: CollectionViewCell.self))
}
The StarWars.iOS code snippet shows the animation trigger in the viewDidAppear method, while the expanding-collection example demonstrates cell registration in viewDidLoad. This highlights the different focus areas of each library, with StarWars.iOS emphasizing animation and expanding-collection providing a more comprehensive collection view implementation.
Our Guillotine Menu Transitioning Animation implemented in Swift reminds a bit of a notorious killing machine.
Pros of GuillotineMenu
- Simpler implementation, making it easier to integrate into existing projects
- More focused functionality, specifically for menu animations
- Lightweight and less resource-intensive
Cons of GuillotineMenu
- Limited to menu animations, less versatile than expanding-collection
- Fewer customization options for the animation and appearance
- Less active development and community support
Code Comparison
GuillotineMenu:
let menuButton = UIButton()
let menu = GuillotineMenu(menuButton: menuButton)
menu.delegate = self
menu.presentationStyle = .slideInOut
view.addSubview(menu)
expanding-collection:
let layout = ExpandingCollectionViewLayout()
let collectionView = UICollectionView(frame: .zero, collectionViewLayout: layout)
collectionView.register(ExpandingCollectionViewCell.self, forCellWithReuseIdentifier: "cell")
collectionView.dataSource = self
collectionView.delegate = self
view.addSubview(collectionView)
The code comparison shows that GuillotineMenu is more straightforward to implement, requiring fewer lines of code and less setup. However, expanding-collection offers more flexibility and customization options, albeit with a slightly more complex implementation.
Convert  designs to code with AI

Introducing Visual Copilot: A new AI model to turn Figma designs to high quality code using your components.
Try Visual CopilotREADME


EXPANDING COLLECTION
An animated material design UI card peek/pop controller
We specialize in the designing and coding of custom UI for Mobile Apps and Websites.
Stay tuned for the latest updates:
![]()


![]()

![]()
Requirements
- iOS 9.0+
- Xcode 9.0+
Installation
Just add the Source folder to your project.
or use CocoaPods with Podfile:
pod 'expanding-collection'
or Carthage users can simply add to their Cartfile:
github "Ramotion/expanding-collection"
Usage
import expanding_collection
Create CollectionViewCell
-
Create UICollectionViewCell inherit from
BasePageCollectionCell(recommend create cell with xib file) -
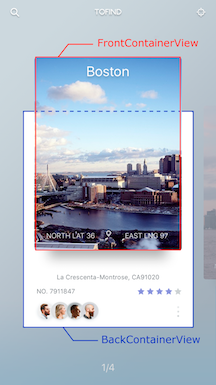
Adding FrontView
- add a view to YOURCELL.xib and connect it to
@IBOutlet weak var frontContainerView: UIView! - add width, height, centerX and centerY constraints (width and height constranints must equal cellSize)
- connect centerY constraint to
@IBOutlet weak var frontConstraintY: NSLayoutConstraint! - add any desired uiviews to frontView
- Adding BackView
- repeat step 2 (connect outlets to
@IBOutlet weak var backContainerView: UIView!,@IBOutlet weak var backConstraintY: NSLayoutConstraint!)
- Cell example DemoCell
If set tag = 101 for any FrontView.subviews this view will be hidden during the transition animation
Create CollectionViewController
-
Create a UIViewController inheriting from
ExpandingViewController -
Register Cell and set Cell size:
override func viewDidLoad() {
    itemSize = CGSize(width: 214, height: 460) //IMPORTANT!!! Height of open state cell
    super.viewDidLoad()

    // register cell
    let nib = UINib(nibName: "NibName", bundle: nil)
    collectionView?.registerNib(nib, forCellWithReuseIdentifier: "CellIdentifier")
}
- Add UICollectionViewDataSource methods
extension YourViewController {

  override func collectionView(collectionView: UICollectionView, numberOfItemsInSection section: Int) -> Int {
    return items.count
  }

  override func collectionView(collectionView: UICollectionView, cellForItemAtIndexPath indexPath: NSIndexPath) -> UICollectionViewCell {
    let cell = collectionView.dequeueReusableCellWithReuseIdentifier("CellIdentifier"), forIndexPath: indexPath)
    // configure cell
    return cell
  }
}
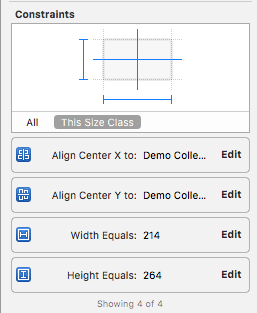
- Open Cell animation
override func viewDidLoad() {
    itemSize = CGSize(width: 214, height: 264)
    super.viewDidLoad()

    // register cell
    let nib = UINib(nibName: "CellIdentifier", bundle: nil)
    collectionView?.registerNib(nib, forCellWithReuseIdentifier: String(DemoCollectionViewCell))
}
func collectionView(collectionView: UICollectionView, didSelectItemAtIndexPath indexPath: NSIndexPath) {
    cell.cellIsOpen(!cell.isOpened)
}
if you use this delegates method:
func collectionView(collectionView: UICollectionView, willDisplayCell cell: UICollectionViewCell, forItemAtIndexPath indexPath: NSIndexPath)

func scrollViewDidEndDecelerating(scrollView: UIScrollView)
must call super method:
func collectionView(collectionView: UICollectionView, willDisplayCell cell: UICollectionViewCell, forItemAtIndexPath indexPath: NSIndexPath) {
  super.collectionView(collectionView: collectionView, willDisplayCell cell: cell, forItemAtIndexPath indexPath: indexPath)
  // code
}

func scrollViewDidEndDecelerating(scrollView: UIScrollView) {
  super.scrollViewDidEndDecelerating(scrollView: scrollView)
  // code
}
Transition animation
-
Create a UITableViewController inheriting from
ExpandingTableViewController -
Set header height default 236
override init(nibName nibNameOrNil: String?, bundle nibBundleOrNil: Bundle?) {
    super.init(nibName: nibNameOrNil, bundle: nibBundleOrNil)
    headerHeight = ***
}
OR
required init?(coder aDecoder: NSCoder) {
    super.init(coder: aDecoder)
    headerHeight = ***
}
- Call the push method in YourViewController to YourTableViewController
  if cell.isOpened == true {
    let vc: YourTableViewController = // ... create view controller
    pushToViewController(vc)
  }
- For back transition use
popTransitionAnimation()
ð Check this library on other language:

ð License
Expanding Collection is released under the MIT license. See LICENSE for details.
This library is a part of a selection of our best UI open-source projects.
If you use the open-source library in your project, please make sure to credit and backlink to www.ramotion.com
ð± Get the Showroom App for iOS to give it a try
Try this UI component and more like this in our iOS app. Contact us if interested.
Top Related Projects
A UICollectionViewLayout subclass that adds custom transitions/animations to the UICollectionView without effecting your existing code.
KolodaView is a class designed to simplify the implementation of Tinder like cards on iOS.
This project aims to provide a simple and customizable pull to refresh implementation. Made in Yalantis
Animated side menu with customizable UI
This component implements transition animation to crumble view-controller into tiny pieces.
Our Guillotine Menu Transitioning Animation implemented in Swift reminds a bit of a notorious killing machine.
Convert designs to code with AI
Introducing Visual Copilot: A new AI model to turn Figma designs to high quality code using your components.
Try Visual Copilot