
Top Related Projects


Quick Overview
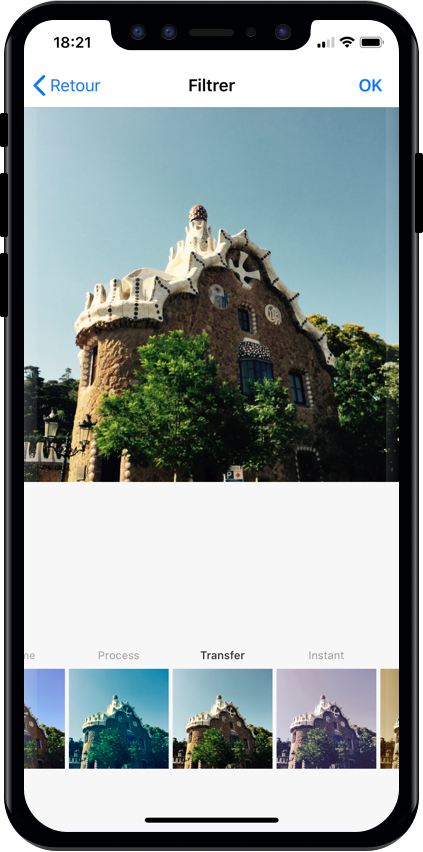
YPImagePicker is an open-source iOS library that provides a customizable and feature-rich image picker for your iOS app. It allows users to select multiple photos and videos from their device's photo library, and offers various editing and filtering options.
Pros
- Customizable UI: The library provides a highly customizable user interface, allowing developers to match the look and feel of their app.
- Multiselection: Users can select multiple photos and videos at once, making it easier to share content.
- Editing and Filtering: The library includes built-in tools for cropping, rotating, and applying filters to the selected media.
- Performance: The library is optimized for performance, ensuring a smooth user experience even with large photo libraries.
Cons
- Limited Android Support: The library is currently only available for iOS, with no official support for Android.
- Dependency on External Libraries: The library relies on several external dependencies, which may increase the overall project size and complexity.
- Limited Documentation: The project's documentation could be more comprehensive, making it harder for new developers to get started.
- Potential Maintenance Issues: As an open-source project, the long-term maintenance and support of the library may be a concern.
Code Examples
Here are a few examples of how to use the YPImagePicker library in your iOS app:
- Initializing the Picker:
let imagePicker = YPImagePicker()
imagePicker.didFinishPicking { [unowned self] items, _ in
    if let photo = items.singlePhoto {
        // Handle the selected photo
    }
    self.dismiss(animated: true, completion: nil)
}
present(imagePicker, animated: true, completion: nil)
- Customizing the Picker:
var config = YPImagePickerConfiguration()
config.library.mediaType = .photo
config.library.maxNumberOfItems = 10
config.showsPhotoFilters = true
config.showsVideoTrimmer = true
let imagePicker = YPImagePicker(configuration: config)
- Handling Selected Media:
imagePicker.didFinishPicking { [unowned self] items, _ in
    for item in items {
        switch item {
        case .photo(let photo):
            // Handle the selected photo
        case .video(let video):
            // Handle the selected video
        }
    }
    self.dismiss(animated: true, completion: nil)
}
- Applying Filters:
imagePicker.filters = [
    .sepia,
    .chrome,
    .fade
]
Getting Started
To get started with YPImagePicker, follow these steps:
-
Add the library to your project using a dependency manager like CocoaPods or Carthage.
-
Import the library in your Swift file:
import YPImagePicker
- Initialize the image picker and present it to the user:
let imagePicker = YPImagePicker()
imagePicker.didFinishPicking { [unowned self] items, _ in
    // Handle the selected media
    self.dismiss(animated: true, completion: nil)
}
present(imagePicker, animated: true, completion: nil)
- Customize the picker's behavior and appearance by modifying the
YPImagePickerConfigurationobject:
var config = YPImagePickerConfiguration()
config.library.mediaType = .photo
config.library.maxNumberOfItems = 10
config.showsPhotoFilters = true
config.showsVideoTrimmer = true
let imagePicker = YPImagePicker(configuration: config)
- Handle the selected media by checking the
itemsparameter in thedidFinishPickingclosure:
imagePicker.didFinishPicking { [unowned self] items, _ in
    for item in items {
        switch item {
        case .photo(let photo):
            // Handle the selected photo
        case .video(let video):
            // Handle the selected video
        }
    }
    self.dismiss(animated: true,
Competitor Comparisons
Elegant HTTP Networking in Swift
Pros of Alamofire
- Alamofire provides a high-level API for making HTTP requests, handling responses, and managing session tasks.
- It has a large and active community, with extensive documentation and a wide range of third-party libraries and extensions.
- Alamofire is highly customizable, allowing developers to configure various aspects of the networking stack, such as request headers, response serialization, and authentication.
Cons of Alamofire
- Alamofire may be overkill for simple networking tasks, as it adds an additional layer of abstraction that can increase the complexity of the codebase.
- The library has a relatively large footprint, which may be a concern for projects with strict size constraints.
- Alamofire's dependency on Foundation may make it less suitable for certain use cases, such as cross-platform development or projects with specific memory management requirements.
Code Comparison
Alamofire:
Alamofire.request("https://httpbin.org/get")
    .responseJSON { response in
        switch response.result {
        case .success(let value):
            print("JSON: \(value)")
        case .failure(let error):
            print("Error: \(error)")
        }
    }
YPImagePicker:
let picker = YPImagePicker()
picker.didFinishPicking { [unowned picker] items, _ in
    if let photo = items.singlePhoto {
        print(photo.image)
    }
    picker.dismiss(animated: true, completion: nil)
}
present(picker, animated: true, completion: nil)
KolodaView is a class designed to simplify the implementation of Tinder like cards on iOS.
Pros of Koloda
- Koloda provides a visually appealing and interactive card-based UI, which can be useful for various types of content presentation.
- The library includes built-in animations and gestures, making it easy to implement a Tinder-like swiping experience.
- Koloda is well-documented and has a active community, providing good support and resources for developers.
Cons of Koloda
- Koloda is primarily focused on the card-based UI and may not be as flexible as other image picker libraries for more complex use cases.
- The library may have a steeper learning curve compared to simpler image picker solutions.
- Koloda is not actively maintained, with the last commit being over 2 years ago, which could be a concern for long-term project support.
Code Comparison
Koloda:
let kolodaView = KolodaView(frame: view.bounds)
kolodaView.dataSource = self
kolodaView.delegate = self
view.addSubview(kolodaView)
YPImagePicker:
let imagePicker = YPImagePicker(configuration: config)
imagePicker.didFinishPicking { [unowned self] items, _ in
    if let photo = items.singlePhoto {
        imageView.image = photo.image
    }
    imagePicker.dismiss(animated: true, completion: nil)
}
present(imagePicker, animated: true, completion: nil)
Convert  designs to code with AI

Introducing Visual Copilot: A new AI model to turn Figma designs to high quality code using your components.
Try Visual CopilotREADME
YPImagePicker
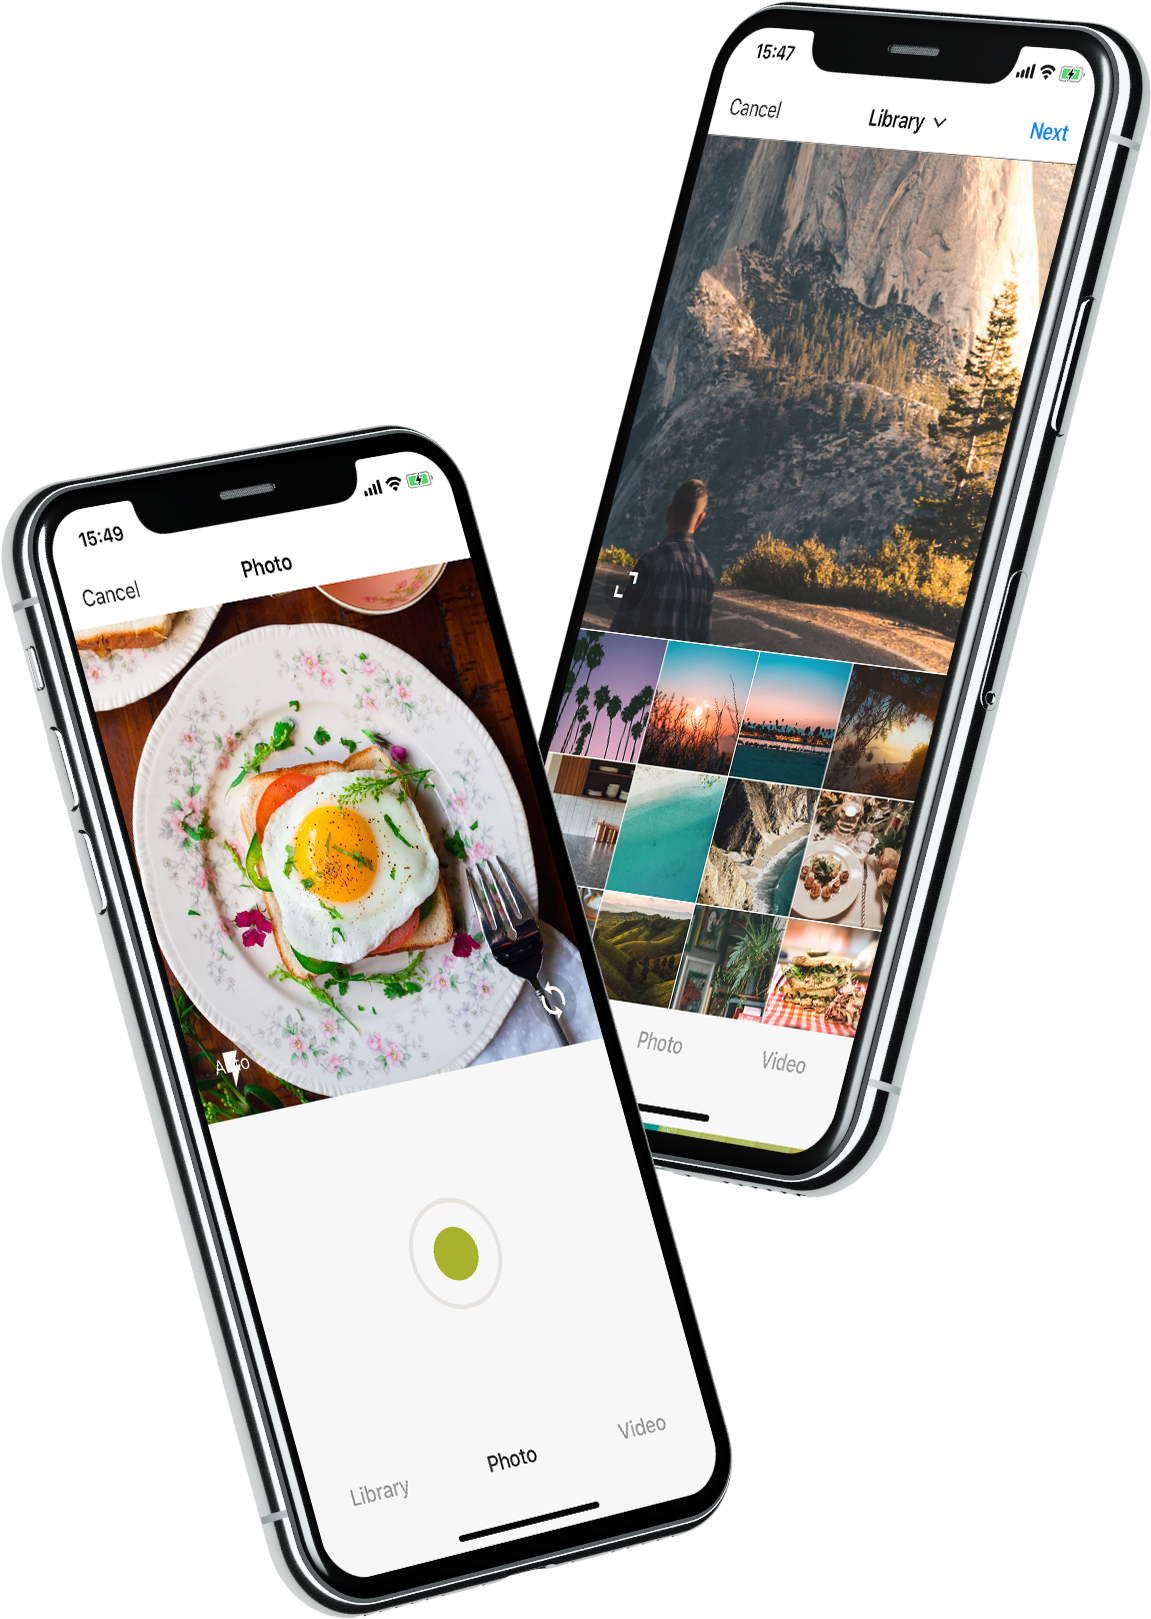
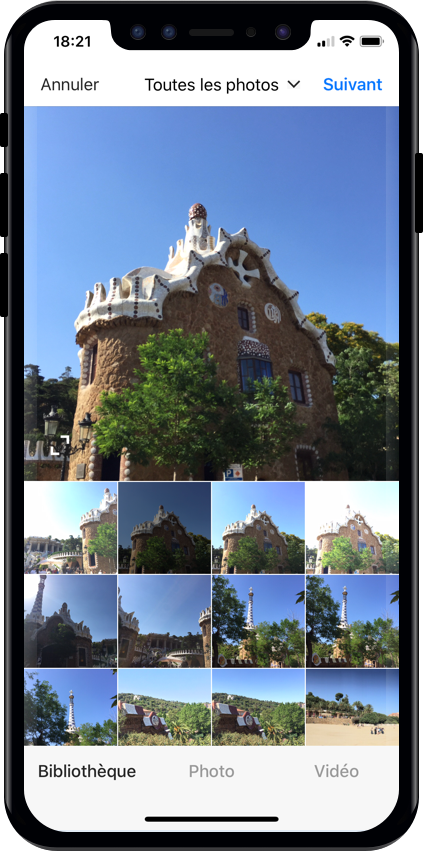
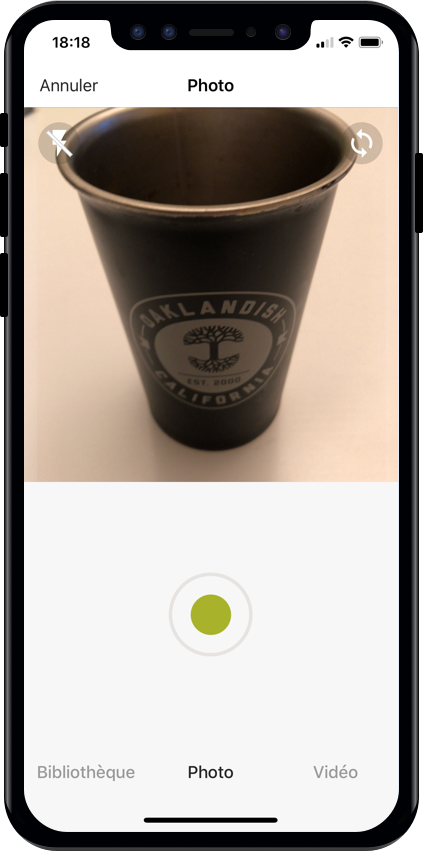
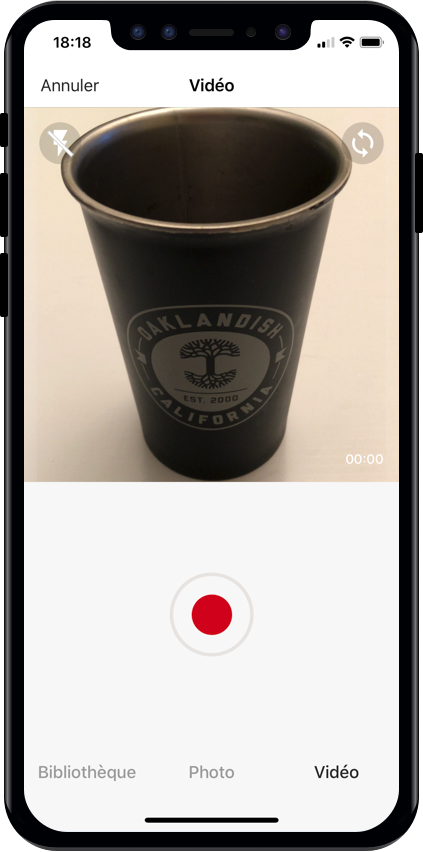
YPImagePicker is an instagram-like photo/video picker for iOS written in pure Swift. It is feature-rich and highly customizable to match your App's requirements.
![]()


![]()
![]()

Installation - Configuration - Usage - Languages - UI Customization
Give it a quick try :
pod repo update then pod try YPImagePicker
Those features are available just with a few lines of code!
Notable Features
ð
Library
ð· Photo
ð¥ Video
âï¸ Crop
â¡ï¸ Flash
ð¼ Filters
ð Albums
ð¢ Multiple Selection
ð Video Trimming & Cover selection
ð Output image size
And many more...
Installation
Using CocoaPods
First, be sure to run pod repo update to get the latest version available.
Add pod 'YPImagePicker' to your Podfile and run pod install. Also, add use_frameworks! to the Podfile.
target 'MyApp'
pod 'YPImagePicker'
use_frameworks!
Using Swift Package Manager
Open SPM dependency manager through File > Swift Packages > Add Package Dependency....
and insert repository URL:
https://github.com/Yummypets/YPImagePicker.git
To add dependency in your own package, just specify a package in dependencies of your Package.swift:
.package(
name: "YPImagePicker",
url: "https://github.com/Yummypets/YPImagePicker.git",
.upToNextMajor(from: "5.0.0")
)
Note: This has a minimum target iOS version of 12.0.
Plist entries
In order for your app to access camera and photo libraries,
you'll need to add these plist entries :
- Privacy - Camera Usage Description (photo/videos)
- Privacy - Photo Library Usage Description (library)
- Privacy - Microphone Usage Description (videos)
<key>NSCameraUsageDescription</key>
<string>yourWording</string>
<key>NSPhotoLibraryUsageDescription</key>
<string>yourWording</string>
<key>NSMicrophoneUsageDescription</key>
<string>yourWording</string>
Configuration
All the configuration endpoints are in the YPImagePickerConfiguration struct. Below are the default value for reference, feel free to play around :)
var config = YPImagePickerConfiguration()
// [Edit configuration here ...]
// Build a picker with your configuration
let picker = YPImagePicker(configuration: config)
General
config.isScrollToChangeModesEnabled = true
config.onlySquareImagesFromCamera = true
config.usesFrontCamera = false
config.showsPhotoFilters = true
config.showsVideoTrimmer = true
config.shouldSaveNewPicturesToAlbum = true
config.albumName = "DefaultYPImagePickerAlbumName"
config.startOnScreen = YPPickerScreen.photo
config.screens = [.library, .photo]
config.showsCrop = .none
config.targetImageSize = YPImageSize.original
config.overlayView = UIView()
config.hidesStatusBar = true
config.hidesBottomBar = false
config.hidesCancelButton = false
config.silentMode = true
config.preferredStatusBarStyle = UIStatusBarStyle.default
config.bottomMenuItemSelectedColour = UIColor(r: 38, g: 38, b: 38)
config.bottomMenuItemUnSelectedColour = UIColor(r: 153, g: 153, b: 153)
config.filters = [DefaultYPFilters...]
config.maxCameraZoomFactor = 1.0
config.fonts..
Library
config.library.options = nil
config.library.onlySquare = false
config.library.isSquareByDefault = true
config.library.minWidthForItem = nil
config.library.mediaType = YPlibraryMediaType.photo
config.library.defaultMultipleSelection = false
config.library.maxNumberOfItems = 1
config.library.minNumberOfItems = 1
config.library.numberOfItemsInRow = 4
config.library.spacingBetweenItems = 1.0
config.library.skipSelectionsGallery = false
config.library.preselectedItems = nil
config.library.preSelectItemOnMultipleSelection = true
Video
config.video.compression = AVAssetExportPresetHighestQuality
config.video.fileType = .mov
config.video.recordingTimeLimit = 60.0
config.video.libraryTimeLimit = 60.0
config.video.minimumTimeLimit = 3.0
config.video.trimmerMaxDuration = 60.0
config.video.trimmerMinDuration = 3.0
Gallery
config.gallery.hidesRemoveButton = false
Default Configuration
// Set the default configuration for all pickers
YPImagePickerConfiguration.shared = config

// And then use the default configuration like so:
let picker = YPImagePicker()
When displaying picker on iPad, picker will support one size only you should set it before displaying it:
let preferredContentSize = CGSize(width: 500, height: 600);
YPImagePickerConfiguration.widthOniPad = preferredContentSize.width;

// Now you can Display the picker with preferred size in dialog, popup etc
Usage
First things first import YPImagePicker.
The picker only has one callback didFinishPicking enabling you to handle all the cases. Let's see some typical use cases ð¤
Single Photo
let picker = YPImagePicker()
picker.didFinishPicking { [unowned picker] items, _ in
    if let photo = items.singlePhoto {
        print(photo.fromCamera) // Image source (camera or library)
        print(photo.image) // Final image selected by the user
        print(photo.originalImage) // original image selected by the user, unfiltered
        print(photo.modifiedImage) // Transformed image, can be nil
        print(photo.exifMeta) // Print exif meta data of original image.
    }
    picker.dismiss(animated: true, completion: nil)
}
present(picker, animated: true, completion: nil)
Single video
// Here we configure the picker to only show videos, no photos.
var config = YPImagePickerConfiguration()
config.screens = [.library, .video]
config.library.mediaType = .video

let picker = YPImagePicker(configuration: config)
picker.didFinishPicking { [unowned picker] items, _ in
    if let video = items.singleVideo {
        print(video.fromCamera)
        print(video.thumbnail)
        print(video.url)
    }
    picker.dismiss(animated: true, completion: nil)
}
present(picker, animated: true, completion: nil)
As you can see singlePhoto and singleVideo helpers are here to help you handle single media which are very common, while using the same callback for all your use-cases \o/
Multiple selection
To enable multiple selection make sure to set library.maxNumberOfItems in the configuration like so:
var config = YPImagePickerConfiguration()
config.library.maxNumberOfItems = 3
let picker = YPImagePicker(configuration: config)
Then you can handle multiple selection in the same callback you know and love :
picker.didFinishPicking { [unowned picker] items, cancelled in
    for item in items {
        switch item {
        case .photo(let photo):
            print(photo)
        case .video(let video):
            print(video)
        }
    }
    picker.dismiss(animated: true, completion: nil)
}
Handle Cancel event (if needed)
picker.didFinishPicking { [unowned picker] items, cancelled in
    if cancelled {
        print("Picker was canceled")
    }
    picker.dismiss(animated: true, completion: nil)
}
That's it !
Languages
ðºð¸ English, ðªð¸ Spanish, ð«ð· French ð·ðº Russian, ðµð± Polish, ð³ð± Dutch, ð§ð· Brazilian, ð¹ð· Turkish, ð¸ð¾ Arabic, ð©ðª German, ð®ð¹ Italian, ð¯ðµ Japanese, ð¨ð³ Chinese, ð®ð© Indonesian, ð°ð· Korean, ð¹ð¼ Traditional Chineseï¼Taiwan), ð»ð³ Vietnamese, ð¹ð Thai, ð¨ð¿ Czech, ð®ð· Farsi.
If your language is not supported, you can still customize the wordings via the configuration.wordings api:
config.wordings.libraryTitle = "Gallery"
config.wordings.cameraTitle = "Camera"
config.wordings.next = "OK"
Better yet you can submit an issue or pull request with your Localizable.strings file to add a new language !
UI Customization
We tried to keep things as native as possible, so this is done mostly through native Apis.
Navigation bar color
let coloredImage = UIImage(color: .red)
UINavigationBar.appearance().setBackgroundImage(coloredImage, for: UIBarMetrics.default)
// UIImage+color helper https://stackoverflow.com/questions/26542035/create-uiimage-with-solid-color-in-swift
Navigation bar fonts
let attributes = [NSAttributedString.Key.font : UIFont.systemFont(ofSize: 30, weight: .bold) ]
UINavigationBar.appearance().titleTextAttributes = attributes // Title fonts
UIBarButtonItem.appearance().setTitleTextAttributes(attributes, for: .normal) // Bar Button fonts
Navigation bar Text colors
UINavigationBar.appearance().titleTextAttributes = [NSAttributedString.Key.foregroundColor : UIColor.yellow ] // Title color
UINavigationBar.appearance().tintColor = .red // Left. bar buttons
config.colors.tintColor = .green // Right bar buttons (actions)
Original Project & Author
This project has been first inspired by Fusuma Considering the big code, design changes, and all the additional features added along the way, this moved from a fork to a standalone separate repo, also for discoverability purposes. Original Fusuma author is ytakz
Core Team


Contributors ð
ezisazis, hanikeddah, tahaburak, ajkolean, Anarchoschnitzel, Emil, Rafael Damasceno, cenkingunlugu heitara portellaa Romixery shotat shalamowww
Special thanks to ihtiht for the cool looking logo!
They helped us one way or another ð
userdar, Evgeniy, MehdiMahdloo, om-ha, userdar, ChintanWeapp, eddieespinal, viktorgardart, gdelarosa, cwestMobile, Tinyik, Vivekthakur647, tomasbykowski, artemsmikh, theolof, dongdong3344, MHX792, CIronfounderson, Guerrix, Zedd0202, mohammadZ74, SalmanGhumsani, wegweiser6, BilalAkram, KazimAhmad, JustinBeBoy, SashaMeyer, GShushanik, Cez95, Palando, sebastienboulogne, JigneshParekh7165, Deepakepaisa, AndreiBoariu, nathankonrad1, wawilliams003, pngo-hypewell, PawanManjani, devender54321, Didar1994, relaxsus restoflash
Dependency
YPImagePicker relies on prynt/PryntTrimmerView for provide video trimming and cover features. Big thanks to @HHK1 for making this open source :)
Obj-C support
Objective-C is not supported and this is not on our roadmap. Swift is the future and dropping Obj-C is the price to pay to keep our velocity on this library :)
License
YPImagePicker is released under the MIT license.
See LICENSE for details.
Swift Version
Top Related Projects
Convert designs to code with AI
Introducing Visual Copilot: A new AI model to turn Figma designs to high quality code using your components.
Try Visual Copilot