
Top Related Projects

✨ Light and Fast AI Assistant. Support: Web | iOS | MacOS | Android | Linux | Windows

GUI for ChatGPT API and many LLMs. Supports agents, file-based QA, GPT finetuning and query with web search. All with a neat UI.

用 Express 和 Vue3 搭建的 ChatGPT 演示网页

🔮 ChatGPT Desktop Application (Mac, Windows and Linux)

AI chat for any model.

The official gpt4free repository | various collection of powerful language models | o4, o3 and deepseek r1, gpt-4.1, gemini 2.5
Quick Overview
ChatGPT-Demo is an open-source project that provides a web-based interface for interacting with OpenAI's GPT models. It offers a user-friendly chat interface similar to ChatGPT, allowing users to experience AI-powered conversations without the need for an OpenAI account.
Pros
- Easy to set up and deploy, with clear documentation and instructions
- Customizable interface and features to suit different use cases
- Supports multiple languages and themes
- Open-source nature allows for community contributions and improvements
Cons
- Requires an OpenAI API key, which may involve costs for heavy usage
- Limited to the capabilities of the underlying GPT models
- May require technical knowledge for advanced customization or self-hosting
Getting Started
To set up ChatGPT-Demo locally:
-
Clone the repository:
git clone https://github.com/anse-app/chatgpt-demo.git cd chatgpt-demo -
Install dependencies:
npm install -
Create a
.envfile in the root directory and add your OpenAI API key:OPENAI_API_KEY=your_api_key_here -
Start the development server:
npm run dev -
Open your browser and navigate to
http://localhost:3000to use the chat interface.
For deployment, follow the project's documentation for platform-specific instructions (e.g., Vercel, Netlify, or self-hosting).
Competitor Comparisons
✨ Light and Fast AI Assistant. Support: Web | iOS | MacOS | Android | Linux | Windows
Pros of NextChat
- More advanced UI with features like dark mode and mobile responsiveness
- Supports multiple chat models beyond just ChatGPT
- Includes built-in prompt templates and conversation management
Cons of NextChat
- More complex setup and configuration required
- Potentially higher resource usage due to additional features
- May have a steeper learning curve for new users
Code Comparison
chatgpt-demo:
const response = await fetch('/api/chat', {
  method: 'POST',
  headers: { 'Content-Type': 'application/json' },
  body: JSON.stringify({ message: userInput }),
});
NextChat:
const { data } = await api.sendMessage(props.messageId, {
  conversationId: props.conversationId,
  parentMessageId: props.parentMessageId,
  text: props.content,
  stream: true,
});
The code snippets show that NextChat uses a more structured API approach with additional parameters, while chatgpt-demo uses a simpler fetch request. This reflects NextChat's more feature-rich design, but also its increased complexity.
Both projects aim to provide ChatGPT-like interfaces, but NextChat offers a more comprehensive solution with additional features and flexibility. However, this comes at the cost of increased complexity and potentially higher resource requirements. chatgpt-demo, on the other hand, provides a simpler, more straightforward implementation that may be easier to set up and use for basic chatbot functionality.
GUI for ChatGPT API and many LLMs. Supports agents, file-based QA, GPT finetuning and query with web search. All with a neat UI.
Pros of ChuanhuChatGPT
- More comprehensive features, including support for multiple language models and API keys
- Advanced customization options, such as temperature and top_p settings
- Built-in file handling capabilities for various formats (PDF, TXT, etc.)
Cons of ChuanhuChatGPT
- More complex setup and configuration process
- Potentially steeper learning curve for new users
- Heavier resource requirements due to additional features
Code Comparison
ChuanhuChatGPT:
def predict(self, inputs, max_length=2048, top_p=0.7, temperature=0.95):
    response = self.client.chat.completions.create(
        model=self.model_name,
        messages=inputs,
        max_tokens=max_length,
        top_p=top_p,
        temperature=temperature,
    )
    return response.choices[0].message.content
chatgpt-demo:
const response = await fetch('/api/generate', {
  method: 'POST',
  headers: {
    'Content-Type': 'application/json',
  },
  body: JSON.stringify({ prompt: inputValue }),
})
ChuanhuChatGPT offers more granular control over API parameters, while chatgpt-demo provides a simpler, more straightforward implementation. The former allows for fine-tuning of generation parameters, whereas the latter focuses on ease of use and quick integration.
用 Express 和 Vue3 搭建的 ChatGPT 演示网页
Pros of chatgpt-web
- More comprehensive UI with additional features like conversation management and settings
- Supports multiple API endpoints, including Azure OpenAI
- Includes a backend server for enhanced functionality and security
Cons of chatgpt-web
- More complex setup due to separate frontend and backend components
- Requires additional configuration for deployment and API integration
- May have higher resource requirements due to its more extensive feature set
Code Comparison
chatgpt-web (Vue 3 + TypeScript):
const { isChatCompletionAvailable, getChatCompletion } = useChat()

const handleSubmit = async () => {
  if (!isChatCompletionAvailable.value)
    return

  chatStore.addChat(
    uuid(),
    prompt.value,
    '',
    'assistant',
  )

  const { answer, id, conversationId, detail } = await getChatCompletion(prompt.value)
  // ... (handling response)
}
chatgpt-demo (React + TypeScript):
const handleSubmit = async (e: React.FormEvent) => {
  e.preventDefault()
  if (!inputValue) return
  setInputValue('')
  setLoading(true)
  try {
    const response = await fetch('/api/generate', {
      method: 'POST',
      headers: { 'Content-Type': 'application/json' },
      body: JSON.stringify({ prompt: inputValue }),
    })
    // ... (handling response)
  } catch (error) {
    // ... (error handling)
  }
}
Both projects use TypeScript and implement similar chat functionality, but chatgpt-web uses Vue 3 while chatgpt-demo uses React. The code structure and state management differ accordingly.
🔮 ChatGPT Desktop Application (Mac, Windows and Linux)
Pros of ChatGPT
- Desktop application with cross-platform support (Windows, macOS, Linux)
- Offers additional features like export options and proxy settings
- More active development and frequent updates
Cons of ChatGPT
- Larger file size and resource usage due to being a desktop application
- May require more setup and configuration compared to the web-based alternative
- Potential for platform-specific issues or bugs
Code Comparison
ChatGPT (Tauri-based desktop app):
#[tauri::command]
fn get_data() -> String {
    // Desktop-specific implementation
}
chatgpt-demo (Web-based application):
async function getData() {
  // Web-based implementation
}
The code comparison highlights the different approaches:
- ChatGPT uses Rust with Tauri for desktop development
- chatgpt-demo likely uses JavaScript for web-based implementation
Both projects aim to provide ChatGPT-like functionality, but ChatGPT offers a native desktop experience with additional features, while chatgpt-demo provides a lightweight, web-based solution. The choice between them depends on user preferences for desktop vs. web applications and the desired feature set.
AI chat for any model.
Pros of chatbot-ui
- More feature-rich UI with conversation management and export options
- Supports multiple AI models beyond just ChatGPT
- Active development with frequent updates and new features
Cons of chatbot-ui
- More complex setup and configuration required
- Potentially higher resource usage due to additional features
- May have a steeper learning curve for new users
Code Comparison
chatbot-ui:
const ChatMessage = ({ message, ...props }: Props) => {
  const [isEditing, setIsEditing] = useState<boolean>(false)
  const [isTyping, setIsTyping] = useState<boolean>(false)
  const [messageContent, setMessageContent] = useState(message.content)
  // ... (additional code)
}
chatgpt-demo:
<script setup lang="ts">
import { computed, onMounted, ref } from 'vue'
import { useRoute } from 'vue-router'
import { storeToRefs } from 'pinia'
import { useAppStore, useChatStore } from '@/store'
// ... (additional imports)
</script>
Both projects use modern web technologies, but chatbot-ui employs React with TypeScript, while chatgpt-demo uses Vue.js. chatbot-ui's code snippet shows a more complex component structure, reflecting its richer feature set. chatgpt-demo's code appears simpler, potentially indicating easier setup and maintenance.
The official gpt4free repository | various collection of powerful language models | o4, o3 and deepseek r1, gpt-4.1, gemini 2.5
Pros of gpt4free
- Offers free access to GPT-4 and other AI models without API keys
- Provides multiple endpoints and providers for AI interactions
- Includes a simple web UI for testing and demonstration
Cons of gpt4free
- May raise ethical and legal concerns due to unauthorized API usage
- Less stable and reliable compared to official APIs
- Limited documentation and support for integration
Code Comparison
chatgpt-demo:
import { ChatGPTAPI } from 'chatgpt'

const api = new ChatGPTAPI({
  apiKey: process.env.OPENAI_API_KEY
})

const response = await api.sendMessage('Hello, how are you?')
gpt4free:
import g4f

response = g4f.ChatCompletion.create(
    model="gpt-3.5-turbo",
    messages=[{"role": "user", "content": "Hello, how are you?"}],
    stream=False,
)
The chatgpt-demo repository uses the official OpenAI API with proper authentication, while gpt4free utilizes unofficial methods to access AI models without API keys. chatgpt-demo focuses on providing a demo application for ChatGPT, whereas gpt4free aims to offer free access to various AI models through multiple providers. While gpt4free may seem appealing due to its free nature, it comes with potential risks and ethical considerations that users should be aware of before implementation.
Convert  designs to code with AI

Introducing Visual Copilot: A new AI model to turn Figma designs to high quality code using your components.
Try Visual CopilotREADME
ChatGPT-API Demo
English | ç®ä½ä¸æ
A demo repo based on OpenAI GPT-3.5 Turbo API.
ð¿ Live preview: https://chatgpt.ddiu.me
â ï¸ Notice: Our API Key limit has been exhausted. So the demo site is not available now.
![]()
Introducing Anse
Looking for multi-chat, image-generation, and more powerful features? Take a look at our newly launched Anse.
More info on https://github.com/ddiu8081/chatgpt-demo/discussions/247.

Running Locally
Pre environment
- Node: Check that both your development environment and deployment environment are using
Node v18or later. You can use nvm to manage multiplenodeversions locally.node -v - PNPM: We recommend using pnpm to manage dependencies. If you have never installed pnpm, you can install it with the following command:
npm i -g pnpm - OPENAI_API_KEY: Before running this application, you need to obtain the API key from OpenAI. You can register the API key at https://beta.openai.com/signup.
Getting Started
- Install dependencies
pnpm install - Copy the
.env.examplefile, then rename it to.env, and add your OpenAI API key to the.envfile.OPENAI_API_KEY=sk-xxx... - Run the application, the local project runs on
http://localhost:3000/pnpm run dev
Deploy
Deploy With Vercel
ð Need website password?
Deploy with the
SITE_PASSWORD
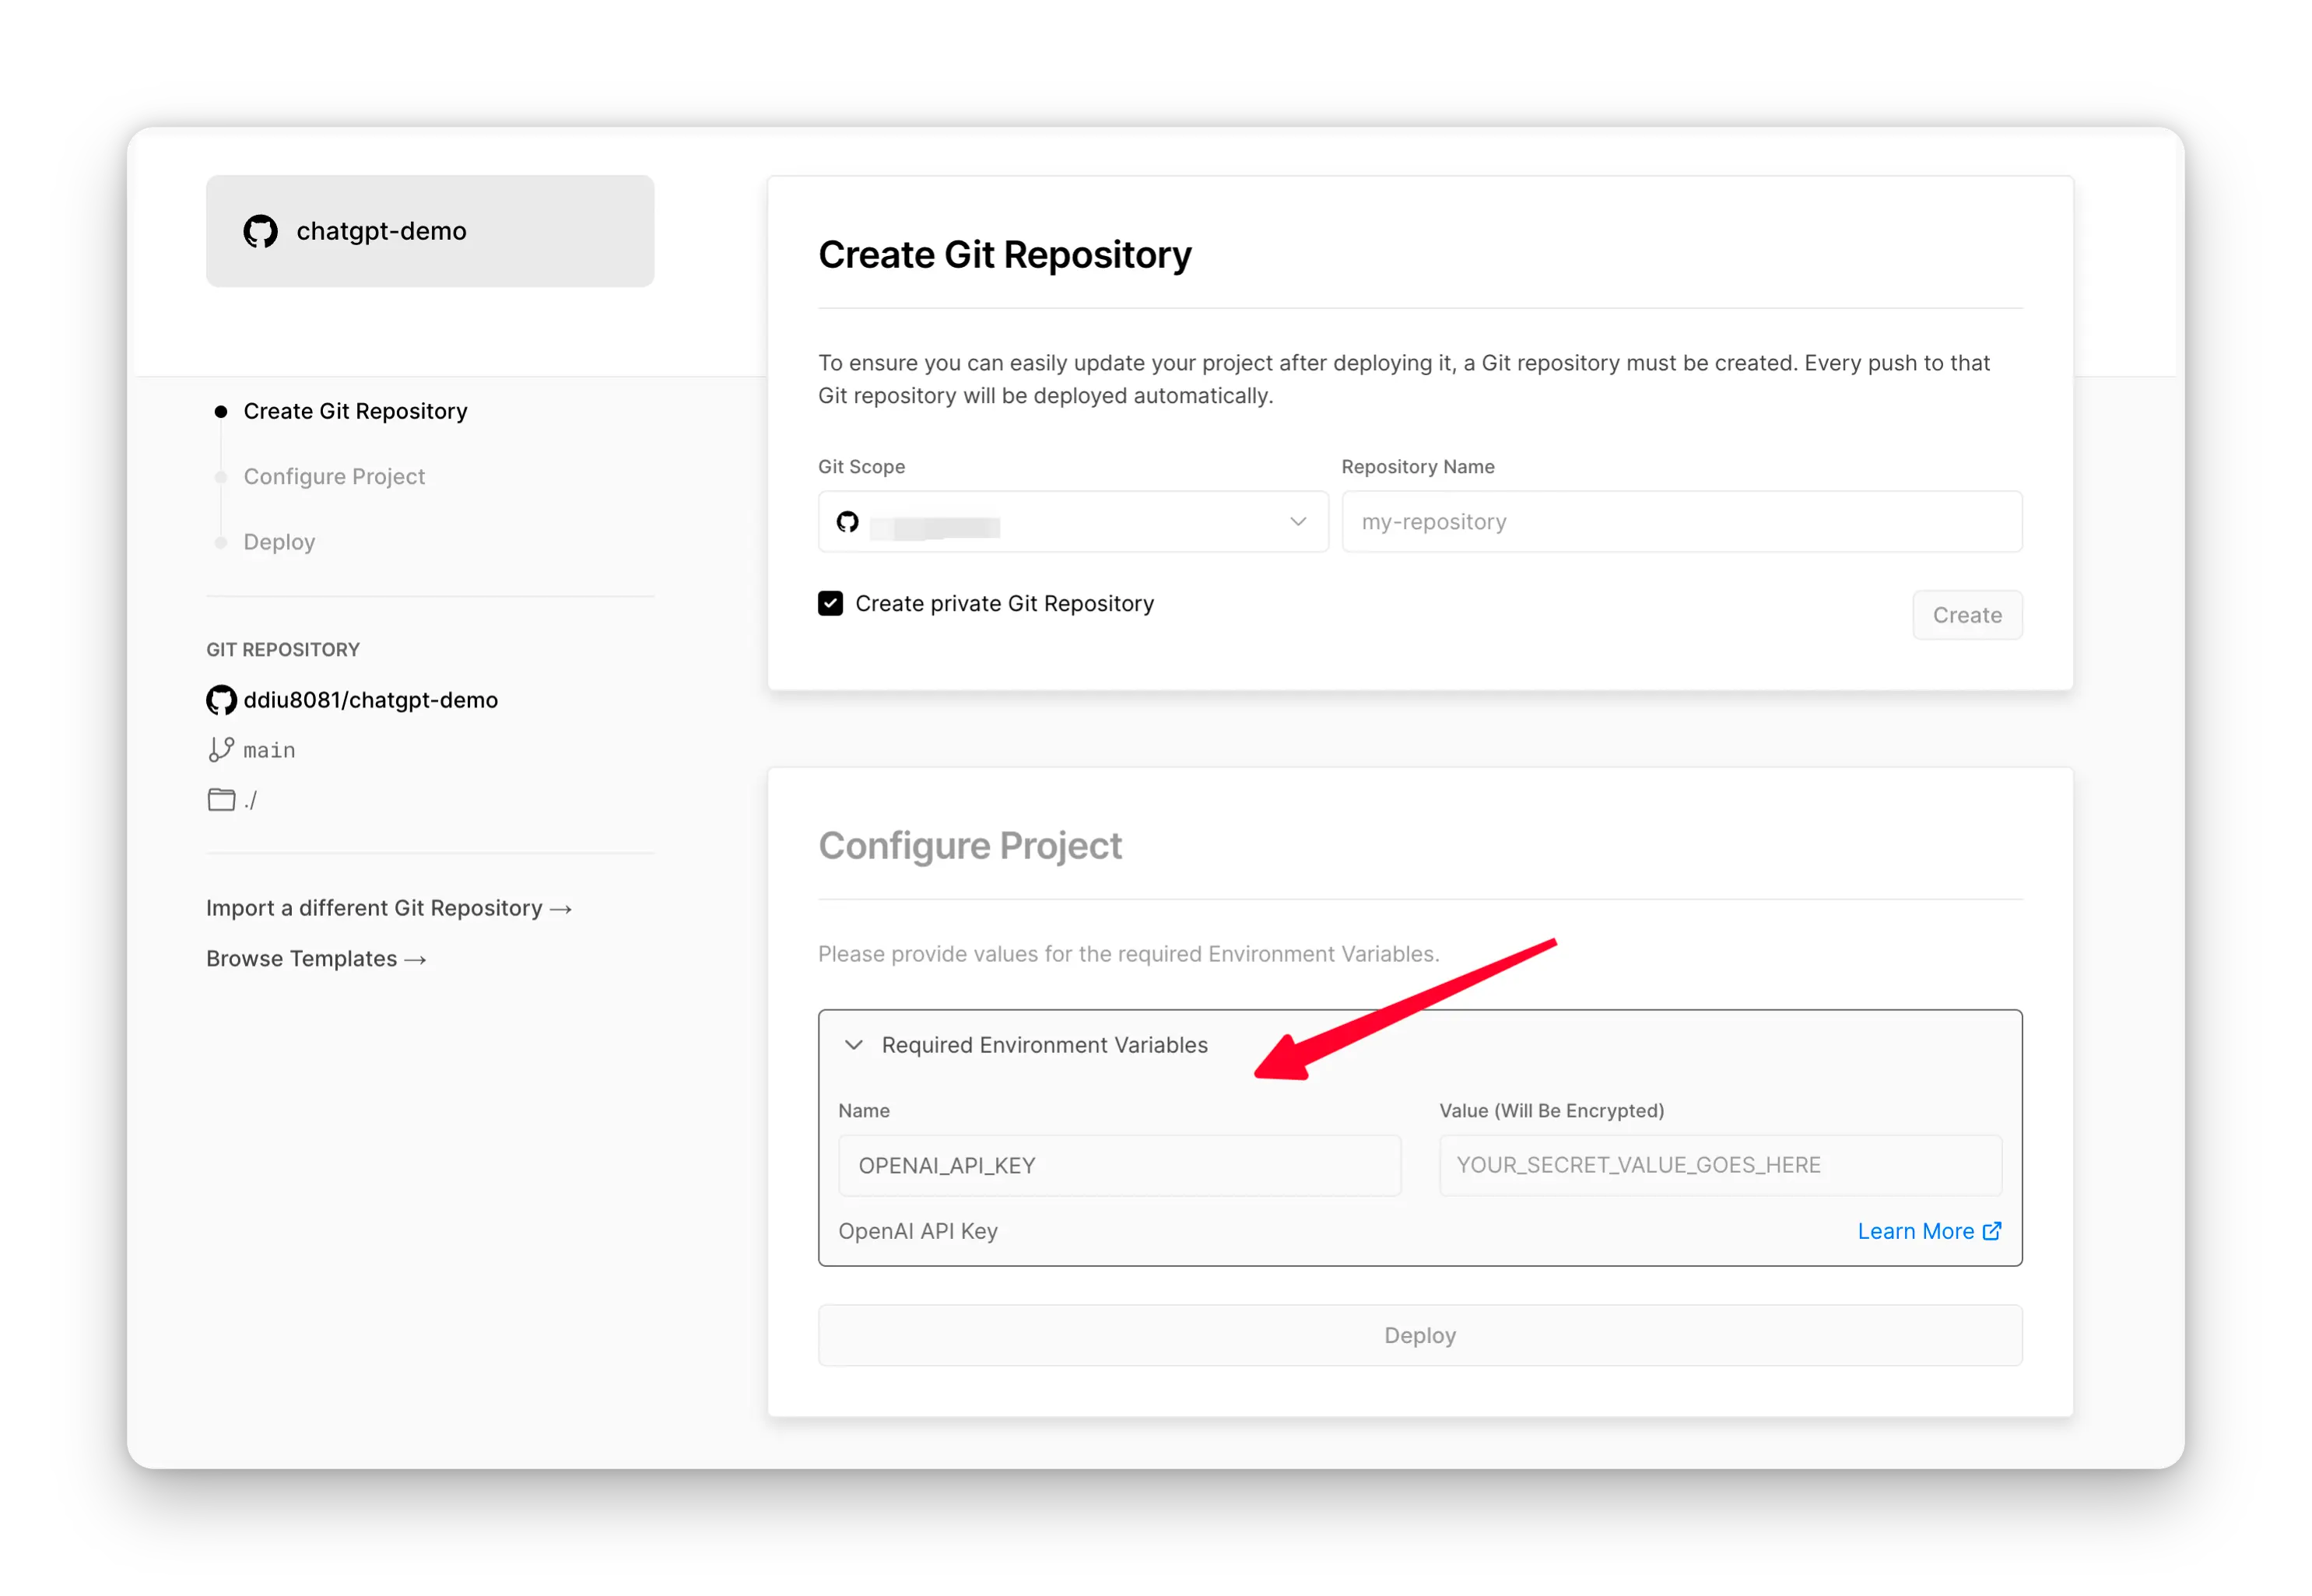
Deploy With Netlify

Step-by-step deployment tutorial:
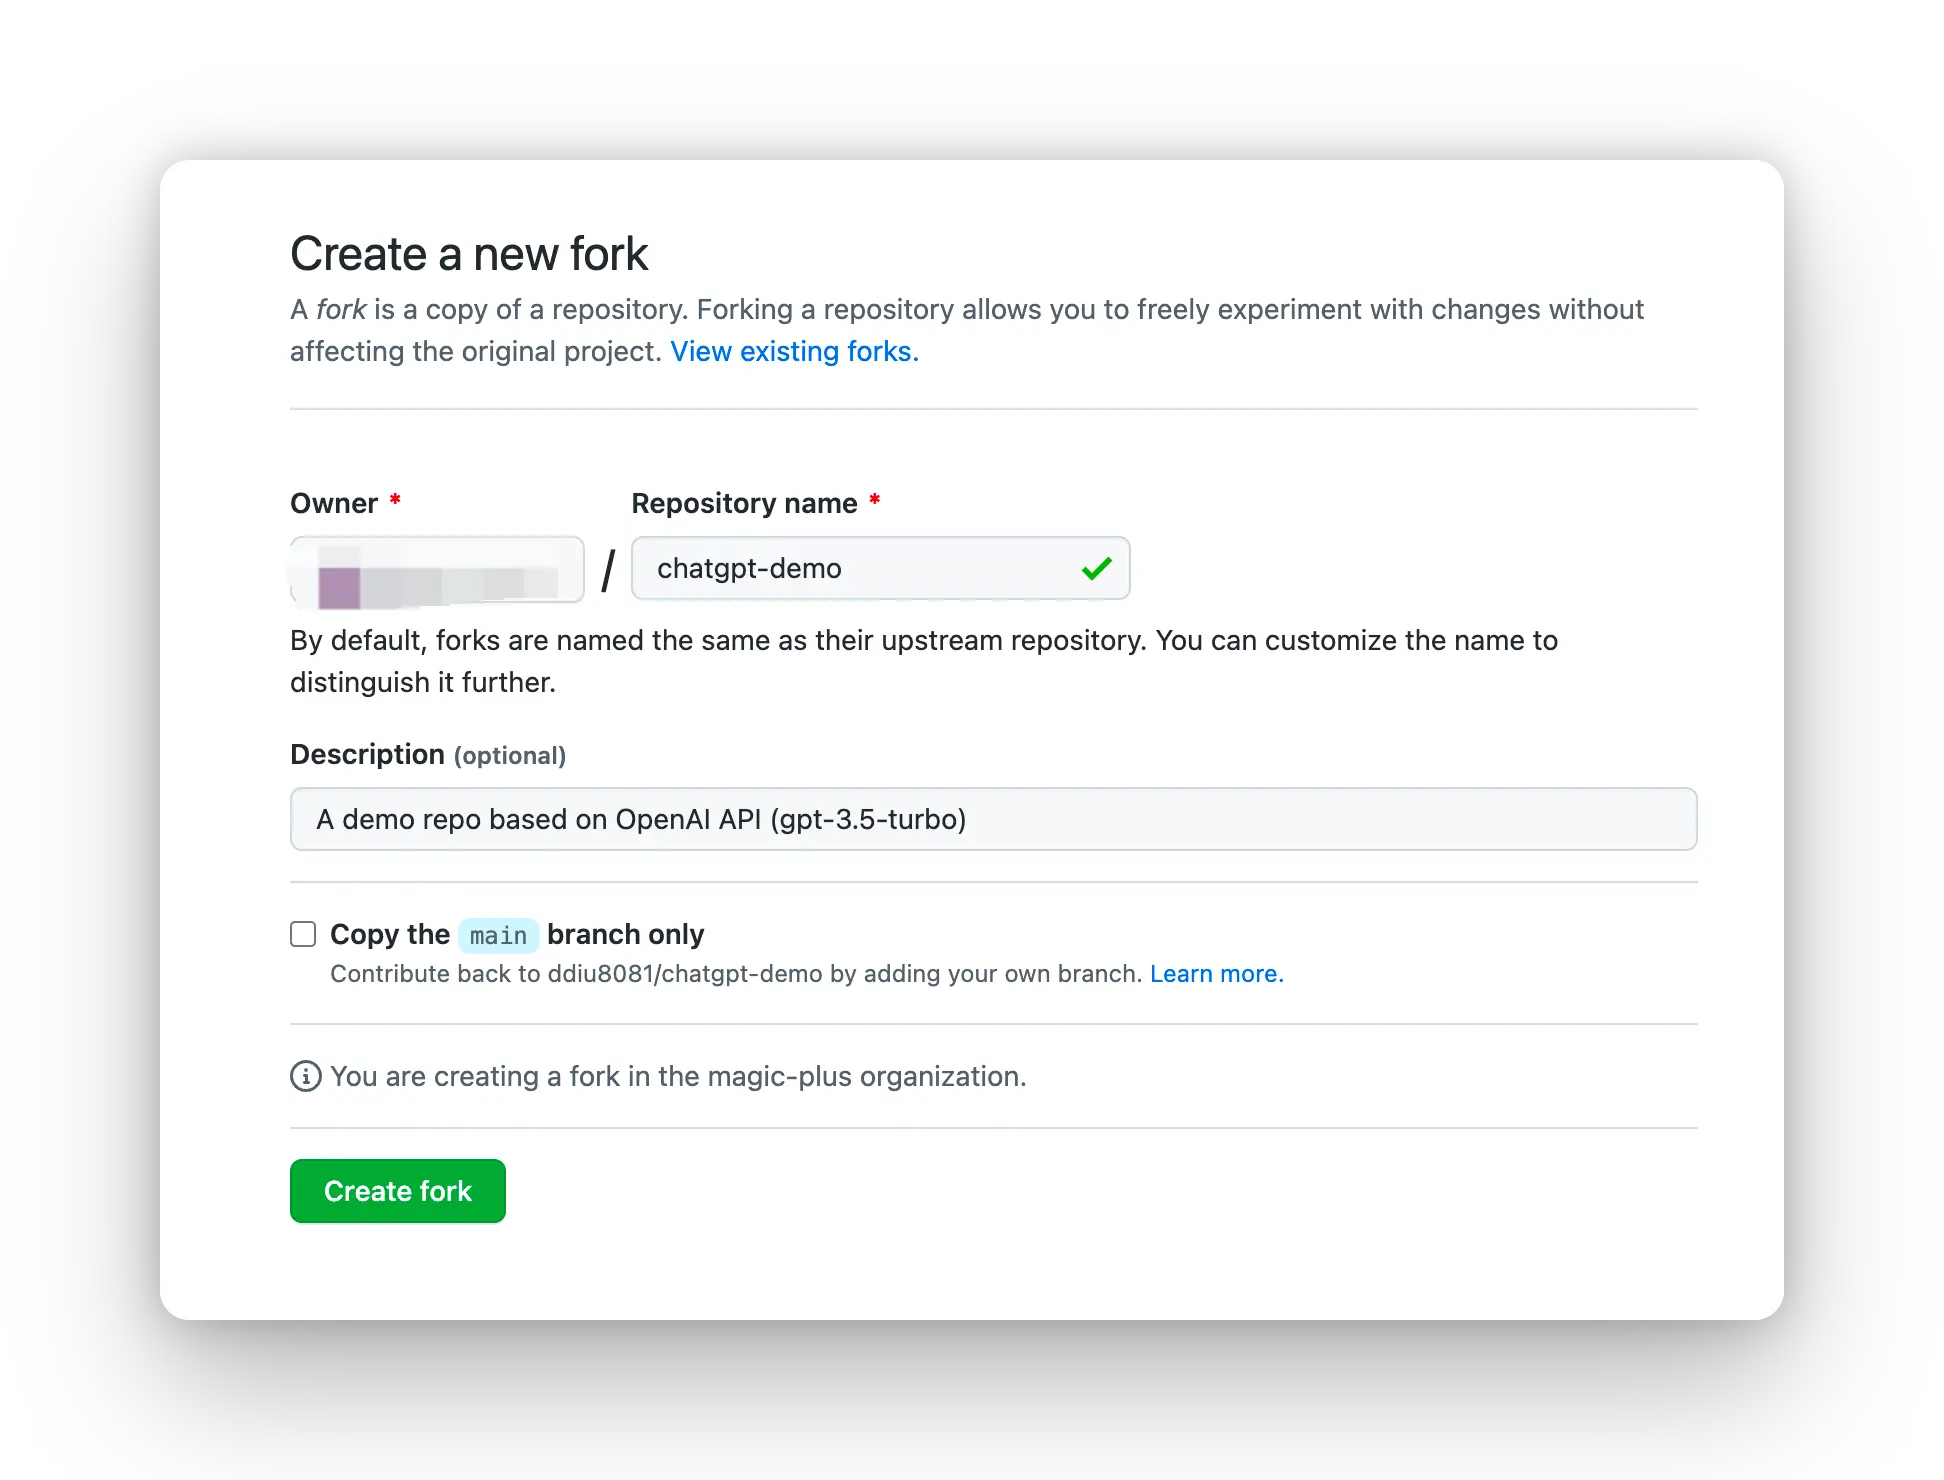
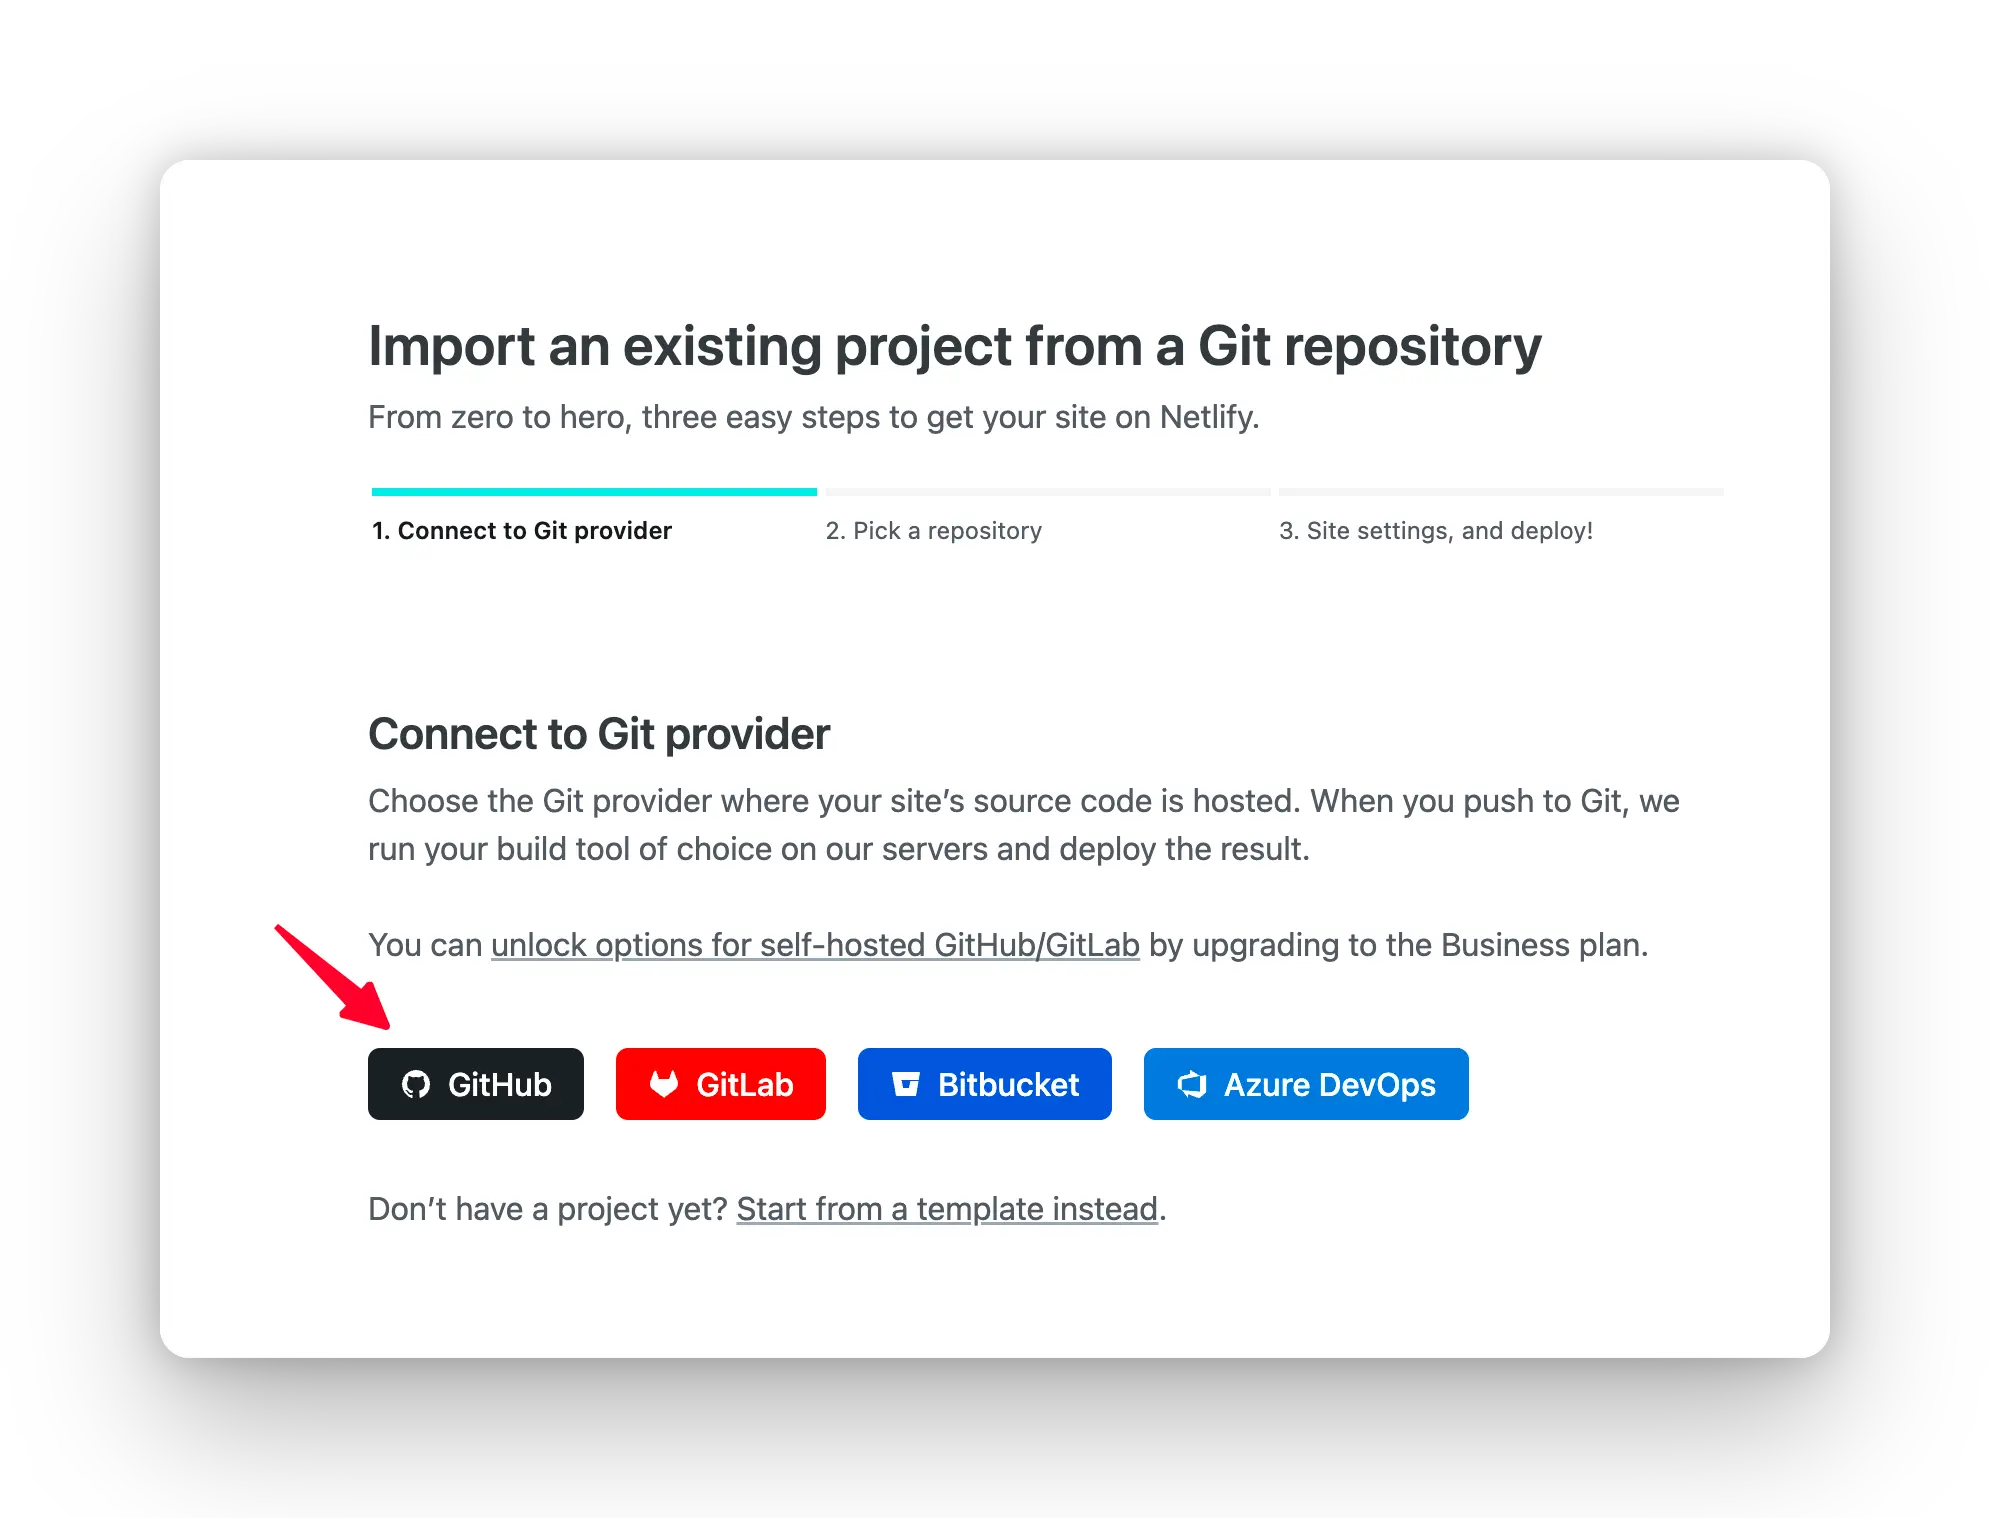
- Fork this project, Go to https://app.netlify.com/start new Site, select the project you
forkeddone, and connect it with yourGitHubaccount.
- Select the branch you want to deploy, then configure environment variables in the project settings.
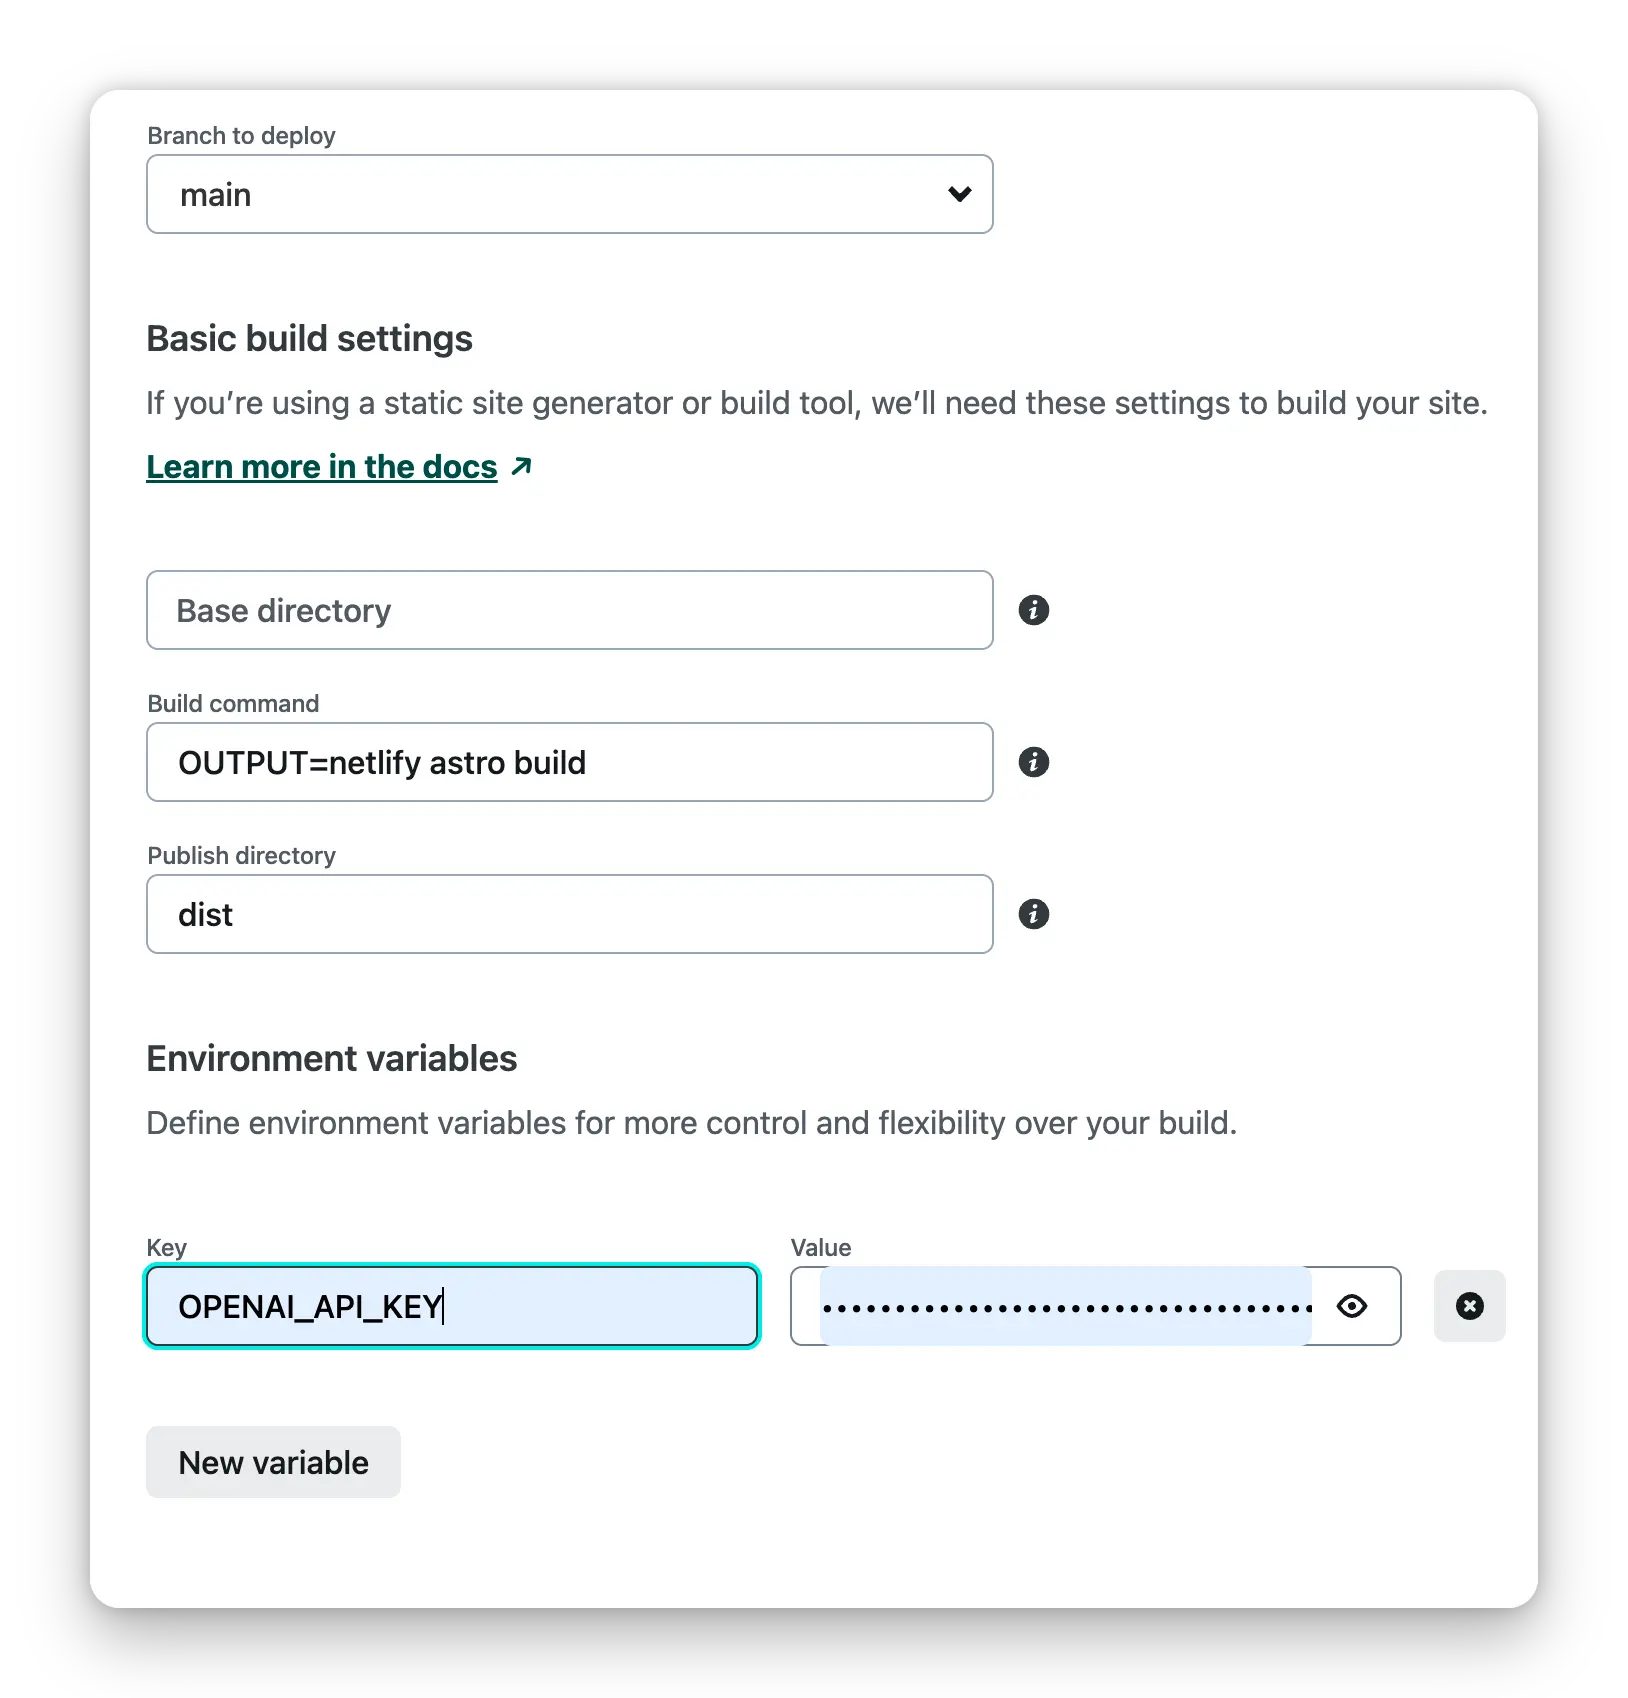
- Select the default build command and output directory, Click the
Deploy Sitebutton to start deploying the site.
Deploy with Docker
Environment variables refer to the documentation below. Docker Hub address.
Direct run
docker run --name=chatgpt-demo -e OPENAI_API_KEY=YOUR_OPEN_API_KEY -p 3000:3000 -d ddiu8081/chatgpt-demo:latest
-e define environment variables in the container.
Docker compose
version: '3'

services:
  chatgpt-demo:
    image: ddiu8081/chatgpt-demo:latest
    container_name: chatgpt-demo
    restart: always
    ports:
      - '3000:3000'
    environment:
      - OPENAI_API_KEY=YOUR_OPEN_API_KEY
      # - HTTPS_PROXY=YOUR_HTTPS_PROXY
      # - OPENAI_API_BASE_URL=YOUR_OPENAI_API_BASE_URL
      # - HEAD_SCRIPTS=YOUR_HEAD_SCRIPTS
      # - PUBLIC_SECRET_KEY=YOUR_SECRET_KEY
      # - SITE_PASSWORD=YOUR_SITE_PASSWORD
      # - OPENAI_API_MODEL=YOUR_OPENAI_API_MODEL
# start
docker compose up -d
# down
docker-compose down
Deploy with Sealos
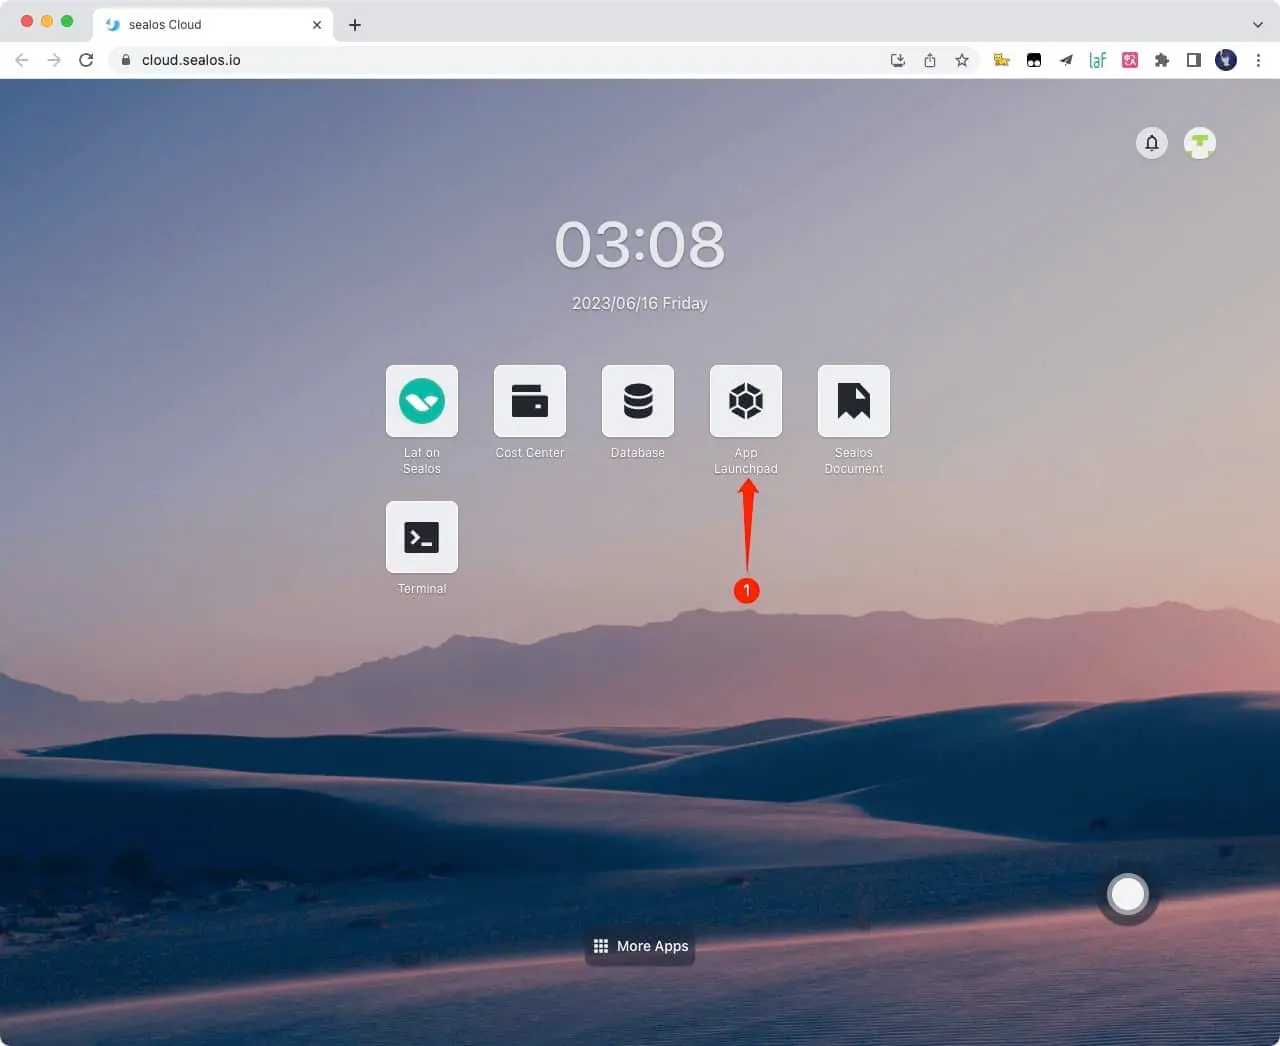
1.Register a Sealos account for free sealos cloud
2.Click App Launchpad button
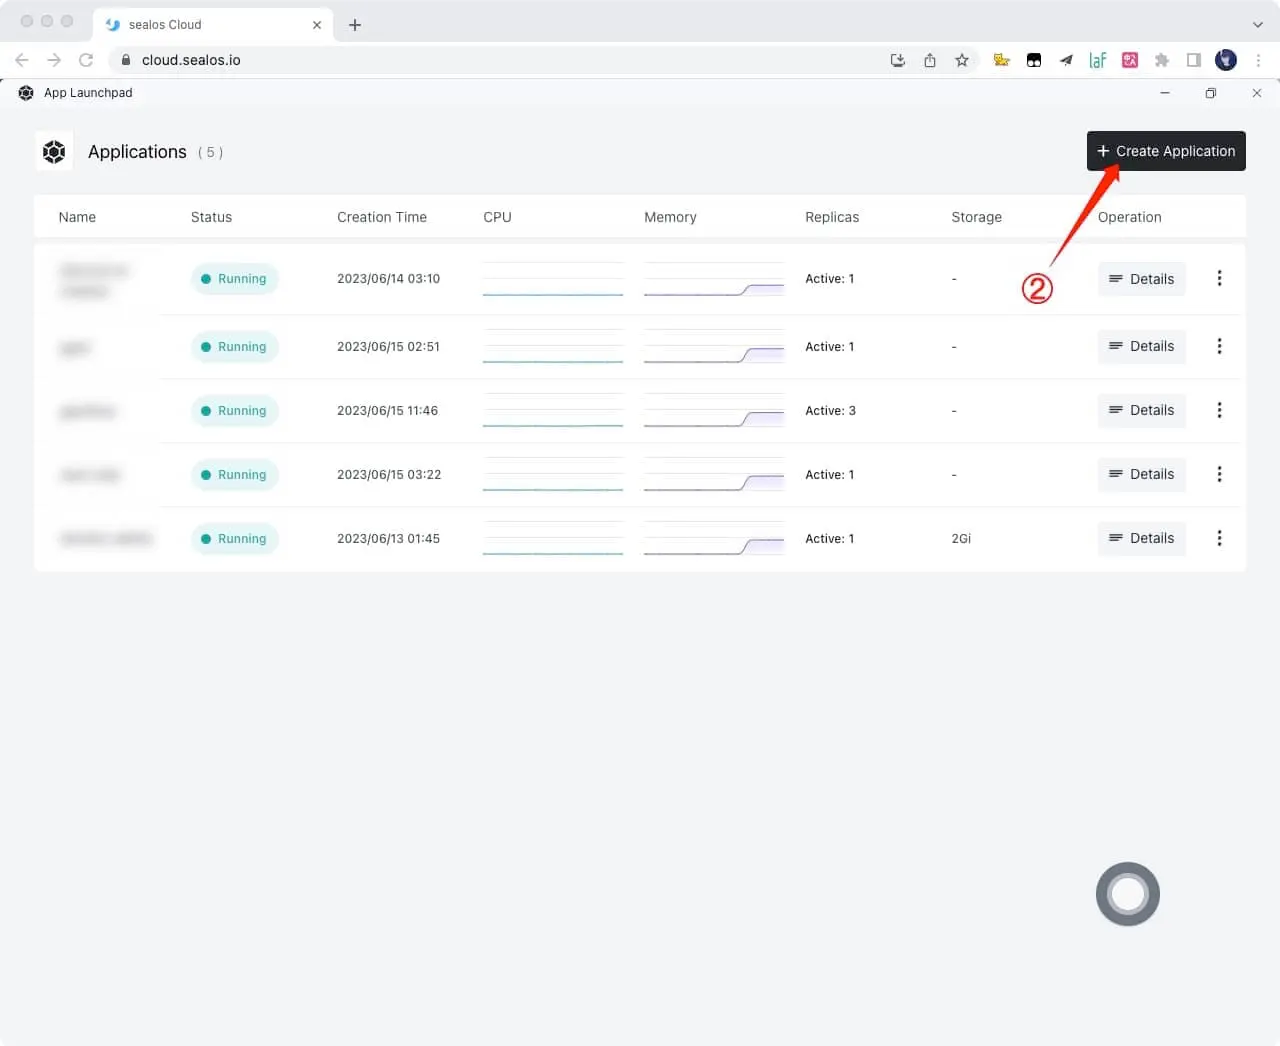
3.Click Create Application button
4.Just fill in according to the following figure, and click on it after filling out Deploy Application button
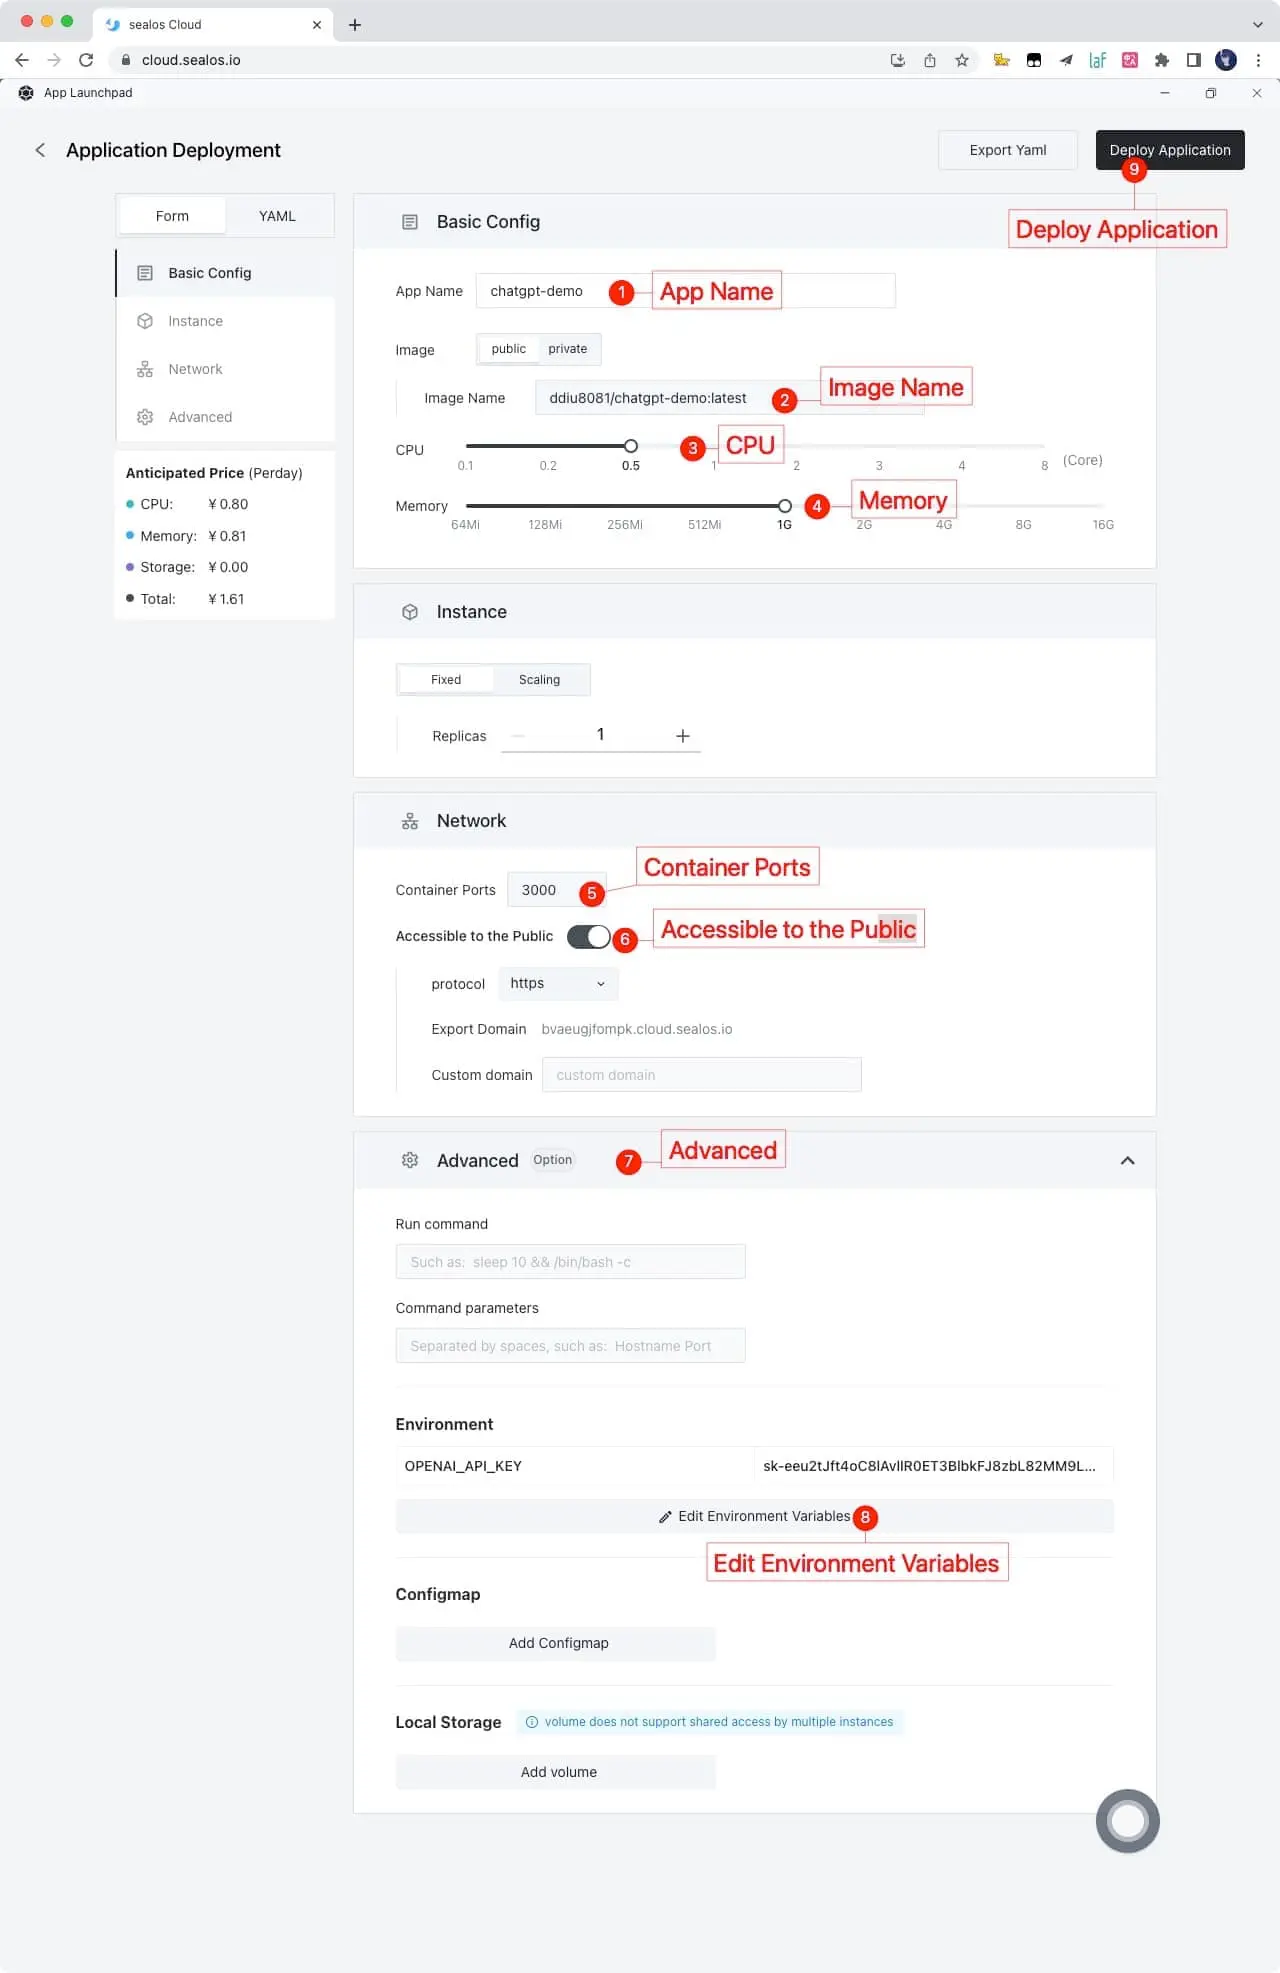
App Name: chatgpt-demo
Image Name: ddiu8081/chatgpt-demo:latest
CPU: 0.5Core
Memory: 1G
Container Ports: 3000
Accessible to the Public: On
Environment: OPENAI_API_KEY=YOUR_OPEN_API_KEY
5.Obtain the access link and click directly to access it. If you need to bind your own domain name, you can also fill in your own domain name in Custom domain and follow the prompts to configure the domain name CNAME
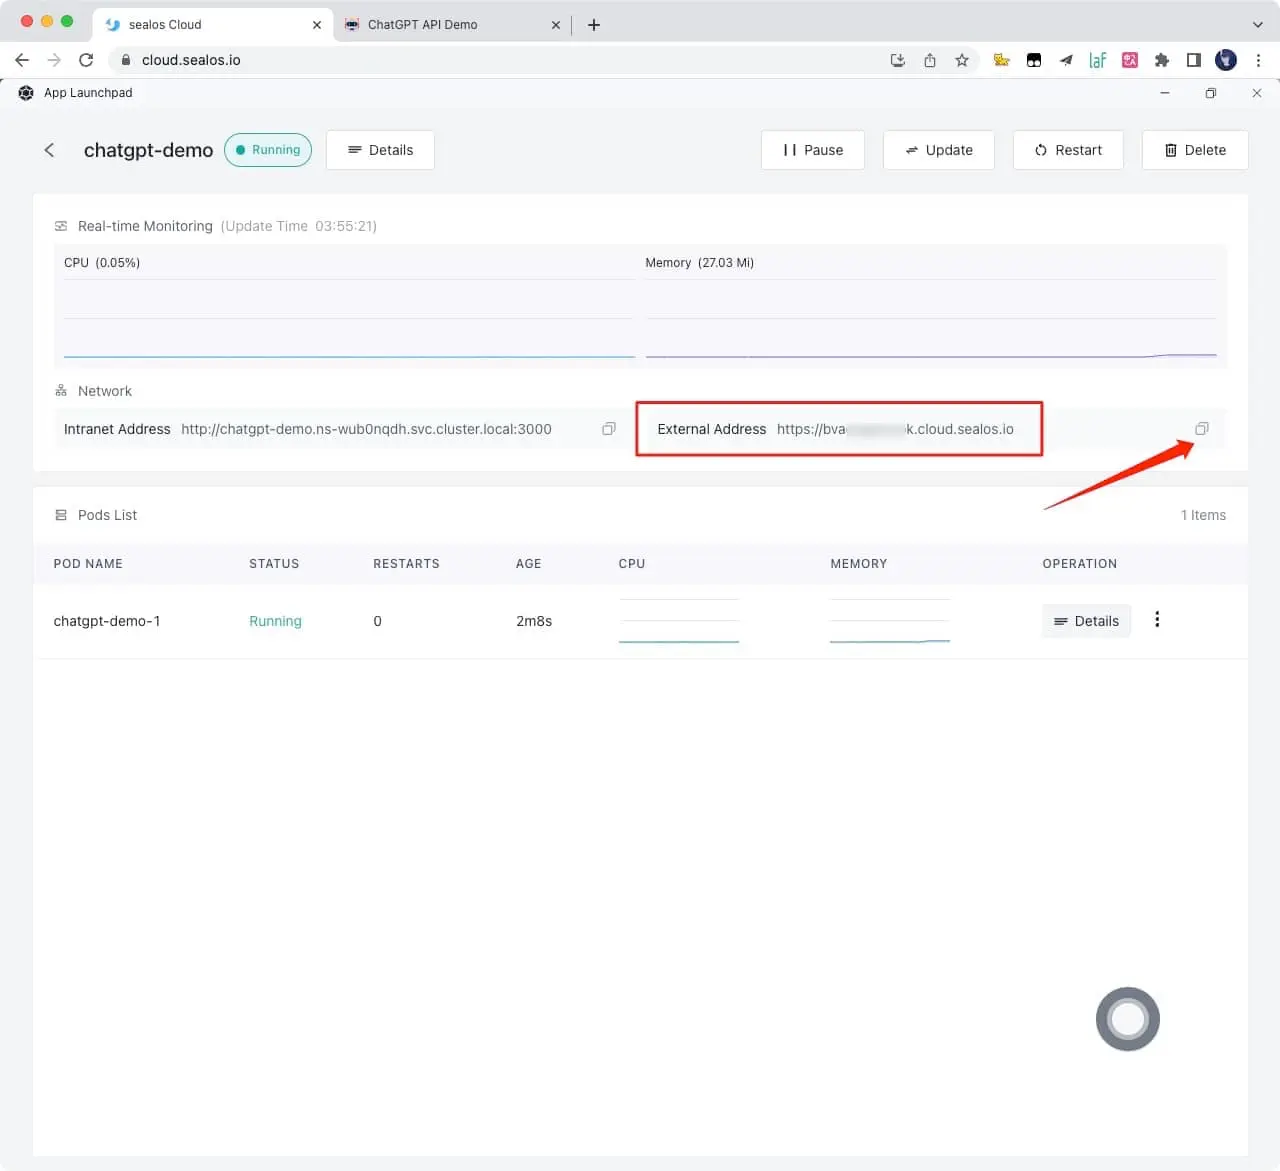
6.Wait for one to two minutes and open this link

Deploy on more servers
Please refer to the official deployment documentation: https://docs.astro.build/en/guides/deploy
Environment Variables
You can control the website through environment variables.
| Name | Description | Default |
|---|---|---|
OPENAI_API_KEY | Your API Key for OpenAI. | null |
HTTPS_PROXY | Provide proxy for OpenAI API. e.g. http://127.0.0.1:7890 | null |
OPENAI_API_BASE_URL | Custom base url for OpenAI API. | https://api.openai.com |
HEAD_SCRIPTS | Inject analytics or other scripts before </head> of the page | null |
PUBLIC_SECRET_KEY | Secret string for the project. Use for generating signatures for API calls | null |
SITE_PASSWORD | Set password for site, support multiple password separated by comma. If not set, site will be public | null |
OPENAI_API_MODEL | ID of the model to use. List models | gpt-3.5-turbo |
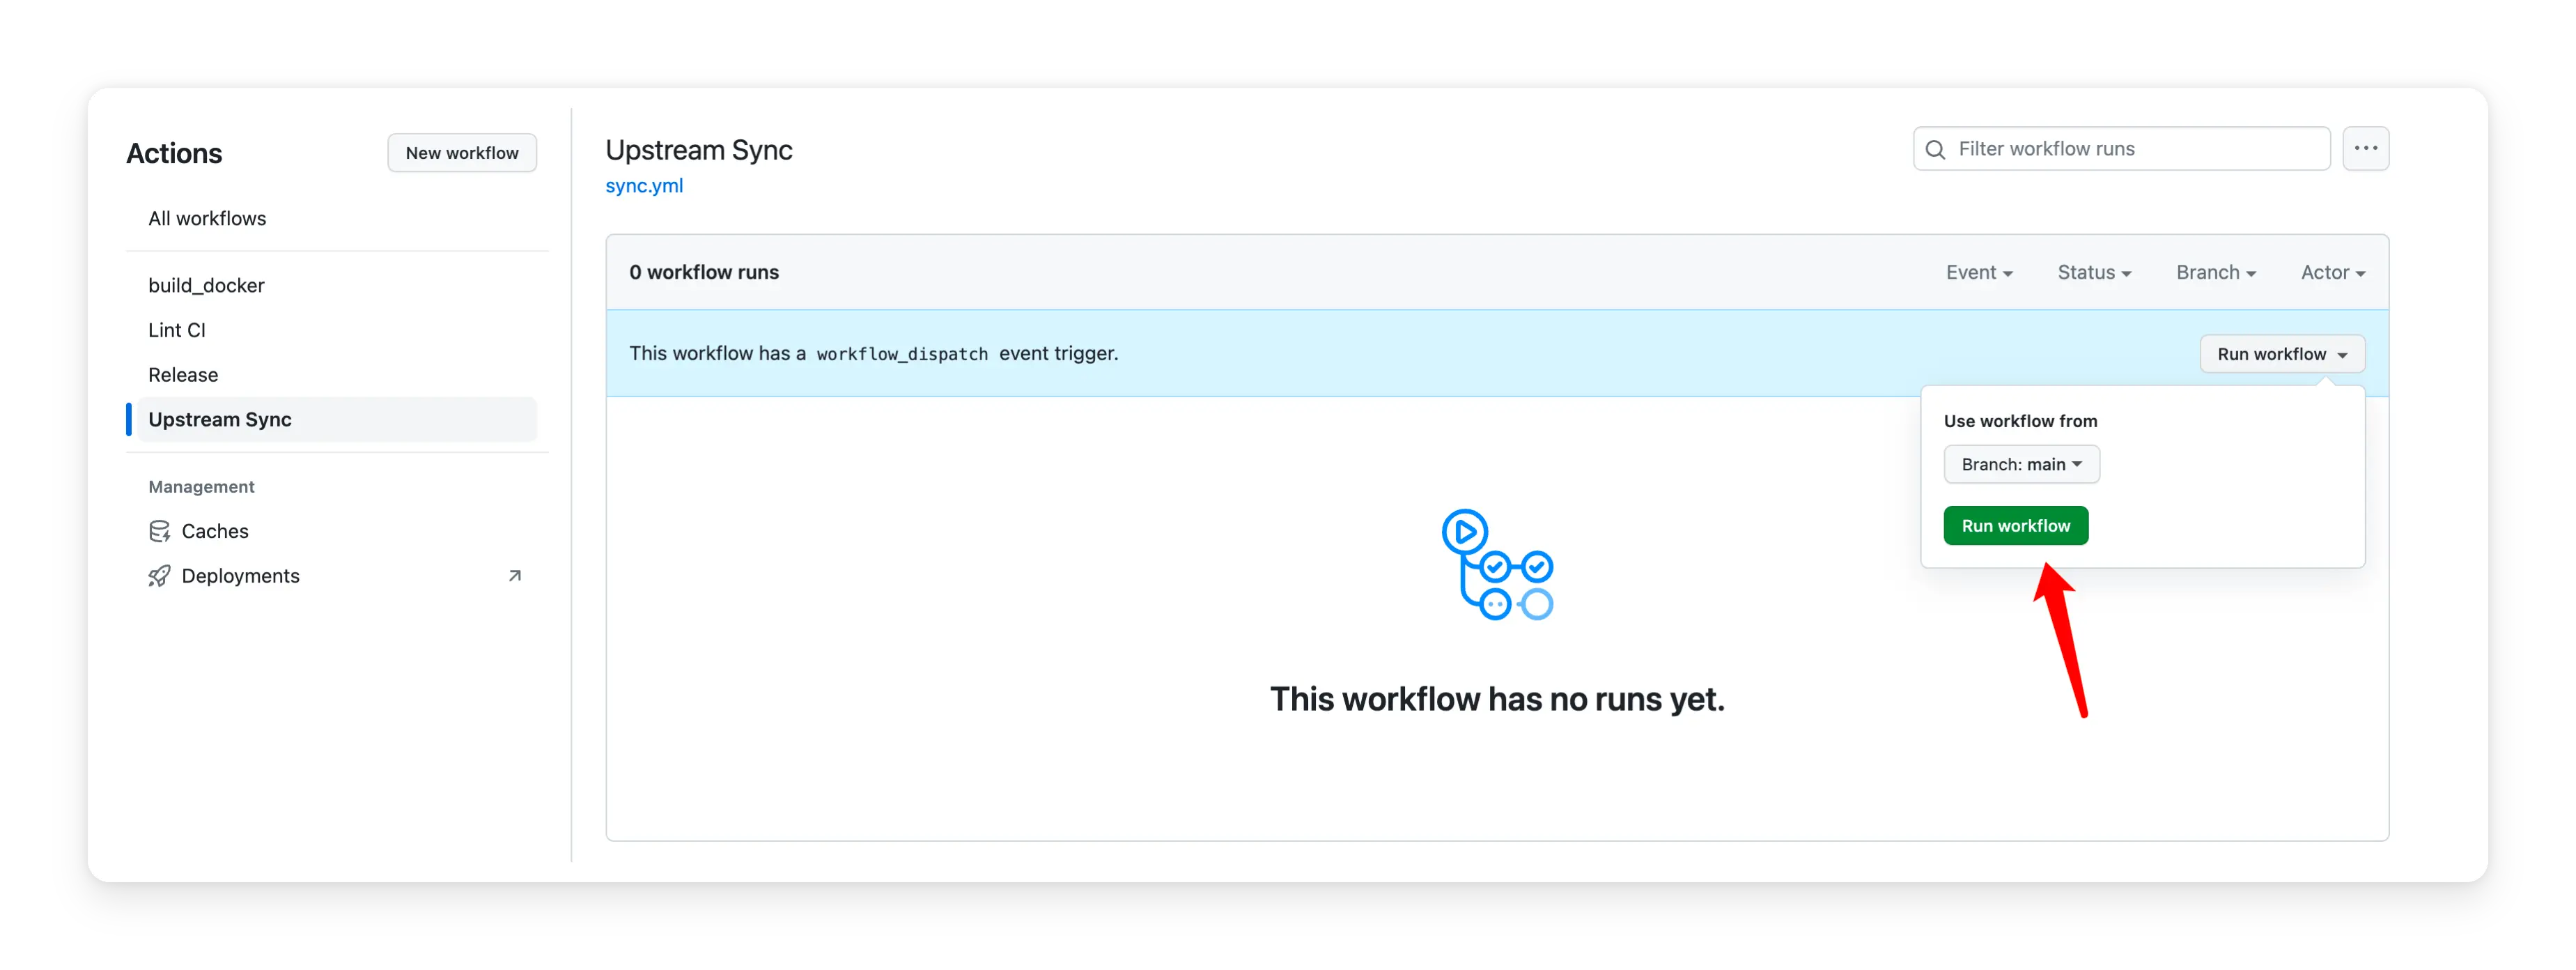
Enable Automatic Updates
After forking the project, you need to manually enable Workflows and Upstream Sync Action on the Actions page of the forked project. Once enabled, automatic updates will be scheduled every day:
Frequently Asked Questions
Q: TypeError: fetch failed (can't connect to OpenAI Api)
A: Configure environment variables HTTPS_PROXYï¼reference: https://github.com/ddiu8081/chatgpt-demo/issues/34
Q: throw new TypeError(${context} is not a ReadableStream.)
A: The Node version needs to be v18 or later, reference: https://github.com/ddiu8081/chatgpt-demo/issues/65
Q: Accelerate domestic access without the need for proxy deployment tutorial?
A: You can refer to this tutorial: https://github.com/ddiu8081/chatgpt-demo/discussions/270
Contributing
This project exists thanks to all those who contributed.
Thank you to all our supporters!ð
License
MIT © ddiu8081
Top Related Projects
✨ Light and Fast AI Assistant. Support: Web | iOS | MacOS | Android | Linux | Windows
GUI for ChatGPT API and many LLMs. Supports agents, file-based QA, GPT finetuning and query with web search. All with a neat UI.
用 Express 和 Vue3 搭建的 ChatGPT 演示网页
🔮 ChatGPT Desktop Application (Mac, Windows and Linux)
AI chat for any model.
The official gpt4free repository | various collection of powerful language models | o4, o3 and deepseek r1, gpt-4.1, gemini 2.5
Convert designs to code with AI
Introducing Visual Copilot: A new AI model to turn Figma designs to high quality code using your components.
Try Visual Copilot