
Top Related Projects

🐶 Kubernetes CLI To Manage Your Clusters In Style!

📦 Find and install kubectl plugins

Highly extensible platform for developers to better understand the complexity of Kubernetes clusters.

Lens - The way the world runs Kubernetes

A solution for implementing efficient and consistent software delivery to Kubernetes facilitating best practices.

⎈ Multi pod and container log tailing for Kubernetes -- Friendly fork of https://github.com/wercker/stern
Quick Overview
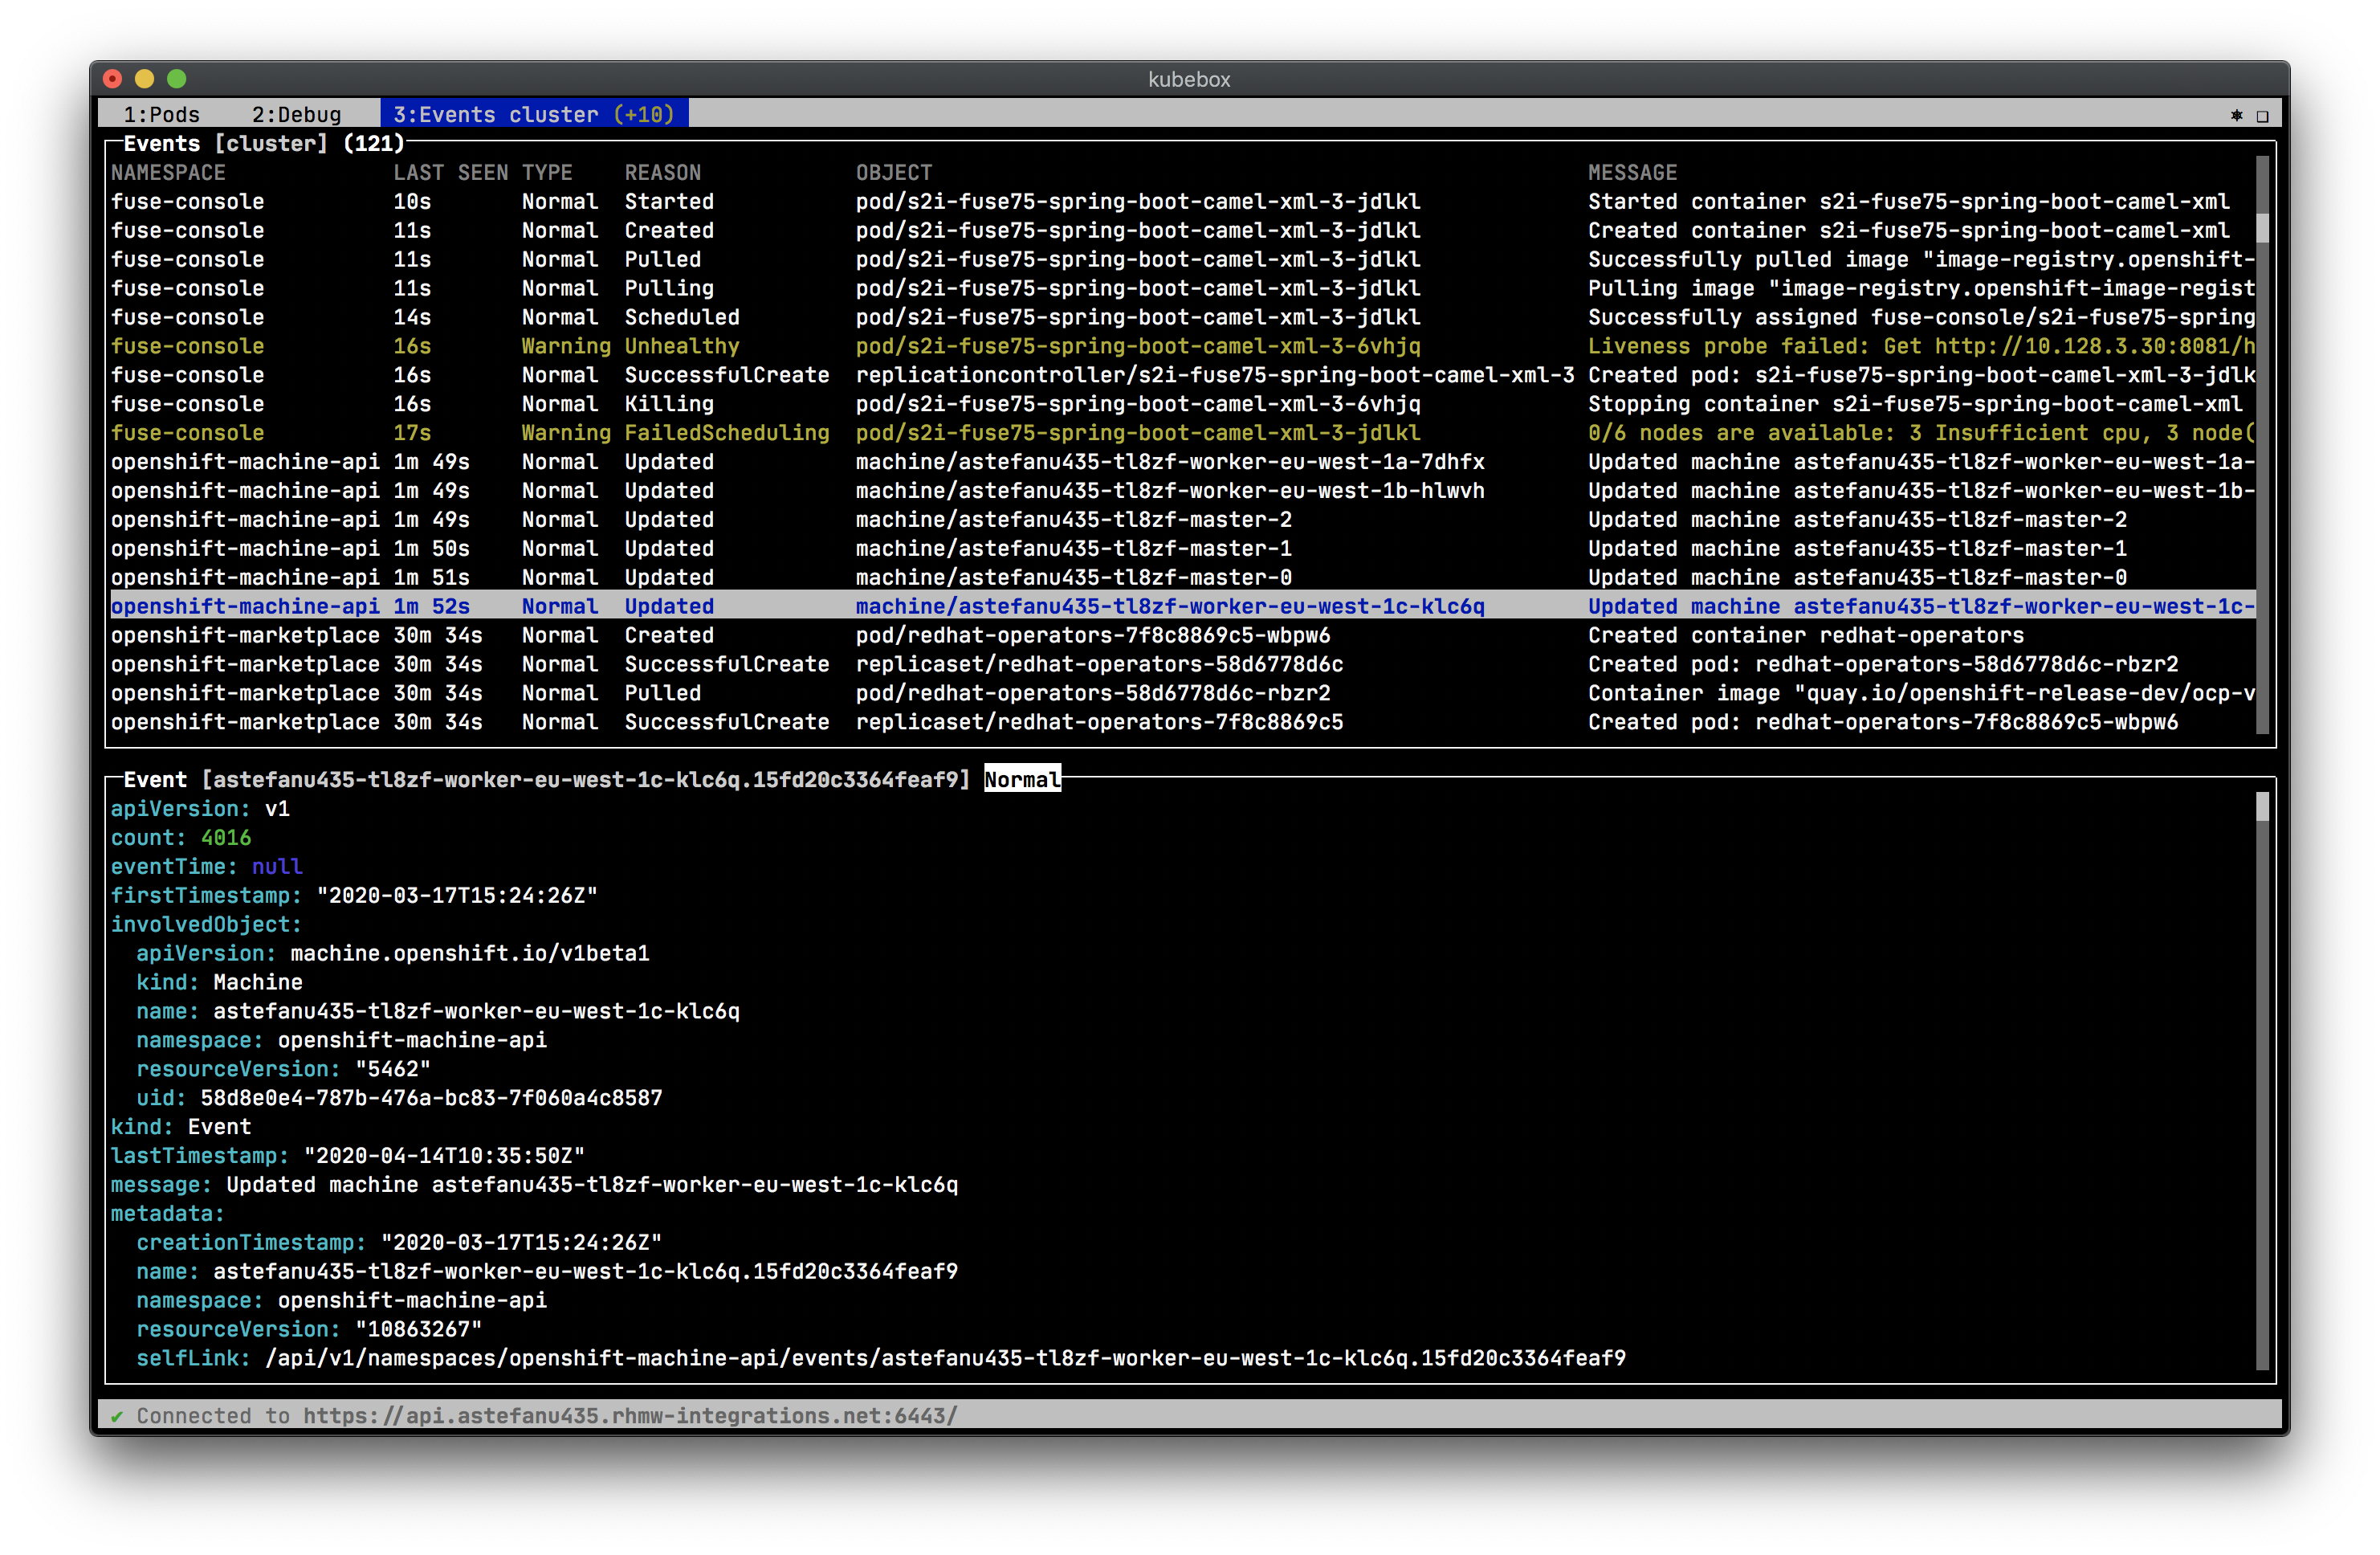
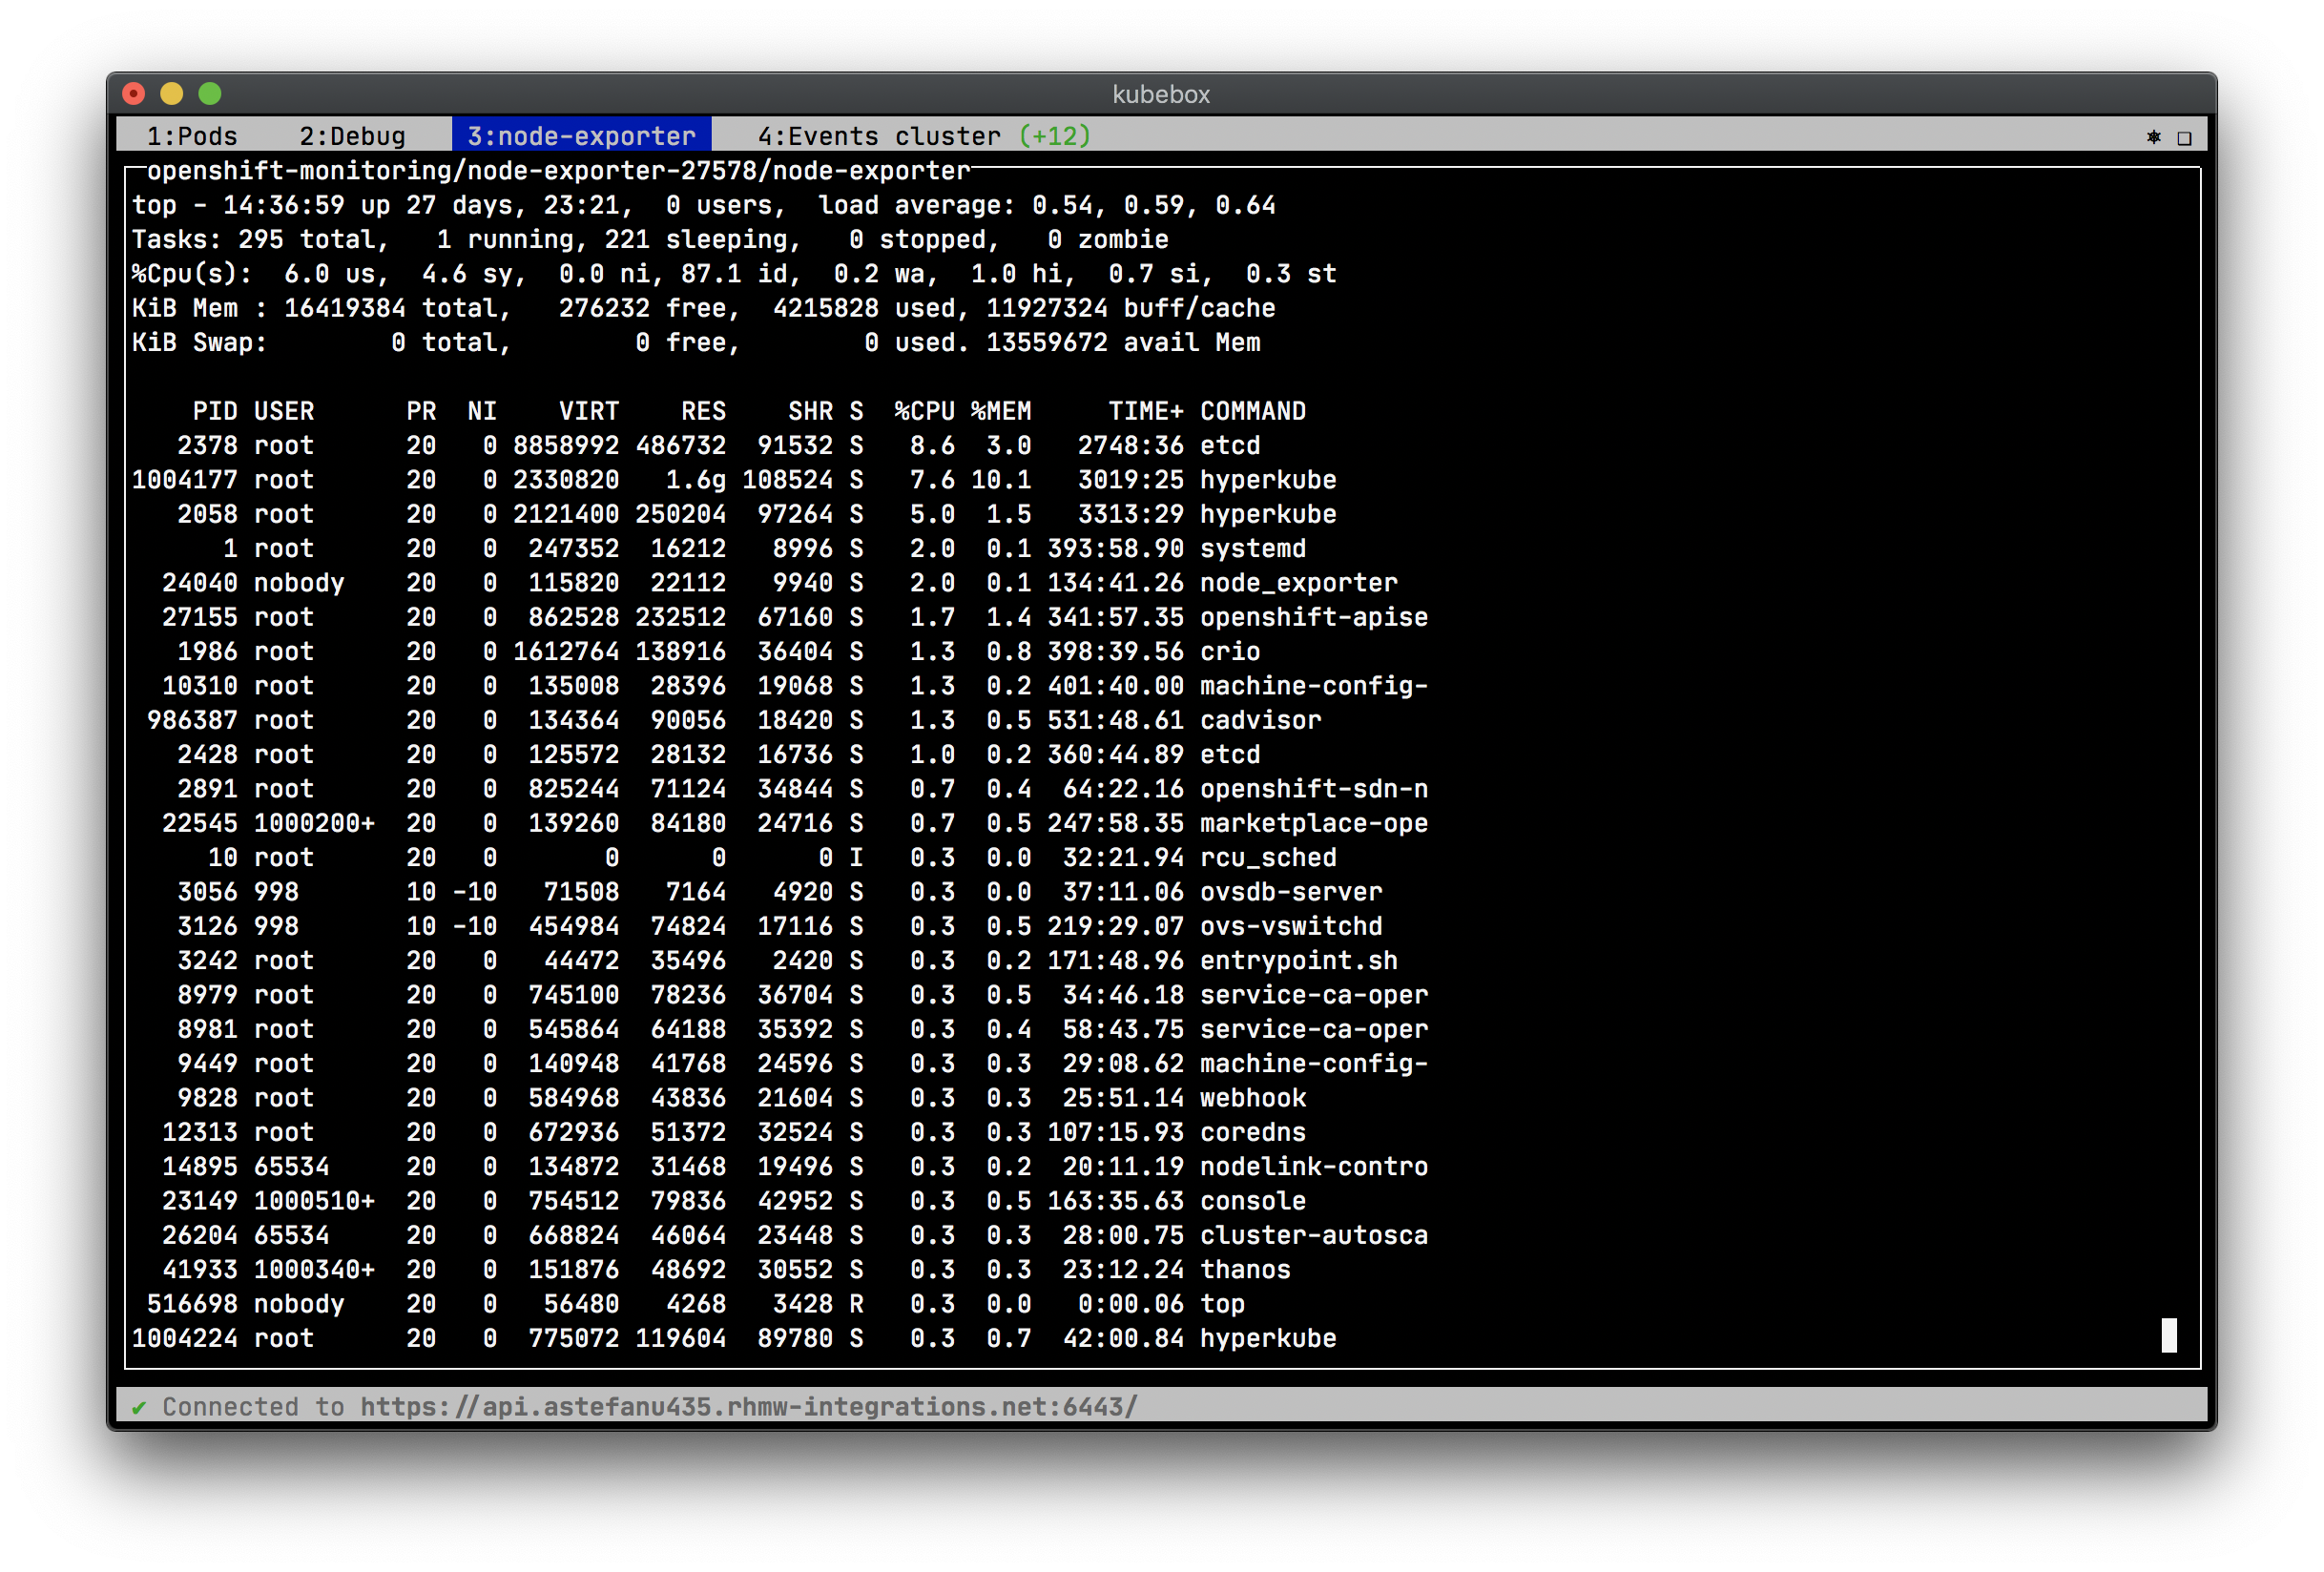
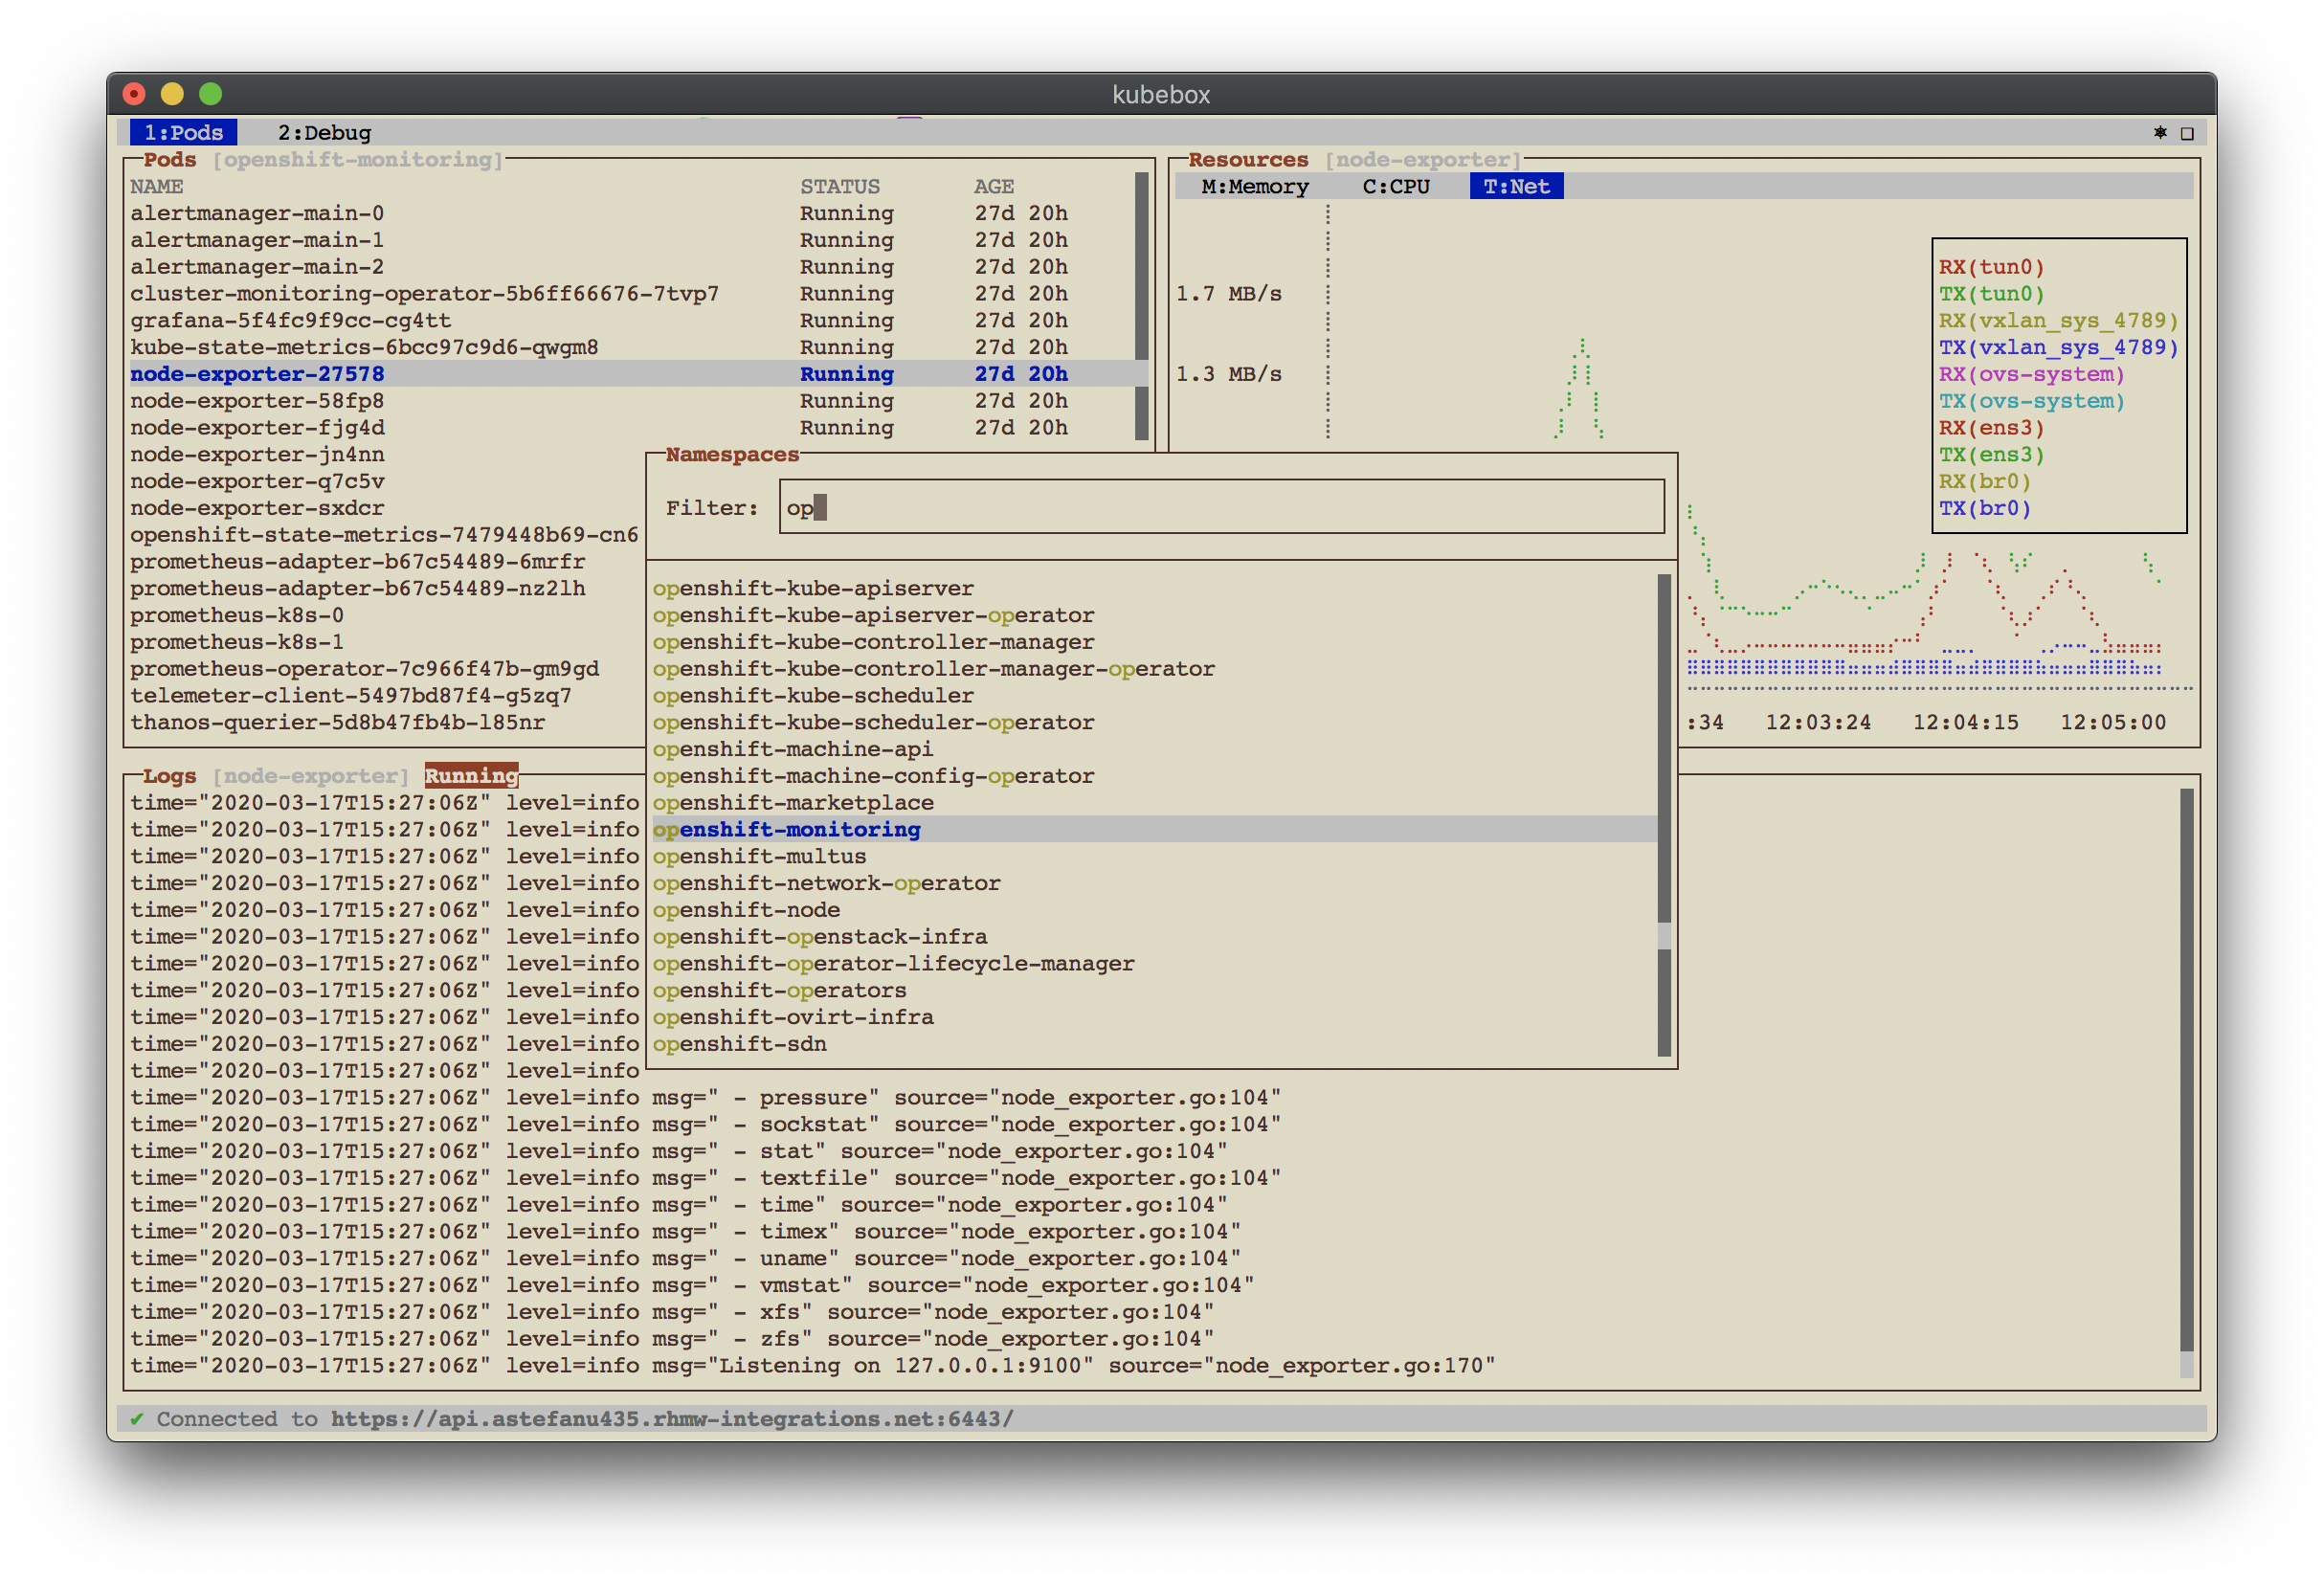
Kubebox is a terminal and web console for Kubernetes. It provides a user-friendly interface to interact with Kubernetes clusters, offering real-time monitoring, log viewing, and cluster management capabilities. Kubebox aims to simplify Kubernetes operations for both beginners and experienced users.
Pros
- Cross-platform compatibility (works on Linux, macOS, and Windows)
- Lightweight and fast, with minimal resource consumption
- Offers both terminal and web-based interfaces for flexibility
- Provides real-time updates and monitoring of cluster resources
Cons
- Limited advanced features compared to some other Kubernetes management tools
- May require some initial learning curve for users new to terminal-based interfaces
- Documentation could be more comprehensive for certain features
- Fewer integrations with third-party tools compared to some alternatives
Getting Started
To get started with Kubebox, follow these steps:
-
Install Kubebox using npm:
npm install -g kubebox -
Ensure you have a valid Kubernetes configuration file (
~/.kube/config). -
Launch Kubebox:
kubebox -
Use arrow keys to navigate, Enter to select, and Esc to go back or exit.
-
For the web interface, run:
kubebox --uiThen open a web browser and navigate to
http://localhost:8080.
Competitor Comparisons
🐶 Kubernetes CLI To Manage Your Clusters In Style!
Pros of k9s
- More feature-rich with extensive functionality for managing Kubernetes clusters
- Highly customizable with support for plugins and skins
- Active development with frequent updates and a larger community
Cons of k9s
- Steeper learning curve due to more complex interface and features
- Higher resource consumption, especially for larger clusters
Code Comparison
k9s uses a more structured approach with Go packages:
package views

type ClusterInfoView struct {
	*tview.TextView
}

func NewClusterInfoView() *ClusterInfoView {
	return &ClusterInfoView{tview.NewTextView()}
}
Kubebox uses a simpler JavaScript structure:
class Dashboard {
  constructor(screen, kube) {
    this.screen = screen;
    this.kube = kube;
  }
}
Both projects aim to provide terminal-based UIs for Kubernetes cluster management, but k9s offers a more comprehensive set of features and customization options. Kubebox, on the other hand, provides a simpler and more lightweight interface, which may be preferable for users who prioritize ease of use and lower resource consumption. The choice between the two depends on the user's specific needs and preferences in managing Kubernetes clusters.
📦 Find and install kubectl plugins
Pros of krew
- Official Kubernetes SIG project, ensuring better long-term support and community involvement
- Provides a plugin management system for kubectl, allowing easy installation and updates of multiple tools
- Supports cross-platform compatibility (Linux, macOS, Windows)
Cons of krew
- Requires separate installation and setup process before using kubectl plugins
- Limited to kubectl plugins, while Kubebox offers a standalone terminal UI for Kubernetes cluster management
- May have a steeper learning curve for users new to kubectl plugin ecosystems
Code comparison
Kubebox (Terminal UI interaction):
screen.key(['C-c', 'q', 'escape'], (ch, key) => process.exit(0));
screen.key(['C-l'], (ch, key) => screen.alloc());
screen.key(['tab'], (ch, key) => dashboard.focus());
krew (Plugin installation):
kubectl krew install ns
kubectl krew upgrade
kubectl krew list
While Kubebox focuses on providing a direct terminal UI for Kubernetes cluster management, krew serves as a plugin manager for kubectl, extending its functionality through various plugins. Kubebox offers a more visual and interactive experience, while krew enhances kubectl's capabilities through a modular approach.
Highly extensible platform for developers to better understand the complexity of Kubernetes clusters.
Pros of Octant
- More feature-rich UI with a comprehensive dashboard for Kubernetes cluster management
- Extensible plugin system allowing for custom views and functionality
- Actively maintained by VMware (until archival) with regular updates and community support
Cons of Octant
- Heavier resource usage due to its more complex UI and features
- Steeper learning curve for users new to Kubernetes dashboards
- Requires installation and setup, unlike Kubebox which can run directly in the terminal
Code Comparison
Kubebox (Terminal-based UI):
const blessed = require('blessed');
const contrib = require('blessed-contrib');
const screen = blessed.screen();
Octant (Web-based UI):
import (
    "github.com/vmware-tanzu/octant/pkg/plugin/service"
    "github.com/vmware-tanzu/octant/pkg/view/component"
)
While Kubebox uses JavaScript and focuses on terminal-based rendering, Octant is built with Go and provides a web-based interface. This fundamental difference in approach affects the overall user experience and deployment complexity of each tool.
Lens - The way the world runs Kubernetes
Pros of Lens
- Rich graphical user interface with a more comprehensive feature set
- Cross-platform support (Windows, macOS, Linux)
- Integrated terminal and resource editor
Cons of Lens
- Larger resource footprint and slower startup time
- Requires installation and updates
- Less suitable for quick, lightweight interactions
Code Comparison
Kubebox (Terminal-based):
kubebox
Lens (GUI-based):
lens
Summary
Kubebox is a lightweight, terminal-based Kubernetes cluster management tool, while Lens is a feature-rich, graphical Kubernetes IDE. Kubebox excels in simplicity and low resource usage, making it ideal for quick interactions and resource-constrained environments. Lens offers a more comprehensive set of features and a user-friendly interface, but at the cost of increased resource usage and complexity.
Kubebox is better suited for users who prefer command-line interfaces and need a fast, lightweight tool for basic cluster management. Lens is more appropriate for users who require a full-featured Kubernetes IDE with advanced capabilities and a graphical interface, especially for complex cluster management tasks and extended development work.
A solution for implementing efficient and consistent software delivery to Kubernetes facilitating best practices.
Pros of werf
- More comprehensive CI/CD solution for Kubernetes
- Supports multiple container registries and deployment strategies
- Actively maintained with frequent updates and releases
Cons of werf
- Steeper learning curve due to more complex features
- Requires more configuration and setup compared to Kubebox
- Larger codebase and dependencies
Code comparison
Kubebox (Terminal-based UI):
const blessed = require('blessed');
const contrib = require('blessed-contrib');
const screen = blessed.screen();
werf (YAML configuration):
project: myapp
configVersion: 1
deploy:
  namespace: myapp
  kubectl:
    context: production
Key differences
- Kubebox is a lightweight, terminal-based UI for Kubernetes cluster management
- werf is a full-featured CI/CD tool for building and deploying applications to Kubernetes
- Kubebox focuses on monitoring and interaction, while werf emphasizes the entire deployment pipeline
- Kubebox is written in JavaScript, while werf is primarily written in Go
- werf has a larger community and more frequent updates compared to Kubebox
Both tools serve different purposes within the Kubernetes ecosystem, with Kubebox being more suitable for quick cluster interactions and werf for managing complex deployment workflows.
⎈ Multi pod and container log tailing for Kubernetes -- Friendly fork of https://github.com/wercker/stern
Pros of stern
- Focused specifically on tailing multiple pod logs simultaneously
- Supports regular expressions for pod/container selection
- Lightweight and easy to install as a single binary
Cons of stern
- Limited to log viewing functionality only
- Lacks interactive UI for broader cluster management
- No built-in container shell access
Code Comparison
stern:
stern pod-query [flags]
kubebox:
kubebox
Summary
stern is a specialized tool for tailing Kubernetes pod logs, offering powerful filtering capabilities and multi-pod support. It's ideal for developers who primarily need log viewing functionality.
kubebox, on the other hand, is a more comprehensive terminal-based Kubernetes dashboard. It provides a broader range of cluster management features, including an interactive UI for navigating resources, viewing logs, and accessing container shells.
While stern excels in its focused log tailing capabilities, kubebox offers a more holistic approach to cluster interaction. The choice between the two depends on whether you need a dedicated log viewing tool or a more versatile cluster management interface.
Convert  designs to code with AI

Introducing Visual Copilot: A new AI model to turn Figma designs to high quality code using your components.
Try Visual CopilotREADME
= Kubebox [small]#^ââ^# Antonin Stefanutti https://github.com/astefanutti[@astefanutti] // Meta :description: Terminal and Web console for Kubernetes // Settings :idprefix: :idseparator: - :experimental: // Aliases ifdef::env-github[] :note-caption: :information_source: :icon-check: :heavy_check_mark: :icon-edit: :pencil2: endif::[] ifndef::env-github[] :icons: font :icon-check: icon:check[] :icon-edit: icon:pencil[fw] endif::[] // URIs :uri-kubebox-download: https://github.com/astefanutti/kubebox/releases/download/v0.10.0 :uri-kubebox-twitter: https://twitter.com/kubebox :uri-kube-apiserver: https://kubernetes.io/docs/admin/kube-apiserver/ :uri-ingress-controllers: https://kubernetes.io/docs/concepts/services-networking/ingress/#ingress-controllers :uri-service-account: https://kubernetes.io/docs/tasks/configure-pod-container/configure-service-account/ :uri-xterm-js: https://github.com/xtermjs/xterm.js :uri-cadvisor: https://github.com/google/cadvisor
{description}
// image::./docs/kubebox.png[kubebox, align="center"] ++++
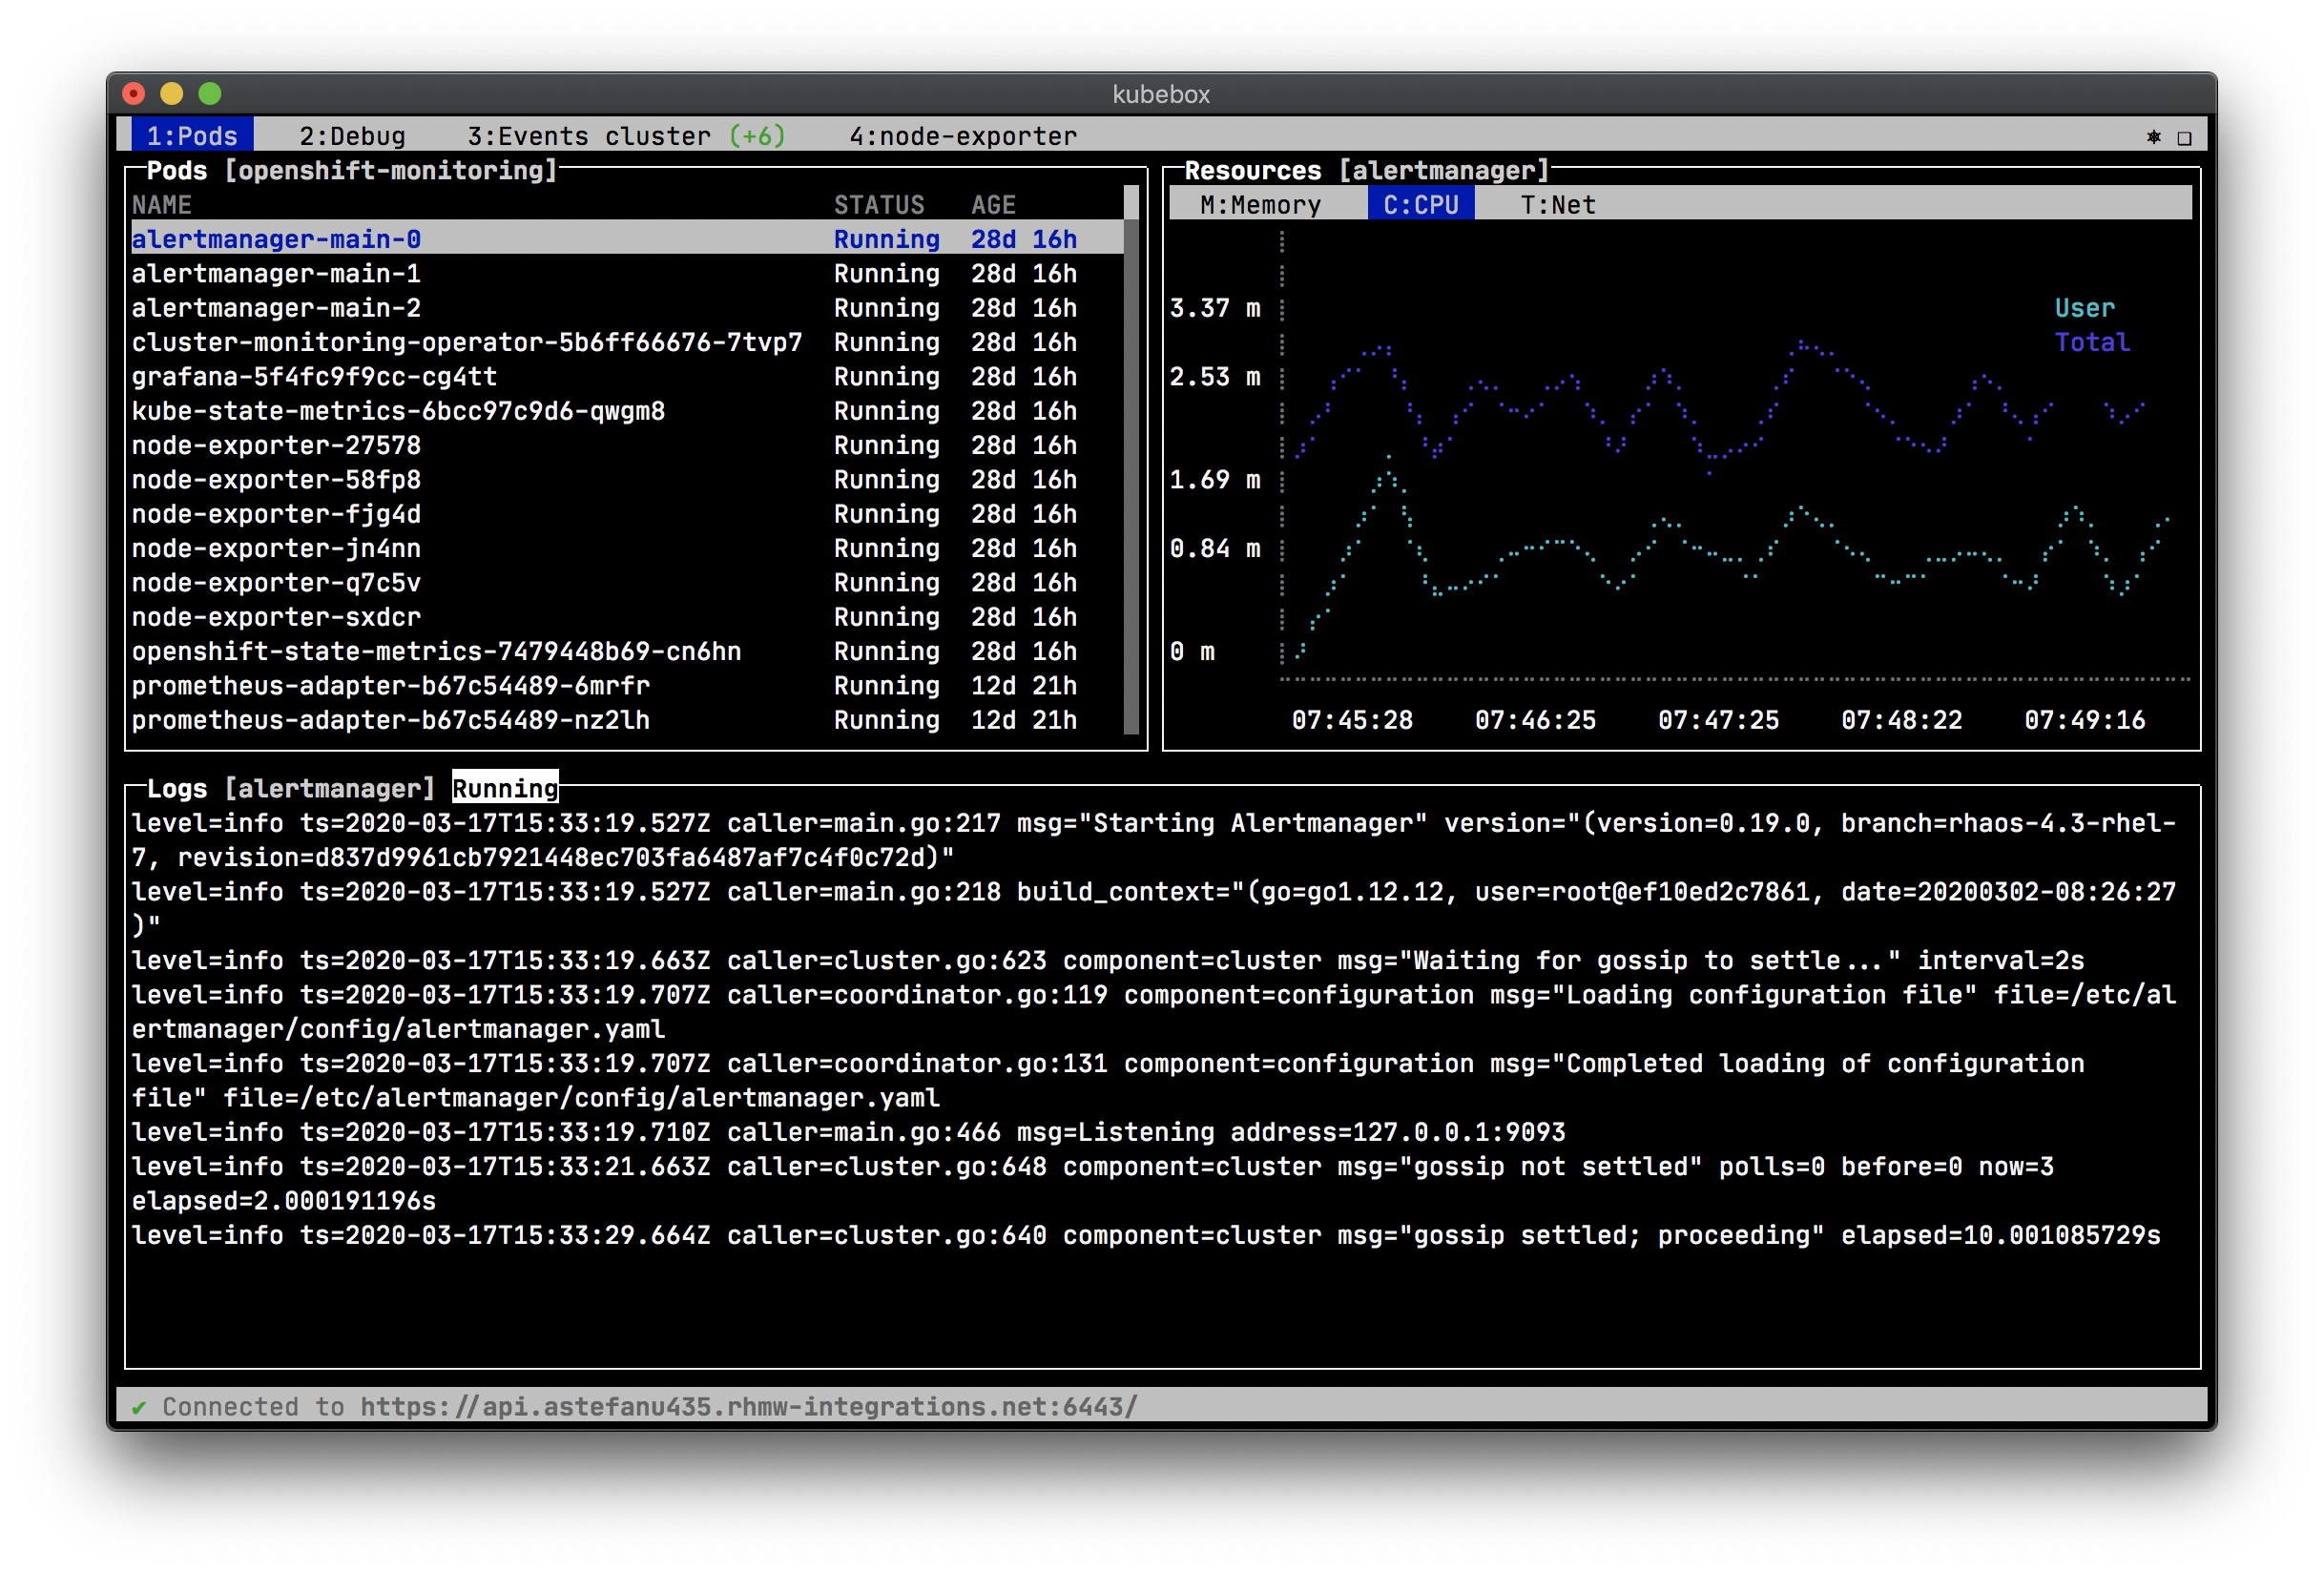
=== Features
- Configuration from kubeconfig files (
KUBECONFIGenvironment variable or$HOME/.kube) - Switch contexts interactively
- <<authentication,Authentication support>> (bearer token, basic auth, private key / cert, OAuth, OpenID Connect, Amazon EKS, Google Kubernetes Engine, Digital Ocean)
- Namespace selection and pods list watching
- Container log scrolling / watching
- Container resources usage (memory, CPU, network, file system charts) footnote:[Requires {uri-cadvisor}[cAdvisor] to be deployed as a DaemonSet. See the <
> section for more details.] - Container remote exec terminal
- Cluster, namespace, pod events
- Object configuration editor and CRUD operations
- Cluster and nodes views / monitoring
See the <
== Run
The following alternatives are available for you to use Kubebox, depending on your preferences and constraints:
=== Executable
Download the Kubebox standalone executable for your OS:
[source,shell,subs=attributes+]
Linux (x86_64)
$ curl -Lo kubebox {uri-kubebox-download}/kubebox-linux && chmod +x kubebox
Linux (ARMv7)
$ curl -Lo kubebox {uri-kubebox-download}/kubebox-linux-arm && chmod +x kubebox
OSX
$ curl -Lo kubebox {uri-kubebox-download}/kubebox-macos && chmod +x kubebox
Windows
$ curl -Lo kubebox.exe {uri-kubebox-download}/kubebox-windows.exe
Then run:
$ ./kubebox
=== Server
Kubebox can be served from a service hosted in your Kubernetes cluster. Terminal emulation is provided by {uri-xterm-js}[Xterm.js] and the communication with the Kubernetes master API is proxied by the server.
To deploy the server in your Kubernetes cluster, run:
$ kubectl apply -f https://raw.github.com/astefanutti/kubebox/master/kubernetes.yaml
To shut down the server and clean-up resources, run:
$ kubectl delete namespace kubebox
For the Ingress resource to work, the cluster must have an Ingress controller running. See {uri-ingress-controllers}[Ingress controllers] for more information.
Alternatively, to deploy the server in your OpenShift cluster, run:
$ oc new-app -f https://raw.github.com/astefanutti/kubebox/master/openshift.yaml
=== Kubectl
You can run Kubebox as an in-cluster client with kubectl, e.g.:
$ kubectl run kubebox -it --rm --env="TERM=xterm" --image=astefanutti/kubebox --restart=Never
If RBAC is enabled, you'll have to use the --serviceaccount option and reference a service account with sufficient permissions.
=== Docker
You can run Kubebox using Docker, e.g.:
$ docker run -it --rm astefanutti/kubebox
You may want to mount your home directory so that Kubebox can rely on the ~/.kube/config file, e.g.:
$ docker run -it --rm -v ~/.kube/:/home/node/.kube/:ro astefanutti/kubebox
=== Online
Kubebox is available online at https://astefanutti.github.com/kubebox. Note that it requires this address to match the allowed origins for CORS by the API server. This can be achived with the {uri-kube-apiserver}[Kubernetes API server CLI], e.g.:
$ kube-apiserver --cors-allowed-origins .*
== Authentication
We try to support the various authentication strategies supported by kubectl, in order to provide seamless integration with your local setup. Here are the different authentication strategies we support, depending on how you're using Kubebox:
[cols="<,^,^,^",options="header"] |=== ||Executable|Docker|Online
|OpenID Connect |{icon-check} |{icon-check} |{icon-check}footnote:[Custom IDP certificate authority files are not supported in Web versions.]
|Amazon EKS| {icon-check} | |
|Digital Ocean |{icon-check} | |
|Google Kubernetes Engine| {icon-check} | | |===
If the mode you're using isn't supported, you can refresh the authentication token/certs manually and update your kubeconfig file accordingly.
== cAdvisor
Kubebox relies on {uri-cadvisor}[cAdvisor] to retrieve the resource usage metrics. Before version 0.8.0, Kubebox used to access the cAdvisor endpoints, that are embedded in the Kubelet. However, these endpoints are being deprecated, and will eventually be removed, as discussed in https://github.com/kubernetes/kubernetes/issues/68522[kubernetes#68522].
Starting version 0.8.0, Kubebox expects cAdvisor to be deployed as a https://kubernetes.io/docs/concepts/workloads/controllers/daemonset/[DaemonSet]. This can be achieved with:
$ kubectl apply -f https://raw.githubusercontent.com/astefanutti/kubebox/master/cadvisor.yaml
It's recommended to use the provided cadvisor.yaml file, that's tested to work with Kubebox.
However, the DaemonSet example, from the {uri-cadvisor}[cAdvisor] project, should also work just fine.
Note that the cAdvisor containers must run with a privileged security context, so that they can access the container runtime on each node.
You can change the default --storage_duration and --housekeeping_interval options, added to the cAdvisor container arguments declared in the cadvisor.yaml file, to adjust the duration of the storage moving window (default to 5m0s), and the sampling period (default to 10s) respectively.
You may also have to provide the path of your cluster container runtime socket, in case it's not following the usual convention.
== Hotkeys
[cols="1v,2v"] |=== |Keybinding |Description
2+^.e|General
|kbd:[l], kbd:[Ctrl+l] |Login
|kbd:[n] |Change current namespace
|[kbd:[Shift]+]kbd:[â], kbd:[â] + [kbd:[Alt]+]kbd:[1], ..., kbd:[9] |Navigate screens + (use kbd:[Shift] or kbd:[Alt] inside exec terminal)
|kbd:[Tab], kbd:[Shift+Tab] |Change focus within the active screen
|kbd:[â], kbd:[â] |Navigate list / form / log
|kbd:[PgUp], kbd:[PgDn] |Move one page up / down
|kbd:[Enter] |Select item / submit form
|kbd:[Esc] |Close modal window / cancel form
|kbd:[Ctrl+z] |Close current screen
|kbd:[q], kbd:[Ctrl+q] |Exit footnote:[Not available in Web versions.]
2+^.e|Login
|kbd:[â], kbd:[â] |Navigate Kube configurations
2+^.e|Pods
|kbd:[Enter] |Select pod / cycle containers
|kbd:[r] |Remote shell into container
|kbd:[m] |Memory usage
|kbd:[c] |CPU usage
|kbd:[t] |Network usage
|kbd:[f] |File system usage
|kbd:[e] |Pod events
|kbd:[Shift+e] |Namespace events
|kbd:[Ctrl+e] |Cluster events
|===
== FAQ
- Resources usage metrics are unavailable!
** Starting version 0.8.0, Kubebox expects {uri-cadvisor}[cAdvisor] to be deployed as a DaemonSet. See the <
** The metrics are retrieved from the REST API, of the cAdvisor pod running on the same node as the container for which the metrics are being requested. That REST API is accessed via the API server proxy, which requires proper RBAC permission, e.g.: + [source,shell]
Permission to list the cAdvisor pods (selected using the spec.nodeName field selector)
$ kubectl auth can-i list pods -n cadvisor yes
Permission to proxy the selected cAdvisor pod, to call its REST API
$ kubectl auth can-i get pod --subresource proxy -n cadvisor yes
== Development
$ git clone https://github.com/astefanutti/kubebox.git
$ cd kubebox
$ npm install
$ node index.js
== Screenshots
Cluster events: ++++
Shell into a container: ++++
Terminal theme support: ++++
Web browser version: ++++

Top Related Projects
🐶 Kubernetes CLI To Manage Your Clusters In Style!
📦 Find and install kubectl plugins
Highly extensible platform for developers to better understand the complexity of Kubernetes clusters.
Lens - The way the world runs Kubernetes
A solution for implementing efficient and consistent software delivery to Kubernetes facilitating best practices.
⎈ Multi pod and container log tailing for Kubernetes -- Friendly fork of https://github.com/wercker/stern
Convert designs to code with AI
Introducing Visual Copilot: A new AI model to turn Figma designs to high quality code using your components.
Try Visual Copilot