
Top Related Projects

An interactive TLS-capable intercepting HTTP proxy for penetration testers and software developers.

A fully configurable http/https proxy in NodeJS

A free utility to help web developers watch and manipulate network traffic from their AJAX applications.

A fast,scalable,distributed game server framework for Node.js.

A full-featured http proxy for node.js
Quick Overview
Whistle is a cross-platform web debugging proxy tool based on Node.js. It provides a powerful set of features for capturing, inspecting, and modifying HTTP/HTTPS traffic between clients and servers, making it an invaluable tool for developers working on web applications and APIs.
Pros
- Extensive feature set including traffic capture, modification, and simulation
- User-friendly web interface for easy configuration and management
- Supports both HTTP and HTTPS traffic interception
- Highly extensible through plugins and custom rules
Cons
- Steeper learning curve compared to some simpler proxy tools
- Documentation can be challenging for non-Chinese speakers, as some parts are primarily in Chinese
- May require additional setup for HTTPS interception on certain platforms
Getting Started
-
Install Whistle globally using npm:
npm install -g whistle -
Start Whistle:
w2 start -
Configure your system or browser to use the Whistle proxy (default:
127.0.0.1:8899) -
Access the Whistle web interface at
http://localhost:8899/ -
Begin capturing and analyzing traffic by navigating to your target website or application
Competitor Comparisons
An interactive TLS-capable intercepting HTTP proxy for penetration testers and software developers.
Pros of mitmproxy
- More powerful and flexible command-line interface
- Better support for scripting and automation
- Stronger focus on security testing and analysis
Cons of mitmproxy
- Steeper learning curve for beginners
- Less user-friendly GUI compared to Whistle
- More complex setup process for certain scenarios
Code Comparison
mitmproxy:
def request(flow):
    if flow.request.host == "example.com":
        flow.request.headers["User-Agent"] = "Custom User Agent"
Whistle:
/example\.com/ reqHeaders://User-Agent/Custom User Agent/
Key Differences
- mitmproxy is primarily a command-line tool with Python scripting capabilities, while Whistle offers a web-based interface and uses a rule-based system.
- mitmproxy excels in advanced networking scenarios and security testing, whereas Whistle is more accessible for general web debugging and proxying tasks.
- Whistle provides a more intuitive visual interface for managing rules and inspecting traffic, making it easier for non-technical users to get started.
Both tools are powerful in their own right, with mitmproxy offering more advanced features and flexibility, while Whistle provides a more user-friendly experience for common web debugging tasks.
A fully configurable http/https proxy in NodeJS
Pros of AnyProxy
- Simpler setup and configuration process
- Better documentation and examples for beginners
- More lightweight and focused on core proxy functionality
Cons of AnyProxy
- Less feature-rich compared to Whistle
- Limited built-in UI for rule management and debugging
- Fewer advanced features for complex scenarios
Code Comparison
AnyProxy:
module.exports = {
  summary: 'a rule to hack response',
  *beforeSendResponse(requestDetail, responseDetail) {
    if (requestDetail.url.indexOf('example.com') > -1) {
      const newResponse = responseDetail.response;
      newResponse.body += '-- modified by anyproxy --';
      return { response: newResponse };
    }
  },
};
Whistle:
exports.handleResponseRules = async (ctx) => {
  const { fullUrl, headers, body } = ctx.response;
  if (fullUrl.indexOf('example.com') > -1) {
    ctx.body = body + '-- modified by whistle --';
  }
};
Both projects offer proxy functionality with rule-based modifications. AnyProxy provides a more straightforward approach, while Whistle offers more advanced features and a built-in UI for rule management. AnyProxy might be better suited for simpler use cases, whereas Whistle excels in complex scenarios with its extensive plugin system and debugging tools.
A free utility to help web developers watch and manipulate network traffic from their AJAX applications.
Pros of BrowserMob Proxy
- Java-based, integrates well with Selenium WebDriver for automated testing
- Supports HAR (HTTP Archive) file generation for detailed network analysis
- More mature project with longer development history
Cons of BrowserMob Proxy
- Less active development and maintenance compared to Whistle
- Limited built-in features for request/response manipulation
- Steeper learning curve for non-Java developers
Code Comparison
BrowserMob Proxy (Java):
Proxy proxy = new BrowserMobProxyServer();
proxy.start(0);
Selenium driver = new ChromeDriver(proxy.seleniumProxy());
proxy.newHar("test");
driver.get("http://example.com");
Har har = proxy.getHar();
Whistle (JavaScript):
const whistle = require('whistle');
const w2 = new whistle();
w2.start({
  port: 8899,
  rules: 'example.com forward://127.0.0.1:8080'
});
Both projects serve as HTTP proxies for debugging and testing, but they cater to different ecosystems. BrowserMob Proxy is more focused on Java-based testing environments, while Whistle offers a more flexible, JavaScript-based approach with a wider range of built-in features for request/response manipulation. Whistle has a more active development community and frequent updates, making it potentially more suitable for modern web development workflows.
A fast,scalable,distributed game server framework for Node.js.
Pros of Pomelo
- Designed specifically for game server development, offering scalable and real-time multiplayer game infrastructure
- Supports multiple programming languages (JavaScript, TypeScript, C#) for game logic implementation
- Provides built-in components for common game server features like channel management and session handling
Cons of Pomelo
- Steeper learning curve due to its focus on game server architecture
- Less versatile for general-purpose web development compared to Whistle
- Requires more setup and configuration for non-game related projects
Code Comparison
Whistle (HTTP proxy configuration):
exports.handleRequest = async (ctx) => {
  if (ctx.fullUrl.includes('example.com')) {
    ctx.response.body = 'Intercepted';
  }
};
Pomelo (Game server route definition):
app.route('connector', function(session, msg, app) {
  var chatServers = app.getServersByType('chat');
  var res = dispatch(chatServers, session.get('rid'));
  return res.id;
});
Both projects serve different purposes, with Whistle focusing on HTTP debugging and Pomelo on game server development. Whistle offers a more straightforward approach for web developers, while Pomelo provides specialized tools for building scalable game backends.
A full-featured http proxy for node.js
Pros of node-http-proxy
- Lightweight and focused solely on HTTP proxying
- Easier to integrate into existing Node.js applications
- More flexible for custom proxy implementations
Cons of node-http-proxy
- Limited built-in features compared to Whistle
- Requires more manual configuration for advanced use cases
- Less comprehensive documentation and examples
Code Comparison
node-http-proxy:
const httpProxy = require('http-proxy');
const proxy = httpProxy.createProxyServer({});

proxy.on('proxyReq', function(proxyReq, req, res, options) {
  proxyReq.setHeader('X-Special-Proxy-Header', 'foobar');
});
Whistle:
exports.handleRequest = function(req, res) {
  req.headers['x-special-proxy-header'] = 'foobar';
  return true;
};
Summary
node-http-proxy is a lightweight and flexible HTTP proxy library for Node.js, ideal for developers who need to integrate proxying functionality into their existing applications. It offers more control over the proxying process but requires more manual configuration.
Whistle, on the other hand, is a more comprehensive proxy tool with a wider range of built-in features and a user-friendly interface. It's better suited for debugging and testing scenarios, offering a more complete out-of-the-box solution.
The choice between the two depends on the specific requirements of your project and the level of control you need over the proxying process.
Convert  designs to code with AI

Introducing Visual Copilot: A new AI model to turn Figma designs to high quality code using your components.
Try Visual CopilotREADME

whistle

![]()
![]()


ä¸æ · English
Whistle æ¯ä¸ä¸ªåºäº Node.js å¼åçåè½å¼ºå¤§ãæä½ç®åç跨平å°æå è°è¯å·¥å ·ï¼æ¯æå¤ç§ä»£ç模å¼ï¼å¦ HTTP 代çãHTTPS 代çãSocks 代çãåå代ççï¼ï¼å¯ç¨äºæå åææéè¿é ç½®è§åä¿®æ¹ HTTPãHTTPSãHTTP/2ãWebSocketãTCP ç请æ±ãWhistle è¿å ç½®äº WeinreãLogãComposer çå·¥å ·ï¼æ¯ææ¥çè¿ç¨é¡µé¢ç DOM ç»æãæ¥çé¡µé¢ console è¾åºãéæ¾ç¼è¾è¯·æ±çãæ¤å¤ï¼Whistle æ¯ææ件æ©å±ï¼ä¹å¯åç¬ä½ä¸º NPM å è¢«å ¶ä»é¡¹ç®å¼ç¨ã
å®è£
WindowsãMacãUbuntuãFedora æ¨èä½¿ç¨ PC 客æ·ç«¯ï¼https://github.com/avwo/whistle-clientã
å¦æéç¨ Whistle 客æ·ç«¯å¯ä»¥è·³è¿è¯¥å®è£ æ¥éª¤
Linux PCãæå¡å¨çå ¶å®ç³»ç»å¯ä»¥ç¨å½ä»¤è¡çæ¬ï¼éä¸¥æ ¼æå¦ä¸ 4 个æ¥éª¤å®è£ ï¼
- å®è£ Whistle
- å¯å¨ Whistle
- å®è£ æ ¹è¯ä¹¦
- 设置代ç
å®è£ Whistle
æ ¹æ®å®é æ åµéæ©ä»¥ä¸ä¸ç§å®è£ æ¹å¼å³å¯ï¼
-
éè¿ npm å®è£ ï¼éè¦å å®è£ Node.JSï¼https://nodejs.org/ ï¼ï¼
npm i -g whistle -
éè¿ brew å®è£ ï¼éè¦å å®è£ brewï¼https://brew.sh/ ï¼ï¼
brew install whistle
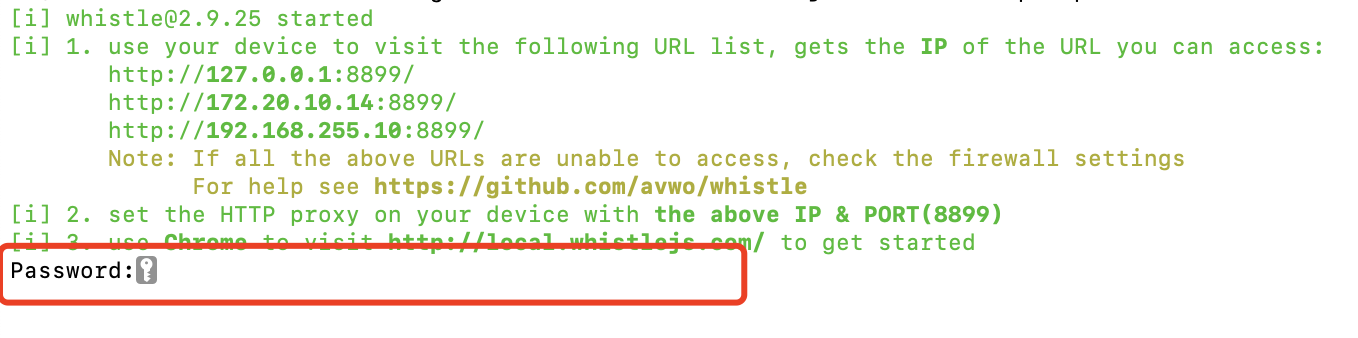
å¯å¨ Whistle
w2 start
Whistle é»è®¤å¯å¨ HTTP 代çï¼IPï¼
127.0.0.1ï¼ç«¯å£ï¼8899ï¼ï¼å¯ä»¥éè¿w2 start -p 8888ä¿®æ¹ç«¯å£ï¼å¦æå·²å¯å¨éè¦éè¿w2 restart -p 8888éå¯ä¿®æ¹ç«¯å£
å®æ´å½ä»¤è¡åè½åè§å®æ´ææ¡£ï¼https://wproxy.org/whistle/options.html
å®è£ æ ¹è¯ä¹¦
å¯å¨ Whistle åå¯ä»¥éè¿ä¸é¢çå½ä»¤å®è£ æ ¹è¯ä¹¦ï¼
w2 ca
Windows éè¦æåç¹å» âæ¯(Y)â 确认
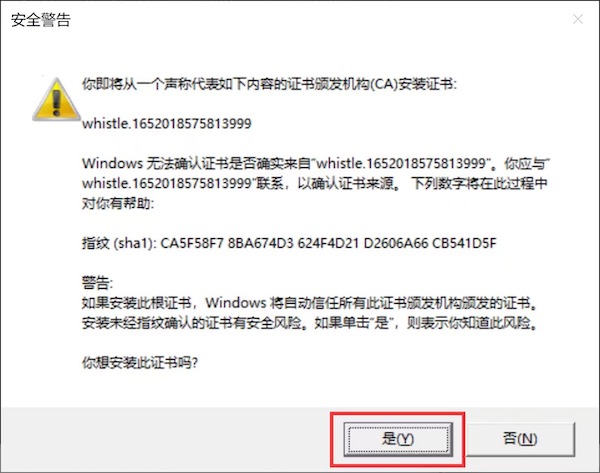
Mac éè¦è¾å ¥å¼æºå¯ç ææ纹éªè¯

ææºçå ¶å®ç«¯å¦ä½å®è£ æ ¹è¯ä¹¦åè§å®æ´ææ¡£ï¼https://wproxy.org/whistle/webui/https.html
设置代ç
Windows PC æ Mac PC æ以ä¸åç§æ¹å¼ï¼æ ¹æ®å®é æ åµéæ©å ¶ä¸ä¸ç§å³å¯ï¼
-
ãæ¨èã éè¿å®è£ Chrome æ件 SwitchyOmega 设置代çï¼https://chromewebstore.google.com/detail/proxy-switchyomega/padekgcemlokbadohgkifijomclgjgif
Chrome åºç¨ååºéè¦ç¿»å¢ï¼å¦ææ æ³è®¿é®è¯·æå¨å®è£ ï¼https://proxy-switchyomega.com/download/
SwitchyOmega 设置æ¹æ³ç¤ºä¾å¾
-
éè¿å½ä»¤è¡è®¾ç½®ç³»ç»ä»£çï¼
w2 proxyä¹å¯ä»¥æå®IPï¼é»è®¤
127.0.0.1ï¼å端å£ï¼w2 proxy "10.x.x.x:8888"ï¼å ³éç³»ç»è®¾ç½®ä»£çç¨w2 proxy 0 -
ç´æ¥å¨å®¢æ·ç«¯ä¸è®¾ç½®ä»£çï¼å¦ FireFoxã微信å¼åè å·¥å ·çå ç½®äºè®¾ç½®ä»£çåè½
FireFox 设置代ç示ä¾å¾
-
éè¿ Proxifier 设置代çï¼é对æ æ³è®¾ç½®ä»£çä¸ä¸ä½¿ç¨ç³»ç»ä»£çç客æ·ç«¯ï¼ï¼https://www.proxifier.com/docs/win-v4/http-proxy.html
Linux 设置路å¾: Settings > Network > VPN > Network Proxy > Manual
Linux 设置代ç示ä¾å¾
ææºç移å¨ç«¯è®¾å¤éè¦å¨ 设置 ä¸é
ç½®å½å Wi-Fi ç代çï¼ä»¥ iOS 为ä¾ï¼
iOS 设置代ç示ä¾å¾
使ç¨
æä¸é¢æ¥éª¤å®è£ 好 Whistleï¼å¨ Chrome æµè§å¨ä¸æå¼é¾æ¥ http://local.whistlejs.com ï¼å³å¯çå°å¦ä¸æä½çé¢ï¼
å ¶ä¸ï¼Network 为æ¥çæå çé¢ï¼Rules 为é ç½®è§åï¼Values 为é ç½®æ°æ®çé¢ï¼é å Rules 使ç¨ï¼ï¼Plugins 为已å®è£ çæ件å表ã
çé¢åè½
éæ¾è¯·æ±
ç¼è¾ææé 请æ±
å ¶å®çé¢åè½åè§å®æ´ææ¡£ï¼https://wproxy.org/whistle/webui/
è§ååè½
Whistle è§åå¯çææ¯å¦ä¸ç³»ç» hosts è§åçæ©å±ï¼
# ä¸ä¸ªåå对åºä¸ä¸ª IP
127.0.0.1 localhost
::1 localhost
# å¤ä¸ªåå对åºä¸ä¸ª IP
10.2.55.3 www.test.com www.example.com
ç³»ç» hosts è§åçåè½åä¸ï¼åªæ¯æä¿®æ¹ DNSåå¹é ååï¼ä¸æ DNS ç¼åé®é¢ï¼æ æ³æ»¡è¶³æ¥å¸¸å·¥ä½éæ±ï¼Whistle è§åæ©å±äºç³»ç» hosts è§åçåè½ï¼å¹é æ¹å¼ä¸ä¸ä» æ¯æååå¹é ãè·¯å¾å¹é ãéé 符å¹é ãæ£åå¹é çï¼è¿æ¯æéè¿è¯·æ±æ¹æ³ï¼ååºç¶æç ã请æ±ï¼ååºï¼å¤´ã请æ±å 容çè¿ä¸æ¥è¿æ»¤ï¼åè½ä¸ä¸ä» æ¯æä¿®æ¹ DNSï¼è¿æ¯æä¿®æ¹ç«¯å£ï¼CNAMEï¼è®¾ç½®ä»£çï¼ä¿®æ¹è¯·æ± URLã请æ±æ¹æ³ãååºç¶æç ã请æ±å¤´ãååºå¤´ã请æ±å 容ãååºå 容çï¼ç论ä¸å¯ä»¥ä¿®æ¹ HTTP 请æ±çææä¸è¥¿ï¼Whistle è§åæ ¼å¼ä¸ºï¼
-
é»è®¤æ ¼å¼
pattern operation -
æ¯æå¹é å¤ä¸ªæä½
pattern operation1 operation2 ... -
æ¯æè¿æ»¤å¨
pattern operation1 operation2 ... includeFilter://filterPattern1 ... excludeFilter://filterPatternN ...å¤ä¸ª filter ä¹é´æ¯ æ çå ³ç³»ï¼å³æ»¡è¶³å ¶ä¸ä¸ä¸ªæ¡ä»¶å³å¯
-
æ¯æä½ç½®è°æ¢ï¼åæï¼operation ä¸ pattern ä¸åæ¶ä¸º URL æååï¼
operation pattern [filters ...] operation pattern1 pattern2 ... [filters ...] -
æ¯ææ¢è¡
line`
operation
pattern1
pattern2 ...
[filters ...]
`
å ·ä½ä¾åå¦ä¸ï¼
ä¿®æ¹ DNSï¼è®¾ç½® Hostsï¼
-
ååå¹é
www.test.com 127.0.0.1 # æ¯æå¸¦ç«¯å£ www.test.com 127.0.0.1:8080 # CNAME åè½ï¼ç«¯å£å¯éï¼ www.test.com host://www.example.com:8181ä¸ç³»ç» hosts è§åä¸åçæ¯ Whistle è§åé»è®¤éç¨ä»å·¦å°å³çæ å°æ¹å¼ï¼**ä»ä¸å°ä¸çä¼å 级**ï¼ä½å¨ operation ä¸ pattern ä¸åæ¶ä¸º URL æååæ åµä¸å¯è°æ¢ä½ç½®ï¼æ以ä¹å ¼å®¹ç³»ç» hosts è§åï¼å³ï¼
127.0.0.1:8080 www.test.com -
è·¯å¾å¹é
www.test.com/path/to 127.0.0.1:8080 # æ¯æ带åè®® https://www.test.com/path/to 127.0.0.1:8080 -
éé 符å¹é
# ååéé 符ï¼å¹é test.com çææå代åå **.test.com 127.0.0.1:8080 # æ¯æ带åè®®ååéé 符 https://**.test.com 127.0.0.1:8080 # è·¯å¾éé 符ï¼* æ¯è·¯å¾çåæ³å符ï¼æ以åé¢è¦å ^ åè¯ Whistle æ¯éé ç¬¦ï¼ ^**.test.com/*/path/to 127.0.0.1:8080 # æ¯æ带å议路å¾éé 符 ^https://**.test.com/*/path/to 127.0.0.1:8080*ã**ã***å¹é çèå´ä¸åï¼è¯¦æ åè§å®æ´ææ¡£ï¼https://wproxy.org/whistle/pattern.html -
æ£åå¹é
# å é¨ç `/` å¯ä»¥ä¸è½¬ä¹ï¼çä»·äº `new RegExp('^https?://\w+\.test\.com')` /^https?://\w+\.test\.com/ 127.0.0.1:8080 -
è¿æ»¤å¹é
# `pattern` åä¸é¢çååãè·¯å¾ãæ£åï¼è¡¨ç¤ºé¤äºå¹é `pattern` è¿è¦æ»¡è¶³è¯·æ±å¤´ `cookie` å å« `env=test` pattern 127.0.0.1:8080 includeFilter://reqH.cookie=/env=test/
ä¿®æ¹è¡¨åæ°æ®
# ä¿®æ¹è¡¨åéé¢ç `test` å段çå¼
pattern reqMerge://test=123
# å é¤è¡¨åéé¢ç `abc` å段
pattern delete://reqBody.abc
设置跨åååºå¤´
# 以路å¾å¹é
为ä¾ï¼è®¾ç½®è·¨åååºå¤´ Access-Control-Allow-Origin: *ï¼ä¸æé¤ OPTION 请æ±
pattern resCors://* excludeFilter://m:option
ææè§ååè§å®æ´ææ¡£ï¼https://wproxy.org/whistle/rules/
å®è£ æ件
æ件ééè¿å½ä»¤è¡å®è£ ï¼
w2 i whistle.inspect whistle.vase
ä¸è¿°æåè½ä»ç»åæºç ï¼https://github.com/whistle-pluginsï¼å®¢æ·ç«¯å¯éè¿çé¢å®è£ ï¼https://github.com/avwo/whistle-client
å®è£ åå³å¯å¨ç®¡ççé¢ç Plugins çå°è¿ä¸¤ä¸ªæ件ï¼
æ件å表示ä¾å¾
æ¯ä¸ªæ件é»è®¤å¯ä»¥æ°å¢ä¸¤ä¸ªè§ååè®®ï¼
whistle.inspect://xxx
inspect://xxx
éè¿é ç½®æ件çèªå®ä¹è§åï¼å¯å°å¹é ç请æ±è½¬åå°æ件æå® hook å®ç°èªå®ä¹åè½ï¼å¦æä¸éè¦ä¹å¯éè¿æ件ç
package.jsonçwhistleConfig设置"hideLongProtocol": trueæ"hideShortProtocol": trueéè对åºè§ååè®®
é¤äºæ©å±è§åï¼æ件è¿æ¯ææ©å± Whistle çé¢ï¼ä»¥åæä¾æä½çé¢ãèªå¸¦è§åçåè½ï¼å ³äºæ件çå®è£ ã使ç¨ãå¼ååè§å®æ´ææ¡£ï¼https://wproxy.org/whistle/plugins.html
License
Top Related Projects
An interactive TLS-capable intercepting HTTP proxy for penetration testers and software developers.
A fully configurable http/https proxy in NodeJS
A free utility to help web developers watch and manipulate network traffic from their AJAX applications.
A fast,scalable,distributed game server framework for Node.js.
A full-featured http proxy for node.js
Convert designs to code with AI
Introducing Visual Copilot: A new AI model to turn Figma designs to high quality code using your components.
Try Visual Copilot