
Top Related Projects

Audio feature extraction for JavaScript.
Audio waveform player

A Web Audio framework for making interactive music in the browser.

Javascript audio library for the modern web.
Quick Overview
Peaks.js is an open-source JavaScript library for audio waveform visualization. It allows developers to display and interact with audio waveforms in web applications, providing features like zooming, scrolling, and segment marking. The library is maintained by the BBC and is designed to work with both browser-based and server-side audio processing.
Pros
- Highly customizable with numerous configuration options
- Supports both WebAudio API and pre-computed waveform data
- Offers multiple view types (overview and zoomed)
- Lightweight and performant, suitable for large audio files
Cons
- Limited built-in UI controls, requiring custom implementation for advanced features
- Documentation could be more comprehensive for complex use cases
- Requires additional setup for server-side waveform generation
- Limited support for real-time audio visualization
Code Examples
- Basic initialization:
const options = {
  container: document.getElementById('waveform-container'),
  mediaElement: document.querySelector('audio'),
  dataUri: {
    arraybuffer: '/path/to/waveform.dat'
  }
};

Peaks.init(options, function(err, peaks) {
  if (err) {
    console.error('Failed to initialize Peaks instance: ' + err.message);
    return;
  }
  // Peaks instance is ready to use
});
- Adding segments:
peaks.segments.add({
  startTime: 5,
  endTime: 10,
  labelText: 'Segment 1',
  color: '#ff0000'
});
- Zooming and scrolling:
peaks.zoom.zoomIn();
peaks.views.getView('zoomview').setStartTime(15);
- Handling events:
peaks.on('segments.dragend', function(segment) {
  console.log('Segment dragged:', segment.id, segment.startTime, segment.endTime);
});
Getting Started
-
Install Peaks.js using npm:
npm install peaks.js -
Include Peaks.js in your HTML:
<script src="node_modules/peaks.js/dist/peaks.js"></script> -
Create a container element and an audio element:
<div id="waveform-container"></div> <audio id="audio" src="/path/to/audio.mp3"></audio> -
Initialize Peaks.js:
const options = {
  container: document.getElementById('waveform-container'),
  mediaElement: document.getElementById('audio'),
  dataUri: {
    arraybuffer: '/path/to/waveform.dat'
  }
};

Peaks.init(options, function(err, peaks) {
  if (err) {
    console.error('Failed to initialize Peaks instance: ' + err.message);
    return;
  }
  // Peaks instance is ready to use
});
Competitor Comparisons
Audio feature extraction for JavaScript.
Pros of Meyda
- Focuses on real-time audio feature extraction, offering a wider range of audio analysis capabilities
- Provides both browser and Node.js support, making it more versatile for different environments
- Offers a plugin system for extending functionality and adding custom features
Cons of Meyda
- Less specialized for waveform visualization compared to Peaks.js
- May have a steeper learning curve due to its broader feature set
- Potentially higher computational overhead for simple waveform-related tasks
Code Comparison
Peaks.js (waveform visualization):
peaks.init({
  container: document.getElementById('waveform-container'),
  mediaElement: document.querySelector('audio'),
  dataUri: {
    arraybuffer: 'path/to/audio/waveform.dat'
  }
});
Meyda (audio feature extraction):
const features = Meyda.extract(['rms', 'zcr'], audioBuffer);
console.log(features.rms);
console.log(features.zcr);
Summary
Peaks.js is specialized for waveform visualization and interaction, while Meyda offers a broader range of audio analysis features. Peaks.js may be more suitable for projects focused on waveform display, while Meyda is better suited for complex audio analysis tasks across different environments.
Audio waveform player
Pros of wavesurfer.js
- More feature-rich with built-in plugins for spectrogram, regions, and timeline
- Supports a wider range of audio formats, including MIDI
- Offers real-time waveform rendering for live audio input
Cons of wavesurfer.js
- Larger file size and potentially higher memory usage
- May have slower performance for very long audio files
- Less focused on specific audio editing tasks compared to peaks.js
Code Comparison
peaks.js:
var options = {
  container: document.getElementById('waveform-container'),
  mediaElement: document.querySelector('audio'),
  dataUri: {
    arraybuffer: 'path/to/audio/file.dat'
  }
};

Peaks.init(options, function(err, peaks) {
  // peaks instance is ready
});
wavesurfer.js:
var wavesurfer = WaveSurfer.create({
  container: '#waveform',
  waveColor: 'violet',
  progressColor: 'purple'
});

wavesurfer.load('path/to/audio/file.mp3');
Both libraries provide waveform visualization for audio files, but peaks.js is more focused on audio editing and segmentation, while wavesurfer.js offers a broader range of features for audio playback and visualization. The code examples show that wavesurfer.js has a simpler initialization process, while peaks.js requires more configuration options upfront.
A Web Audio framework for making interactive music in the browser.
Pros of Tone.js
- Comprehensive audio synthesis and processing capabilities
- Extensive documentation and active community support
- Built-in scheduling and timing features for precise audio control
Cons of Tone.js
- Steeper learning curve due to its broader scope
- Potentially higher resource usage for simple audio tasks
- Less focused on waveform visualization compared to Peaks.js
Code Comparison
Tone.js example:
const synth = new Tone.Synth().toDestination();
const now = Tone.now();
synth.triggerAttackRelease("C4", "8n", now);
synth.triggerAttackRelease("E4", "8n", now + 0.5);
synth.triggerAttackRelease("G4", "8n", now + 1);
Peaks.js example:
peaks.init({
  container: document.getElementById('waveform-container'),
  mediaElement: document.querySelector('audio'),
  dataUri: {
    arraybuffer: 'path/to/audio/waveform.dat'
  }
});
Summary
Tone.js is a powerful library for audio synthesis and processing, offering a wide range of features for complex audio applications. It excels in creating and manipulating audio but may be overkill for simple waveform visualization tasks. Peaks.js, on the other hand, focuses specifically on audio waveform visualization and interaction, making it more suitable for projects that primarily require waveform display and simple audio playback control.
Javascript audio library for the modern web.
Pros of Howler.js
- Broader audio support: Handles various audio formats and fallbacks
- Simpler API for basic audio playback and control
- Lightweight and focused on audio playback functionality
Cons of Howler.js
- Lacks waveform visualization capabilities
- Not designed for precise audio analysis or segmentation
- Limited features for audio editing or manipulation
Code Comparison
Howler.js (basic audio playback):
var sound = new Howl({
  src: ['sound.mp3'],
  autoplay: true,
  loop: true,
  volume: 0.5,
});
Peaks.js (waveform visualization):
Peaks.init({
  container: document.getElementById('waveform-container'),
  mediaElement: document.querySelector('audio'),
  dataUri: 'audio-file.json',
  height: 100,
});
Summary
Howler.js is a lightweight audio library focused on playback across various platforms and browsers. It offers a simple API for basic audio control but lacks advanced features like waveform visualization.
Peaks.js, developed by the BBC, specializes in audio waveform visualization and interaction. It provides tools for displaying and manipulating audio waveforms, making it suitable for more complex audio editing and analysis tasks.
Choose Howler.js for straightforward audio playback needs, and Peaks.js for projects requiring detailed waveform visualization and interaction.
Convert  designs to code with AI

Introducing Visual Copilot: A new AI model to turn Figma designs to high quality code using your components.
Try Visual CopilotREADME
![]()

![]()
A client-side JavaScript component to display and interact with audio waveforms in the browser
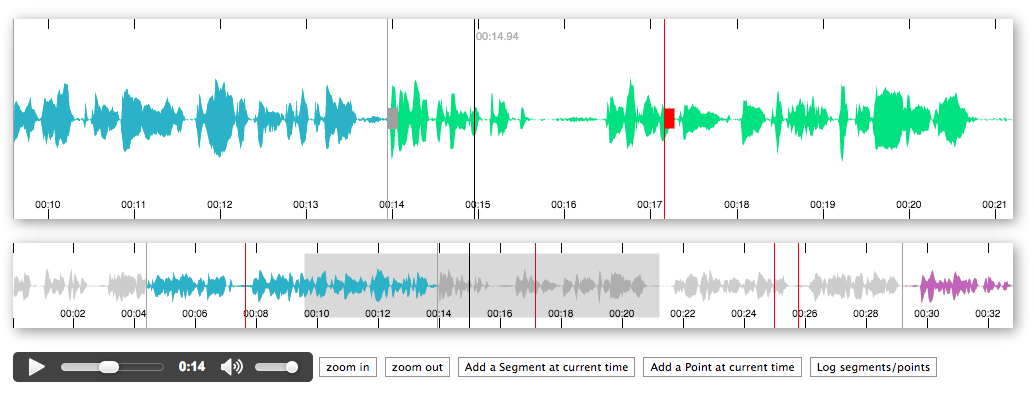
Peaks.js uses the HTML canvas element to display the waveform at different zoom levels, and has configuration options to allow you to customize the waveform views. Peaks.js allows users to interact with the waveform views, including zooming and scrolling, and creating point or segment markers that denote content to be clipped or for reference, e.g., distinguishing music from speech or identifying different music tracks.
Features
- Zoomable and scrollable waveform view
- Fixed width waveform view
- Mouse, touch, scroll wheel, and keyboard interaction
- Client-side waveform computation, using the Web Audio API, for convenience
- Server-side waveform computation, for efficiency
- Mono, stereo, or multi-channel waveform views
- Create point or segment marker annotations
- Customizable waveform views
You can read more about the project and see a demo here.
Contents
- Installing Peaks.js
- Add Peaks.js to your web page
- Initialize Peaks.js
- Generating waveform data
- Next steps
- Demos
- API
- Building Peaks.js
- Contributing
- License
- Credits
Installing Peaks.js
You can start using Peaks.js by either including the UMD bundle in a <script> tag in your web page, or by installing it using npm or yarn and including it in your module bundle with Webpack, Rollup, Parcel, etc.
Add a script tag
To add the Peaks.js UMD bundle to your web page, add a <script> tag:
<script src="https://unpkg.com/peaks.js/dist/peaks.js"></script>
The UMD bundle is available at unpkg and cdnjs.
Install with npm
We recommend that you use an ES module bundler.
Run the following commands to include Peaks.js in your module bundle:
npm install --save peaks.js
npm install --save konva
npm install --save waveform-data
Note that Peaks.js uses Konva and waveform-data as peer dependencies, so you must also install those modules.
Add Peaks.js to your web page
To include Peaks.js in your web page, you need to add container <div> elements that Peaks.js will use to render the waveform views, and a media element for your audio or video content. Here is an example HTML fragment:
<div id="zoomview-container"></div>
<div id="overview-container"></div>
<audio id="audio">
  <source src="sample.mp3" type="audio/mpeg">
  <source src="sample.ogg" type='audio/ogg codecs="vorbis"'>
</audio>
The container divs should be left empty, as shown above, as their content will be replaced by the waveform view canvas elements. They should also be styled to have the desired width and height:
#zoomview-container, #overview-container {
  width: 1000px;
  height: 100px;
}
Initialize Peaks.js
The next step is to initialize a Peaks instance with Peaks.init() and your configuration options.
The following examples show how to initialize Peaks.js with a minimal configuration. Refer to the Configuration section in the API documentation for details of all the available options.
Using a script tag
<script src="https://unpkg.com/peaks.js/dist/peaks.js"></script>
<script>
(function(Peaks) {
  const options = {
    zoomview: {
      container: document.getElementById('zoomview-container')
    },
    overview: {
      container: document.getElementById('overview-container')
    },
    mediaElement: document.getElementById('audio'),
    webAudio: {
      audioContext: new AudioContext()
    }
  };

  Peaks.init(options, function(err, peaks) {
    if (err) {
      console.error(`Failed to initialize Peaks instance: ${err.message}`);
      return;
    }

    // Do something when the waveform is displayed and ready
  });
})(peaks);
</script>
Using an ES2015 module import
import Peaks from 'peaks.js';

const options = {
  zoomview: {
    container: document.getElementById('zoomview-container')
  },
  overview: {
    container: document.getElementById('overview-container')
  },
  mediaElement: document.getElementById('audio'),
  webAudio: {
    audioContext: new AudioContext()
  }
};

Peaks.init(options, function(err, peaks) {
  if (err) {
    console.error('Failed to initialize Peaks instance: ' + err.message);
    return;
  }

  // Do something when the waveform is displayed and ready
});
Generating waveform data
Peaks.js creates its audio waveform visualization by processing the audio to produce waveform data. There are two ways that you can do this:
- Pre-compute the waveform data from the audio, using audiowaveform, and provide the data to Peaks.js from your web server
- Compute the waveform data in the browser using the Web Audio API
Using the Web Audio API can work well for short audio files, but involves downloading the entire audio file to the browser and is CPU intensive. Pre-computing the waveform data is preferable for longer audio files, because it saves your users' bandwidth and allows the waveform to be rendered faster.
Pre-computed waveform data
Peaks.js uses waveform data files produced by audiowaveform. These can be generated in either binary (.dat) or JSON format. Binary format is preferred because of the smaller file size (including after gzip or Brotli compression).
You should also use the -b 8 option when generating waveform data files, as Peaks.js does not currently support 16-bit waveform data files, and also to minimise file size.
To generate a binary waveform data file:
audiowaveform -i sample.mp3 -o sample.dat -b 8
To generate a JSON format waveform data file:
audiowaveform -i sample.mp3 -o sample.json -b 8
Refer to the audiowaveform documentation for full details of the available command line options, or use the manual page:
man audiowaveform
Once you have created a waveform data file, you can use this from Peaks.js by passing a dataUri option to Peaks.init():
import Peaks from 'peaks.js';

const options = {
  zoomview: {
    container: document.getElementById('zoomview-container')
  },
  overview: {
    container: document.getElementById('overview-container')
  },
  mediaElement: document.getElementById('audio'),
  dataUri: {
    arraybuffer: 'sample.dat' // or json: 'sample.json'
  }
};

Peaks.init(options, function(err, peaks) {
  // Do something when the waveform is displayed and ready, or handle errors
});
Web Audio based waveform data
Peaks.js can use the Web Audio API to generate waveforms, which means you do not have to pre-compute a waveform data file beforehand.
To use Web Audio, omit the dataUri option and instead pass a webAudio object that contains an AudioContext instance. Your browser must support the Web Audio API.
import Peaks from 'peaks.js';

const audioContext = new AudioContext();

const options = {
  zoomview: {
    container: document.getElementById('zoomview-container')
  },
  overview: {
    container: document.getElementById('overview-container')
  },
  mediaElement: document.getElementById('audio'),
  webAudio: {
    audioContext: audioContext,
    scale: 128,
    multiChannel: false
  }
};

Peaks.init(options, function(err, peaks) {
  // Do something when the waveform is displayed and ready, or handle errors
});
Alternatively, if you have an AudioBuffer containing decoded audio samples, e.g., from
AudioContext.decodeAudioData
then an AudioContext is not needed:
import Peaks from 'peaks.js';

const audioContext = new AudioContext();

// arrayBuffer contains the encoded audio (e.g., MP3 format)
audioContext.decodeAudioData(arrayBuffer)
  .then(function(audioBuffer) {
    const options = {
      zoomview: {
        container: document.getElementById('zoomview-container')
      },
      overview: {
        container: document.getElementById('overview-container')
      },
      mediaElement: document.getElementById('audio'),
      webAudio: {
        audioBuffer: audioBuffer
      }
    };

    Peaks.init(options, function(err, peaks) {
      // Do something when the waveform is displayed and ready, or handle errors
    });
  });
Next steps
We recommend that you take a look at the demos, which show how to use the various options and APIs that Peaks.js provides.
Refer to the API documentation for details of all the available configuration options and the API methods and events, and to Customizing Peaks.js for more information on advanced customization options.
If you're having difficulty, please refer to the Frequently Asked Questions page or raise an issue.
Demos
The demo folder contains some working examples of Peaks.js in use. To view these, enter the following commands:
git clone git@github.com:bbc/peaks.js.git
cd peaks.js
npm install
npm start
and then open your browser at http://localhost:8080.
There are also some example projects that show how to use Peaks.js with popular JavaScript frameworks:
API
Refer to the API documentation for details of all the available configuration options and the API methods and events, and to Customizing Peaks.js for more information on advanced customization options.
If you're updating your code to use a new release of Peaks.js, please refer to the Version Migration Guide for details of any breaking API changes.
Building Peaks.js
This section describes how to build Peaks.js locally, if you want to modify the code or contribute changes.
The first step is to clone the git repository and install the dependencies:
git clone git@github.com:bbc/peaks.js.git
cd peaks.js
npm install
Next, use the following command to build the library:
npm run build
This will produce various builds of Peaks.js:
-
dist/peaks.jsanddist/peaks.min.jsare stand-alone UMD modules that contain all dependencies. Note that custom markers do not work with these builds. See the FAQ for more details -
dist/peaks.esm.jsis an ES module bundle that does not include the Konva.js and waveform-data.js dependencies -
dist/peaks.ext.jsanddist/peaks.ext.min.jsare UMD builds that do not include the Konva.js and waveform-data.js dependencies
The build also creates an associated source map for each JavaScript file.
Testing
Tests run in Karma using Mocha, Chai, and Sinon.
npm testshould work for simple one time testing.npm test -- --glob %pattern%to run selected tests onlynpm run test-watchif you are developing and want to repeatedly run tests in a browser on your machine.npm run test-watch -- --glob %pattern%is also available
Contributing
If you'd like to contribute to Peaks.js, please take a look at our contributor guidelines.
License
See COPYING.
This project includes sample audio from the BBC radio programme Desert Island Discs, used under the terms of the Creative Commons 3.0 Unported License.
Credits
This software was written by:
Thank you to all our contributors.
Copyright
Copyright 2024 British Broadcasting Corporation
Top Related Projects
Audio feature extraction for JavaScript.
Audio waveform player
A Web Audio framework for making interactive music in the browser.
Javascript audio library for the modern web.
Convert designs to code with AI
Introducing Visual Copilot: A new AI model to turn Figma designs to high quality code using your components.
Try Visual Copilot