
Top Related Projects

🖍 Terminal string styling done right

node.js command-line interfaces made easy

Stylish, intuitive and user-friendly prompts. Used by eslint, webpack, yarn, pm2, pnpm, RedwoodJS, FactorJS, salesforce, Cypress, Google Lighthouse, Generate, tencent cloudbase, lint-staged, gluegun, hygen, hardhat, AWS Amplify, GitHub Actions Toolkit, @airbnb/nimbus, and more! Please follow Enquirer's author: https://github.com/jonschlinkert

A collection of common interactive command line user interfaces.

A FIG Driver written in JavaScript which aims to fully implement the FIGfont spec.

Highly configurable logging utility
Quick Overview
Terminal-kit is a powerful Node.js library for creating feature-rich terminal applications. It provides a wide range of functionalities, including input/output handling, screen manipulation, and advanced terminal control, allowing developers to create interactive and visually appealing command-line interfaces.
Pros
- Extensive feature set, including mouse support, screen buffers, and color manipulation
- Cross-platform compatibility (Windows, macOS, Linux)
- Well-documented API with comprehensive examples
- Active development and community support
Cons
- Steep learning curve for beginners due to the extensive API
- Some features may not work consistently across all terminal emulators
- Performance can be slower compared to lower-level terminal libraries
- Large package size due to comprehensive feature set
Code Examples
- Basic input and output:
const term = require('terminal-kit').terminal;

term.bold.cyan('Hello, world!\n');
term('Enter your name: ');
term.inputField((error, input) => {
    term.green('\nNice to meet you, %s!\n', input);
    process.exit();
});
- Creating a simple menu:
const term = require('terminal-kit').terminal;

const items = ['Option 1', 'Option 2', 'Option 3', 'Exit'];

term.singleColumnMenu(items, (error, response) => {
    term(`You selected: ${items[response.selectedIndex]}\n`);
    if (response.selectedIndex === items.length - 1) {
        process.exit();
    }
});
- Drawing a progress bar:
const term = require('terminal-kit').terminal;

const progressBar = term.progressBar({
    width: 80,
    title: 'Progress',
    eta: true,
    percent: true
});

let progress = 0;
const interval = setInterval(() => {
    progress += 0.05;
    progressBar.update(progress);
    if (progress >= 1) {
        clearInterval(interval);
        term('\nDone!\n');
        process.exit();
    }
}, 100);
Getting Started
To get started with Terminal-kit, follow these steps:
-
Install the library:
npm install terminal-kit -
Create a new JavaScript file and require the library:
const term = require('terminal-kit').terminal; -
Start using Terminal-kit's features in your code:
term.bold.green('Welcome to Terminal-kit!\n');
term('Press any key to exit...');
term.grabInput(true);
term.on('key', (key) => {
    if (key === 'CTRL_C') { process.exit(); }
});
This basic setup allows you to start exploring Terminal-kit's capabilities and build more complex terminal applications.
Competitor Comparisons
🖍 Terminal string styling done right
Pros of Chalk
- Simpler API and easier to use for basic color and styling tasks
- Lighter weight with fewer dependencies
- Widely adopted and well-maintained
Cons of Chalk
- Limited functionality compared to Terminal-kit
- Lacks advanced terminal manipulation features
- No input handling or interactive capabilities
Code Comparison
Terminal-kit:
var term = require('terminal-kit').terminal;

term.bold.red('Hello world!\n');
term.table([
    ['Name', 'Age'],
    ['Alice', '30'],
    ['Bob', '25']
]);
Chalk:
const chalk = require('chalk');

console.log(chalk.bold.red('Hello world!'));
// No built-in table functionality
Summary
Chalk is a lightweight and easy-to-use library for adding colors and styles to console output. It's ideal for simple styling tasks but lacks advanced features. Terminal-kit offers a more comprehensive set of tools for terminal manipulation, including input handling, progress bars, and tables. While Terminal-kit provides more functionality, it comes with a steeper learning curve and more dependencies. Choose Chalk for basic styling needs and Terminal-kit for more complex terminal applications.
node.js command-line interfaces made easy
Pros of Commander.js
- Simpler API and easier to get started for basic CLI applications
- Extensive documentation and large community support
- Lightweight with minimal dependencies
Cons of Commander.js
- Limited built-in features for advanced terminal manipulation
- Less flexibility for complex command structures and nested subcommands
- Fewer options for customizing the appearance of CLI output
Code Comparison
Commander.js:
const program = require('commander');

program
  .version('0.1.0')
  .option('-p, --peppers', 'Add peppers')
  .option('-c, --cheese <type>', 'Add cheese')
  .parse(process.argv);
Terminal-kit:
const term = require('terminal-kit').terminal;

term.bold.red('Error: ').green('Success!\n');
term.table([
    ['Name', 'Age'],
    ['Alice', '30'],
    ['Bob', '25']
]);
Terminal-kit offers more advanced terminal manipulation features, including colored output and table formatting, while Commander.js focuses on command-line argument parsing and option handling. Commander.js is better suited for simpler CLI applications, while Terminal-kit provides more tools for creating rich terminal interfaces.
Stylish, intuitive and user-friendly prompts. Used by eslint, webpack, yarn, pm2, pnpm, RedwoodJS, FactorJS, salesforce, Cypress, Google Lighthouse, Generate, tencent cloudbase, lint-staged, gluegun, hygen, hardhat, AWS Amplify, GitHub Actions Toolkit, @airbnb/nimbus, and more! Please follow Enquirer's author: https://github.com/jonschlinkert
Pros of Enquirer
- More focused on prompts and user input, offering a wide variety of question types
- Cleaner and more modern API design
- Extensive documentation and examples
Cons of Enquirer
- Less comprehensive terminal manipulation features
- May require additional libraries for advanced terminal control
Code Comparison
Enquirer:
const { prompt } = require('enquirer');

prompt({
  type: 'input',
  name: 'username',
  message: 'What is your username?'
}).then(answer => console.log('Username:', answer.username));
Terminal-kit:
const term = require('terminal-kit').terminal;

term.inputField((error, input) => {
  term.green("\nYour username is '%s'\n", input);
  process.exit();
});
Summary
Enquirer excels in creating interactive command-line prompts with a user-friendly API, making it ideal for building CLI applications that require user input. It offers a wide range of question types and has excellent documentation.
Terminal-kit, on the other hand, provides a more comprehensive set of terminal manipulation features, including cursor control, color management, and input handling. It's better suited for applications that require fine-grained control over the terminal display.
Choose Enquirer for focused, user-friendly prompts, and Terminal-kit for broader terminal control and manipulation capabilities.
A collection of common interactive command line user interfaces.
Pros of Inquirer.js
- More focused on user prompts and input collection
- Simpler API with a cleaner, more intuitive interface
- Better documentation and wider community adoption
Cons of Inquirer.js
- Less comprehensive terminal manipulation capabilities
- Limited styling options compared to Terminal-kit
- Slower performance for complex terminal operations
Code Comparison
Inquirer.js:
const inquirer = require('inquirer');

inquirer.prompt([
  {
    type: 'input',
    name: 'username',
    message: 'Enter your username:'
  }
]).then(answers => {
  console.log('Hello, ' + answers.username);
});
Terminal-kit:
const term = require('terminal-kit').terminal;

term.cyan('Enter your username: ');
term.inputField((error, input) => {
  term.green('\nHello, ' + input + '\n');
  process.exit();
});
Summary
Inquirer.js is more suitable for projects focused on user input and prompts, offering a simpler API and better documentation. Terminal-kit, on the other hand, provides more comprehensive terminal manipulation capabilities and styling options, making it better suited for complex terminal applications. The choice between the two depends on the specific requirements of your project and the level of terminal control needed.
A FIG Driver written in JavaScript which aims to fully implement the FIGfont spec.
Pros of figlet.js
- Focused specifically on ASCII art text generation
- Lightweight and easy to integrate into projects
- Supports a wide variety of FIGlet fonts
Cons of figlet.js
- Limited to text-based ASCII art generation
- Lacks advanced terminal manipulation features
- No built-in color support for generated text
Code Comparison
figlet.js:
const figlet = require('figlet');

figlet('Hello World!', function(err, data) {
    if (err) {
        console.log('Something went wrong...');
        console.dir(err);
        return;
    }
    console.log(data);
});
terminal-kit:
const term = require('terminal-kit').terminal;

term.drawText({
    x: 1, y: 1,
    attr: { color: 'red', bold: true },
    text: 'Hello world!'
});
Summary
figlet.js is a specialized library for generating ASCII art text, making it ideal for projects that require this specific functionality. It's lightweight and easy to use but lacks advanced terminal features.
terminal-kit, on the other hand, is a comprehensive terminal manipulation library that includes text styling, input handling, and more. While it can create styled text, it doesn't specialize in ASCII art generation like figlet.js does.
Choose figlet.js for simple ASCII art text generation, and terminal-kit for more complex terminal-based applications requiring a wider range of features.
Highly configurable logging utility
Pros of Signale
- Simpler API with a focus on logging and console output
- Built-in support for custom loggers and themes
- Lightweight with minimal dependencies
Cons of Signale
- Less comprehensive terminal manipulation features
- Limited input handling capabilities
- Fewer advanced formatting options for complex layouts
Code Comparison
Signale:
const signale = require('signale');

signale.success('Operation successful');
signale.error('Error occurred');
signale.info('Informational message');
Terminal-kit:
const term = require('terminal-kit').terminal;

term.green('Operation successful\n');
term.red('Error occurred\n');
term.blue('Informational message\n');
Summary
Signale is a lightweight logging library with a focus on simplicity and customization, while Terminal-kit offers a more comprehensive set of terminal manipulation features. Signale excels in creating custom loggers and themes, making it ideal for projects that primarily need enhanced console output. Terminal-kit, on the other hand, provides more advanced terminal control, input handling, and complex layout capabilities, making it suitable for interactive terminal applications and more sophisticated console interfaces.
Choose Signale for straightforward logging and console output with easy customization, or opt for Terminal-kit when you need extensive terminal manipulation and advanced input handling in your Node.js applications.
Convert  designs to code with AI

Introducing Visual Copilot: A new AI model to turn Figma designs to high quality code using your components.
Try Visual CopilotREADME


Terminal Kit
A full-blown terminal lib featuring: 256 colors, styles, keys & mouse handling, input field, progress bars, screen buffer (including 32-bit composition and image loading), text buffer, and many more...
Whether you just need colors & styles, build a simple interactive command line tool or a complexe terminal application: this is the absolute terminal lib for Node.js!
It does NOT depend on ncurses.
Some tutorials are available at blog.soulserv.net/tag/terminal.
Screenshot, PleaZe!
This is a fraction of what Terminal-Kit can do, with only few lines of code. Click any image to see the documentation related to the feature!

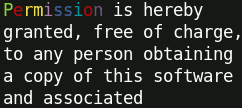 â Word-wrapping
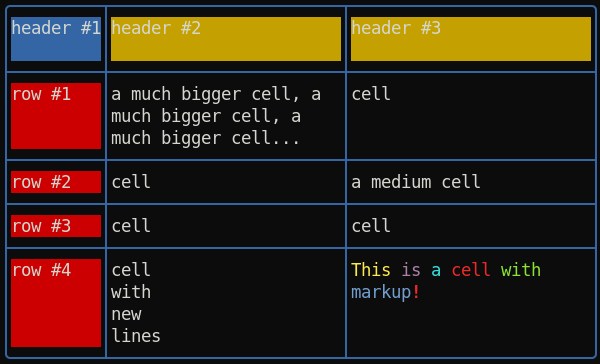 â Table with automatic column computing, cell fitting and word-wrapping


 â Surfaces and Sprites
 â Load and draw an image inside the terminal
Key features
New: Document model for building rich app GUI
New: Spinner
New: Table with automatic column computing, cell fitting and word-wrapping
New: Promises can be used instead of callback everywhere
New: Word-wrapping along full terminal width or a pre-defined column-width
New: ScreenBuffer HD 32-bit (RGBA) surfaces with composition and image loading
- colors, 256 colors or even 24-bit colors, if the terminal supports it
- styles (bold, underline, italic, and many more)
- style mixing
- chainable
- string formatting
- short style markup
- terminal window title
- cursor positioning
- keyboard input
- mouse support (GPM is supported for the Linux Console)
- input field
- single line menu
- single column menu
- grid/table menu
- progress bar
- interactive 'yes or no'
- screen & off-screen buffers (a concept similar to SDL's Surface)
- text buffers
- change the terminal color palette
- draw an image file (PNG, JPEG, GIF) directly inside the terminal
- event-driven
Quick examples
Some examples (note that if you execute all at once, some examples overwrite each other) :
// Require the lib, get a working terminal
var term = require( 'terminal-kit' ).terminal ;

// The term() function simply output a string to stdout, using current style
// output "Hello world!" in default terminal's colors
term( 'Hello world!\n' ) ;

// This output 'red' in red
term.red( 'red' ) ;

// This output 'bold' in bold
term.bold( 'bold' ) ;

// output 'mixed' using bold, underlined & red, exposing the style-mixing syntax
term.bold.underline.red( 'mixed' ) ;

// printf() style formatting everywhere:
// this will output 'My name is Jack, I'm 32.' in green
term.green( "My name is %s, I'm %d.\n" , 'Jack' , 32 ) ;

// Since v0.16.x, style markup are supported as a shorthand.
// Those two lines produce the same result.
term( "My name is " ).red( "Jack" )( " and I'm " ).green( "32\n" ) ;
term( "My name is ^rJack^ and I'm ^g32\n" ) ;

// Width and height of the terminal
term( 'The terminal size is %dx%d' , term.width , term.height ) ;

// Move the cursor at the upper-left corner
term.moveTo( 1 , 1 ) ;

// We can always pass additional arguments that will be displayed...
term.moveTo( 1 , 1 , 'Upper-left corner' ) ;

// ... and formated
term.moveTo( 1 , 1 , "My name is %s, I'm %d.\n" , 'Jack' , 32 ) ;

// ... or even combined with other styles
term.moveTo.cyan( 1 , 1 , "My name is %s, I'm %d.\n" , 'Jack' , 32  ) ;

// Get some user input
term.magenta( "Enter your name: " ) ;
var input = await term.inputField().promise ;
term.green( "\nYour name is '%s'\n" , input ) ;

// Cleanly exit : avoid having junk escape characters and restore default style.
// Any interactive functions (like .inputFiled(), .yesOrNo(), etc) will open "stdin" and listen for events,
// so the process will NOT exit except explicitly (or explicitly calling .grabInput( false )).
term.processExit() ;
More complete examples could be found in the sample directory.
â¥â¥ I want to READ THE DOC NOW! â¥â¥
License: MIT
Top Related Projects
🖍 Terminal string styling done right
node.js command-line interfaces made easy
Stylish, intuitive and user-friendly prompts. Used by eslint, webpack, yarn, pm2, pnpm, RedwoodJS, FactorJS, salesforce, Cypress, Google Lighthouse, Generate, tencent cloudbase, lint-staged, gluegun, hygen, hardhat, AWS Amplify, GitHub Actions Toolkit, @airbnb/nimbus, and more! Please follow Enquirer's author: https://github.com/jonschlinkert
A collection of common interactive command line user interfaces.
A FIG Driver written in JavaScript which aims to fully implement the FIGfont spec.
Highly configurable logging utility
Convert designs to code with AI
Introducing Visual Copilot: A new AI model to turn Figma designs to high quality code using your components.
Try Visual Copilot