
Top Related Projects


A latent text-to-image diffusion model

Denoising Diffusion Probabilistic Models

Implementation of Denoising Diffusion Probabilistic Model in Pytorch

Karras et al. (2022) diffusion models for PyTorch
Quick Overview
The ermongroup/ddim repository is an implementation of Denoising Diffusion Implicit Models (DDIMs), a class of non-Markovian diffusion processes that generate high-quality samples faster than their Markovian counterparts. This project provides a PyTorch implementation of DDIMs, along with training and sampling scripts for various datasets.
Pros
- Faster sampling compared to traditional diffusion models
- High-quality image generation results
- Flexible architecture that can be applied to various datasets
- Well-documented codebase with clear instructions
Cons
- Requires significant computational resources for training
- Limited to image generation tasks
- May require fine-tuning for specific use cases
- Relatively complex mathematical foundation, which may be challenging for beginners
Code Examples
- Loading a pre-trained DDIM model:
from models.diffusion import Model

model = Model(args)
model.load_state_dict(torch.load('path/to/checkpoint.pth'))
model.eval()
- Generating samples using DDIM:
from sampling import ddim_sampling

samples = ddim_sampling(model, x_T, alphas, betas, T, eta)
- Training a DDIM model:
from train import train

train(args, model, train_loader, optimizer, scheduler)
Getting Started
To get started with DDIM:
-
Clone the repository:
git clone https://github.com/ermongroup/ddim.git cd ddim -
Install dependencies:
pip install -r requirements.txt -
Train a model or use a pre-trained one:
from models.diffusion import Model from train import train model = Model(args) train(args, model, train_loader, optimizer, scheduler) -
Generate samples:
from sampling import ddim_sampling

samples = ddim_sampling(model, x_T, alphas, betas, T, eta)
Competitor Comparisons
Pros of guided-diffusion
- More comprehensive implementation with additional features like classifier guidance
- Better documentation and code organization
- Supports a wider range of diffusion models and sampling techniques
Cons of guided-diffusion
- Higher computational requirements due to more complex models
- Steeper learning curve for newcomers to diffusion models
- Less focused on specific DDIM implementation
Code Comparison
guided-diffusion:
def p_sample_loop(
    model,
    shape,
    noise=None,
    clip_denoised=True,
    denoised_fn=None,
    model_kwargs=None,
    device=None,
    progress=False,
):
    # ... (implementation details)
ddim:
def p_sample_ddim(model, x, t, clip_denoised=True, denoised_fn=None, model_kwargs=None):
    out = p_mean_variance(
        model,
        x,
        t,
        clip_denoised=clip_denoised,
        denoised_fn=denoised_fn,
        model_kwargs=model_kwargs,
    )
    # ... (implementation details)
The guided-diffusion repository offers a more flexible sampling loop with additional parameters, while ddim provides a more focused implementation of the DDIM sampling process. guided-diffusion's approach allows for easier integration of various sampling techniques, but ddim's implementation is more straightforward for those specifically interested in DDIM.
A latent text-to-image diffusion model
Pros of stable-diffusion
- More advanced and versatile image generation capabilities
- Larger community and active development
- Supports text-to-image generation
Cons of stable-diffusion
- Higher computational requirements
- More complex architecture and implementation
- Larger model size, requiring more storage and memory
Code Comparison
DDIM:
def p_sample(self, x, t, clip_denoised=True):
    out = self.p_mean_variance(x, t)
    noise = torch.randn_like(x)
    nonzero_mask = (t != 0).float().view(-1, *([1] * (len(x.shape) - 1)))
    return out["mean"] + nonzero_mask * torch.exp(0.5 * out["log_variance"]) * noise
stable-diffusion:
@torch.no_grad()
def p_sample_plms(self, x, c, t, index, repeat_noise=False, use_original_steps=False, quantize_denoised=False,
                  temperature=1., noise_dropout=0., score_corrector=None, corrector_kwargs=None,
                  unconditional_guidance_scale=1., unconditional_conditioning=None, old_eps=None, t_next=None):
    b, *_, device = *x.shape, x.device
The code snippets show that stable-diffusion has a more complex sampling function with additional parameters and features compared to DDIM's simpler implementation.
Denoising Diffusion Probabilistic Models
Pros of diffusion
- More comprehensive implementation of diffusion models
- Includes additional features like conditional sampling and various noise schedules
- Better documentation and code organization
Cons of diffusion
- Larger codebase, potentially more complex to understand and modify
- May require more computational resources due to additional features
- Less focused on specific applications compared to ddim
Code Comparison
diffusion:
def p_sample(self, model, x, t, clip_denoised=True, denoised_fn=None, cond_fn=None, model_kwargs=None):
    out = self.p_mean_variance(
        model,
        x,
        t,
        clip_denoised=clip_denoised,
        denoised_fn=denoised_fn,
        model_kwargs=model_kwargs,
    )
ddim:
def p_sample(self, model, x, t, t_index, betas):
    e_t = model(x, t)
    alphas = 1.0 - betas
    alphas_cumprod = torch.cumprod(alphas, dim=0)
    x_recon = self._predict_xstart_from_eps(x, t_index, e_t)
The code snippets show different approaches to sampling in the diffusion process, with diffusion offering more flexibility and options, while ddim focuses on a specific implementation.
Implementation of Denoising Diffusion Probabilistic Model in Pytorch
Pros of denoising-diffusion-pytorch
- More comprehensive implementation with additional features like conditional generation and image inpainting
- Better documentation and code organization, making it easier for users to understand and modify
- Active development and regular updates, incorporating latest research and improvements
Cons of denoising-diffusion-pytorch
- Higher complexity, which may be overwhelming for beginners or those seeking a simpler implementation
- Potentially slower inference time due to the additional features and flexibility
Code Comparison
ddim:
def p_sample(self, x, t, clip_denoised=True):
    out = self.p_mean_variance(x, t)
    noise = torch.randn_like(x)
    nonzero_mask = (t != 0).float().view(-1, *([1] * (len(x.shape) - 1)))
    return out["mean"] + nonzero_mask * torch.exp(0.5 * out["log_variance"]) * noise
denoising-diffusion-pytorch:
@torch.no_grad()
def p_sample(self, x, t: int, x_self_cond = None, clip_denoised = True):
    b, *_, device = *x.shape, x.device
    model_mean, _, model_log_variance = self.p_mean_variance(x = x, t = t, x_self_cond = x_self_cond)
    noise = torch.randn_like(x) if t > 0 else 0.
    pred_img = model_mean + (0.5 * model_log_variance).exp() * noise
    return pred_img, x_self_cond
Karras et al. (2022) diffusion models for PyTorch
Pros of k-diffusion
- More flexible sampling algorithms, including advanced methods like DPM-Solver
- Better support for conditional generation and guidance techniques
- More active development and community support
Cons of k-diffusion
- Steeper learning curve due to more complex architecture
- Less focus on theoretical foundations compared to DDIM
- May require more computational resources for some advanced sampling methods
Code Comparison
k-diffusion:
model = diffusion.DiffusionModel(...)
x = torch.randn(...)
samples = diffusion.sample(model, x, steps=20, eta=0.0)
DDIM:
model = DDIM(...)
x_T = torch.randn(...)
samples = model.sample(x_T, num_steps=20)
Both repositories provide implementations of diffusion models, but k-diffusion offers a wider range of sampling algorithms and more flexibility in model architecture. DDIM focuses on a specific sampling technique (Denoising Diffusion Implicit Models) and provides a more straightforward implementation. k-diffusion is generally more suitable for advanced users and researchers exploring various diffusion model variants, while DDIM may be preferable for those specifically interested in the DDIM algorithm or seeking a simpler starting point.
Convert  designs to code with AI

Introducing Visual Copilot: A new AI model to turn Figma designs to high quality code using your components.
Try Visual CopilotREADME
Denoising Diffusion Implicit Models (DDIM)
Jiaming Song, Chenlin Meng and Stefano Ermon, Stanford
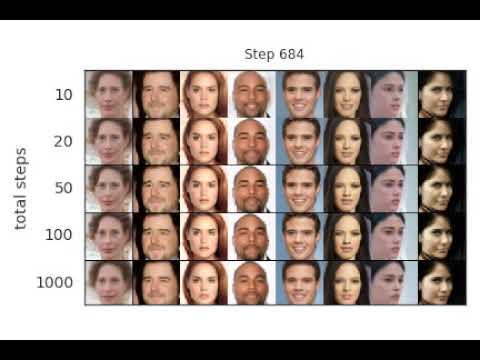
Implements sampling from an implicit model that is trained with the same procedure as Denoising Diffusion Probabilistic Model, but costs much less time and compute if you want to sample from it (click image below for a video demo):
Integration with ð¤ Diffusers library
DDIM is now also available in 𧨠Diffusers and accesible via the DDIMPipeline. Diffusers allows you to test DDIM in PyTorch in just a couple lines of code.
You can install diffusers as follows:
pip install diffusers torch accelerate
And then try out the model with just a couple lines of code:
from diffusers import DDIMPipeline

model_id = "google/ddpm-cifar10-32"

# load model and scheduler
ddim = DDIMPipeline.from_pretrained(model_id)

# run pipeline in inference (sample random noise and denoise)
image = ddim(num_inference_steps=50).images[0]

# save image
image.save("ddim_generated_image.png")
More DDPM/DDIM models compatible with hte DDIM pipeline can be found directly on the Hub
To better understand the DDIM scheduler, you can check out this introductionary google colab
The DDIM scheduler can also be used with more powerful diffusion models such as Stable Diffusion
You simply need to accept the license on the Hub, login with huggingface-cli login and install transformers:
pip install transformers
Then you can run:
from diffusers import StableDiffusionPipeline, DDIMScheduler

ddim = DDIMScheduler.from_config("runwayml/stable-diffusion-v1-5", subfolder="scheduler")
pipeline = StableDiffusionPipeline.from_pretrained("runwayml/stable-diffusion-v1-5", scheduler=ddim)

image = pipeline("An astronaut riding a horse.").images[0]

image.save("astronaut_riding_a_horse.png")
Running the Experiments
The code has been tested on PyTorch 1.6.
Train a model
Training is exactly the same as DDPM with the following:
python main.py --config {DATASET}.yml --exp {PROJECT_PATH} --doc {MODEL_NAME} --ni
Sampling from the model
Sampling from the generalized model for FID evaluation
python main.py --config {DATASET}.yml --exp {PROJECT_PATH} --doc {MODEL_NAME} --sample --fid --timesteps {STEPS} --eta {ETA} --ni
where
ETAcontrols the scale of the variance (0 is DDIM, and 1 is one type of DDPM).STEPScontrols how many timesteps used in the process.MODEL_NAMEfinds the pre-trained checkpoint according to its inferred path.
If you want to use the DDPM pretrained model:
python main.py --config {DATASET}.yml --exp {PROJECT_PATH} --use_pretrained --sample --fid --timesteps {STEPS} --eta {ETA} --ni
the --use_pretrained option will automatically load the model according to the dataset.
We provide a CelebA 64x64 model here, and use the DDPM version for CIFAR10 and LSUN.
If you want to use the version with the larger variance in DDPM: use the --sample_type ddpm_noisy option.
Sampling from the model for image inpainting
Use --interpolation option instead of --fid.
Sampling from the sequence of images that lead to the sample
Use --sequence option instead.
The above two cases contain some hard-coded lines specific to producing the image, so modify them according to your needs.
References and Acknowledgements
@article{song2020denoising,
  title={Denoising Diffusion Implicit Models},
  author={Song, Jiaming and Meng, Chenlin and Ermon, Stefano},
  journal={arXiv:2010.02502},
  year={2020},
  month={October},
  abbr={Preprint},
  url={https://arxiv.org/abs/2010.02502}
}
This implementation is based on / inspired by:
- https://github.com/hojonathanho/diffusion (the DDPM TensorFlow repo),
- https://github.com/pesser/pytorch_diffusion (PyTorch helper that loads the DDPM model), and
- https://github.com/ermongroup/ncsnv2 (code structure).
Top Related Projects
A latent text-to-image diffusion model
Denoising Diffusion Probabilistic Models
Implementation of Denoising Diffusion Probabilistic Model in Pytorch
Karras et al. (2022) diffusion models for PyTorch
Convert designs to code with AI
Introducing Visual Copilot: A new AI model to turn Figma designs to high quality code using your components.
Try Visual Copilot