
Top Related Projects

A list of awesome beginners-friendly projects.

This is a list of projects which have curated tasks specifically for new contributors. These issues are a great way to get started with a project, or to help share the load of working on open source projects. Jump in!

📚 Community guides for open source creators

A guide to contributing to open source
Quick Overview
First Contributions is a GitHub repository designed to help beginners make their first contribution to an open-source project. It provides a simple, step-by-step guide for newcomers to understand the process of contributing to a project on GitHub, including forking, cloning, creating branches, making changes, and submitting pull requests.
Pros
- Beginner-friendly with clear, detailed instructions
- Supports multiple languages, making it accessible to a global audience
- Provides a safe, low-pressure environment for first-time contributors
- Actively maintained and supported by a large community
Cons
- Limited to very basic contributions (adding name to a list)
- May not provide enough challenge for more experienced developers
- Doesn't cover more complex scenarios in open-source contributions
- High volume of pull requests may lead to slower response times
Getting Started
- Fork the repository on GitHub
- Clone your forked repository to your local machine
- Create a new branch for your contribution
- Add your name to the
Contributors.mdfile - Commit your changes and push to your fork on GitHub
- Create a pull request from your fork to the original repository
For detailed instructions, visit the repository's README.md file.
Competitor Comparisons
A list of awesome beginners-friendly projects.
Pros of awesome-for-beginners
- Provides a curated list of projects across various programming languages and technologies
- Offers a wider range of difficulty levels for beginners
- Includes detailed descriptions and labels for each project
Cons of awesome-for-beginners
- Less hands-on guidance for making the first contribution
- May be overwhelming due to the large number of options
- Requires more self-direction from the user to choose a project
Code Comparison
While both repositories are primarily focused on documentation and lists, awesome-for-beginners uses markdown for organization:
## JavaScript

- [Leaflet](https://github.com/Leaflet/Leaflet) - JavaScript library for mobile-friendly interactive maps. (Label: good first issue)
- [Brackets](https://github.com/adobe/brackets) - An open source code editor for the web, written in JavaScript, HTML and CSS. (Label: good first issue)
first-contributions provides a step-by-step guide with code snippets:
git clone https://github.com/firstcontributions/first-contributions.git
cd first-contributions
git checkout -b add-your-name
git add Contributors.md
git commit -m "Add <your-name> to Contributors list"
Both repositories serve as valuable resources for beginners, with awesome-for-beginners offering a broader selection of projects and first-contributions providing a more structured, hands-on approach to making the first contribution.
This is a list of projects which have curated tasks specifically for new contributors. These issues are a great way to get started with a project, or to help share the load of working on open source projects. Jump in!
Pros of Up-for-grabs.net
- Provides a curated list of projects seeking contributions, making it easier for beginners to find suitable projects
- Offers a wider range of projects across various programming languages and technologies
- Includes a tagging system to filter projects based on skills or interests
Cons of Up-for-grabs.net
- Requires more effort to get started, as users need to navigate through project listings
- May be overwhelming for absolute beginners due to the variety of projects available
- Less hands-on guidance for making the first contribution compared to First-contributions
Code Comparison
Up-for-grabs.net (JavaScript):
$(function () {
  var projects = projectsService.get().then(function (projectsInformation) {
    var projects = projectsInformation.projects;
    renderProjects(projects);
  });
});
First-contributions (Markdown):
# First Contributions

This project aims to simplify and guide the way beginners make their first contribution. If you are looking to make your first contribution, follow the steps below.
The code comparison shows that Up-for-grabs.net uses JavaScript to fetch and render project information, while First-contributions primarily uses Markdown to provide step-by-step instructions for making contributions.
📚 Community guides for open source creators
Pros of opensource.guide
- Comprehensive guide covering various aspects of open source, including starting and maintaining projects
- Well-structured content with detailed sections on best practices, community building, and legal considerations
- Regularly updated with contributions from the open source community
Cons of opensource.guide
- More theoretical and less hands-on compared to first-contributions
- May be overwhelming for absolute beginners looking for a quick start
- Requires more time investment to digest the extensive information
Code comparison
first-contributions:
# First Contributions

This project aims to simplify and guide the way beginners make their first contribution. If you are looking to make your first contribution, follow the steps below.
opensource.guide:
<h1 class="alt-h1 text-center">Open Source Guides</h1>
<p class="alt-lead text-center">Open source software is made by people just like you. Learn how to launch and grow your project.</p>
Summary
first-contributions focuses on providing a practical, step-by-step guide for making a first contribution to open source projects. It's ideal for beginners who want to quickly understand the process of contributing.
opensource.guide offers a comprehensive resource covering various aspects of open source development and maintenance. It's better suited for those looking to gain a deeper understanding of open source principles and practices.
Both repositories serve valuable purposes in the open source ecosystem, catering to different needs and experience levels of contributors and project maintainers.
A guide to contributing to open source
Pros of how-to-contribute-to-open-source
- Comprehensive guide covering various aspects of open-source contribution
- Includes a curated list of resources and projects for beginners
- Provides information on different programming languages and technologies
Cons of how-to-contribute-to-open-source
- More theoretical approach, lacking hands-on practice
- Can be overwhelming for absolute beginners due to the amount of information
- Requires more time to navigate and understand the content
Code comparison
While both repositories focus on guiding newcomers to open-source contributions, they don't contain significant code examples. However, here's a comparison of their README structures:
how-to-contribute-to-open-source:
# How to Contribute to Open Source

## Table of Contents
- [Contributing to open source in general](#contributing-to-open-source-in-general)
- [Direct GitHub searches](#direct-github-searches)
- [Mozilla's contributor ecosystem](#mozillas-contributor-ecosystem)
first-contributions:
# First Contributions

This project aims to simplify and guide the way beginners make their first contribution. If you are looking to make your first contribution, follow the steps below.

_If you're not comfortable with command line, [here are tutorials using GUI tools.](#tutorials-using-other-tools)_
The how-to-contribute-to-open-source README provides a more structured and comprehensive approach, while first-contributions focuses on a step-by-step guide for making the first contribution.
Convert  designs to code with AI

Introducing Visual Copilot: A new AI model to turn Figma designs to high quality code using your components.
Try Visual CopilotREADME

![]()

Read this in other languages.
![]()
![]()
![]()
![]()
![]()
![]()
![]()
![]()
![]()
![]()
![]()
![]()
![]()
![]()
![]()
![]()
![]()
![]()
![]()
![]()
![]()
![]()
![]()
![]()
![]()
![]()
![]()
![]()
![]()
![]()
![]()
![]()
![]()
![]()
![]()
![]()
![]()
![]()
![]()
![]()
![]()
![]()
![]()
![]()
![]()
![]()
![]()
![]()
![]()
![]()
![]()
![]()
![]()
![]()
![]()
![]()
![]()
![]()
![]()
![]()
![]()
![]()
![]()
![]()
![]()
![]()
![]()
![]()
![]()
![]()
![]()
![]()
![]()
![]()
![]()
![]()
![]()
![]()
![]()
![]()
![]()
![]()
![]()
First Contributions
This project aims to simplify and guide the way beginners make their first contribution. If you are looking to make your first contribution, follow the steps below.
If you're not comfortable with command line, here are tutorials using GUI tools.
If you don't have git on your machine, install it.
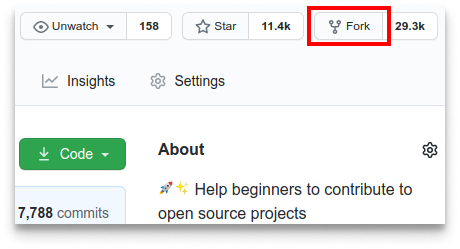
Fork this repository
Fork this repository by clicking on the fork button on the top of this page. This will create a copy of this repository in your account.
Clone the repository
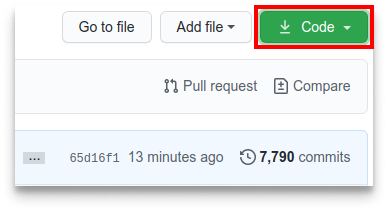
Now clone the forked repository to your machine. Go to your GitHub account, open the forked repository, click on the code button, then on SSH tab and then click the copy url to clipboard icon.
Open a terminal and run the following git command:
git clone "url you just copied"
where "url you just copied" (without the quotation marks) is the url to this repository (your fork of this project). See the previous steps to obtain the url.

For example:
git clone git@github.com:this-is-you/first-contributions.git
where this-is-you is your GitHub username. Here you're copying the contents of the first-contributions repository on GitHub to your computer.
Create a branch
Change to the repository directory on your computer (if you are not already there):
cd first-contributions
Now create a branch using the git switch command:
git switch -c your-new-branch-name
For example:
git switch -c add-alonzo-church
If you get any errors using git switch, click here:
If the error message "Git: switch is not a git command. See git âhelp" appears, it's likely because you're using an older version of git.
In this case, try to use git checkout instead:
git checkout -b your-new-branch-name
Make necessary changes and commit those changes
Now open Contributors.md file in a text editor, add your name to it. Don't add it at the beginning or end of the file. Put it anywhere in between. Now, save the file.
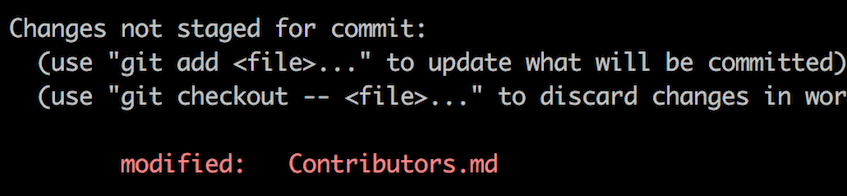
If you go to the project directory and execute the command git status, you'll see there are changes.
Add those changes to the branch you just created using the git add command:
git add Contributors.md
Now commit those changes using the git commit command:
git commit -m "Add your-name to Contributors list"
replacing your-name with your name.
Push changes to GitHub
Push your changes using the command git push:
git push -u origin your-branch-name
replacing your-branch-name with the name of the branch you created earlier.
If you get any errors while pushing, click here:
-
Authentication Error
remote: Support for password authentication was removed on August 13, 2021. Please use a personal access token instead. remote: Please see https://github.blog/2020-12-15-token-authentication-requirements-for-git-operations/ for more information. fatal: Authentication failed for 'https://github.com/
/first-contributions.git/' Go to GitHub's tutorial on generating and configuring an SSH key to your account.
Also, you might want to run 'git remote -v' to check your remote address.
If it looks anything like this:
origin	https://github.com/your-username/your_repo.git (fetch)
origin	https://github.com/your-username/your_repo.git (push)
change it using this command:
git remote set-url origin git@github.com:your-username/your_repo.gitOtherwise you'll still get prompted for username and password and get authentication error.
Submit your changes for review
If you go to your repository on GitHub, you'll see a Compare & pull request button. Click on that button.
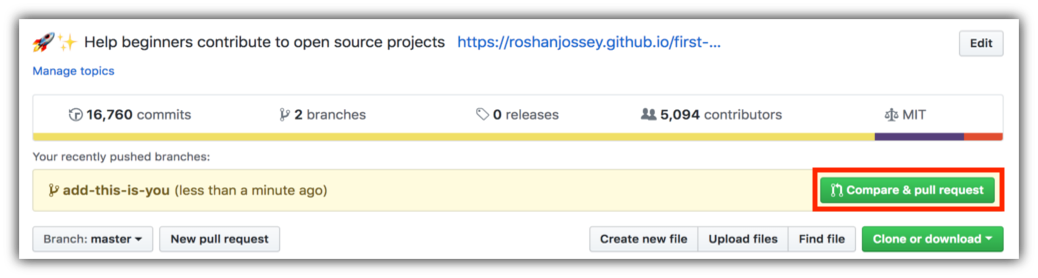
Now submit the pull request.

Soon I'll be merging all your changes into the main branch of this project. You will get a notification email once the changes have been merged.
Where to go from here?
Congrats! You just completed the standard fork -> clone -> edit -> pull request workflow that you'll often encounter as a contributor!
Celebrate your contribution and share it with your friends and followers by going to web app.
If you'd like more practice, checkout code contributions.
Now let's get you started with contributing to other projects. We've compiled a list of projects with easy issues you can get started on. Check out the list of projects in the web app.
Additional material
Tutorials Using Other Tools
| GitHub Desktop | Visual Studio 2017 | GitKraken | Visual Studio Code | Atlassian Sourcetree | IntelliJ IDEA |
Top Related Projects
A list of awesome beginners-friendly projects.
This is a list of projects which have curated tasks specifically for new contributors. These issues are a great way to get started with a project, or to help share the load of working on open source projects. Jump in!
📚 Community guides for open source creators
A guide to contributing to open source
Convert designs to code with AI
Introducing Visual Copilot: A new AI model to turn Figma designs to high quality code using your components.
Try Visual Copilot