
Top Related Projects

A fluent API to FFMPEG (http://www.ffmpeg.org)

Docker build for FFmpeg on Ubuntu / Alpine / Centos / Scratch / nvidia / vaapi

Mirror of https://git.ffmpeg.org/ffmpeg.git

Video editing with Python
Quick Overview
The ffmpeg-python project is a Python wrapper for the popular FFmpeg multimedia framework, allowing developers to easily integrate FFmpeg functionality into their Python applications. It provides a high-level, Pythonic interface for working with video, audio, and other multimedia files.
Pros
- Simplifies FFmpeg Integration:
ffmpeg-pythonabstracts away the complexity of working with the FFmpeg command-line tool, making it easier for Python developers to leverage FFmpeg's powerful multimedia processing capabilities. - Cross-Platform Compatibility: The library works across multiple platforms, including Windows, macOS, and Linux, making it a versatile choice for a wide range of projects.
- Extensive Functionality: The library supports a wide range of FFmpeg features, including video and audio encoding/decoding, file format conversion, and various filters and transformations.
- Active Development and Community: The project is actively maintained, with regular updates and a growing community of contributors and users.
Cons
- Dependency on FFmpeg: The library requires the FFmpeg command-line tool to be installed on the system, which may not be a trivial task for some users.
- Limited Documentation: While the project has a README file and some examples, the overall documentation could be more comprehensive, making it harder for new users to get started.
- Performance Overhead: The use of a Python wrapper may introduce some performance overhead compared to directly using the FFmpeg command-line tool, especially for large or complex multimedia processing tasks.
- Potential Compatibility Issues: As the library wraps the FFmpeg command-line tool, it may be subject to compatibility issues if the underlying FFmpeg version changes or if the library's API is not kept up-to-date.
Code Examples
Here are a few examples of how to use the ffmpeg-python library:
- Basic Video Conversion:
import ffmpeg

# Load the input video file
input_video = ffmpeg.input('input.mp4')

# Perform video conversion
output_video = ffmpeg.output(input_video, 'output.avi')

# Run the FFmpeg process
ffmpeg.run()
- Video Resizing and Cropping:
import ffmpeg

# Load the input video file
input_video = ffmpeg.input('input.mp4')

# Resize the video to 720p and crop to a 16:9 aspect ratio
output_video = (
    input_video
    .filter('scale', 1280, 720)
    .filter('crop', 'iw:ih*(9/16)', '(iw-iw*(9/16))/2', '(ih-ih*(9/16))/2')
)

# Save the output video
ffmpeg.output(output_video, 'output.mp4').run()
- Audio Extraction and Conversion:
import ffmpeg

# Load the input video file
input_video = ffmpeg.input('input.mp4')

# Extract the audio stream and convert it to MP3 format
audio_stream = input_video.audio
output_audio = ffmpeg.output(audio_stream, 'output.mp3')

# Run the FFmpeg process
ffmpeg.run()
- Applying Video Filters:
import ffmpeg

# Load the input video file
input_video = ffmpeg.input('input.mp4')

# Apply a sepia tone filter to the video
output_video = (
    input_video
    .filter('colorchannelmixer', 'r=.393,.769,.189', 'g=.349,.686,.168', 'b=.272,.534,.131')
)

# Save the output video
ffmpeg.output(output_video, 'output.mp4').run()
Getting Started
To get started with ffmpeg-python, follow these steps:
- Install the
ffmpeg-pythonpackage using pip:
pip install ffmpeg-python
-
Ensure that you have the FFmpeg command-line tool installed on your system. You can download it from the official FFmpeg website (https://ffmpeg.org/download.html) and follow the installation instructions for your operating system.
-
Import the
ffmpegmodule in your Python script:
Competitor Comparisons
A fluent API to FFMPEG (http://www.ffmpeg.org)
Pros of fluent-ffmpeg
- More extensive documentation and examples
- Wider range of features and options for video processing
- Better integration with Node.js ecosystem
Cons of fluent-ffmpeg
- Limited to Node.js environment
- May have a steeper learning curve due to more complex API
Code Comparison
ffmpeg-python:
import ffmpeg

stream = ffmpeg.input('input.mp4')
stream = ffmpeg.filter(stream, 'scale', 1280, 720)
stream = ffmpeg.output(stream, 'output.mp4')
ffmpeg.run(stream)
fluent-ffmpeg:
const ffmpeg = require('fluent-ffmpeg');

ffmpeg('input.mp4')
  .videoFilters('scale=1280:720')
  .output('output.mp4')
  .run();
Both libraries provide a fluent interface for working with FFmpeg, but ffmpeg-python offers a more Pythonic approach, while fluent-ffmpeg is tailored for JavaScript and Node.js developers. ffmpeg-python has a simpler API, making it easier to get started, but fluent-ffmpeg offers more advanced features and better integration with the Node.js ecosystem. The choice between the two largely depends on the programming language and environment you're working in, as well as the complexity of your FFmpeg tasks.
Docker build for FFmpeg on Ubuntu / Alpine / Centos / Scratch / nvidia / vaapi
Pros of ffmpeg
- Docker-based solution for easy deployment and isolation
- Supports multiple architectures and platforms
- Regularly updated with the latest FFmpeg versions
Cons of ffmpeg
- Requires Docker knowledge and setup
- Less flexible for direct Python integration
- May have higher resource overhead due to containerization
Code Comparison
ffmpeg-python:
import ffmpeg

stream = ffmpeg.input('input.mp4')
stream = ffmpeg.filter(stream, 'scale', 1920, 1080)
stream = ffmpeg.output(stream, 'output.mp4')
ffmpeg.run(stream)
ffmpeg (Dockerfile):
FROM jrottenberg/ffmpeg:4.4-ubuntu

COPY input.mp4 /tmp/input.mp4
RUN ffmpeg -i /tmp/input.mp4 -vf scale=1920:1080 /tmp/output.mp4
Key Differences
- ffmpeg-python provides a Pythonic interface for FFmpeg operations
- ffmpeg offers a containerized FFmpeg environment
- ffmpeg-python allows for more complex, programmatic video processing
- ffmpeg is better suited for standalone FFmpeg usage and CI/CD pipelines
Use Cases
- Choose ffmpeg-python for Python-based projects requiring deep FFmpeg integration
- Opt for ffmpeg when deploying FFmpeg in containerized environments or CI/CD workflows
Mirror of https://git.ffmpeg.org/ffmpeg.git
Pros of FFmpeg
- Comprehensive and powerful multimedia framework with extensive capabilities
- Direct access to low-level APIs for fine-grained control
- Extensive documentation and community support
Cons of FFmpeg
- Steep learning curve due to complex command-line interface
- Requires manual string manipulation for command construction
- Less intuitive for Python developers
Code Comparison
FFmpeg (command-line):
ffmpeg -i input.mp4 -vf scale=1280:720 output.mp4
ffmpeg-python:
import ffmpeg
stream = ffmpeg.input('input.mp4')
stream = ffmpeg.filter(stream, 'scale', 1280, 720)
stream.output('output.mp4').run()
Key Differences
- ffmpeg-python provides a Pythonic interface to FFmpeg functionality
- FFmpeg offers more granular control but requires more in-depth knowledge
- ffmpeg-python simplifies common tasks but may limit access to some advanced features
Use Cases
- FFmpeg: Advanced multimedia processing, complex workflows, and performance-critical applications
- ffmpeg-python: Python developers, rapid prototyping, and integration with existing Python projects
Video editing with Python
Pros of MoviePy
- Higher-level API, making it easier for beginners to use
- Built-in effects and transitions for quick video editing
- Supports image manipulation and text overlay out of the box
Cons of MoviePy
- Slower performance compared to direct FFmpeg bindings
- Limited access to advanced FFmpeg features
- Potential for memory issues with large video files
Code Comparison
MoviePy:
from moviepy.editor import VideoFileClip, TextClip, CompositeVideoClip

video = VideoFileClip("input.mp4")
text = TextClip("Hello World", fontsize=70, color='white')
result = CompositeVideoClip([video, text.set_pos('center')])
result.write_videofile("output.mp4")
ffmpeg-python:
import ffmpeg

stream = ffmpeg.input('input.mp4')
stream = ffmpeg.drawtext(stream, text='Hello World', fontsize=70, x='(w-tw)/2', y='(h-th)/2')
stream = ffmpeg.output(stream, 'output.mp4')
ffmpeg.run(stream)
Both libraries offer Python interfaces for video manipulation, but MoviePy provides a more user-friendly approach with built-in effects, while ffmpeg-python offers direct access to FFmpeg's powerful features with potentially better performance.
Convert  designs to code with AI

Introducing Visual Copilot: A new AI model to turn Figma designs to high quality code using your components.
Try Visual CopilotREADME
ffmpeg-python: Python bindings for FFmpeg
![]()

Overview
There are tons of Python FFmpeg wrappers out there but they seem to lack complex filter support. ffmpeg-python works well for simple as well as complex signal graphs.
Quickstart
Flip a video horizontally:
import ffmpeg
stream = ffmpeg.input('input.mp4')
stream = ffmpeg.hflip(stream)
stream = ffmpeg.output(stream, 'output.mp4')
ffmpeg.run(stream)
Or if you prefer a fluent interface:
import ffmpeg
(
    ffmpeg
    .input('input.mp4')
    .hflip()
    .output('output.mp4')
    .run()
)
API reference
Complex filter graphs
FFmpeg is extremely powerful, but its command-line interface gets really complicated rather quickly - especially when working with signal graphs and doing anything more than trivial.
Take for example a signal graph that looks like this:
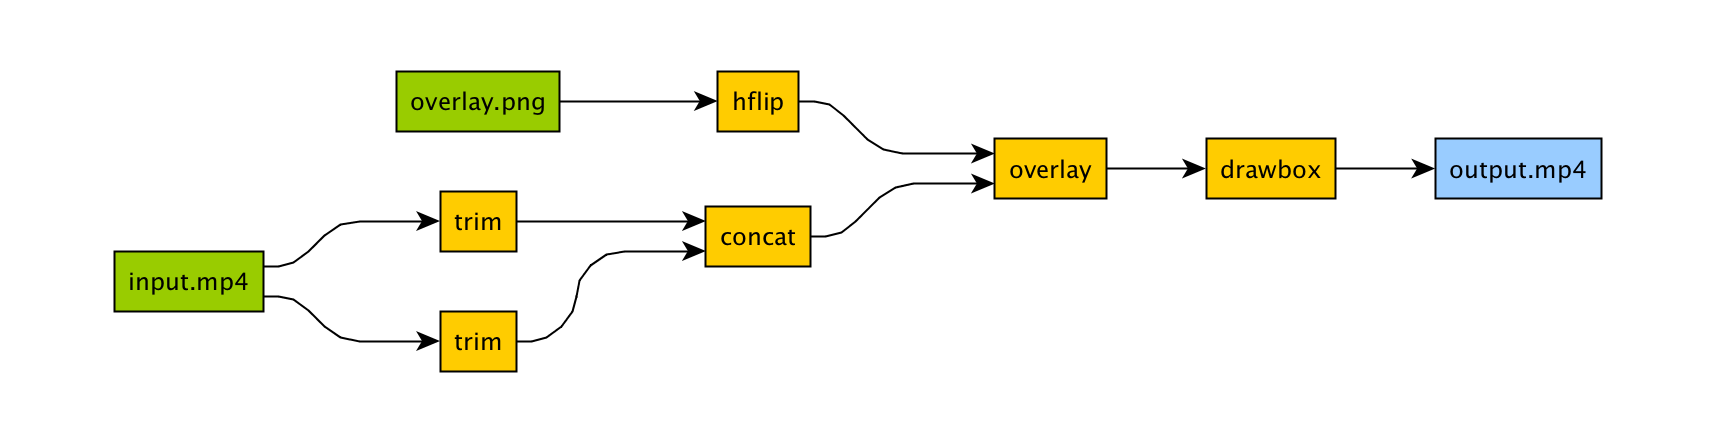
The corresponding command-line arguments are pretty gnarly:
ffmpeg -i input.mp4 -i overlay.png -filter_complex "[0]trim=start_frame=10:end_frame=20[v0];\
    [0]trim=start_frame=30:end_frame=40[v1];[v0][v1]concat=n=2[v2];[1]hflip[v3];\
    [v2][v3]overlay=eof_action=repeat[v4];[v4]drawbox=50:50:120:120:red:t=5[v5]"\
    -map [v5] output.mp4
Maybe this looks great to you, but if you're not an FFmpeg command-line expert, it probably looks alien.
If you're like me and find Python to be powerful and readable, it's easier with ffmpeg-python:
import ffmpeg

in_file = ffmpeg.input('input.mp4')
overlay_file = ffmpeg.input('overlay.png')
(
    ffmpeg
    .concat(
        in_file.trim(start_frame=10, end_frame=20),
        in_file.trim(start_frame=30, end_frame=40),
    )
    .overlay(overlay_file.hflip())
    .drawbox(50, 50, 120, 120, color='red', thickness=5)
    .output('out.mp4')
    .run()
)
ffmpeg-python takes care of running ffmpeg with the command-line arguments that correspond to the above filter diagram, in familiar Python terms.

Real-world signal graphs can get a heck of a lot more complex, but ffmpeg-python handles arbitrarily large (directed-acyclic) signal graphs.
Installation
Installing ffmpeg-python
The latest version of ffmpeg-python can be acquired via a typical pip install:
pip install ffmpeg-python
Or the source can be cloned and installed from locally:
git clone git@github.com:kkroening/ffmpeg-python.git
pip install -e ./ffmpeg-python
Note:
ffmpeg-pythonmakes no attempt to download/install FFmpeg, asffmpeg-pythonis merely a pure-Python wrapper - whereas FFmpeg installation is platform-dependent/environment-specific, and is thus the responsibility of the user, as described below.
Installing FFmpeg
Before using ffmpeg-python, FFmpeg must be installed and accessible via the $PATH environment variable.
There are a variety of ways to install FFmpeg, such as the official download links, or using your package manager of choice (e.g. sudo apt install ffmpeg on Debian/Ubuntu, brew install ffmpeg on OS X, etc.).
Regardless of how FFmpeg is installed, you can check if your environment path is set correctly by running the ffmpeg command from the terminal, in which case the version information should appear, as in the following example (truncated for brevity):
$ ffmpeg
ffmpeg version 4.2.4-1ubuntu0.1 Copyright (c) 2000-2020 the FFmpeg developers
  built with gcc 9 (Ubuntu 9.3.0-10ubuntu2)
Note: The actual version information displayed here may vary from one system to another; but if a message such as
ffmpeg: command not foundappears instead of the version information, FFmpeg is not properly installed.
Examples
When in doubt, take a look at the examples to see if there's something that's close to whatever you're trying to do.
Here are a few:

See the Examples README for additional examples.
Custom Filters
Don't see the filter you're looking for? While ffmpeg-python includes shorthand notation for some of the most commonly used filters (such as concat), all filters can be referenced via the .filter operator:
stream = ffmpeg.input('dummy.mp4')
stream = ffmpeg.filter(stream, 'fps', fps=25, round='up')
stream = ffmpeg.output(stream, 'dummy2.mp4')
ffmpeg.run(stream)
Or fluently:
(
    ffmpeg
    .input('dummy.mp4')
    .filter('fps', fps=25, round='up')
    .output('dummy2.mp4')
    .run()
)
Special option names:
Arguments with special names such as -qscale:v (variable bitrate), -b:v (constant bitrate), etc. can be specified as a keyword-args dictionary as follows:
(
    ffmpeg
    .input('in.mp4')
    .output('out.mp4', **{'qscale:v': 3})
    .run()
)
Multiple inputs:
Filters that take multiple input streams can be used by passing the input streams as an array to ffmpeg.filter:
main = ffmpeg.input('main.mp4')
logo = ffmpeg.input('logo.png')
(
    ffmpeg
    .filter([main, logo], 'overlay', 10, 10)
    .output('out.mp4')
    .run()
)
Multiple outputs:
Filters that produce multiple outputs can be used with .filter_multi_output:
split = (
    ffmpeg
    .input('in.mp4')
    .filter_multi_output('split')  # or `.split()`
)
(
    ffmpeg
    .concat(split[0], split[1].reverse())
    .output('out.mp4')
    .run()
)
(In this particular case, .split() is the equivalent shorthand, but the general approach works for other multi-output filters)
String expressions:
Expressions to be interpreted by ffmpeg can be included as string parameters and reference any special ffmpeg variable names:
(
    ffmpeg
    .input('in.mp4')
    .filter('crop', 'in_w-2*10', 'in_h-2*20')
    .input('out.mp4')
)
When in doubt, refer to the existing filters, examples, and/or the official ffmpeg documentation.
Frequently asked questions
Why do I get an import/attribute/etc. error from import ffmpeg?
Make sure you ran pip install ffmpeg-python and not pip install ffmpeg (wrong) or pip install python-ffmpeg (also wrong).
Why did my audio stream get dropped?
Some ffmpeg filters drop audio streams, and care must be taken to preserve the audio in the final output. The .audio and .video operators can be used to reference the audio/video portions of a stream so that they can be processed separately and then re-combined later in the pipeline.
This dilemma is intrinsic to ffmpeg, and ffmpeg-python tries to stay out of the way while users may refer to the official ffmpeg documentation as to why certain filters drop audio.
As usual, take a look at the examples (Audio/video pipeline in particular).
How can I find out the used command line arguments?
You can run stream.get_args() before stream.run() to retrieve the command line arguments that will be passed to ffmpeg. You can also run stream.compile() that also includes the ffmpeg executable as the first argument.
How do I do XYZ?
Take a look at each of the links in the Additional Resources section at the end of this README. If you look everywhere and can't find what you're looking for and have a question that may be relevant to other users, you may open an issue asking how to do it, while providing a thorough explanation of what you're trying to do and what you've tried so far.
Issues not directly related to ffmpeg-python or issues asking others to write your code for you or how to do the work of solving a complex signal processing problem for you that's not relevant to other users will be closed.
That said, we hope to continue improving our documentation and provide a community of support for people using ffmpeg-python to do cool and exciting things.
Contributing
One of the best things you can do to help make ffmpeg-python better is to answer open questions in the issue tracker. The questions that are answered will be tagged and incorporated into the documentation, examples, and other learning resources.
If you notice things that could be better in the documentation or overall development experience, please say so in the issue tracker. And of course, feel free to report any bugs or submit feature requests.
Pull requests are welcome as well, but it wouldn't hurt to touch base in the issue tracker or hop on the Matrix chat channel first.
Anyone who fixes any of the open bugs or implements requested enhancements is a hero, but changes should include passing tests.
Running tests
git clone git@github.com:kkroening/ffmpeg-python.git
cd ffmpeg-python
virtualenv venv
. venv/bin/activate  # (OS X / Linux)
venv\bin\activate    # (Windows)
pip install -e .[dev]
pytest
Special thanks
Additional Resources
Top Related Projects
A fluent API to FFMPEG (http://www.ffmpeg.org)
Docker build for FFmpeg on Ubuntu / Alpine / Centos / Scratch / nvidia / vaapi
Mirror of https://git.ffmpeg.org/ffmpeg.git
Video editing with Python
Convert designs to code with AI
Introducing Visual Copilot: A new AI model to turn Figma designs to high quality code using your components.
Try Visual Copilot