
Top Related Projects


Quick Overview
Sizes is a Swift library that simplifies the process of working with device sizes and safe areas in iOS applications. It provides a convenient way to access device dimensions, safe area insets, and other size-related information, making it easier for developers to create responsive and adaptive user interfaces.
Pros
- Simplifies access to device size information and safe area insets
- Supports both UIKit and SwiftUI
- Lightweight and easy to integrate into existing projects
- Regularly updated to support new iOS devices and features
Cons
- Limited to iOS platform only
- May require updates when new device sizes are introduced
- Some developers might prefer to use native APIs directly for more control
- Documentation could be more comprehensive
Code Examples
- Getting device size information:
import Sizes

let screenWidth = Sizes.screen.width
let screenHeight = Sizes.screen.height
let isIPhoneX = Sizes.isIPhoneX
- Accessing safe area insets:
import Sizes

let topInset = Sizes.topInset
let bottomInset = Sizes.bottomInset
let leftInset = Sizes.leftInset
let rightInset = Sizes.rightInset
- Using size helpers in SwiftUI:
import SwiftUI
import Sizes

struct ContentView: View {
    var body: some View {
        VStack {
            Text("Hello, World!")
                .padding(.top, Sizes.topInset)
        }
        .frame(width: Sizes.screen.width, height: Sizes.screen.height)
    }
}
Getting Started
To use Sizes in your project, follow these steps:
-
Add Sizes to your project using Swift Package Manager:
- In Xcode, go to File > Swift Packages > Add Package Dependency
- Enter the repository URL: https://github.com/marcosgriselli/Sizes.git
-
Import Sizes in your Swift file:
import Sizes
- Start using Sizes in your code:
let screenSize = Sizes.screen
let safeAreaInsets = Sizes.insets
That's it! You can now access device size information and safe area insets easily in your iOS app.
Competitor Comparisons
DeviceKit is a value-type replacement of UIDevice.
Pros of DeviceKit
- More comprehensive device information, including detailed hardware specs
- Actively maintained with frequent updates and broader community support
- Supports a wider range of iOS devices and versions
Cons of DeviceKit
- Larger codebase and potentially higher complexity
- May include unnecessary features for projects only needing basic device information
Code Comparison
DeviceKit:
let device = Device.current
if device.isPad {
    print("Running on iPad")
} else if device.isPhone {
    print("Running on iPhone")
}
Sizes:
let device = Device()
if device.isPad {
    print("Running on iPad")
} else if device.isPhone {
    print("Running on iPhone")
}
Both libraries offer similar basic device detection functionality, but DeviceKit provides more detailed information and additional methods for specific device characteristics. Sizes focuses on a simpler, more lightweight approach to device detection and screen size information.
DeviceKit is better suited for projects requiring in-depth device information and support for a wide range of iOS devices. Sizes is ideal for simpler projects that only need basic device type and screen size data, offering a more streamlined solution with a smaller footprint.
Light weight tool for detecting the current device and screen size written in swift.
Pros of Device
- More comprehensive device information, including model, version, and screen details
- Supports both iOS and tvOS platforms
- Includes additional utility functions like checking for simulator and specific device types
Cons of Device
- Less focused on size-related information compared to Sizes
- May include unnecessary information for projects only concerned with screen dimensions
- Potentially more complex to use for simple size-related tasks
Code Comparison
Sizes:
let width = Sizes.width(.iPhoneXr)
let height = Sizes.height(.iPhoneXr)
let size = Sizes.size(.iPhoneXr)
Device:
let width = Device.size().width
let height = Device.size().height
let deviceType = Device.type
let version = Device.version
Key Differences
- Sizes focuses specifically on device dimensions, while Device provides a broader range of device information
- Sizes uses an enum-based approach for device selection, whereas Device relies on runtime detection
- Device offers more detailed information about the current device, while Sizes provides pre-defined size data for various device models
Use Cases
- Choose Sizes for projects primarily concerned with screen dimensions and layout calculations
- Opt for Device when needing comprehensive device information beyond just screen size
Convert  designs to code with AI

Introducing Visual Copilot: A new AI model to turn Figma designs to high quality code using your components.
Try Visual CopilotREADME


![]()
![]()
![]()
![]()


Sizes reduces the time it takes to evaluate all of our apps possible device sizes, orientations and font combinations. With Sizes we'll avoid launching all the supported devices simulator, running our app and navigating through each screen manually which not only takes a lot of time but its also highly error prone since we sometimes forget to test one particular combination and we ship a screen with a layout bug to the App Store.
â ï¸ Sizes deprecation recommendation
Xcode 11 introduced Previews which is a fantastic way to quickly validate your UI in multiple scenarios just like Sizes did. If you'd like to know more about Xcode Previews I recommend this WWDC session. You can even use Previews with UIKit so there's no reason to stick to this library.
This library will be deprecated and the repo will be archived in the future.
ð± Sizes in action
Recorded on an 10.5 inch iPad Pro

Sizes was created as a port of Brandon Williams and Stephen Celis in Playgrounds for the Kickstarter iOS app and further explained in PointFree to iOS. Make sure to check their site out!
ð Features
- Inspect your app in multiple device sizes
- Switch orientations
- Test all font sizes
- Universal (iPhone & iPad)
ð¡ Demo
To run the demo project, clone the repo and run Sizes target.
ð² Installation
Using CocoaPods
Edit your Podfile and specify the dependency:
pod 'Sizes'
Using Carthage
Edit your Cartfile and specify the dependency:
github "marcosgriselli/Sizes"
ð©âð» How to use
Preparations
Sizes require you to use Auto Layout in order to update the UI correctly with each change.
For font updates you'll need to use Dynamic Type.
Programmatically:
let label = UILabel()
label.font = UIFont.preferredFont(forTextStyle: .headline, compatibleWith: traitCollection)
label.adjustsFontForContentSizeCategory = true
IB/Storyboard:
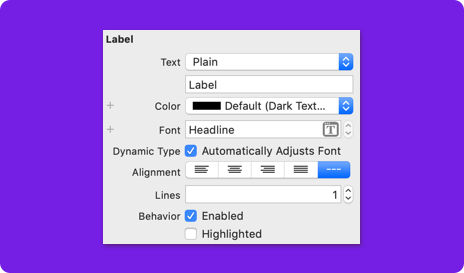
Setup
I highly recommend you only use this while on #DEBUG mode.
The best way to setup Sizes is to use the SizesWindow as your AppDelegates' window. This will automatically make a SizesViewController instance contain your apps root view controller and you'll still be able to use code like UIApplication.shared.windows.first?.rootViewController as? YourInitialCustomViewController with no issues.
func application(_ application: UIApplication, didFinishLaunchingWithOptions launchOptions: [UIApplication.LaunchOptionsKey: Any]?) -> Bool {
    #if DEBUG
        window = SizesWindow()
        window?.rootViewController = UIStoryboard(name: "Main", bundle: nil).instantiateInitialViewController()!
        window?.makeKeyAndVisible()
    #endif
    return true
}
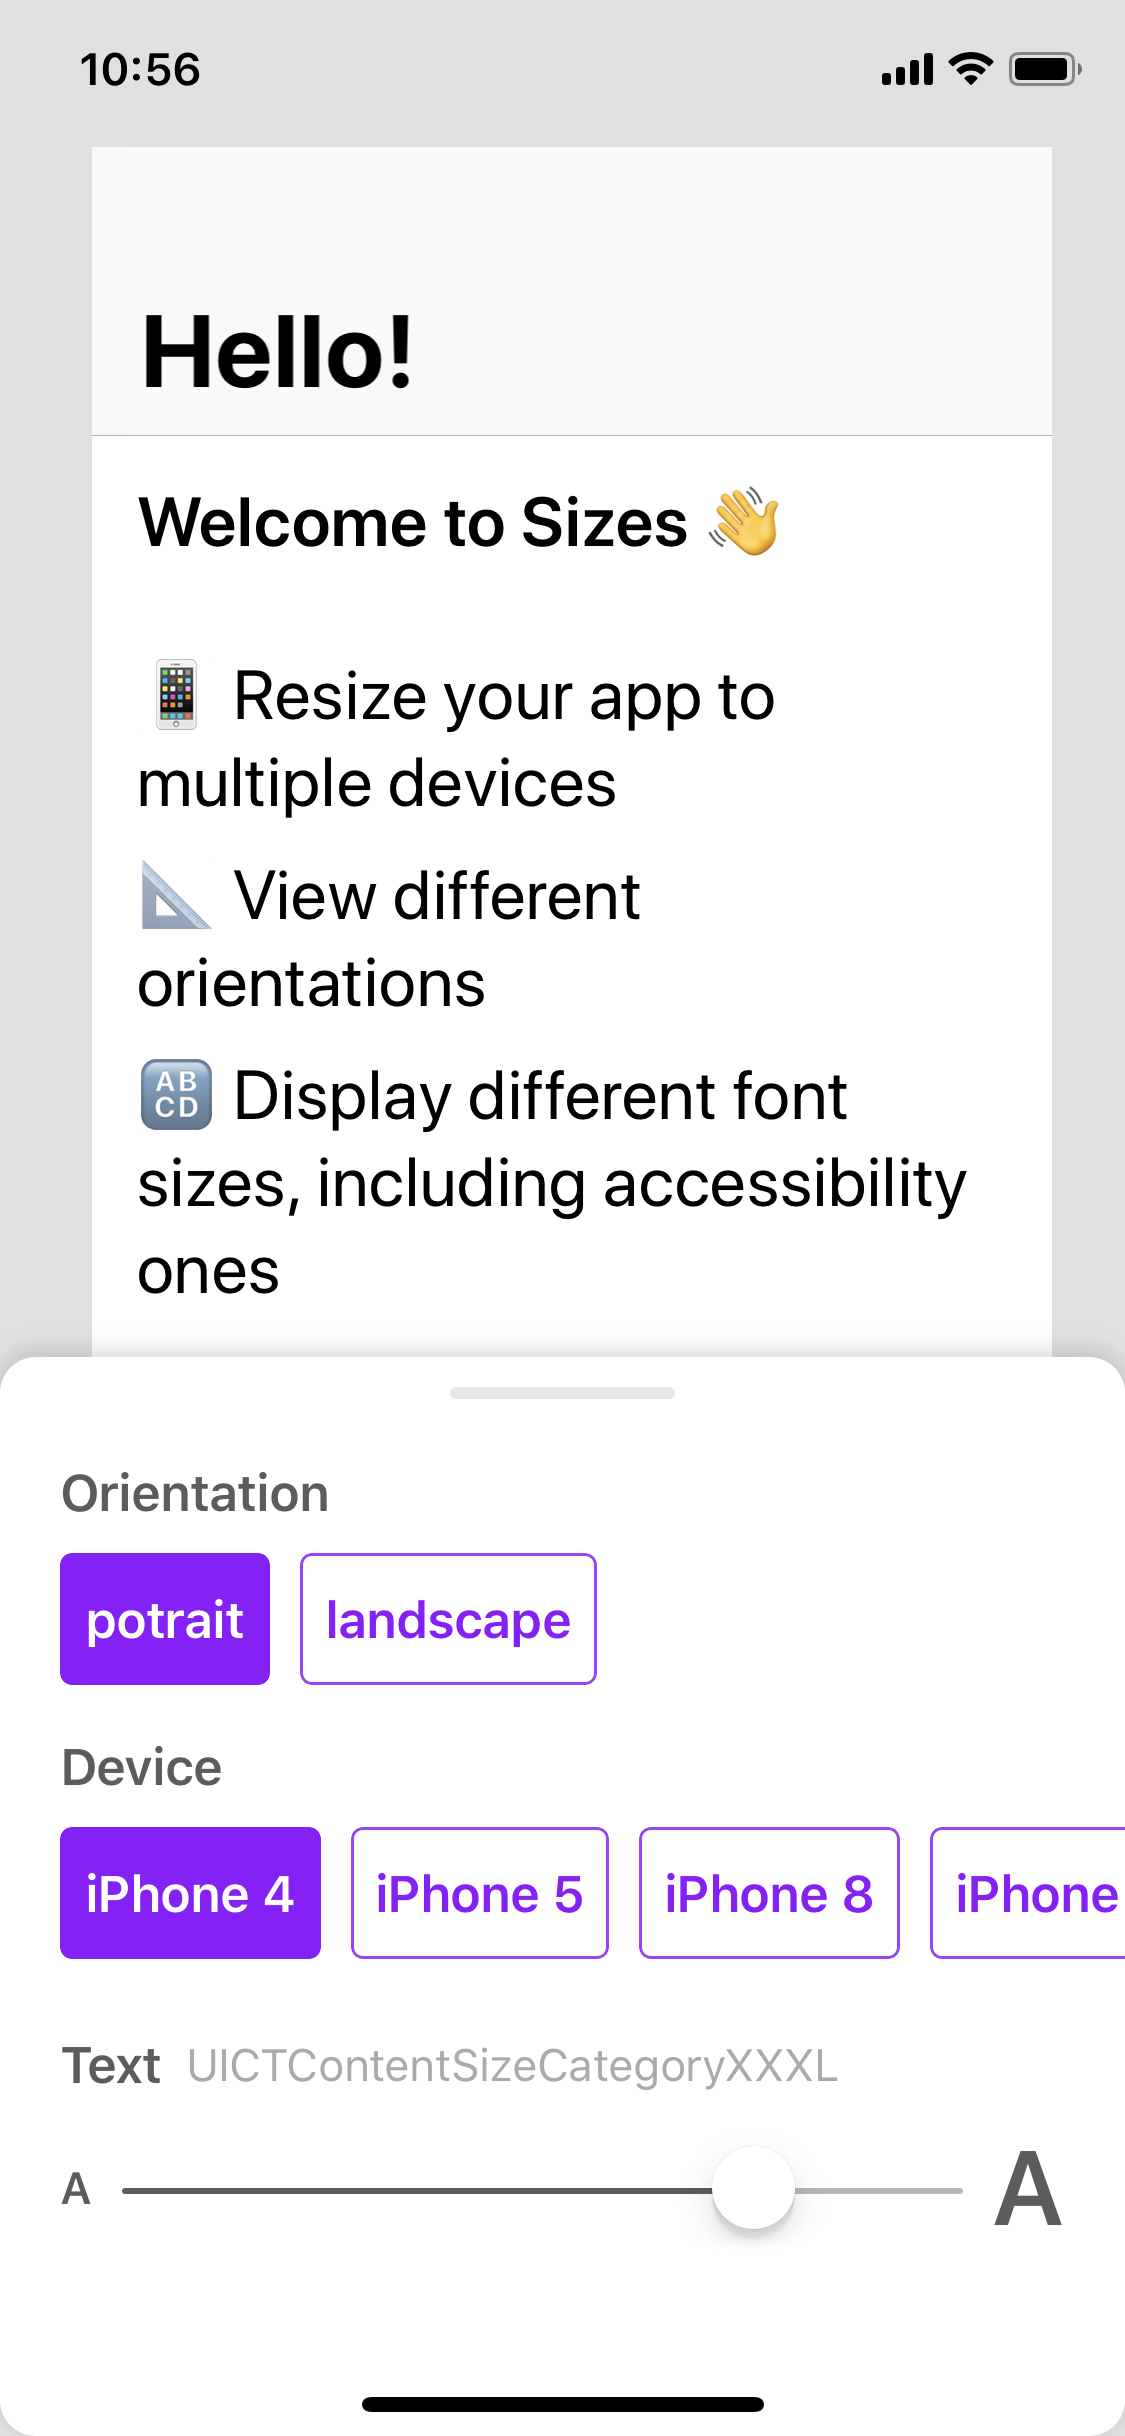
Usage
Shake to display the Sizes configuration UI, then tap on one of the orientation/device options to trigger a change. Or update the Text size slider to navigate through the different font sizes, you'll get the font name as you slide. You can check a longer video implementation and some of the use cases of Sizes in this tweet
ð£ Roadmap
You can check the GitHub Project or Issues to get an overview of new features, fixes or releases planed.
â¤ï¸ Contributing
This is an open source project, so feel free to contribute. How?
- Open an issue.
- Send feedback via twitter.
- Propose your own fixes, suggestions and open a pull request with the changes.
See all contributors
ð£ Mentions
ð¨âð» Author
Marcos Griselli | ![]() @marcosgriselli
@marcosgriselli


ð¡ License
MIT License

Copyright (c) 2018 Marcos Griselli

Permission is hereby granted, free of charge, to any person obtaining a copy
of this software and associated documentation files (the "Software"), to deal
in the Software without restriction, including without limitation the rights
to use, copy, modify, merge, publish, distribute, sublicense, and/or sell
copies of the Software, and to permit persons to whom the Software is
furnished to do so, subject to the following conditions:

The above copyright notice and this permission notice shall be included in all
copies or substantial portions of the Software.

THE SOFTWARE IS PROVIDED "AS IS", WITHOUT WARRANTY OF ANY KIND, EXPRESS OR
IMPLIED, INCLUDING BUT NOT LIMITED TO THE WARRANTIES OF MERCHANTABILITY,
FITNESS FOR A PARTICULAR PURPOSE AND NONINFRINGEMENT. IN NO EVENT SHALL THE
AUTHORS OR COPYRIGHT HOLDERS BE LIABLE FOR ANY CLAIM, DAMAGES OR OTHER
LIABILITY, WHETHER IN AN ACTION OF CONTRACT, TORT OR OTHERWISE, ARISING FROM,
OUT OF OR IN CONNECTION WITH THE SOFTWARE OR THE USE OR OTHER DEALINGS IN THE
SOFTWARE.
Top Related Projects
Convert designs to code with AI
Introducing Visual Copilot: A new AI model to turn Figma designs to high quality code using your components.
Try Visual Copilot