
Top Related Projects

Simple side/slide menu control for iOS, no code necessary! Lots of customization. Add it to your project in 5 minutes or less.

iOS 7/8 style side menu with parallax effect.

iOS Slide Menu View based on Google+, iQON, Feedly, Ameba iOS app. It is written in pure swift.

A UIViewController subclass for presenting side view controllers inspired on the FaceBook and Wunderlist apps, done right !

A simple side menu for iOS written in Swift.

Animated side menu with customizable UI
Quick Overview
SideMenuController is a lightweight Swift library for creating customizable side menu navigation in iOS applications. It provides an easy-to-use interface for implementing sliding side menus with various customization options, allowing developers to create intuitive and visually appealing navigation experiences.
Pros
- Simple and straightforward API for quick implementation
- Highly customizable, allowing for various menu styles and animations
- Supports both left and right side menus
- Lightweight and efficient, with minimal impact on app performance
Cons
- Limited documentation and examples for advanced use cases
- May require additional work to integrate with complex navigation structures
- Not actively maintained, with the last update being several years ago
- Lacks some modern iOS features and Swift language updates
Code Examples
- Basic setup of SideMenuController:
let menuViewController = MenuViewController()
let contentViewController = ContentViewController()

let sideMenuController = SideMenuController(menuViewController: menuViewController, contentViewController: contentViewController)
- Customizing menu appearance:
sideMenuController.menuViewControllerSpacing = 80
sideMenuController.menuViewControllerPresentation = .viewSlideOut
sideMenuController.menuWidth = 240
- Toggling the side menu programmatically:
sideMenuController.revealMenu()
sideMenuController.hideMenu()
- Adding gesture recognition for menu interaction:
sideMenuController.delegate = self
sideMenuController.panGestureEnabled = true
Getting Started
- Install SideMenuController using CocoaPods by adding the following to your Podfile:
pod 'SideMenuController'
- Import the library in your Swift file:
import SideMenuController
- Create your menu and content view controllers:
let menuVC = MenuViewController()
let contentVC = ContentViewController()
- Initialize the SideMenuController:
let sideMenuController = SideMenuController(menuViewController: menuVC, contentViewController: contentVC)
- Set the SideMenuController as the root view controller of your window:
window?.rootViewController = sideMenuController
window?.makeKeyAndVisible()
Competitor Comparisons
Simple side/slide menu control for iOS, no code necessary! Lots of customization. Add it to your project in 5 minutes or less.
Pros of SideMenu
- More actively maintained with frequent updates
- Supports both left and right side menus out of the box
- Offers more customization options for menu appearance and behavior
Cons of SideMenu
- Slightly more complex setup process
- May have a steeper learning curve for beginners
Code Comparison
SideMenu:
let menu = SideMenuNavigationController(rootViewController: YourMenuViewController())
menu.leftSide = true
menu.presentationStyle = .menuSlideIn
menu.menuWidth = 300
present(menu, animated: true, completion: nil)
SideMenuController:
let sideMenuController = SideMenuController()
sideMenuController.embed(centerViewController: centerViewController)
sideMenuController.embed(leftViewController: leftViewController)
sideMenuController.leftViewWidth = 300
Both libraries offer similar functionality for implementing side menus in iOS applications. SideMenu provides more built-in features and customization options, making it suitable for complex projects. SideMenuController has a simpler API, which might be preferable for smaller projects or developers who want more control over the implementation details.
The code comparison shows that SideMenu requires slightly more configuration upfront, while SideMenuController has a more straightforward setup process. However, SideMenu's additional configuration options allow for greater flexibility in menu behavior and appearance.
iOS 7/8 style side menu with parallax effect.
Pros of RESideMenu
- More customizable appearance with options for background image and blur effects
- Supports both left and right side menus simultaneously
- Includes built-in animations for menu transitions
Cons of RESideMenu
- Less actively maintained (last update was several years ago)
- Potentially more complex to implement due to additional features
- May have compatibility issues with newer iOS versions
Code Comparison
RESideMenu:
RESideMenu *sideMenu = [[RESideMenu alloc] initWithContentViewController:contentViewController
                                                    leftMenuViewController:leftMenuViewController
                                                   rightMenuViewController:rightMenuViewController];
self.window.rootViewController = sideMenu;
SideMenuController:
let sideMenuController = SideMenuController()
sideMenuController.embed(menuViewController: menuViewController)
sideMenuController.embed(contentViewController: contentViewController)
window?.rootViewController = sideMenuController
Both libraries offer similar basic functionality for implementing side menus in iOS applications. RESideMenu provides more built-in customization options and supports dual side menus, but it's older and less maintained. SideMenuController is more modern, written in Swift, and actively maintained, but may have fewer built-in features. The choice between them depends on specific project requirements and preferences for customization vs. simplicity.
iOS Slide Menu View based on Google+, iQON, Feedly, Ameba iOS app. It is written in pure swift.
Pros of SlideMenuControllerSwift
- More customizable appearance options, including shadow and overlay effects
- Supports both left and right side menus simultaneously
- Includes gesture recognizers for swipe-to-open functionality out of the box
Cons of SlideMenuControllerSwift
- Less actively maintained, with fewer recent updates
- May require more setup and configuration compared to SideMenuController
- Limited documentation and examples available
Code Comparison
SlideMenuControllerSwift:
let slideMenuController = SlideMenuController(mainViewController: mainViewController, leftMenuViewController: leftViewController, rightMenuViewController: rightViewController)
self.window?.rootViewController = slideMenuController
self.window?.makeKeyAndVisible()
SideMenuController:
let sideMenuController = SideMenuController()
sideMenuController.embed(menuViewController: menuViewController)
sideMenuController.embed(contentViewController: contentViewController)
window?.rootViewController = sideMenuController
Both libraries offer similar functionality for implementing side menus in iOS applications. SlideMenuControllerSwift provides more built-in customization options and supports dual-side menus, while SideMenuController has a simpler setup process and more recent updates. The choice between the two depends on specific project requirements and preferences for customization vs. simplicity.
A UIViewController subclass for presenting side view controllers inspired on the FaceBook and Wunderlist apps, done right !
Pros of SWRevealViewController
- More mature and widely adopted, with a larger community and extensive documentation
- Supports both left and right side menus, offering greater flexibility
- Provides built-in gesture recognizers for smoother user interactions
Cons of SWRevealViewController
- Written in Objective-C, which may be less appealing for Swift-only projects
- Slightly more complex setup process compared to SideMenuController
- Less frequent updates and maintenance in recent years
Code Comparison
SWRevealViewController:
SWRevealViewController *revealViewController = self.revealViewController;
if (revealViewController) {
    [self.sidebarButton setTarget: self.revealViewController];
    [self.sidebarButton setAction: @selector(revealToggle:)];
    [self.view addGestureRecognizer:self.revealViewController.panGestureRecognizer];
}
SideMenuController:
let sideMenuController = SideMenuController()
sideMenuController.embed(menuViewController: MenuViewController())
sideMenuController.embed(centerViewController: MainViewController())
Both libraries offer similar functionality for implementing side menus in iOS applications. SWRevealViewController provides more features and customization options but requires more setup, while SideMenuController offers a simpler, Swift-native implementation with a more streamlined API. The choice between the two depends on project requirements, preferred language, and desired level of customization.
A simple side menu for iOS written in Swift.
Pros of ENSwiftSideMenu
- Written in Swift, which may be preferred for iOS developers
- Simpler implementation with fewer features, potentially easier to integrate
- Supports both left and right side menus
Cons of ENSwiftSideMenu
- Less actively maintained (last update was several years ago)
- Fewer customization options compared to SideMenuController
- Limited documentation and examples
Code Comparison
ENSwiftSideMenu:
let menuViewController = UIViewController()
let sideMenu = ENSideMenu(sourceView: self.view, menuViewController: menuViewController, menuPosition: .Left)
sideMenu.delegate = self
SideMenuController:
let sideMenuController = SideMenuController()
sideMenuController.embed(menuViewController: menuViewController)
sideMenuController.embed(centerViewController: centerViewController)
Both libraries offer relatively simple setup, but SideMenuController provides more flexibility in terms of configuration and customization. ENSwiftSideMenu's implementation is more straightforward, while SideMenuController offers additional features like custom transitions and gestures.
SideMenuController has more recent updates and active maintenance, which may lead to better compatibility with newer iOS versions and Swift updates. However, ENSwiftSideMenu's simplicity might be preferred for projects with basic side menu requirements.
Overall, SideMenuController appears to be the more robust and feature-rich option, while ENSwiftSideMenu could be suitable for simpler implementations or projects specifically requiring Swift.
Animated side menu with customizable UI
Pros of Side-Menu.iOS
- More visually appealing with customizable animations
- Supports both left and right side menus
- Easier to implement with a storyboard-friendly approach
Cons of Side-Menu.iOS
- Less actively maintained (last update was 4 years ago)
- Limited configuration options compared to SideMenuController
- Heavier implementation, potentially impacting app performance
Code Comparison
Side-Menu.iOS:
let menuLeftNavigationController = UISideMenuNavigationController(rootViewController: YourViewController)
SideMenuManager.default.menuLeftNavigationController = menuLeftNavigationController
SideMenuManager.default.menuPresentMode = .menuSlideIn
SideMenuController:
let controller = SideMenuController()
controller.leftViewController = YourLeftViewController()
controller.centerViewController = YourCenterViewController()
Side-Menu.iOS offers a more straightforward setup with built-in navigation controller support, while SideMenuController provides a more flexible approach with separate view controllers for left and center content.
Both libraries offer easy-to-use side menu implementations, but SideMenuController is more actively maintained and provides more customization options. Side-Menu.iOS, however, offers more visually appealing animations out of the box. The choice between the two depends on specific project requirements and the desired level of customization.
Convert  designs to code with AI

Introducing Visual Copilot: A new AI model to turn Figma designs to high quality code using your components.
Try Visual CopilotREADME
![]()


![]()

Description
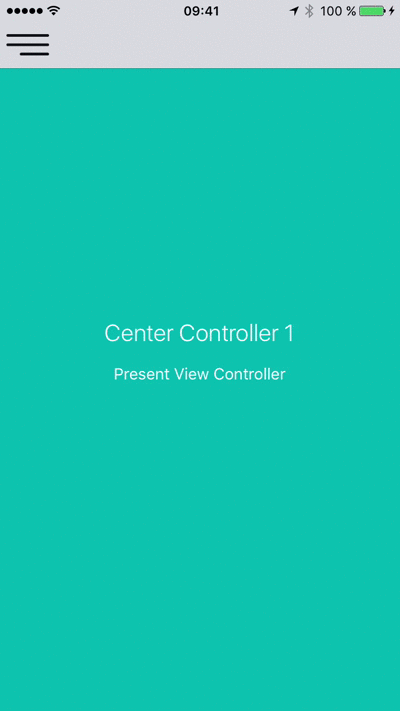
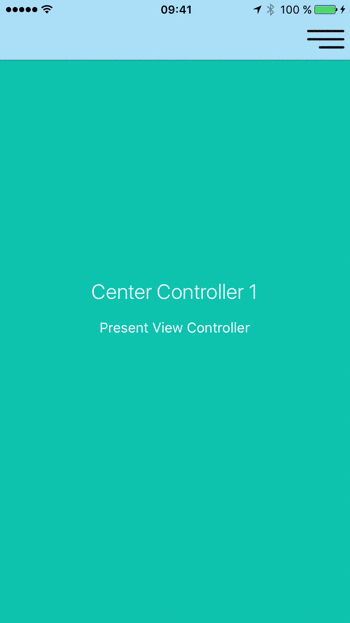
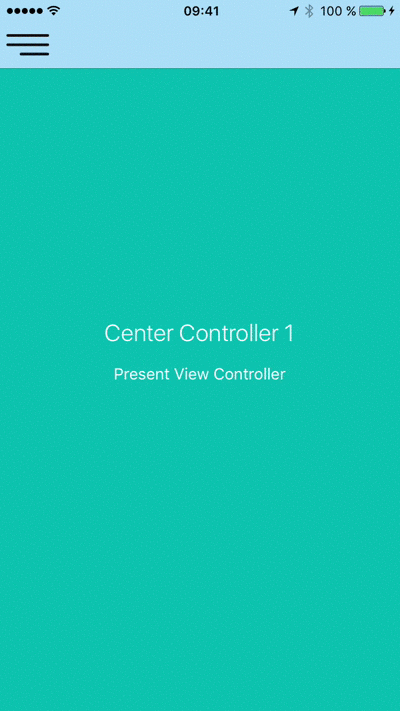
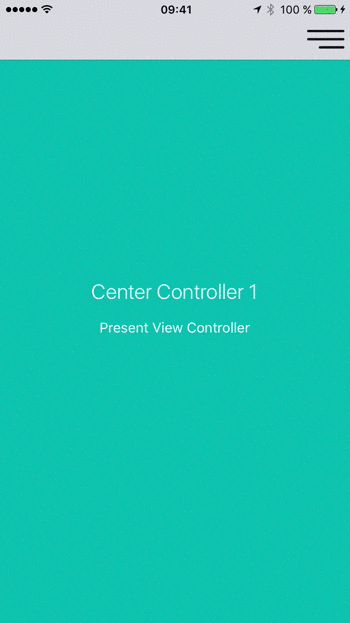
SideMenuController is a custom container view controller written in Swift which will display the main content within a center panel and the secondary content (option menu, navigation menu, etc.) within a side panel when triggered. The side panel can be displayed either on the left or on the right side, under or over the center panel.
 |
 |
 |
 |
Contents
- Features
- Installation
- Supported OS & SDK versions
- Usage
- Caching
- Customisation
- Implementing custom transitions
- Public interface
- [Delegation] (#delegation)
- License
- Contact
## Features
- Easy to use, fully customisable
- Left and Right side positioning
- Over and Under center positioning
- Automatic orientation change adjustments.
- Fully customisable transition animations
- Custom status bar behaviour (see Customisation for details):
 |
 |
 |
 |
Installation
CocoaPods
CocoaPods is a dependency manager for Cocoa projects.
CocoaPods 0.36 adds supports for Swift and embedded frameworks. You can install it with the following command:
$ gem install cocoapods
To integrate SideMenuController into your Xcode project using CocoaPods, specify it in your Podfile:
pod 'SideMenuController'
Then, run the following command:
$ pod install
Carthage
Carthage is a decentralized dependency manager that builds your dependencies and provides you with binary frameworks.
You can install Carthage with Homebrew using the following command:
$ brew update
$ brew install carthage
To integrate SideMenuController into your Xcode project using Carthage, specify it in your Cartfile:
github "teodorpatras/SideMenuController"
Run carthage update to build the framework and drag the built SideMenuController.framework into your Xcode project.
Manually
If you prefer not to use either of the aforementioned dependency managers, you can integrate sources in the Source folder into your project manually.
Supported OS & SDK Versions
- Supported build target - iOS 8.0+ (Xcode 7+)
Usage
You can get started using SideMenuController in 3 simple steps:
###Step 1 First of all, you should add a menu button image and specify the position of the side panel. Optionally, you can customise other preferences as well. This can be achieved in two ways:
1) If the SideMenuController subclass is the initial view controller in your main storyboard:
Subclass SideMenuController and override init(coder:) where you can change the preferences according to your own style:
class CustomSideMenuController: SideMenuController {

    required init?(coder aDecoder: NSCoder) {
        SideMenuController.preferences.drawing.menuButtonImage = UIImage(named: "menu")
        SideMenuController.preferences.drawing.sidePanelPosition = .overCenterPanelLeft
        SideMenuController.preferences.drawing.sidePanelWidth = 300
        SideMenuController.preferences.drawing.centerPanelShadow = true
        SideMenuController.preferences.animating.statusBarBehaviour = .showUnderlay
        super.init(coder: aDecoder)
    }
}
Next, go to the Storyboard, and change the class of the SideMenuController to the custom subclass you just created.
2) In all other cases:
In AppDelegate.swift, override application:didFinishLaunchingWithOptions::
func func application(_ application: UIApplication, didFinishLaunchingWithOptions launchOptions: [UIApplicationLaunchOptionsKey: Any]?) -> Bool {
    // Override point for customization after application launch.

    SideMenuController.preferences.drawing.menuButtonImage = UIImage(named: "menu")
    SideMenuController.preferences.drawing.sidePanelPosition = .overCenterPanelLeft
    SideMenuController.preferences.drawing.sidePanelWidth = 300
    SideMenuController.preferences.drawing.centerPanelShadow = true
    SideMenuController.preferences.animating.statusBarBehaviour = .showUnderlay
}
â ï¸_If you do not specify a menu button image, SideMenuController will not add one by default and you will have to manually add one whenever transitioning to a new center view controller._
###Step 2
SideMenuController can be used with storyboard segues, or you can programmatically transition to a new center view controller.
####Using storyboard segues####
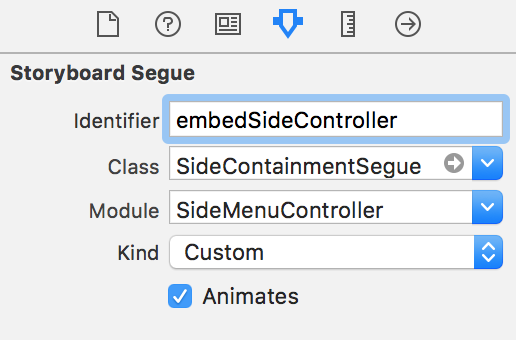
SideMenuController defines two custom segues:
SideContainmentSegue- which transitions to a new side controller (triggersembedSideController)CenterContainmentSegue- which transitions to a new center controller (triggersembedCenterController)
In the storyboard file, add initially two segues from the SideMenuController scene, one for the center view controller, and another for the side menu view controller. Later on, you can add more CenterContainmentSeuges depending on how many scenes you want to transition to.
Remember to set all the appropriate attributes of each segue in the Attributes Inspector:
| SideContainmentSegue | CenterContainmentSegue |
|----------|:-------------:|------:|
|  |
|  |
|
In order to embed the inital view controlles inside the SideMenuController you will have to call performSegue(withIdentifier:sender:). Easiest way is to subclass SideMenuController and override viewDidLoad:
override func viewDidLoad() {
    super.viewDidLoad()
    performSegue(withIdentifier: "embedInitialCenterController", sender: nil)
    performSegue(withIdentifier: "embedSideController", sender: nil)
}
####Programmatically####
You can perform all the above mentioned transitions programmatically, without using segues, by calling one of the two public methods:
public func embed(sideViewController: UIViewController)
public func embed(centerViewController: UViewController)
Important Note: In case you want the center view controller to be of different type than UINavigationController, you'll have to add the menu button to one/all of its children navigation controllers programmatically. SideMenuController defines an extension to UINavigationController in order to make it easy to do that. Just call navigationController.addSideMenuButton(). Before calling that method, make sure the navigation controller is already embedded inside the SideMenuController's child controller hierarchy.
Example with UITabBarController:
// create the view controllers for center containment
let vc1 = UIViewController()
vc1.view.backgroundColor = UIColor.red
vc1.title = "first"
let nc1 = UINavigationController(rootViewController: vc1)
vc1.navigationItem.title = "first"

let vc2 = UIViewController()
vc2.view.backgroundColor = UIColor.yellow
vc2.title = "second"
let nc2 = UINavigationController(rootViewController: vc2)
vc2.navigationItem.title = "second"

let vc3 = UIViewController()
vc3.view.backgroundColor = UIColor.blue
vc3.title = "third"
let nc3 = UINavigationController(rootViewController: vc3)
vc3.navigationItem.title = "third"

let tabBarController = UITabBarController()
tabBarController.viewControllers = [nc1, nc2, nc3]

// create the side controller
let sideController = UITableViewController()

// embed the side and center controllers
sideMenuViewController.embed(sideViewController: sideController)
sideMenuViewController.embed(centerViewController: tabBarController)

// add the menu button to each view controller embedded in the tab bar controller
[nc1, nc2, nc3].forEach({ controller in
  controller.addSideMenuButton()
})

show(sideMenuViewController, sender: nil)
###Step 3 You're almost set now. Last step is to know how to transition to new center view controllers.
Important Note: SideMenuController defines an extension to UIViewController in order to make it more accessible via the computed property public var sideMenuController: SideMenuController?. From any UIViewController instance, you can access the SideMenuController by typing: self.sideMenuController. This will return the SideMenuController if the caller is one of its child view controllers or otherwise nil.
From here onwards, whenever the user selects an option in the side menu controller, you can easily perform the segue like so:
####Using storyboard segues####
override func tableView(_ tableView: UITableView,
                            didSelectRowAt indexPath: IndexPath)  {
	sideMenuController?.performSegue(withIdentifier: segues[indexPath.row], sender: nil)
}
####Programmatically####
override func tableView(_ tableView: UITableView,
                            didSelectRowAt indexPath: IndexPath)  {
	sideMenuController?.embed(centerViewController: someUIViewControllerInstance)
}
Caching
SideMenuController offers you the possibility to cache center view controllers instead of always instantiating new ones when changing them.
To transition to a new center view controller and cache it, call embed(centerViewController:, cacheIdentifier:) on the SideMenuController.
To retrieve a cached center view controller based on a cache identifier, call viewController(forCacheIdentifier:) on the SideMenuController.
###Example
In your side view controller (a.k.a the menu controller):
override func tableView(_ tableView: UITableView,
                            didSelectRowAt indexPath: IndexPath)  {

    // retrieve your identifier
    let cacheIdentifier = ...
    // retrieve your view controller
    let viewController = ...

    if let controller = sideMenuController?.viewController(forCacheIdentifier: cacheIdentifier) {
        sideMenuController?.embed(centerViewController: controller)
    } else {
        sideMenuController?.embed(centerViewController: UINavigationController(rootViewController: viewController), cacheIdentifier: cacheIdentifier)
    }
}
For a more detailed example, check the Example project.
Customisation
In order to customise the SideMenuController appearance and behaviour, you can play with the SideMenuController .Preferences structure. It is split into three sub structures:
Drawing- encapsulates custom attributes specifying howSideMenuControllerwill adjust its layout, positioning on screen.Animating- encapsulates custom attributes specifying which animations will be used for different components.Interaction- encapsulates custom attributes specifying how the user is allowed to interract with the side panel
| Drawing attribute | Description |
|----------|-------------|------|
| menuButtonImage | In case this attribute is set, SideMenuController will add a button on the left or right side of the navigation bar of the center view controller (in case it is a subclass of UINavigationController) in order to trigger the slide animation. If the attribute is missing, or the center view controller is not a subclass of UINavigationController, you'll have to add the menu button by yourself to all the UINavigationControllers that will be embedded. |
| sidePanelPosition | Specifies the positioning of the side panel. This attribute can take one of the four values: .underCenterPanelLeft, .underCenterPanelRight, .overCenterPanelLeft, .overCenterPanelRight |
| sidePanelWidth | The width of the side panel. |
| centerPanelOverlayColor | When the side panel is either .overCenterPanelLeft or .overCenterPanelRight, an overlay will be shown on top of the center panel when the side is revealed. Pass the preferred color of this overlay. |
| centerPanelShadow | When the side panel is either .underCenterPanelRight or .underCenterPanelLeft you can opt in or out to draw a side shadow for the center panel. |
| Animating attribute | Description |
|----------|-------------|------|
| statusBarBehaviour | The animating style of the status bar when the side panel is revealed. This can be:
+ .slideAnimation: the status bar will be hidden using the UIStatusBarAnimation.slide animation
+ .fadeAnimation: the status bar will be hidden using the UIStatusBarAnimation.fade animation
+ .horizontalPan: the status bar will slide along with the center panel horizontally.
+ .showUnderlay: a layer with the same color as the navigation bar will be displayed under the status bar |
| reavealDuration | Reveal animation duration. |
| hideDuration | Hide animation duration. |
| transitionAnimator | TransitionAnimatable subtype which defines how the new center view controller will be animated on screen. |
Interaction attribute | Description | Discussion |
|---|---|---|
panningEnabled | Default value is true | When the side panel is positioned under the center panel, the panning is recognized on the center panel. When the side panel is positoned over the center panel, the panning is recognized on the side panel. |
swipingEnabled | Default value is true | There is no swipe gesture recognizer instantiated when the side panel is positioned under the center panel. When the side panel is positioned over the center panel, the swipe is going to recognized on the center panel. |
menuButtonAccessibilityIdentifier | Accessibility identifier to be set on the menu button. |
Implementing custom transitions
In order to implement custom transition animations for the center view controller, you have to create a struct that conforms to the TransitionAnimatable protocol and implement:
static func performTransition(forView view: UIView, completion: () -> Void)
Example:
public struct FadeAnimator: TransitionAnimatable {

    public static func performTransition(forView view: UIView, completion: @escaping () -> Void) {
        CATransaction.begin()
        CATransaction.setCompletionBlock(completion)
        let fadeAnimation = CABasicAnimation(keyPath: "opacity")
        fadeAnimation.duration = 0.35
        fadeAnimation.fromValue = 0
        fadeAnimation.toValue = 1
        fadeAnimation.fillMode = kCAFillModeForwards
        fadeAnimation.isRemovedOnCompletion = true
        view.layer.add(fadeAnimation, forKey: "fade")
        CATransaction.commit()
    }
}
For more examples, check TransitionAnimator.swift.
Public interface
##Public methods##
/**
 Toggles the side pannel visible or not.
*/
public func toggle()

/**
 Returns a view controller for the specified cache identifier

 - parameter identifier: cache identifier

 - returns: Cached UIViewController or nil
*/
public func viewController(forCacheIdentifier identifier: String) -> UIViewController?

/**
 Embeds a new side controller

 - parameter sideViewController: controller to be embedded
*/
public func embed(sideViewController controller: UIViewController)

/**
 Embeds a new center controller.

 - parameter centerViewController: controller to be embedded
 - parameter cacheIdentifier: identifier for the view controllers cache
*/
public func embed(centerViewController controller: UIViewController, cacheIdentifier: String? = nil)
##Public properties##
| Property | Type | Description |
|---|---|---|
preferences | SideMenuController.Preferences | use to customise the SideMenuController preferences |
sidePanelVisible | Bool | use to check at any time if the side panel is visible or not |
centerViewController | UIViewController | use to access the currently embedded center view controller. |
sideViewController | UIViewController | use to access the currently embedded side view controller. |
delegate | SideMenuControllerDelegate | use to set the delegate to be notified about certain events. |
Delegation
SideMenuController defines a delegate protocol which you can use if you want to be announced when the side panel has been revealed or hidden:
public protocol SideMenuControllerDelegate: class {
    func sideMenuControllerDidHide(_ sideMenuController: SideMenuController)
    func sideMenuControllerDidReveal(_ sideMenuController: SideMenuController)
}
In order to receive the aforementioned callbacks, simply assign the delegate property to the SideMenuController instance.
License
SideMenuController is developed by Teodor PatraÅ and is released under the MIT license. See the LICENSE file for details. Logo graphic created with Logo Maker.
Contact
You can follow or drop me a line on my Twitter account. If you find any issues on the project, you can open a ticket. Pull requests are also welcome.
Top Related Projects
Simple side/slide menu control for iOS, no code necessary! Lots of customization. Add it to your project in 5 minutes or less.
iOS 7/8 style side menu with parallax effect.
iOS Slide Menu View based on Google+, iQON, Feedly, Ameba iOS app. It is written in pure swift.
A UIViewController subclass for presenting side view controllers inspired on the FaceBook and Wunderlist apps, done right !
A simple side menu for iOS written in Swift.
Animated side menu with customizable UI
Convert designs to code with AI
Introducing Visual Copilot: A new AI model to turn Figma designs to high quality code using your components.
Try Visual Copilot