Top Related Projects
YOLOv4 / Scaled-YOLOv4 / YOLO - Neural Networks for Object Detection (Windows and Linux version of Darknet )
Implementation of paper - YOLOv7: Trainable bag-of-freebies sets new state-of-the-art for real-time object detectors
Detectron2 is a platform for object detection, segmentation and other visual recognition tasks.
YOLOv6: a single-stage object detection framework dedicated to industrial applications.
OpenMMLab Detection Toolbox and Benchmark
Models and examples built with TensorFlow
Quick Overview
YOLOv5 is a family of object detection architectures and models pretrained on the COCO dataset, representing Ultralytics' open-source research into future vision AI methods. It offers a range of model sizes for various applications, from edge devices to cloud deployments, and includes features for training, validation, and deployment.
Pros
- High performance and speed in object detection tasks
- Flexible architecture with multiple model sizes for different use cases
- Extensive documentation and community support
- Easy integration with popular deep learning frameworks
Cons
- Requires significant computational resources for training large models
- May have lower accuracy compared to some two-stage detectors in certain scenarios
- Potential overfitting on small datasets without proper regularization
- Naming convention (YOLOv5) has caused some confusion in the research community
Code Examples
- Loading a pretrained model:
import torch

# Load YOLOv5s model
model = torch.hub.load('ultralytics/yolov5', 'yolov5s')
- Performing inference on an image:
# Perform inference
results = model('path/to/image.jpg')

# Print results
results.print()
- Training a custom model:
from ultralytics import YOLO

# Load a model
model = YOLO('yolov5s.pt')  # load a pretrained model

# Train the model
results = model.train(data='coco128.yaml', epochs=100, imgsz=640)
Getting Started
To get started with YOLOv5:
- Install the required packages:
pip install ultralytics
- Load a pretrained model and perform inference:
from ultralytics import YOLO

# Load a pretrained YOLOv5 model
model = YOLO('yolov5s.pt')

# Run inference on an image
results = model('https://ultralytics.com/images/zidane.jpg')

# Display results
results.show()
This will download a pretrained YOLOv5 model, perform object detection on the specified image, and display the results.
Competitor Comparisons
YOLOv4 / Scaled-YOLOv4 / YOLO - Neural Networks for Object Detection (Windows and Linux version of Darknet )
Pros of darknet
- Supports a wider range of YOLO versions (YOLOv3, YOLOv4, etc.)
- Offers more customization options for advanced users
- Implements some additional features like Gaussian YOLOv3
Cons of darknet
- Less user-friendly, especially for beginners
- Slower development cycle and less frequent updates
- More complex setup process compared to YOLOv5
Code Comparison
darknet:
layer make_yolo_layer(int batch, int w, int h, int n, int total, int *mask, int classes)
{
    int i;
    layer l = {0};
    l.type = YOLO;
YOLOv5:
class YOLOLayer(nn.Module):
    def __init__(self, anchors, nc, img_size, yolo_index, layers, stride):
        super(YOLOLayer, self).__init__()
        self.anchors = torch.Tensor(anchors)
The darknet implementation is in C, while YOLOv5 uses Python with PyTorch. YOLOv5's code is generally more readable and easier to modify for most users familiar with modern deep learning frameworks. However, darknet's C implementation may offer performance benefits in certain scenarios.
Implementation of paper - YOLOv7: Trainable bag-of-freebies sets new state-of-the-art for real-time object detectors
Pros of YOLOv7
- Improved accuracy and performance over YOLOv5
- Incorporates advanced techniques like compound scaling and dynamic label assignment
- Supports additional tasks like instance segmentation and pose estimation
Cons of YOLOv7
- Less extensive documentation and community support compared to YOLOv5
- Fewer pre-trained models and configurations available
- Steeper learning curve for implementation and customization
Code Comparison
YOLOv5:
from yolov5 import YOLOv5

model = YOLOv5('yolov5s.pt')
results = model('image.jpg')
YOLOv7:
from models.experimental import attempt_load
from utils.general import non_max_suppression

model = attempt_load('yolov7.pt')
pred = model(img)[0]
pred = non_max_suppression(pred)
Both repositories offer powerful object detection capabilities, but YOLOv7 provides improved accuracy and additional features at the cost of a steeper learning curve and less extensive community support. YOLOv5 remains more accessible and widely adopted, while YOLOv7 pushes the boundaries of performance and versatility.
Detectron2 is a platform for object detection, segmentation and other visual recognition tasks.
Pros of Detectron2
- More comprehensive and flexible framework for object detection and segmentation
- Supports a wider range of models and architectures
- Better integration with PyTorch ecosystem
Cons of Detectron2
- Steeper learning curve and more complex setup
- Slower inference speed compared to YOLOv5
- Requires more computational resources for training and inference
Code Comparison
YOLOv5:
from yolov5 import YOLOv5

model = YOLOv5('yolov5s.pt')
results = model('image.jpg')
Detectron2:
from detectron2.config import get_cfg
from detectron2.engine import DefaultPredictor

cfg = get_cfg()
cfg.merge_from_file("config.yaml")
predictor = DefaultPredictor(cfg)
outputs = predictor(image)
YOLOv5 offers a simpler API for quick implementation, while Detectron2 provides more flexibility and customization options. YOLOv5 is better suited for real-time applications and edge devices, whereas Detectron2 excels in research and complex computer vision tasks. The choice between the two depends on the specific requirements of your project, balancing factors such as ease of use, performance, and adaptability.
YOLOv6: a single-stage object detection framework dedicated to industrial applications.
Pros of YOLOv6
- Improved accuracy and speed compared to YOLOv5
- Optimized for edge devices and mobile platforms
- Includes advanced features like anchor-free detection and SimOTA label assignment
Cons of YOLOv6
- Less extensive documentation and community support
- Fewer pre-trained models available
- Limited flexibility for custom architectures
Code Comparison
YOLOv5:
from models.yolo import Model
model = Model('yolov5s.yaml')
results = model('image.jpg')
YOLOv6:
from yolov6.core.inferer import Inferer
inferer = Inferer(model='yolov6s.pt', device='cpu')
results = inferer.infer('image.jpg')
Both repositories offer efficient object detection implementations, but YOLOv5 provides a more established ecosystem with extensive documentation and community support. YOLOv6, on the other hand, focuses on improved performance and optimization for specific use cases, particularly on edge devices. The code structure differs slightly, with YOLOv6 using an Inferer class for inference, while YOLOv5 allows direct model instantiation and inference. Users should consider their specific requirements and deployment scenarios when choosing between these two options.
OpenMMLab Detection Toolbox and Benchmark
Pros of MMDetection
- Extensive model library with support for various object detection algorithms
- Highly modular and customizable architecture
- Comprehensive documentation and tutorials
Cons of MMDetection
- Steeper learning curve due to complex architecture
- Slower inference speed compared to YOLOv5
- Larger codebase and potentially higher resource requirements
Code Comparison
MMDetection configuration example:
model = dict(
    type='FasterRCNN',
    backbone=dict(
        type='ResNet',
        depth=50,
        num_stages=4,
        out_indices=(0, 1, 2, 3),
        frozen_stages=1,
        norm_cfg=dict(type='BN', requires_grad=True),
        norm_eval=True,
        style='pytorch'),
    neck=dict(
        type='FPN',
        in_channels=[256, 512, 1024, 2048],
        out_channels=256,
        num_outs=5),
    rpn_head=dict(
        type='RPNHead',
        in_channels=256,
        feat_channels=256,
        anchor_generator=dict(
            type='AnchorGenerator',
            scales=[8],
            ratios=[0.5, 1.0, 2.0],
            strides=[4, 8, 16, 32, 64]),
        bbox_coder=dict(
            type='DeltaXYWHBBoxCoder',
            target_means=[.0, .0, .0, .0],
            target_stds=[1.0, 1.0, 1.0, 1.0]),
        loss_cls=dict(
            type='CrossEntropyLoss', use_sigmoid=True, loss_weight=1.0),
        loss_bbox=dict(type='L1Loss', loss_weight=1.0)),
    roi_head=dict(
        type='StandardRoIHead',
        bbox_roi_extractor=dict(
            type='SingleRoIExtractor',
            roi_layer=dict(type='RoIAlign', output_size=7, sampling_ratio=0),
            out_channels=256,
            featmap_strides=[4, 8, 16, 32]),
        bbox_head=dict(
            type='Shared2FCBBoxHead',
            in_channels=256,
            fc_out_channels=1024,
            roi_feat_size=7,
            num_classes=80,
            bbox_coder=dict(
                type='DeltaXYWHBBoxCoder',
                target_means=[0., 0., 0., 0.],
                target_stds=[0.1, 0.1, 0.2, 0.2]),
            reg_class_agnostic=False,
            loss_cls=dict(
                type='CrossEntropyLoss', use_sigmoid=False, loss_weight=1.0),
            loss_bbox=dict(type='L1Loss', loss_weight=1.0))),
    # model training and testing settings
    train_cfg=dict(
        rpn=dict(
            assigner=dict(
                type='MaxIoUAssigner',
                pos_iou_thr=0.7,
                neg_iou_thr=0.3,
                min_pos_iou=0.3,
                match_low_quality=True,
                ignore_iof_thr=-1),
            sampler=dict(
                type='RandomSampler',
                num=256,
                pos_fraction=0.5,
                neg_pos_ub=-1,
                add_gt_as_proposals=False),
            allowed_border=-1,
            pos_weight=-1,
            debug=False),
        rpn_proposal=dict(
            nms_pre=2000,
            max_per_img=1000,
            nms=dict(type='nms', iou_threshold=0.7),
            min_bbox_size=0),
        rcnn=
Models and examples built with TensorFlow
Pros of models
- Broader scope: Covers a wide range of machine learning models and tasks
- Official TensorFlow support: Maintained by Google's TensorFlow team
- Extensive documentation and tutorials
Cons of models
- Steeper learning curve: More complex structure due to diverse models
- Potentially slower inference: Not optimized specifically for object detection
Code comparison
models:
import tensorflow as tf
from object_detection.utils import label_map_util
from object_detection.utils import visualization_utils as viz_utils

model = tf.saved_model.load('path/to/saved_model')
detect_fn = model.signatures['serving_default']
YOLOv5:
import torch

model = torch.hub.load('ultralytics/yolov5', 'yolov5s')
results = model('image.jpg')
results.print()
Key differences
- models provides a comprehensive suite of machine learning models, while YOLOv5 focuses specifically on object detection
- YOLOv5 offers simpler implementation and faster inference for object detection tasks
- models integrates seamlessly with TensorFlow ecosystem, while YOLOv5 uses PyTorch
- YOLOv5 provides easier deployment options, including mobile and edge devices
- models offers more flexibility for custom model architectures and research purposes
Convert  designs to code with AI

Introducing Visual Copilot: A new AI model to turn Figma designs to high quality code using your components.
Try Visual CopilotREADME
ä¸æ | íêµì´ | æ¥æ¬èª | Ð ÑÑÑкий | Deutsch | Français | Español | Português | Türkçe | Tiếng Viá»t | اÙعربÙØ©
Ultralytics YOLOv5 ð is a cutting-edge, state-of-the-art (SOTA) computer vision model developed by Ultralytics. Based on the PyTorch framework, YOLOv5 is renowned for its ease of use, speed, and accuracy. It incorporates insights and best practices from extensive research and development, making it a popular choice for a wide range of vision AI tasks, including object detection, image segmentation, and image classification.
We hope the resources here help you get the most out of YOLOv5. Please browse the YOLOv5 Docs for detailed information, raise an issue on GitHub for support, and join our Discord community for questions and discussions!
To request an Enterprise License, please complete the form at Ultralytics Licensing.
ð YOLO11: The Next Evolution
We are excited to announce the launch of Ultralytics YOLO11 ð, the latest advancement in our state-of-the-art (SOTA) vision models! Available now at the Ultralytics YOLO GitHub repository, YOLO11 builds on our legacy of speed, precision, and ease of use. Whether you're tackling object detection, instance segmentation, pose estimation, image classification, or oriented object detection (OBB), YOLO11 delivers the performance and versatility needed to excel in diverse applications.
Get started today and unlock the full potential of YOLO11! Visit the Ultralytics Docs for comprehensive guides and resources:
# Install the ultralytics package
pip install ultralytics
ð Documentation
See the YOLOv5 Docs for full documentation on training, testing, and deployment. See below for quickstart examples.
Install
Clone the repository and install dependencies in a Python>=3.8.0 environment. Ensure you have PyTorch>=1.8 installed.
# Clone the YOLOv5 repository
git clone https://github.com/ultralytics/yolov5

# Navigate to the cloned directory
cd yolov5

# Install required packages
pip install -r requirements.txt
Inference with PyTorch Hub
Use YOLOv5 via PyTorch Hub for inference. Models are automatically downloaded from the latest YOLOv5 release.
import torch

# Load a YOLOv5 model (options: yolov5n, yolov5s, yolov5m, yolov5l, yolov5x)
model = torch.hub.load("ultralytics/yolov5", "yolov5s")  # Default: yolov5s

# Define the input image source (URL, local file, PIL image, OpenCV frame, numpy array, or list)
img = "https://ultralytics.com/images/zidane.jpg"  # Example image

# Perform inference (handles batching, resizing, normalization automatically)
results = model(img)

# Process the results (options: .print(), .show(), .save(), .crop(), .pandas())
results.print()  # Print results to console
results.show()  # Display results in a window
results.save()  # Save results to runs/detect/exp
Inference with detect.py
The detect.py script runs inference on various sources. It automatically downloads models from the latest YOLOv5 release and saves the results to the runs/detect directory.
# Run inference using a webcam
python detect.py --weights yolov5s.pt --source 0

# Run inference on a local image file
python detect.py --weights yolov5s.pt --source img.jpg

# Run inference on a local video file
python detect.py --weights yolov5s.pt --source vid.mp4

# Run inference on a screen capture
python detect.py --weights yolov5s.pt --source screen

# Run inference on a directory of images
python detect.py --weights yolov5s.pt --source path/to/images/

# Run inference on a text file listing image paths
python detect.py --weights yolov5s.pt --source list.txt

# Run inference on a text file listing stream URLs
python detect.py --weights yolov5s.pt --source list.streams

# Run inference using a glob pattern for images
python detect.py --weights yolov5s.pt --source 'path/to/*.jpg'

# Run inference on a YouTube video URL
python detect.py --weights yolov5s.pt --source 'https://youtu.be/LNwODJXcvt4'

# Run inference on an RTSP, RTMP, or HTTP stream
python detect.py --weights yolov5s.pt --source 'rtsp://example.com/media.mp4'
Training
The commands below demonstrate how to reproduce YOLOv5 COCO dataset results. Both models and datasets are downloaded automatically from the latest YOLOv5 release. Training times for YOLOv5n/s/m/l/x are approximately 1/2/4/6/8 days on a single NVIDIA V100 GPU. Using Multi-GPU training can significantly reduce training time. Use the largest --batch-size your hardware allows, or use --batch-size -1 for YOLOv5 AutoBatch. The batch sizes shown below are for V100-16GB GPUs.
# Train YOLOv5n on COCO for 300 epochs
python train.py --data coco.yaml --epochs 300 --weights '' --cfg yolov5n.yaml --batch-size 128

# Train YOLOv5s on COCO for 300 epochs
python train.py --data coco.yaml --epochs 300 --weights '' --cfg yolov5s.yaml --batch-size 64

# Train YOLOv5m on COCO for 300 epochs
python train.py --data coco.yaml --epochs 300 --weights '' --cfg yolov5m.yaml --batch-size 40

# Train YOLOv5l on COCO for 300 epochs
python train.py --data coco.yaml --epochs 300 --weights '' --cfg yolov5l.yaml --batch-size 24

# Train YOLOv5x on COCO for 300 epochs
python train.py --data coco.yaml --epochs 300 --weights '' --cfg yolov5x.yaml --batch-size 16
Tutorials
- Train Custom Data ð RECOMMENDED: Learn how to train YOLOv5 on your own datasets.
- Tips for Best Training Results âï¸: Improve your model's performance with expert tips.
- Multi-GPU Training: Speed up training using multiple GPUs.
- PyTorch Hub Integration ð NEW: Easily load models using PyTorch Hub.
- Model Export (TFLite, ONNX, CoreML, TensorRT) ð: Convert your models to various deployment formats like ONNX or TensorRT.
- NVIDIA Jetson Deployment ð NEW: Deploy YOLOv5 on NVIDIA Jetson devices.
- Test-Time Augmentation (TTA): Enhance prediction accuracy with TTA.
- Model Ensembling: Combine multiple models for better performance.
- Model Pruning/Sparsity: Optimize models for size and speed.
- Hyperparameter Evolution: Automatically find the best training hyperparameters.
- Transfer Learning with Frozen Layers: Adapt pretrained models to new tasks efficiently using transfer learning.
- Architecture Summary ð NEW: Understand the YOLOv5 model architecture.
- Ultralytics HUB Training ð RECOMMENDED: Train and deploy YOLO models using Ultralytics HUB.
- ClearML Logging: Integrate with ClearML for experiment tracking.
- Neural Magic DeepSparse Integration: Accelerate inference with DeepSparse.
- Comet Logging ð NEW: Log experiments using Comet ML.
𧩠Integrations
Our key integrations with leading AI platforms extend the functionality of Ultralytics' offerings, enhancing tasks like dataset labeling, training, visualization, and model management. Discover how Ultralytics, in collaboration with partners like Weights & Biases, Comet ML, Roboflow, and Intel OpenVINO, can optimize your AI workflow. Explore more at Ultralytics Integrations.

| Ultralytics HUB ð | Weights & Biases | Comet | Neural Magic |
|---|---|---|---|
| Streamline YOLO workflows: Label, train, and deploy effortlessly with Ultralytics HUB. Try now! | Track experiments, hyperparameters, and results with Weights & Biases. | Free forever, Comet ML lets you save YOLO models, resume training, and interactively visualize predictions. | Run YOLO inference up to 6x faster with Neural Magic DeepSparse. |
â Ultralytics HUB
Experience seamless AI development with Ultralytics HUB â, the ultimate platform for building, training, and deploying computer vision models. Visualize datasets, train YOLOv5 and YOLOv8 ð models, and deploy them to real-world applications without writing any code. Transform images into actionable insights using our cutting-edge tools and user-friendly Ultralytics App. Start your journey for Free today!

ð¤ Why YOLOv5?
YOLOv5 is designed for simplicity and ease of use. We prioritize real-world performance and accessibility.
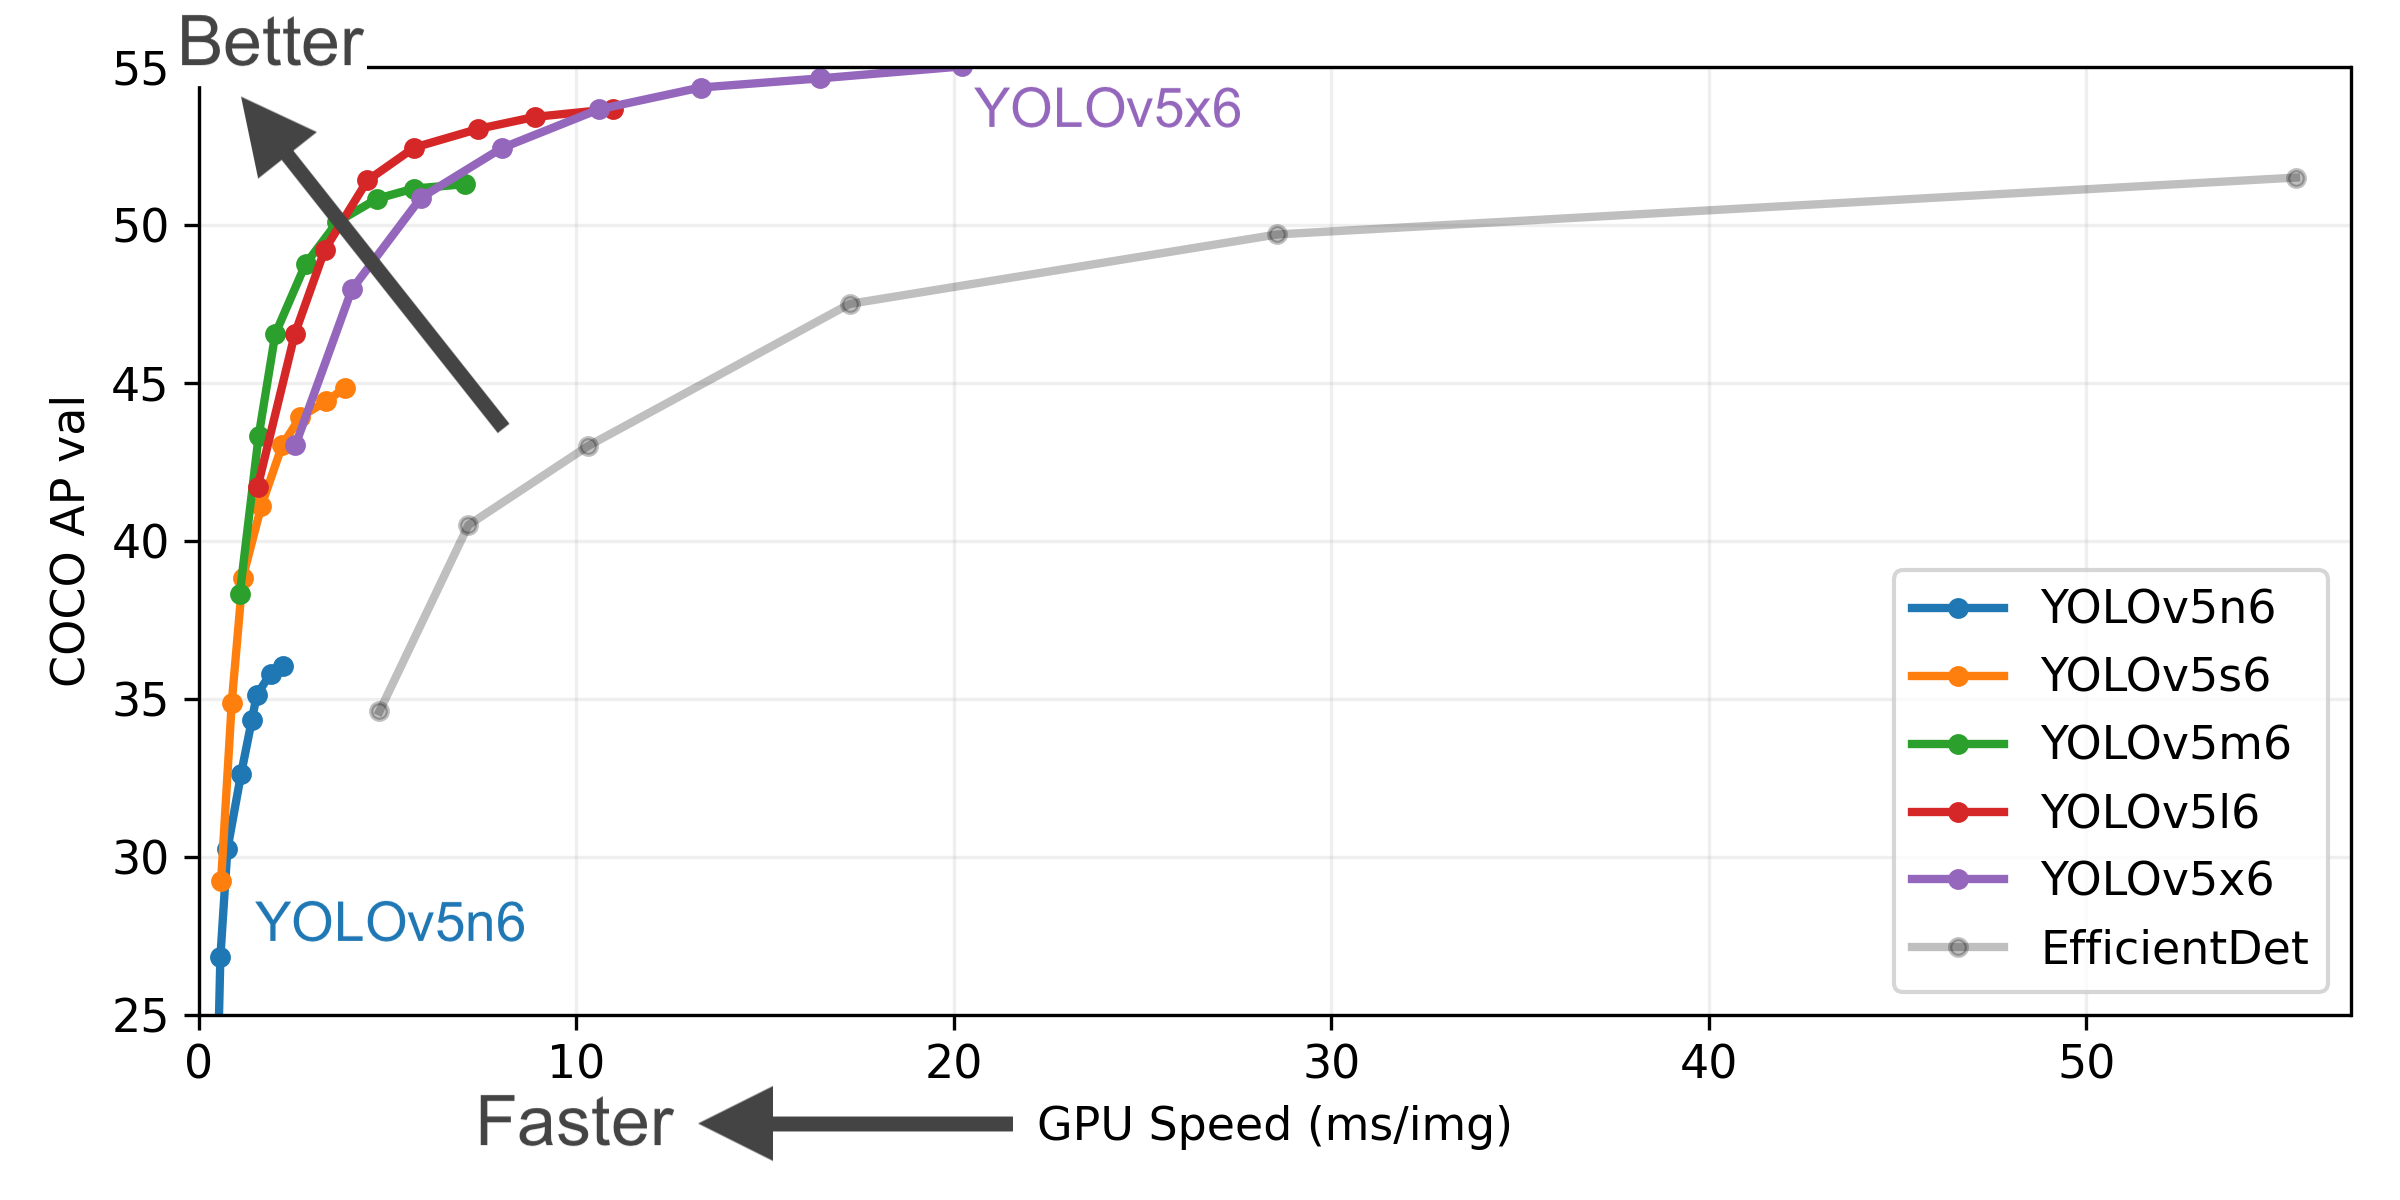
YOLOv5-P5 640 Figure
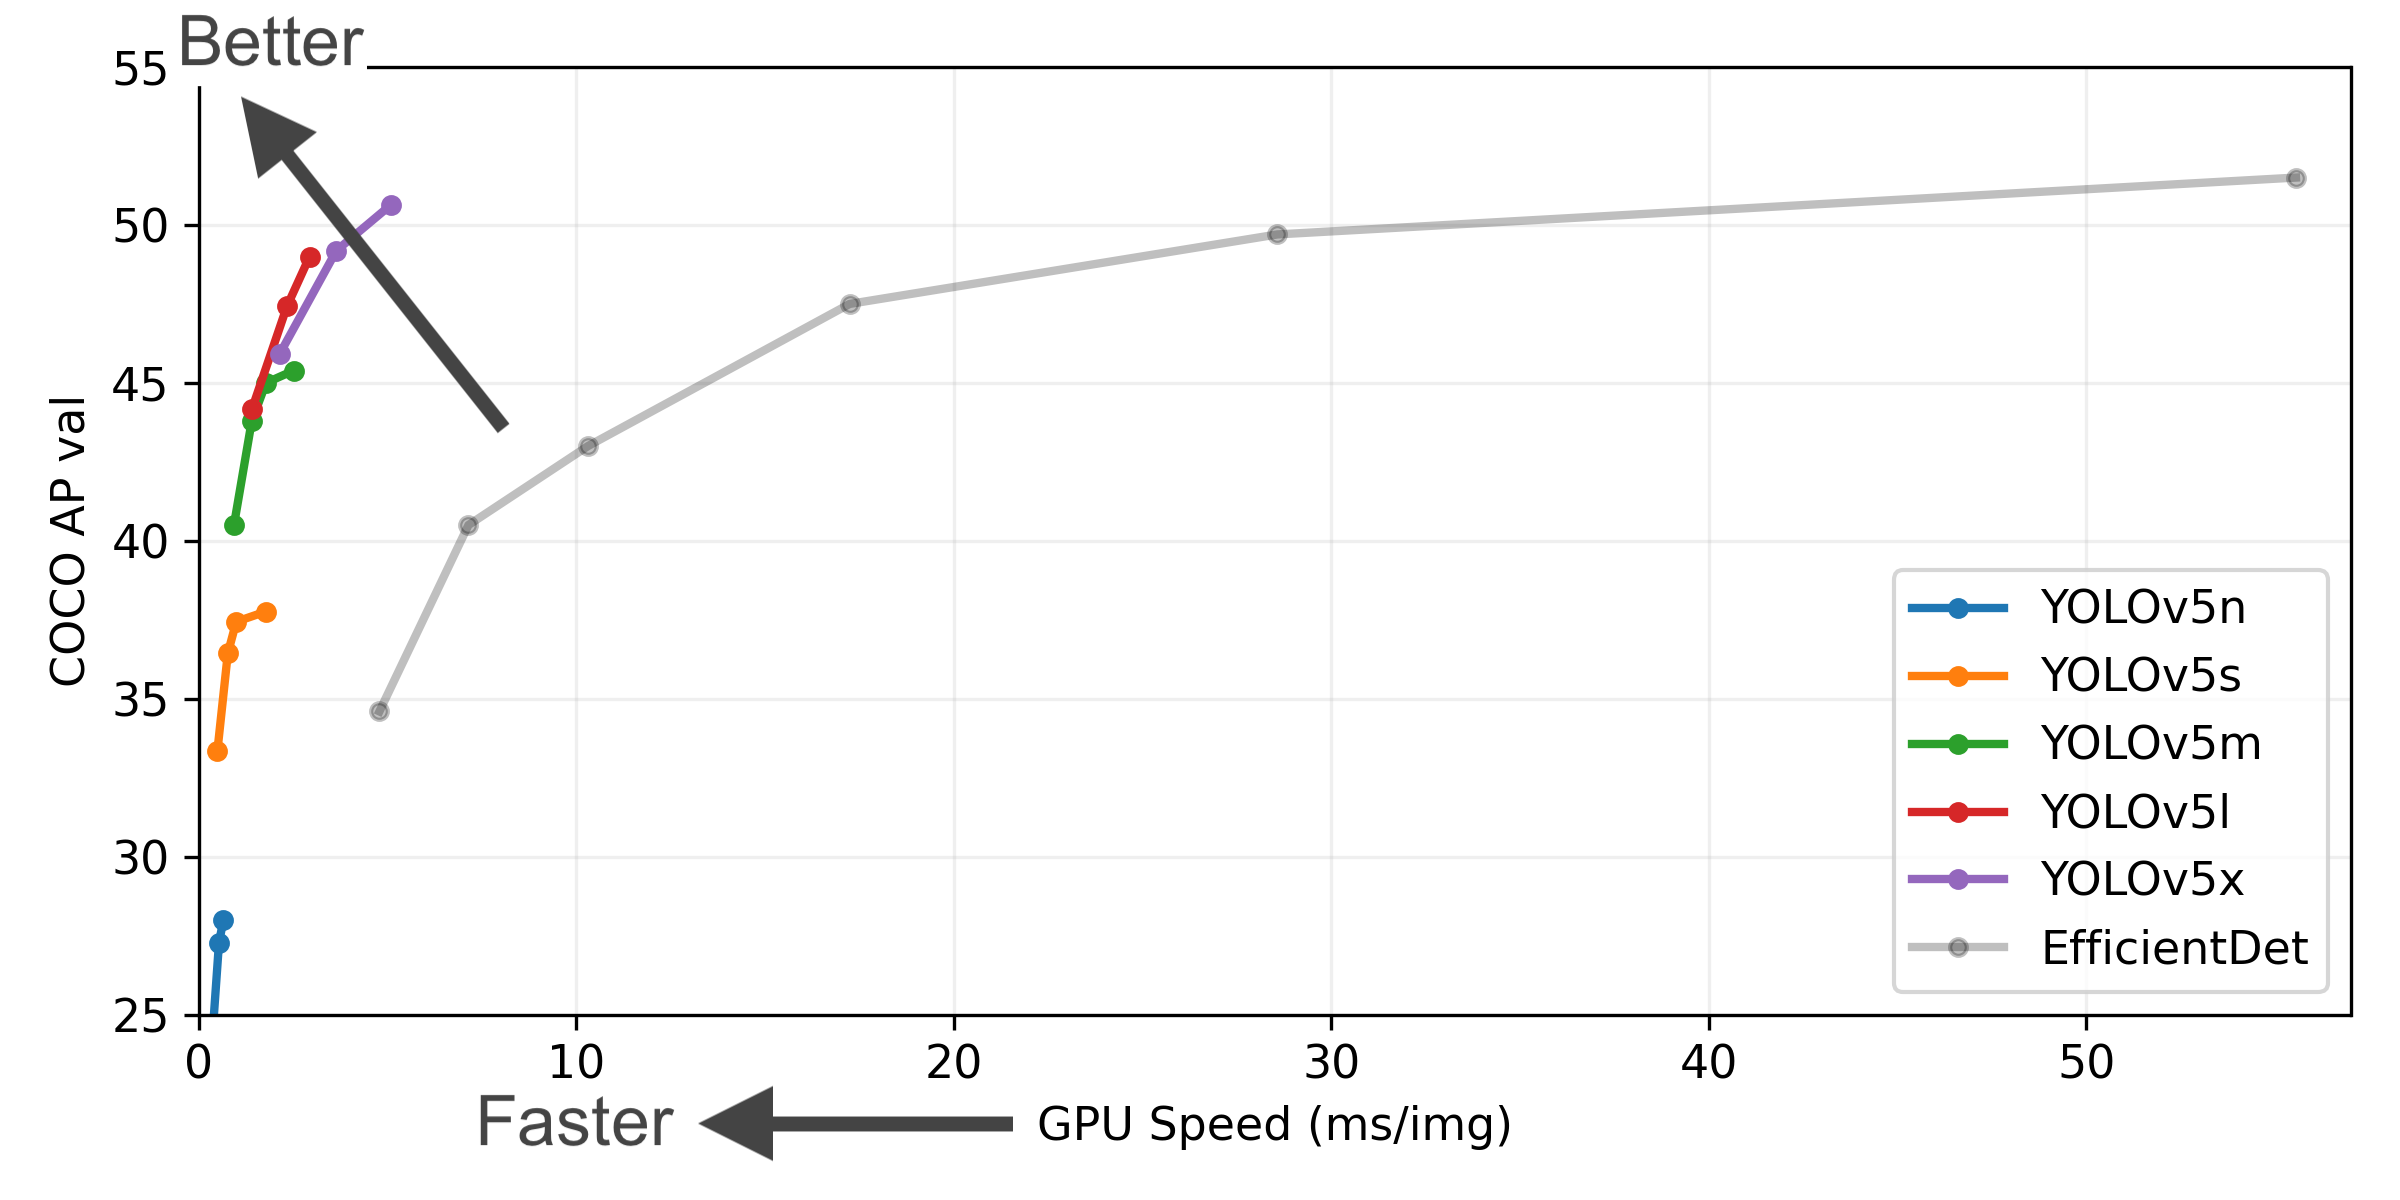
Figure Notes
- COCO AP val denotes the mean Average Precision (mAP) at Intersection over Union (IoU) thresholds from 0.5 to 0.95, measured on the 5,000-image COCO val2017 dataset across various inference sizes (256 to 1536 pixels).
- GPU Speed measures the average inference time per image on the COCO val2017 dataset using an AWS p3.2xlarge V100 instance with a batch size of 32.
- EfficientDet data is sourced from the google/automl repository at batch size 8.
- Reproduce these results using the command:
python val.py --task study --data coco.yaml --iou 0.7 --weights yolov5n6.pt yolov5s6.pt yolov5m6.pt yolov5l6.pt yolov5x6.pt
Pretrained Checkpoints
This table shows the performance metrics for various YOLOv5 models trained on the COCO dataset.
| Model | Size (pixels) | mAPval 50-95 | mAPval 50 | Speed CPU b1 (ms) | Speed V100 b1 (ms) | Speed V100 b32 (ms) | Params (M) | FLOPs @640 (B) |
|---|---|---|---|---|---|---|---|---|
| YOLOv5n | 640 | 28.0 | 45.7 | 45 | 6.3 | 0.6 | 1.9 | 4.5 |
| YOLOv5s | 640 | 37.4 | 56.8 | 98 | 6.4 | 0.9 | 7.2 | 16.5 |
| YOLOv5m | 640 | 45.4 | 64.1 | 224 | 8.2 | 1.7 | 21.2 | 49.0 |
| YOLOv5l | 640 | 49.0 | 67.3 | 430 | 10.1 | 2.7 | 46.5 | 109.1 |
| YOLOv5x | 640 | 50.7 | 68.9 | 766 | 12.1 | 4.8 | 86.7 | 205.7 |
| YOLOv5n6 | 1280 | 36.0 | 54.4 | 153 | 8.1 | 2.1 | 3.2 | 4.6 |
| YOLOv5s6 | 1280 | 44.8 | 63.7 | 385 | 8.2 | 3.6 | 12.6 | 16.8 |
| YOLOv5m6 | 1280 | 51.3 | 69.3 | 887 | 11.1 | 6.8 | 35.7 | 50.0 |
| YOLOv5l6 | 1280 | 53.7 | 71.3 | 1784 | 15.8 | 10.5 | 76.8 | 111.4 |
| YOLOv5x6 + [TTA] | 1280 1536 | 55.0 55.8 | 72.7 72.7 | 3136 - | 26.2 - | 19.4 - | 140.7 - | 209.8 - |
Table Notes
- All checkpoints were trained for 300 epochs using default settings. Nano (n) and Small (s) models use hyp.scratch-low.yaml hyperparameters, while Medium (m), Large (l), and Extra-Large (x) models use hyp.scratch-high.yaml.
- mAPval values represent single-model, single-scale performance on the COCO val2017 dataset.
Reproduce using:python val.py --data coco.yaml --img 640 --conf 0.001 --iou 0.65 - Speed metrics are averaged over COCO val images using an AWS p3.2xlarge V100 instance. Non-Maximum Suppression (NMS) time (~1 ms/image) is not included.
Reproduce using:python val.py --data coco.yaml --img 640 --task speed --batch 1 - TTA (Test Time Augmentation) includes reflection and scale augmentations for improved accuracy.
Reproduce using:python val.py --data coco.yaml --img 1536 --iou 0.7 --augment
ð¼ï¸ Segmentation
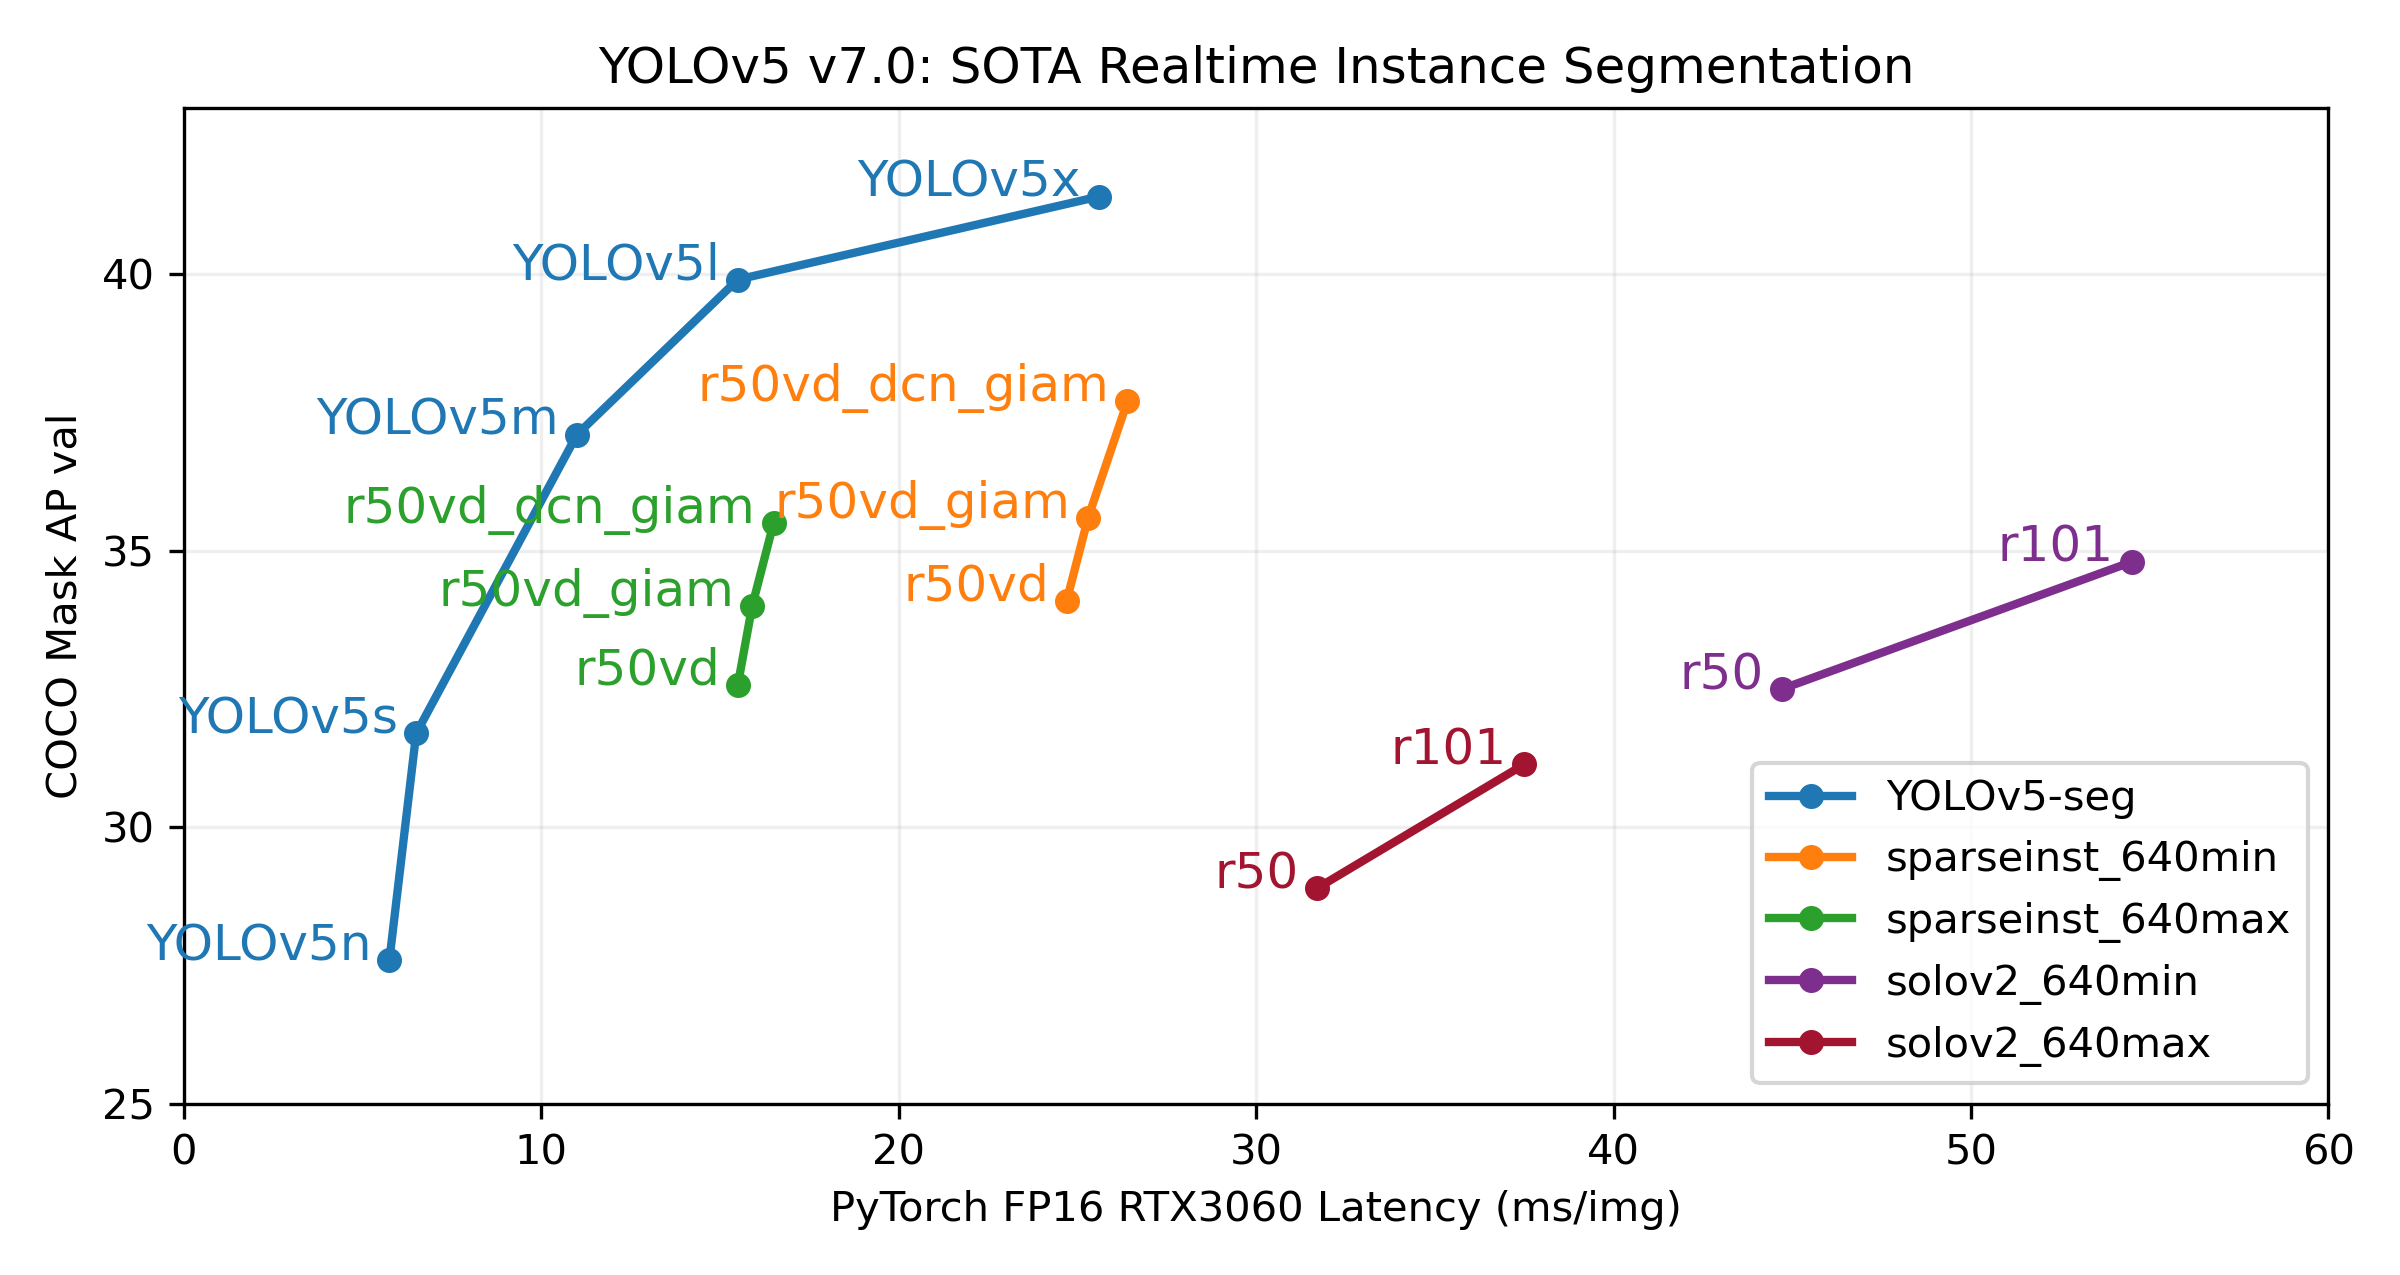
The YOLOv5 release v7.0 introduced instance segmentation models that achieve state-of-the-art performance. These models are designed for easy training, validation, and deployment. For full details, see the Release Notes and explore the YOLOv5 Segmentation Colab Notebook for quickstart examples.
Segmentation Checkpoints
YOLOv5 segmentation models were trained on the COCO dataset for 300 epochs at an image size of 640 pixels using A100 GPUs. Models were exported to ONNX FP32 for CPU speed tests and TensorRT FP16 for GPU speed tests. All speed tests were conducted on Google Colab Pro notebooks for reproducibility.
| Model | Size (pixels) | mAPbox 50-95 | mAPmask 50-95 | Train Time 300 epochs A100 (hours) | Speed ONNX CPU (ms) | Speed TRT A100 (ms) | Params (M) | FLOPs @640 (B) |
|---|---|---|---|---|---|---|---|---|
| YOLOv5n-seg | 640 | 27.6 | 23.4 | 80:17 | 62.7 | 1.2 | 2.0 | 7.1 |
| YOLOv5s-seg | 640 | 37.6 | 31.7 | 88:16 | 173.3 | 1.4 | 7.6 | 26.4 |
| YOLOv5m-seg | 640 | 45.0 | 37.1 | 108:36 | 427.0 | 2.2 | 22.0 | 70.8 |
| YOLOv5l-seg | 640 | 49.0 | 39.9 | 66:43 (2x) | 857.4 | 2.9 | 47.9 | 147.7 |
| YOLOv5x-seg | 640 | 50.7 | 41.4 | 62:56 (3x) | 1579.2 | 4.5 | 88.8 | 265.7 |
- All checkpoints were trained for 300 epochs using the SGD optimizer with
lr0=0.01andweight_decay=5e-5at an image size of 640 pixels, using default settings.
Training runs are logged at https://wandb.ai/glenn-jocher/YOLOv5_v70_official. - Accuracy values represent single-model, single-scale performance on the COCO dataset.
Reproduce using:python segment/val.py --data coco.yaml --weights yolov5s-seg.pt - Speed metrics are averaged over 100 inference images using a Colab Pro A100 High-RAM instance. Values indicate inference speed only (NMS adds approximately 1ms per image).
Reproduce using:python segment/val.py --data coco.yaml --weights yolov5s-seg.pt --batch 1 - Export to ONNX (FP32) and TensorRT (FP16) was performed using
export.py.
Reproduce using:python export.py --weights yolov5s-seg.pt --include engine --device 0 --half
Segmentation Usage Examples 
Train
YOLOv5 segmentation training supports automatic download of the COCO128-seg dataset via the --data coco128-seg.yaml argument. For the full COCO-segments dataset, download it manually using bash data/scripts/get_coco.sh --train --val --segments and then train with python train.py --data coco.yaml.
# Train on a single GPU
python segment/train.py --data coco128-seg.yaml --weights yolov5s-seg.pt --img 640

# Train using Multi-GPU Distributed Data Parallel (DDP)
python -m torch.distributed.run --nproc_per_node 4 --master_port 1 segment/train.py --data coco128-seg.yaml --weights yolov5s-seg.pt --img 640 --device 0,1,2,3
Val
Validate the mask mean Average Precision (mAP) of YOLOv5s-seg on the COCO dataset:
# Download COCO validation segments split (780MB, 5000 images)
bash data/scripts/get_coco.sh --val --segments

# Validate the model
python segment/val.py --weights yolov5s-seg.pt --data coco.yaml --img 640
Predict
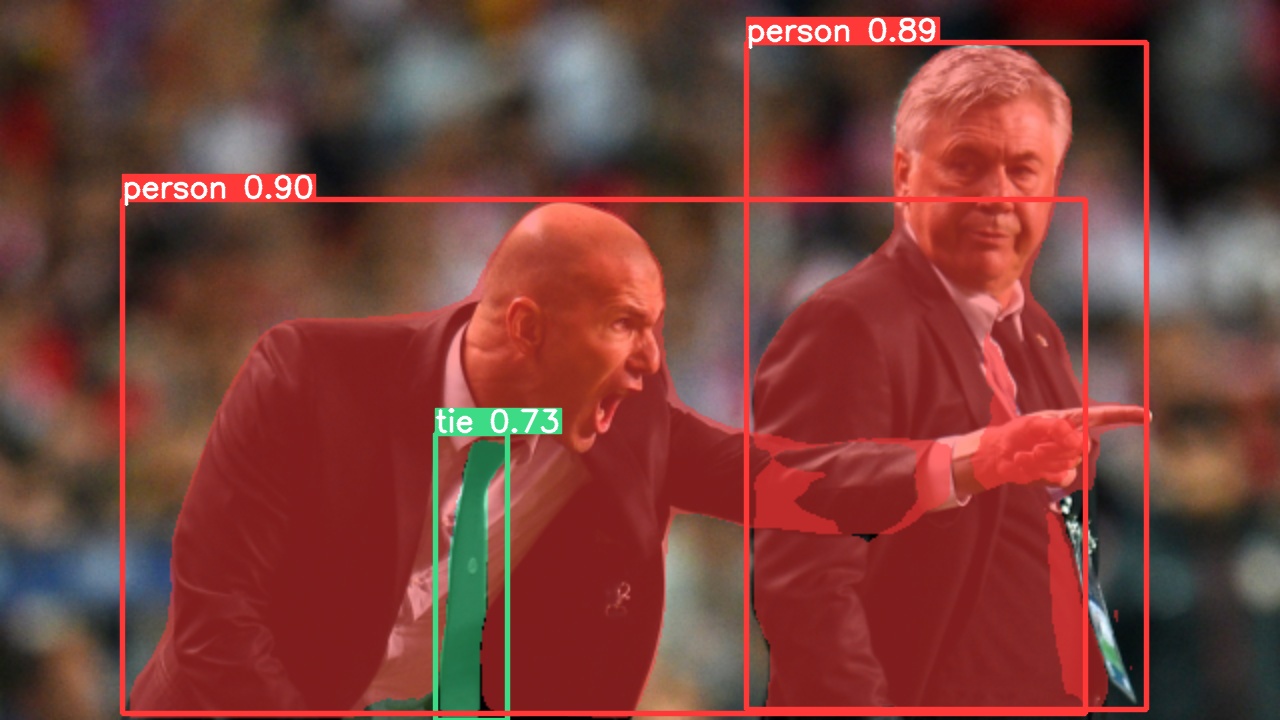
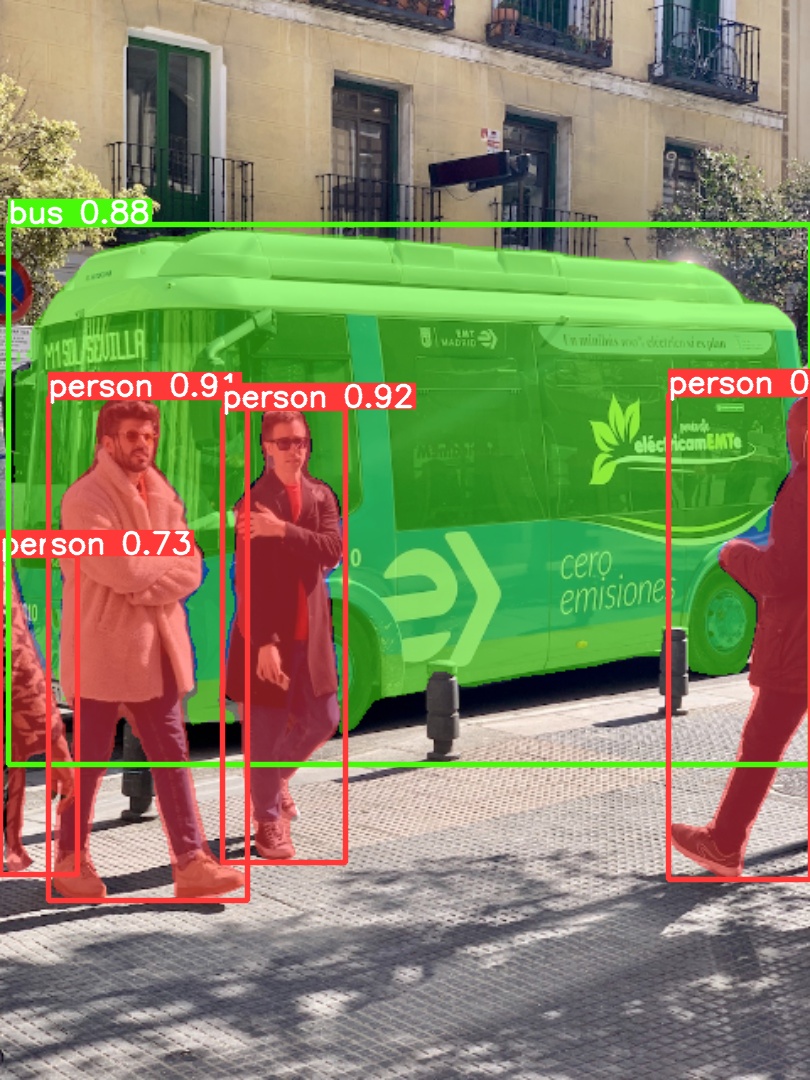
Use the pretrained YOLOv5m-seg.pt model to perform segmentation on bus.jpg:
# Run prediction
python segment/predict.py --weights yolov5m-seg.pt --source data/images/bus.jpg
# Load model from PyTorch Hub (Note: Inference support might vary)
model = torch.hub.load("ultralytics/yolov5", "custom", "yolov5m-seg.pt")
 |  |
|---|
Export
Export the YOLOv5s-seg model to ONNX and TensorRT formats:
# Export model
python export.py --weights yolov5s-seg.pt --include onnx engine --img 640 --device 0
ð·ï¸ Classification
YOLOv5 release v6.2 introduced support for image classification model training, validation, and deployment. Check the Release Notes for details and the YOLOv5 Classification Colab Notebook for quickstart guides.
Classification Checkpoints
YOLOv5-cls classification models were trained on ImageNet for 90 epochs using a 4xA100 instance. ResNet and EfficientNet models were trained alongside under identical settings for comparison. Models were exported to ONNX FP32 (CPU speed tests) and TensorRT FP16 (GPU speed tests). All speed tests were run on Google Colab Pro for reproducibility.
| Model | Size (pixels) | Acc top1 | Acc top5 | Training 90 epochs 4xA100 (hours) | Speed ONNX CPU (ms) | Speed TensorRT V100 (ms) | Params (M) | FLOPs @224 (B) |
|---|---|---|---|---|---|---|---|---|
| YOLOv5n-cls | 224 | 64.6 | 85.4 | 7:59 | 3.3 | 0.5 | 2.5 | 0.5 |
| YOLOv5s-cls | 224 | 71.5 | 90.2 | 8:09 | 6.6 | 0.6 | 5.4 | 1.4 |
| YOLOv5m-cls | 224 | 75.9 | 92.9 | 10:06 | 15.5 | 0.9 | 12.9 | 3.9 |
| YOLOv5l-cls | 224 | 78.0 | 94.0 | 11:56 | 26.9 | 1.4 | 26.5 | 8.5 |
| YOLOv5x-cls | 224 | 79.0 | 94.4 | 15:04 | 54.3 | 1.8 | 48.1 | 15.9 |
| ResNet18 | 224 | 70.3 | 89.5 | 6:47 | 11.2 | 0.5 | 11.7 | 3.7 |
| ResNet34 | 224 | 73.9 | 91.8 | 8:33 | 20.6 | 0.9 | 21.8 | 7.4 |
| ResNet50 | 224 | 76.8 | 93.4 | 11:10 | 23.4 | 1.0 | 25.6 | 8.5 |
| ResNet101 | 224 | 78.5 | 94.3 | 17:10 | 42.1 | 1.9 | 44.5 | 15.9 |
| EfficientNet_b0 | 224 | 75.1 | 92.4 | 13:03 | 12.5 | 1.3 | 5.3 | 1.0 |
| EfficientNet_b1 | 224 | 76.4 | 93.2 | 17:04 | 14.9 | 1.6 | 7.8 | 1.5 |
| EfficientNet_b2 | 224 | 76.6 | 93.4 | 17:10 | 15.9 | 1.6 | 9.1 | 1.7 |
| EfficientNet_b3 | 224 | 77.7 | 94.0 | 19:19 | 18.9 | 1.9 | 12.2 | 2.4 |
Table Notes (click to expand)
- All checkpoints were trained for 90 epochs using the SGD optimizer with
lr0=0.001andweight_decay=5e-5at an image size of 224 pixels, using default settings.
Training runs are logged at https://wandb.ai/glenn-jocher/YOLOv5-Classifier-v6-2. - Accuracy values (top-1 and top-5) represent single-model, single-scale performance on the ImageNet-1k dataset.
Reproduce using:python classify/val.py --data ../datasets/imagenet --img 224 - Speed metrics are averaged over 100 inference images using a Google Colab Pro V100 High-RAM instance.
Reproduce using:python classify/val.py --data ../datasets/imagenet --img 224 --batch 1 - Export to ONNX (FP32) and TensorRT (FP16) was performed using
export.py.
Reproduce using:python export.py --weights yolov5s-cls.pt --include engine onnx --imgsz 224
Classification Usage Examples 
Train
YOLOv5 classification training supports automatic download for datasets like MNIST, Fashion-MNIST, CIFAR10, CIFAR100, Imagenette, Imagewoof, and ImageNet using the --data argument. For example, start training on MNIST with --data mnist.
# Train on a single GPU using CIFAR-100 dataset
python classify/train.py --model yolov5s-cls.pt --data cifar100 --epochs 5 --img 224 --batch 128

# Train using Multi-GPU DDP on ImageNet dataset
python -m torch.distributed.run --nproc_per_node 4 --master_port 1 classify/train.py --model yolov5s-cls.pt --data imagenet --epochs 5 --img 224 --device 0,1,2,3
Val
Validate the accuracy of the YOLOv5m-cls model on the ImageNet-1k validation dataset:
# Download ImageNet validation split (6.3GB, 50,000 images)
bash data/scripts/get_imagenet.sh --val

# Validate the model
python classify/val.py --weights yolov5m-cls.pt --data ../datasets/imagenet --img 224
Predict
Use the pretrained YOLOv5s-cls.pt model to classify the image bus.jpg:
# Run prediction
python classify/predict.py --weights yolov5s-cls.pt --source data/images/bus.jpg
# Load model from PyTorch Hub
model = torch.hub.load("ultralytics/yolov5", "custom", "yolov5s-cls.pt")
Export
Export trained YOLOv5s-cls, ResNet50, and EfficientNet_b0 models to ONNX and TensorRT formats:
# Export models
python export.py --weights yolov5s-cls.pt resnet50.pt efficientnet_b0.pt --include onnx engine --img 224
âï¸ Environments
Get started quickly with our pre-configured environments. Click the icons below for setup details.
ð¤ Contribute
We welcome your contributions! Making YOLOv5 accessible and effective is a community effort. Please see our Contributing Guide to get started. Share your feedback through the YOLOv5 Survey. Thank you to all our contributors for making YOLOv5 better!
ð License
Ultralytics provides two licensing options to meet different needs:
- AGPL-3.0 License: An OSI-approved open-source license ideal for academic research, personal projects, and testing. It promotes open collaboration and knowledge sharing. See the LICENSE file for details.
- Enterprise License: Tailored for commercial applications, this license allows seamless integration of Ultralytics software and AI models into commercial products and services, bypassing the open-source requirements of AGPL-3.0. For commercial use cases, please contact us via Ultralytics Licensing.
ð§ Contact
For bug reports and feature requests related to YOLOv5, please visit GitHub Issues. For general questions, discussions, and community support, join our Discord server!
Top Related Projects
YOLOv4 / Scaled-YOLOv4 / YOLO - Neural Networks for Object Detection (Windows and Linux version of Darknet )
Implementation of paper - YOLOv7: Trainable bag-of-freebies sets new state-of-the-art for real-time object detectors
Detectron2 is a platform for object detection, segmentation and other visual recognition tasks.
YOLOv6: a single-stage object detection framework dedicated to industrial applications.
OpenMMLab Detection Toolbox and Benchmark
Models and examples built with TensorFlow
Convert  designs to code with AI

Introducing Visual Copilot: A new AI model to turn Figma designs to high quality code using your components.
Try Visual Copilot


