Top Related Projects
Realm is a mobile database: a replacement for Core Data & SQLite
A type-safe, Swift-language layer over SQLite3.
A toolkit for SQLite databases, with a focus on application development
A Cocoa / Objective-C wrapper around SQLite
WCDB is a cross-platform database framework developed by WeChat.
Vapor ORM (queries, models, and relations) for NoSQL and SQL databases
Quick Overview
Sync is a lightweight Swift library designed for efficient synchronization of Core Data with remote JSON APIs. It simplifies the process of keeping local data in sync with server-side data, making it easier to manage data persistence and network communication in iOS applications.
Pros
- Easy to integrate and use with existing Core Data models
- Supports custom mapping between JSON and Core Data attributes
- Handles both one-to-many and many-to-many relationships
- Provides automatic conflict resolution and error handling
Cons
- Limited to Core Data and JSON APIs, may not be suitable for other data storage or API formats
- Requires some setup and configuration for complex data models
- Documentation could be more comprehensive for advanced use cases
- May have performance limitations with very large datasets
Code Examples
- Basic setup and synchronization:
let dataStack = DataStack(modelName: "MyModel")
let synchronizer = Synchronizer(dataStack: dataStack)

synchronizer.sync(json: jsonArray, entityName: "User") { error in
    if let error = error {
        print("Sync error: \(error)")
    } else {
        print("Sync completed successfully")
    }
}
- Custom attribute mapping:
let mapper = Mapper()
mapper.setMapping("id", forEntityName: "User", withAttributeName: "userID")
mapper.setMapping("full_name", forEntityName: "User", withAttributeName: "name")

synchronizer.sync(json: jsonArray, entityName: "User", mapper: mapper) { error in
    // Handle completion
}
- Relationship mapping:
let mapper = Mapper()
mapper.setMapping("posts", forEntityName: "User", withRelationshipName: "userPosts")
mapper.setMapping("author", forEntityName: "Post", withRelationshipName: "postAuthor")

synchronizer.sync(json: jsonArray, entityName: "User", mapper: mapper) { error in
    // Handle completion
}
Getting Started
- Add Sync to your project using Swift Package Manager:
dependencies: [
    .package(url: "https://github.com/3lvis/Sync.git", from: "6.0.0")
]
- Import Sync in your Swift file:
import Sync
- Set up your Core Data stack and create a Synchronizer instance:
let dataStack = DataStack(modelName: "MyModel")
let synchronizer = Synchronizer(dataStack: dataStack)
- Perform synchronization with your JSON data:
synchronizer.sync(json: jsonArray, entityName: "EntityName") { error in
    if let error = error {
        print("Sync error: \(error)")
    } else {
        print("Sync completed successfully")
    }
}
Competitor Comparisons
Realm is a mobile database: a replacement for Core Data & SQLite
Pros of Realm Swift
- More mature and widely adopted database solution with extensive documentation
- Offers real-time synchronization and offline-first capabilities out of the box
- Provides a rich query language and supports complex data models
Cons of Realm Swift
- Steeper learning curve due to its unique object-oriented data model
- Larger footprint and potential performance overhead for simple use cases
- Less flexibility in terms of customizing the underlying storage mechanism
Code Comparison
Sync:
let dataStack = DataStack(modelName: "MyModel")
let synchronizer = Synchronizer(dataStack: dataStack)
synchronizer.delegate = self
synchronizer.sync()
Realm Swift:
let realm = try! Realm()
let results = realm.objects(MyObject.self)
let token = results.observe { changes in
    switch changes {
    case .initial(let objects):
        // Initial data loaded
    case .update(let objects, let deletions, let insertions, let modifications):
        // Handle updates
    case .error(let error):
        // Handle error
    }
}
Both libraries aim to simplify data synchronization, but Realm Swift offers a more comprehensive solution with built-in observation and real-time updates. Sync provides a simpler API for basic synchronization tasks, while Realm Swift requires more setup but offers greater flexibility and features for complex data management scenarios.
A type-safe, Swift-language layer over SQLite3.
Pros of SQLite.swift
- Direct SQLite database access with a type-safe Swift API
- Supports complex SQL queries and operations
- Lightweight and doesn't require additional dependencies
Cons of SQLite.swift
- Requires more manual setup and management of database schema
- Less abstraction from raw SQL, which may increase complexity for some use cases
- Limited built-in synchronization features
Code Comparison
SQLite.swift:
let db = try Connection("path/to/db.sqlite3")
let users = Table("users")
let id = Expression<Int64>("id")
let name = Expression<String>("name")
try db.run(users.create { t in
    t.column(id, primaryKey: true)
    t.column(name)
})
Sync:
struct User: Codable, Equatable {
    let id: Int
    let name: String
}
let dataStack = DataStack(modelName: "MyModel")
let users = try dataStack.fetch(User.self)
Summary
SQLite.swift provides direct, low-level access to SQLite databases with a Swift-friendly API, offering more control and flexibility for complex database operations. Sync, on the other hand, focuses on simplifying data synchronization and provides a higher-level abstraction for working with Core Data, making it easier to manage data models and persistence but potentially limiting fine-grained control over database operations.
A toolkit for SQLite databases, with a focus on application development
Pros of GRDB.swift
- More comprehensive database functionality, including support for SQLite features like full-text search and JSON columns
- Better performance for complex queries and large datasets
- Actively maintained with frequent updates and improvements
Cons of GRDB.swift
- Steeper learning curve due to more advanced features
- Requires more setup and configuration compared to Sync's simpler approach
- May be overkill for basic synchronization needs
Code Comparison
GRDB.swift example:
try dbQueue.write { db in
    try Player(name: "Arthur", score: 100).insert(db)
    let players = try Player.fetchAll(db)
}
Sync example:
let dataStack = DataStack(modelName: "MyModel")
let synchronizer = Synchronizer(dataStack: dataStack)
synchronizer.sync(changes)
GRDB.swift offers more fine-grained control over database operations, while Sync provides a higher-level abstraction for data synchronization. GRDB.swift is better suited for complex database interactions, whereas Sync excels in simplifying the process of keeping local and remote data in sync.
A Cocoa / Objective-C wrapper around SQLite
Pros of FMDB
- Mature and widely-used SQLite wrapper for Objective-C and Swift
- Supports both synchronous and asynchronous database operations
- Extensive documentation and community support
Cons of FMDB
- Requires more manual management of database operations
- Less abstraction compared to Sync's high-level API
- May require more boilerplate code for complex data models
Code Comparison
FMDB:
FMDatabase *db = [FMDatabase databaseWithPath:@"test.db"];
[db open];
[db executeUpdate:@"INSERT INTO users (name) VALUES (?)", @"John"];
FMResultSet *result = [db executeQuery:@"SELECT * FROM users"];
while ([result next]) {
    NSString *name = [result stringForColumn:@"name"];
}
Sync:
let dataStack = DataStack(modelName: "MyModel")
let user = User(context: dataStack.mainContext)
user.name = "John"
try! dataStack.mainContext.save()
let users = try! dataStack.mainContext.fetch(User.fetchRequest())
The code comparison shows that FMDB requires more explicit SQL statements and result handling, while Sync provides a higher-level abstraction using Core Data, resulting in more concise code for basic operations.
WCDB is a cross-platform database framework developed by WeChat.
Pros of WCDB
- More comprehensive database solution with support for SQLite and SQLCipher
- Higher performance and optimized for mobile devices
- Extensive documentation and active community support
Cons of WCDB
- Steeper learning curve due to more complex features
- Larger codebase and potentially higher resource usage
- Primarily focused on iOS and Android, less suitable for cross-platform development
Code Comparison
WCDB (Objective-C):
WCTDatabase *database = [[WCTDatabase alloc] initWithPath:path];
[database createTableAndIndexesOfName:@"message" withClass:Message.class];
[database insertObject:message into:@"message"];
Sync (Swift):
let dataStack = DataStack(modelName: "MyModel")
let syncManager = SyncManager(dataStack: dataStack, remote: remote)
syncManager.sync()
Summary
WCDB is a more robust and performance-oriented database solution, while Sync focuses on simplifying Core Data synchronization. WCDB offers advanced features and optimizations for mobile platforms, but may be overkill for simpler projects. Sync provides a straightforward approach to data synchronization but may lack some of the advanced capabilities of WCDB. The choice between the two depends on project requirements, performance needs, and development complexity preferences.
Vapor ORM (queries, models, and relations) for NoSQL and SQL databases
Pros of Fluent
- More comprehensive ORM with support for multiple databases (PostgreSQL, MySQL, SQLite)
- Integrated with Vapor web framework for full-stack Swift development
- Active development and larger community support
Cons of Fluent
- Steeper learning curve due to more complex architecture
- Requires using Vapor framework, less flexible for standalone use
- Heavier dependency footprint
Code Comparison
Fluent model definition:
final class User: Model {
    static let schema = "users"

    @ID(key: .id)
    var id: UUID?

    @Field(key: "name")
    var name: String
}
Sync model definition:
struct User: Codable, Equatable {
    let id: String
    let name: String
}
Key Differences
- Fluent uses property wrappers and a more declarative approach
- Sync relies on simpler structs conforming to Codable
- Fluent provides more built-in functionality for database operations
- Sync focuses on lightweight synchronization between Core Data and JSON
Both libraries aim to simplify data management in Swift applications, but Fluent offers a more comprehensive solution for database interactions, while Sync provides a streamlined approach for Core Data synchronization with remote APIs.
Convert  designs to code with AI

Introducing Visual Copilot: A new AI model to turn Figma designs to high quality code using your components.
Try Visual CopilotREADME
Notice: Sync was supported from it's creation back in 2014 until March 2021
Moving forward I won't be able to support this project since I'm no longer active in making iOS apps with Core Data. I'm leaving this repository as a historical reference of what happened during this time. Sync had in total 130 releases with almost 30 contributors. If you still support this project I encourage you to fork it and continue the development. I don't feel comfortable with passing this project to another developer due to the fact that I want to have some involvement in all the projects that live under my account. 7 years was a good run, thank you everyone for using this project and thank you to everyone that has contributed to it. Best of luck in your careers and in what this constantly evolving tech world has for all of us.
Initial releases: https://github.com/3lvis/Sync/releases?after=0.4.1

Sync eases your everyday job of parsing a JSON response and syncing it with Core Data. Sync is a lightweight Swift library that uses a convention-over-configuration paradigm to facilitate your workflow.
Syncing JSON to Core Data is a repetitive tasks that often demands adding a lot of boilerplate code. Mapping attributes, mapping relationships, diffing for inserts, removals and updates are often tasks that don't change between apps. Taking this in account we took the challenge to abstract this into a library. Sync uses the knowledge of your Core Data model to infer all the mapping between your JSON and Core Data, once you use it, it feels so obvious that you'll wonder why you weren't doing this before.
- Automatic mapping of camelCase or snake_case JSON into Core Data
- Thread-safe saving, we handle retrieving and storing objects in the right threads
- Diffing of changes, updated, inserted and deleted objects (which are automatically purged for you)
- Auto-mapping of relationships (one-to-one, one-to-many and many-to-many)
- Smart-updates, only updates your
NSManagedObjects if the server values are different from your local ones - Uniquing, one Core Data entry per primary key
NSOperationsubclass, any Sync process can be queued and cancelled at any time!
Table of Contents
Basic example
Model
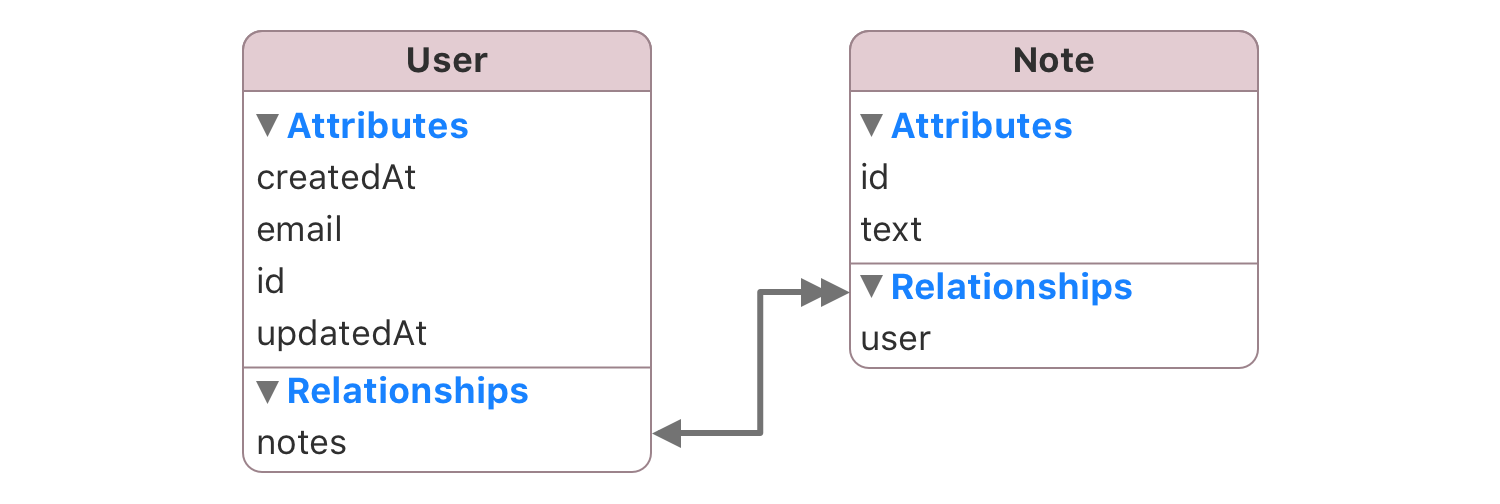
JSON
[
  {
    "id": 6,
    "name": "Shawn Merrill",
    "email": "shawn@ovium.com",
    "created_at": "2014-02-14T04:30:10+00:00",
    "updated_at": "2014-02-17T10:01:12+00:00",
    "notes": [
      {
        "id": 0,
        "text": "Shawn Merril's diary, episode 1",
        "created_at": "2014-03-11T19:11:00+00:00",
        "updated_at": "2014-04-18T22:01:00+00:00"
      }
    ]
  }
]
DataStack
DataStack is a wrapper on top of the Core Data boilerplate, it encapsulates dealing with NSPersistentStoreCoordinator and NSManageObjectContexts.
self.dataStack = DataStack(modelName: "DataModel")
You can find here more ways of initializing your DataStack.
Sync
dataStack.sync(json, inEntityNamed: "User") { error in
    // New objects have been inserted
    // Existing objects have been updated
    // And not found objects have been deleted
}
Alternatively, if you only want to sync users that have been created in the last 24 hours, you could do this by using a NSPredicate.
let now = NSDate()
let yesterday = now.dateByAddingTimeInterval(-24*60*60)
let predicate = NSPredicate(format:@"createdAt > %@", yesterday)

dataStack.sync(json, inEntityNamed: "User", predicate: predicate) { error in
    //..
}
Demo Project
We have a simple demo project of how to set up and use Sync to fetch data from the network and display it in a UITableView. The demo project features both Networking and Alamofire as the networking libraries.
DataStack with Storyboards
Configuring a DataStack with Storyboard is different than doing it via dependency injection here you'll find a sample project in how to achieve this setup.
https://github.com/3lvis/StoryboardDemo
Getting Started
Core Data Stack
Replace your Core Data stack with an instance of DataStack.
self.dataStack = DataStack(modelName: "Demo")
Primary key
Sync requires your entities to have a primary key, this is important for diffing, otherwise Sync doesnât know how to differentiate between entries.
By default Sync uses id from the JSON and id (or remoteID) from Core Data as the primary key.
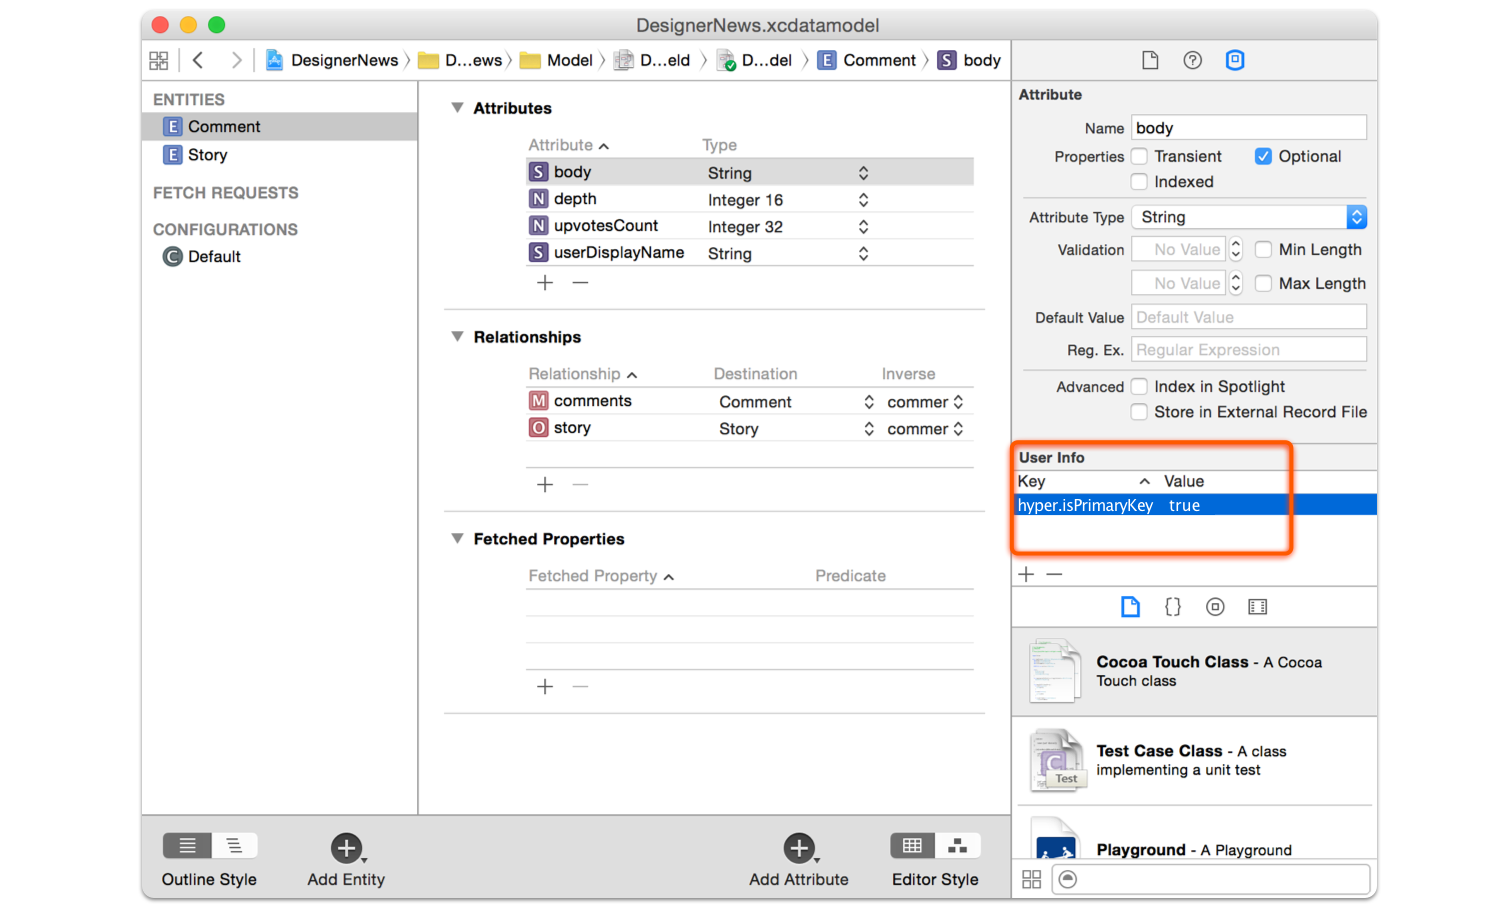
You can mark any attribute as primary key by adding sync.isPrimaryKey and the value true (or YES). For example, in our Designer News project we have a Comment entity that uses body as the primary key.
If you add the flag sync.isPrimaryKey to the attribute contractID then:
- Local primary key will be:
contractID - Remote primary key will be:
contract_id
If you want to use id for the remote primary key you also have to add the flag sync.remoteKey and write id as the value.
- Local primary key will be:
articleBody - Remote primary key will be:
id
Attribute Mapping
Your attributes should match their JSON counterparts in camelCase notation instead of snake_case. For example first_name in the JSON maps to firstName in Core Data and address in the JSON maps to address in Core Data.
There are some exception to this rule:
- Reserved attributes should be prefixed with the
entityName(typebecomesuserType,descriptionbecomesuserDescriptionand so on). In the JSON they don't need to change, you can keeptypeanddescriptionfor example. A full list of reserved attributes can be found here - Attributes with acronyms will be normalized (
id,pdf,url,png,jpg,uri,json,xml). For exampleuser_idwill be mapped touserIDand so on. You can find the entire list of supported acronyms here.
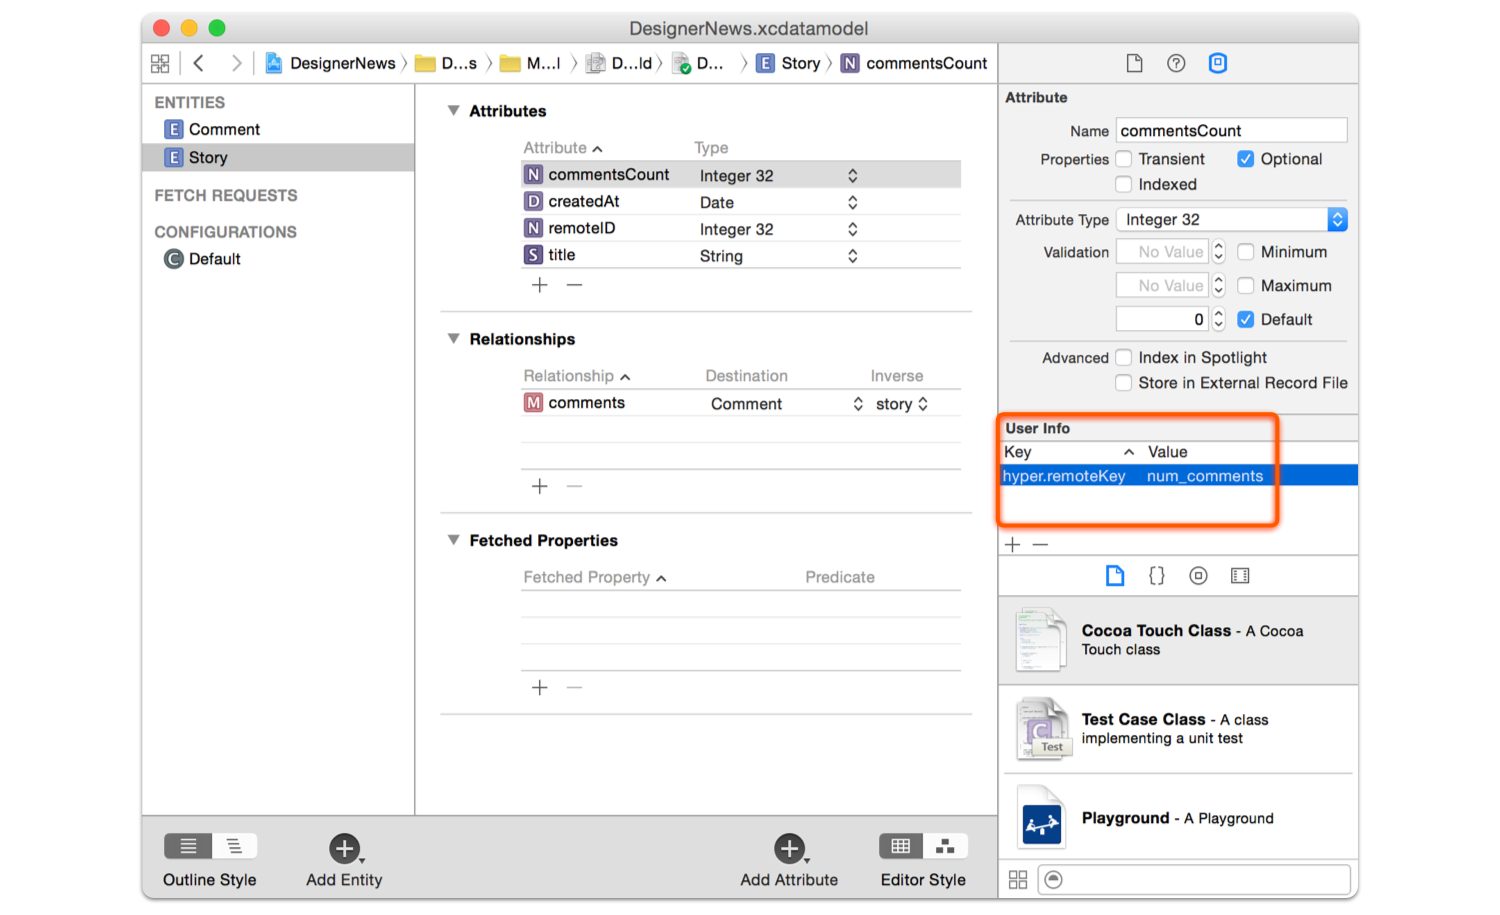
If you want to map your Core Data attribute with a JSON attribute that has different naming, you can do by adding sync.remoteKey in the user info box with the value you want to map.
Attribute Types
Array/Dictionary
To map arrays or dictionaries just set attributes as Binary Data on the Core Data modeler.

Retrieving mapped arrays
{
  "hobbies": [
    "football",
    "soccer",
    "code"
  ]
}
let hobbies = NSKeyedUnarchiver.unarchiveObjectWithData(managedObject.hobbies) as? [String]
// ==> "football", "soccer", "code"
Retrieving mapped dictionaries
{
  "expenses" : {
    "cake" : 12.50,
    "juice" : 0.50
  }
}
let expenses = NSKeyedUnarchiver.unarchiveObjectWithData(managedObject.expenses) as? [String: Double]
// ==> "cake" : 12.50, "juice" : 0.50
Dates
We went for supporting ISO8601 and unix timestamp out of the box because those are the most common formats when parsing dates, also we have a quite performant way to parse this strings which overcomes the performance issues of using NSDateFormatter.
let values = ["created_at" : "2014-01-01T00:00:00+00:00",
              "updated_at" : "2014-01-02",
              "published_at": "1441843200"
              "number_of_attendes": 20]

managedObject.fill(values)

let createdAt = managedObject.value(forKey: "createdAt")
// ==> "2014-01-01 00:00:00 +00:00"

let updatedAt = managedObject.value(forKey: "updatedAt")
// ==> "2014-01-02 00:00:00 +00:00"

let publishedAt = managedObject.value(forKey: "publishedAt")
// ==> "2015-09-10 00:00:00 +00:00"
Relationship mapping
Sync will map your relationships to their JSON counterparts. In the Example presented at the beginning of this document you can see a very basic example of relationship mapping.
One-to-many
Lets consider the following Core Data model.

This model has a one-to-many relationship between User and Note, so in other words a user has many notes. Here can also find an inverse relationship to user on the Note model. This is required for Sync to have more context on how your models are presented. Finally, in the Core Data model there is a cascade relationship between user and note, so when a user is deleted all the notes linked to that user are also removed (you can specify any delete rule).
So when Sync, looks into the following JSON, it will sync all the notes for that specific user, doing the necessary inverse relationship dance.
[
  {
    "id": 6,
    "name": "Shawn Merrill",
    "notes": [
      {
        "id": 0,
        "text": "Shawn Merril's diary, episode 1",
      }
    ]
  }
]
One-to-many Simplified
As you can see this procedures require the full JSON object to be included, but when working with APIs, sometimes you already have synced all the required items. Sync supports this too.
For example, in the one-to-many example, you have a user, that has many notes. If you already have synced all the notes then your JSON would only need the notes_ids, this can be an array of strings or integers. As a side-note only do this if you are 100% sure that all the required items (notes) have been synced, otherwise this relationships will get ignored and an error will be logged. Also if you want to remove all the notes from a user, just provide "notes_ids": null and Sync will do the clean up for you.
[
  {
    "id": 6,
    "name": "Shawn Merrill",
    "notes_ids": [0, 1, 2]
  }
]
One-to-one
A similar procedure is applied to one-to-one relationships. For example lets say you have the following model:
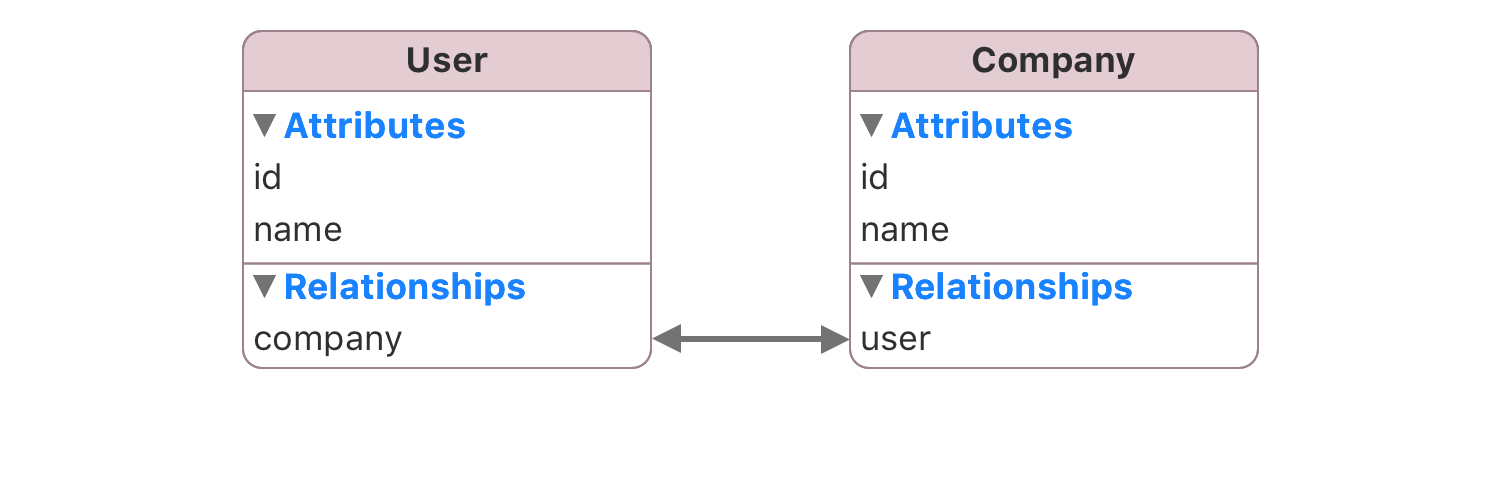
This model is simple, a user as a company. A compatible JSON would look like this:
[
  {
    "id": 6,
    "name": "Shawn Merrill",
    "company": {
      "id": 0,
      "text": "Facebook",
    }
  }
]
One-to-one Simplified
As you can see this procedures require the full JSON object to be included, but when working with APIs, sometimes you already have synced all the required items. Sync supports this too.
For example, in the one-to-one example, you have a user, that has one company. If you already have synced all the companies then your JSON would only need the company_id. As a sidenote only do this if you are 100% sure that all the required items (companies) have been synced, otherwise this relationships will get ignored and an error will be logged. Also if you want to remove the company from the user, just provide "company_id": null and Sync will do the clean up for you.
[
  {
    "id": 6,
    "name": "Shawn Merrill",
    "company_id": 0
  }
]
JSON Exporting
Sync provides an easy way to convert your NSManagedObject back into JSON. Just use the export() method.
let user = //...
user.set(value: "John" for: "firstName")
user.set(value: "Sid" for: "lastName")

let userValues = user.export()
That's it, that's all you have to do, the keys will be magically transformed into a snake_case convention.
{
  "first_name": "John",
  "last_name": "Sid"
}
Excluding
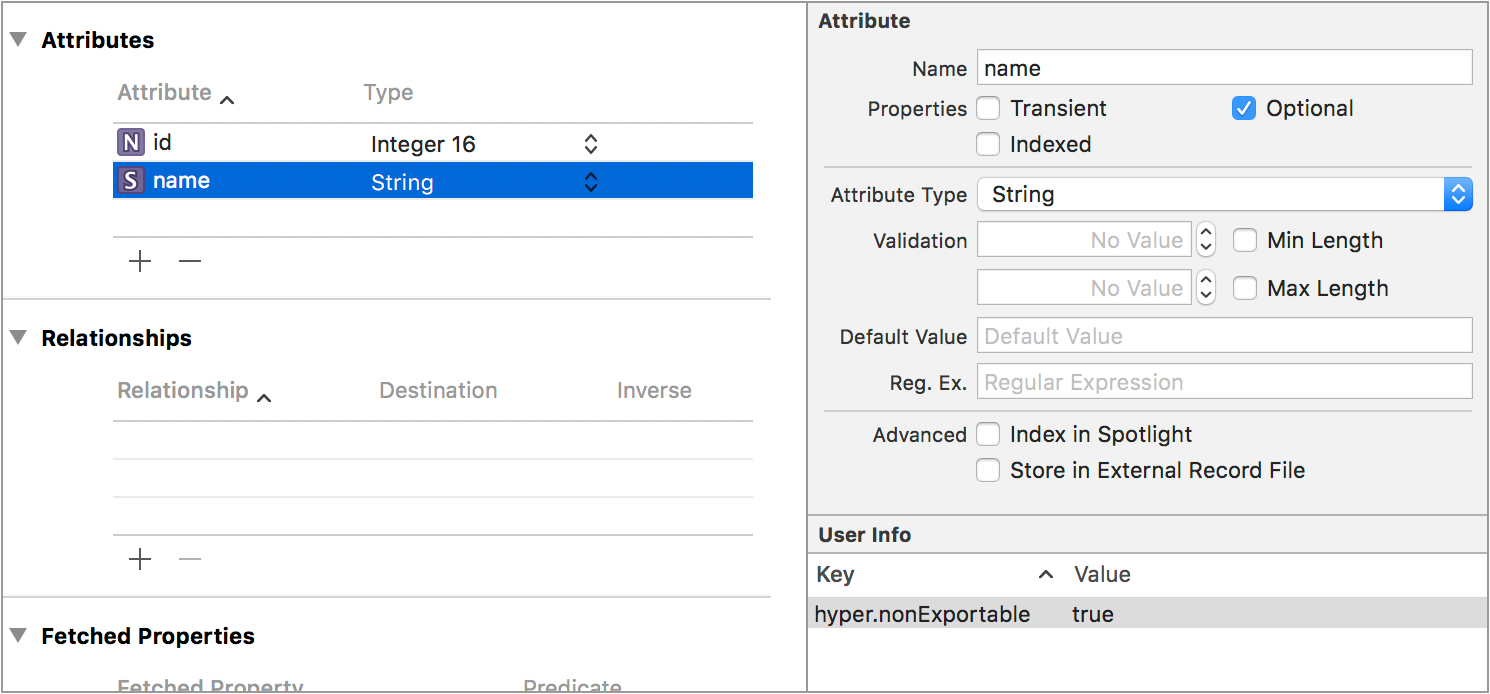
If you don't want to export certain attribute or relationship, you can prohibit exporting by adding sync.nonExportable in the user info of the excluded attribute or relationship.
Relationships
It supports exporting relationships too.
"first_name": "John",
"last_name": "Sid",
"notes": [
  {
    "id": 0,
    "text": "This is the text for the note A"
  },
  {
    "id": 1,
    "text": "This is the text for the note B"
  }
]
If you don't want relationships you can also ignore relationships:
let dictionary = user.export(using: .excludedRelationships)
"first_name": "John",
"last_name": "Sid"
Or get them as nested attributes, something that Ruby on Rails uses (accepts_nested_attributes_for), for example for a user that has many notes:
var exportOptions = ExportOptions()
exportOptions.relationshipType = .nested
let dictionary = user.export(using: exportOptions)
"first_name": "John",
"last_name": "Sid",
"notes_attributes": [
  {
    "0": {
      "id": 0,
      "text": "This is the text for the note A"
    },
    "1": {
      "id": 1,
      "text": "This is the text for the note B"
    }
  }
]
FAQ
Installation
CocoaPods
pod 'Sync', '~> 6'
Carthage
github "3lvis/Sync" ~> 6.0
Supported iOS, OS X, watchOS and tvOS Versions
- iOS 8 or above
- OS X 10.10 or above
- watchOS 2.0 or above
- tvOS 9.0 or above
Backers
Finding Sync helpful? Consider supporting further development and support by becoming a sponsor: ð https://github.com/sponsors/3lvis
License
Sync is available under the MIT license. See the LICENSE file for more info.
Top Related Projects
Realm is a mobile database: a replacement for Core Data & SQLite
A type-safe, Swift-language layer over SQLite3.
A toolkit for SQLite databases, with a focus on application development
A Cocoa / Objective-C wrapper around SQLite
WCDB is a cross-platform database framework developed by WeChat.
Vapor ORM (queries, models, and relations) for NoSQL and SQL databases
Convert  designs to code with AI

Introducing Visual Copilot: A new AI model to turn Figma designs to high quality code using your components.
Try Visual Copilot


