 labelImg
LabelImg is now part of the Label Studio community. The popular image annotation tool created by Tzutalin is no longer actively being developed, but you can check out Label Studio, the open source data labeling tool for images, text, hypertext, audio, video and time-series data.
Top Related Projects
LabelImg is now part of the Label Studio community. The popular image annotation tool created by Tzutalin is no longer actively being developed, but you can check out Label Studio, the open source data labeling tool for images, text, hypertext, audio, video and time-series data.

Image Polygonal Annotation with Python (polygon, rectangle, circle, line, point and image-level flag annotation).

Annotate better with CVAT, the industry-leading data engine for machine learning. Used and trusted by teams at any scale, for data of any scale.

Visual Object Tagging Tool: An electron app for building end to end Object Detection Models from Images and Videos.
Label Studio is a multi-type data labeling and annotation tool with standardized output format
Quick Overview
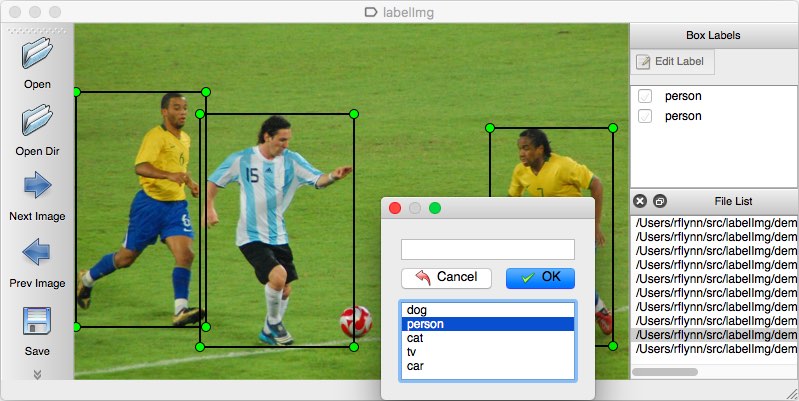
LabelImg is a graphical image annotation tool written in Python using Qt for its graphical interface. It's designed for labeling object bounding boxes in images, which is crucial for training object detection models. The tool supports various image formats and can save annotations in PASCAL VOC and YOLO formats.
Pros
- User-friendly interface for quick and efficient image annotation
- Supports multiple annotation formats (PASCAL VOC and YOLO)
- Cross-platform compatibility (Windows, macOS, and Linux)
- Keyboard shortcuts for faster labeling workflow
Cons
- Limited to bounding box annotations (no polygon or segmentation support)
- May experience performance issues with very large datasets
- Lacks advanced features like automatic labeling or AI-assisted annotation
- No built-in version control or collaboration features
Code Examples
As LabelImg is primarily a graphical tool, there aren't many code examples to showcase. However, here's an example of how to use LabelImg programmatically:
from labelImg import LabelImg

# Create a LabelImg instance
label_img = LabelImg()

# Open an image file
label_img.load_file("path/to/image.jpg")

# Add a bounding box
label_img.add_label("car", [100, 100, 200, 200])

# Save annotations
label_img.save_pascal_voc_format("path/to/annotations.xml")
Getting Started
To get started with LabelImg:
-
Install LabelImg:
pip install labelImg -
Launch the application:
labelImg -
Open an image directory:
- Click "Open Dir" and choose your image folder
-
Create annotations:
- Press 'W' to create a bounding box
- Enter the label name
- Press 'D' to move to the next image
-
Save annotations:
- Click "Save" to save in the current format
- Use "PascalVOC" or "YOLO" buttons to switch formats
For more detailed instructions, refer to the project's GitHub repository.
Competitor Comparisons
LabelImg is now part of the Label Studio community. The popular image annotation tool created by Tzutalin is no longer actively being developed, but you can check out Label Studio, the open source data labeling tool for images, text, hypertext, audio, video and time-series data.
Pros of labelImg
- Identical functionality and features
- Same user interface and labeling capabilities
- Consistent performance and reliability
Cons of labelImg
- No additional features or improvements
- Lacks any unique advantages over the other repository
- Potentially redundant if both repositories are maintained separately
Code Comparison
Both repositories contain identical code, as they are the same project. Here's a sample from the main.py file in both:
def toggleAdvancedMode(status):
    self.toggleAdvancedMode(status)

def setDirty(self):
    self.setDirty()

def toggleActions(self, value=True):
    self.toggleActions(value)
Summary
The comparison between HumanSignal/labelImg and HumanSignal/labelImg reveals that they are identical repositories. There are no distinguishable differences in terms of features, functionality, or code. This situation might be due to a mirroring or forking process, or it could be an error in repository management. Users would have the same experience with either repository, and the choice between them would likely depend on factors such as maintenance frequency, community engagement, or personal preference for the repository owner.
Image Polygonal Annotation with Python (polygon, rectangle, circle, line, point and image-level flag annotation).
Pros of labelme
- Supports a wider variety of annotation types, including polygons and points
- Offers a more flexible and customizable interface
- Provides built-in support for multiple image formats
Cons of labelme
- Steeper learning curve due to more complex features
- May be slower for simple bounding box annotations
- Requires Python installation, which can be challenging for some users
Code Comparison
labelme:
from labelme import utils
from labelme.label_file import LabelFile

label_file = LabelFile(filename="path/to/file.json")
img = utils.img_data_to_arr(label_file.imageData)
labelImg:
from libs.labelFile import LabelFile
from libs.pascal_voc_io import PascalVocWriter

label_file = LabelFile(filename="path/to/file.xml")
writer = PascalVocWriter(foldername, filename, imgSize, databaseSrc='Unknown')
Both projects provide tools for image annotation, but labelme offers more advanced features at the cost of complexity, while labelImg focuses on simplicity and ease of use for bounding box annotations. The code snippets demonstrate the different approaches to handling label files and image data in each project.
Annotate better with CVAT, the industry-leading data engine for machine learning. Used and trusted by teams at any scale, for data of any scale.
Pros of CVAT
- More comprehensive and feature-rich, supporting a wider range of annotation tasks
- Web-based interface allows for collaborative work and easier project management
- Supports AI-assisted annotation and automatic annotation features
Cons of CVAT
- More complex setup and deployment compared to LabelImg's simplicity
- Steeper learning curve for new users due to its extensive feature set
- Requires more system resources to run effectively
Code Comparison
LabelImg (Python):
def save(self, _value=False):
    if self.filename is None:
        return self.save_as()
    else:
        try:
            self.save_labels(self.filename)
            self.set_clean()
            return True
        except LabelFileError as e:
            self.error_message('Error saving label data', str(e))
            return False
CVAT (JavaScript):
async function saveAnnotations(session, annotations) {
    const payload = {
        version: 1,
        tags: [],
        shapes: annotations.map((anno) => ({
            type: anno.type,
            points: anno.points,
            label: anno.label,
        })),
    };
    await session.annotations.put(payload);
}
Visual Object Tagging Tool: An electron app for building end to end Object Detection Models from Images and Videos.
Pros of VoTT
- More comprehensive and feature-rich, supporting multiple project types and export formats
- Cross-platform support (Windows, macOS, Linux) with both web and desktop versions
- Advanced features like AI-assisted labeling and project management capabilities
Cons of VoTT
- Steeper learning curve due to more complex interface and features
- Potentially slower for simple labeling tasks compared to LabelImg's straightforward approach
- Requires more system resources, which may impact performance on older hardware
Code Comparison
LabelImg (Python):
def save(self, _value=False):
    if self.filename is None:
        return self.save_as()
    else:
        try:
            self.save_labels(self.filename)
            self.set_clean()
            return True
        except:
            return False
VoTT (TypeScript):
public async save(): Promise<void> {
    if (this.project.isDirty || this.state.assets.length === 0) {
        await this.saveProject();
    }
    await this.props.actions.saveProject(this.project);
    await this.props.actions.exportProject(this.project);
}
Both repositories provide tools for image labeling, but VoTT offers a more comprehensive solution with advanced features and cross-platform support. LabelImg, on the other hand, is simpler and more lightweight, making it easier to use for basic labeling tasks.
Label Studio is a multi-type data labeling and annotation tool with standardized output format
Pros of Label Studio
- Supports a wide variety of data types (images, text, audio, video, time series)
- Offers a web-based interface for collaborative labeling
- Provides project management features and analytics
Cons of Label Studio
- More complex setup and configuration
- Steeper learning curve for new users
- Requires more system resources to run
Code Comparison
Label Studio (Python):
import label_studio
from label_studio import Project

project = Project.create(title="My Project")
project.import_tasks("tasks.json")
project.create_labeling_interface("config.xml")
LabelImg (Python):
from labelImg import LabelImg

app = LabelImg()
app.load_image("image.jpg")
app.create_rect_box(10, 20, 100, 200, "Object")
app.save_annotations("annotations.xml")
Label Studio offers a more comprehensive API for project management and task importing, while LabelImg provides a simpler interface focused on image annotation. Label Studio's code emphasizes project setup and configuration, whereas LabelImg's code is more directly related to the annotation process itself.
Convert  designs to code with AI

Introducing Visual Copilot: A new AI model to turn Figma designs to high quality code using your components.
Try Visual CopilotREADME
.. image:: /readme/images/labelimg.png :target: https://github.com/heartexlabs/label-studio
Label Studio is a modern, multi-modal data annotation tool
LabelImg, the popular image annotation tool created by Tzutalin with the help of dozens contributors, is no longer actively being developed and has become part of the Label Studio community. Check out Label Studio <https://github.com/heartexlabs/label-studio>, the most flexible open source data labeling tool for images, text, hypertext, audio, video and time-series data. Install <https://labelstud.io/guide/install.html> Label Studio and join the slack community <https://label-studio.slack.com/>__ to get started.
.. image:: /readme/images/label-studio-1-6-player-screenshot.png :target: https://github.com/heartexlabs/label-studio
About LabelImg
.. image:: https://img.shields.io/pypi/v/labelimg.svg :target: https://pypi.python.org/pypi/labelimg
.. image:: https://img.shields.io/github/workflow/status/tzutalin/labelImg/Package?style=for-the-badge :alt: GitHub Workflow Status
.. image:: https://img.shields.io/badge/lang-en-blue.svg :target: https://github.com/tzutalin/labelImg
.. image:: https://img.shields.io/badge/lang-zh-green.svg :target: https://github.com/tzutalin/labelImg/blob/master/readme/README.zh.rst
.. image:: https://img.shields.io/badge/lang-jp-green.svg :target: https://github.com/tzutalin/labelImg/blob/master/readme/README.jp.rst
LabelImg is a graphical image annotation tool.
It is written in Python and uses Qt for its graphical interface.
Annotations are saved as XML files in PASCAL VOC format, the format used
by ImageNet <http://www.image-net.org/>__. Besides, it also supports YOLO and CreateML formats.
.. image:: https://raw.githubusercontent.com/tzutalin/labelImg/master/demo/demo3.jpg :alt: Demo Image
.. image:: https://raw.githubusercontent.com/tzutalin/labelImg/master/demo/demo.jpg :alt: Demo Image
Watch a demo video <https://youtu.be/p0nR2YsCY_U>__
Installation
Get from PyPI but only python3.0 or above
This is the simplest (one-command) install method on modern Linux distributions such as Ubuntu and Fedora.
.. code:: shell
pip3 install labelImg
labelImg
labelImg [IMAGE_PATH] [PRE-DEFINED CLASS FILE]
Build from source
~~~~~~~~~~~~~~~~~
Linux/Ubuntu/Mac requires at least `Python
2.6 <https://www.python.org/getit/>`__ and has been tested with `PyQt
4.8 <https://www.riverbankcomputing.com/software/pyqt/intro>`__. However, `Python
3 or above <https://www.python.org/getit/>`__ and `PyQt5 <https://pypi.org/project/PyQt5/>`__ are strongly recommended.
Ubuntu Linux
^^^^^^^^^^^^
Python 3 + Qt5
.. code:: shell
sudo apt-get install pyqt5-dev-tools
sudo pip3 install -r requirements/requirements-linux-python3.txt
make qt5py3
python3 labelImg.py
python3 labelImg.py [IMAGE_PATH] [PRE-DEFINED CLASS FILE]
macOS
^^^^^
Python 3 + Qt5
.. code:: shell
brew install qt # Install qt-5.x.x by Homebrew
brew install libxml2
or using pip
pip3 install pyqt5 lxml # Install qt and lxml by pip
make qt5py3
python3 labelImg.py
python3 labelImg.py [IMAGE_PATH] [PRE-DEFINED CLASS FILE]
Python 3 Virtualenv (Recommended)
Virtualenv can avoid a lot of the QT / Python version issues
.. code:: shell
brew install python3
pip3 install pipenv
pipenv run pip install pyqt5==5.15.2 lxml
pipenv run make qt5py3
pipenv run python3 labelImg.py
[Optional] rm -rf build dist; pipenv run python setup.py py2app -A;mv "dist/labelImg.app" /Applications
Note: The Last command gives you a nice .app file with a new SVG Icon in your /Applications folder. You can consider using the script: build-tools/build-for-macos.sh
Windows
^^^^^^^
Install `Python <https://www.python.org/downloads/windows/>`__,
`PyQt5 <https://www.riverbankcomputing.com/software/pyqt/download5>`__
and `install lxml <http://lxml.de/installation.html>`__.
Open cmd and go to the `labelImg <#labelimg>`__ directory
.. code:: shell
pyrcc4 -o libs/resources.py resources.qrc
For pyqt5, pyrcc5 -o libs/resources.py resources.qrc
python labelImg.py
python labelImg.py [IMAGE_PATH] [PRE-DEFINED CLASS FILE]
If you want to package it into a separate EXE file
.. code:: shell
Install pyinstaller and execute:
pip install pyinstaller
pyinstaller --hidden-import=pyqt5 --hidden-import=lxml -F -n "labelImg" -c labelImg.py -p ./libs -p ./
Windows + Anaconda
^^^^^^^^^^^^^^^^^^
Download and install `Anaconda <https://www.anaconda.com/download/#download>`__ (Python 3+)
Open the Anaconda Prompt and go to the `labelImg <#labelimg>`__ directory
.. code:: shell
conda install pyqt=5
conda install -c anaconda lxml
pyrcc5 -o libs/resources.py resources.qrc
python labelImg.py
python labelImg.py [IMAGE_PATH] [PRE-DEFINED CLASS FILE]
Use Docker
~~~~~~~~~~~~~~~~~
.. code:: shell
docker run -it \
--user $(id -u) \
-e DISPLAY=unix$DISPLAY \
--workdir=$(pwd) \
--volume="/home/$USER:/home/$USER" \
--volume="/etc/group:/etc/group:ro" \
--volume="/etc/passwd:/etc/passwd:ro" \
--volume="/etc/shadow:/etc/shadow:ro" \
--volume="/etc/sudoers.d:/etc/sudoers.d:ro" \
-v /tmp/.X11-unix:/tmp/.X11-unix \
tzutalin/py2qt4
make qt4py2;./labelImg.py
You can pull the image which has all of the installed and required dependencies. `Watch a demo video <https://youtu.be/nw1GexJzbCI>`__
Usage
-----
Steps (PascalVOC)
~~~~~~~~~~~~~~~~~
1. Build and launch using the instructions above.
2. Click 'Change default saved annotation folder' in Menu/File
3. Click 'Open Dir'
4. Click 'Create RectBox'
5. Click and release left mouse to select a region to annotate the rect
box
6. You can use right mouse to drag the rect box to copy or move it
The annotation will be saved to the folder you specify.
You can refer to the below hotkeys to speed up your workflow.
Steps (YOLO)
~~~~~~~~~~~~
1. In ``data/predefined_classes.txt`` define the list of classes that will be used for your training.
2. Build and launch using the instructions above.
3. Right below "Save" button in the toolbar, click "PascalVOC" button to switch to YOLO format.
4. You may use Open/OpenDIR to process single or multiple images. When finished with a single image, click save.
A txt file of YOLO format will be saved in the same folder as your image with same name. A file named "classes.txt" is saved to that folder too. "classes.txt" defines the list of class names that your YOLO label refers to.
Note:
- Your label list shall not change in the middle of processing a list of images. When you save an image, classes.txt will also get updated, while previous annotations will not be updated.
- You shouldn't use "default class" function when saving to YOLO format, it will not be referred.
- When saving as YOLO format, "difficult" flag is discarded.
Create pre-defined classes
~~~~~~~~~~~~~~~~~~~~~~~~~~
You can edit the
`data/predefined\_classes.txt <https://github.com/tzutalin/labelImg/blob/master/data/predefined_classes.txt>`__
to load pre-defined classes
Annotation visualization
~~~~~~~~~~~~~~~~~~~~~~~~
1. Copy the existing lables file to same folder with the images. The labels file name must be same with image file name.
2. Click File and choose 'Open Dir' then Open the image folder.
3. Select image in File List, it will appear the bounding box and label for all objects in that image.
(Choose Display Labels mode in View to show/hide lablels)
Hotkeys
~~~~~~~
+--------------------+--------------------------------------------+
| Ctrl + u | Load all of the images from a directory |
+--------------------+--------------------------------------------+
| Ctrl + r | Change the default annotation target dir |
+--------------------+--------------------------------------------+
| Ctrl + s | Save |
+--------------------+--------------------------------------------+
| Ctrl + d | Copy the current label and rect box |
+--------------------+--------------------------------------------+
| Ctrl + Shift + d | Delete the current image |
+--------------------+--------------------------------------------+
| Space | Flag the current image as verified |
+--------------------+--------------------------------------------+
| w | Create a rect box |
+--------------------+--------------------------------------------+
| d | Next image |
+--------------------+--------------------------------------------+
| a | Previous image |
+--------------------+--------------------------------------------+
| del | Delete the selected rect box |
+--------------------+--------------------------------------------+
| Ctrl++ | Zoom in |
+--------------------+--------------------------------------------+
| Ctrl-- | Zoom out |
+--------------------+--------------------------------------------+
| ââââ | Keyboard arrows to move selected rect box |
+--------------------+--------------------------------------------+
**Verify Image:**
When pressing space, the user can flag the image as verified, a green background will appear.
This is used when creating a dataset automatically, the user can then through all the pictures and flag them instead of annotate them.
**Difficult:**
The difficult field is set to 1 indicates that the object has been annotated as "difficult", for example, an object which is clearly visible but difficult to recognize without substantial use of context.
According to your deep neural network implementation, you can include or exclude difficult objects during training.
How to reset the settings
~~~~~~~~~~~~~~~~~~~~~~~~~
In case there are issues with loading the classes, you can either:
1. From the top menu of the labelimg click on Menu/File/Reset All
2. Remove the `.labelImgSettings.pkl` from your home directory. In Linux and Mac you can do:
`rm ~/.labelImgSettings.pkl`
How to contribute
~~~~~~~~~~~~~~~~~
Send a pull request
License
~~~~~~~
`Free software: MIT license <https://github.com/tzutalin/labelImg/blob/master/LICENSE>`_
Citation: Tzutalin. LabelImg. Git code (2015). https://github.com/tzutalin/labelImg
Related and additional tools
~~~~~~~~~~~~~~~~~~~~~~~~~~~~
1. `Label Studio <https://github.com/heartexlabs/label-studio>`__ to label images, text, audio, video and time-series data for machine learning and AI
2. `ImageNet Utils <https://github.com/tzutalin/ImageNet_Utils>`__ to
download image, create a label text for machine learning, etc
3. `Use Docker to run labelImg <https://hub.docker.com/r/tzutalin/py2qt4>`__
4. `Generating the PASCAL VOC TFRecord files <https://github.com/tensorflow/models/blob/4f32535fe7040bb1e429ad0e3c948a492a89482d/research/object_detection/g3doc/preparing_inputs.md#generating-the-pascal-voc-tfrecord-files>`__
5. `App Icon based on Icon by Nick Roach (GPL) <https://www.elegantthemes.com/>`__
6. `Setup python development in vscode <https://tzutalin.blogspot.com/2019/04/set-up-visual-studio-code-for-python-in.html>`__
7. `The link of this project on iHub platform <https://code.ihub.org.cn/projects/260/repository/labelImg>`__
8. `Convert annotation files to CSV format or format for Google Cloud AutoML <https://github.com/tzutalin/labelImg/tree/master/tools>`__
Stargazers over time
~~~~~~~~~~~~~~~~~~~~
.. image:: https://starchart.cc/tzutalin/labelImg.svg
Top Related Projects
LabelImg is now part of the Label Studio community. The popular image annotation tool created by Tzutalin is no longer actively being developed, but you can check out Label Studio, the open source data labeling tool for images, text, hypertext, audio, video and time-series data.
Image Polygonal Annotation with Python (polygon, rectangle, circle, line, point and image-level flag annotation).
Annotate better with CVAT, the industry-leading data engine for machine learning. Used and trusted by teams at any scale, for data of any scale.
Visual Object Tagging Tool: An electron app for building end to end Object Detection Models from Images and Videos.
Label Studio is a multi-type data labeling and annotation tool with standardized output format
Convert designs to code with AI
Introducing Visual Copilot: A new AI model to turn Figma designs to high quality code using your components.
Try Visual Copilot