 SwiftLanguageWeather
Swift Language Weather is an iOS weather app developed in Swift 4.
Top Related Projects

KolodaView is a class designed to simplify the implementation of Tinder like cards on iOS.

A very flexible message bar for UIKit and SwiftUI.

The better way to deal with JSON data in Swift.

Elegant HTTP Networking in Swift

Beautiful charts for iOS/tvOS/OSX! The Apple side of the crossplatform MPAndroidChart.
Quick Overview
SwiftLanguageWeather is an open-source weather app developed using Swift. It serves as a demonstration of Swift programming language features and best practices for iOS app development. The project showcases how to build a functional and visually appealing weather application while leveraging Swift's capabilities.
Pros
- Excellent learning resource for Swift developers
- Clean and well-structured codebase
- Demonstrates integration with weather APIs
- Implements modern iOS UI design principles
Cons
- May not be regularly updated with the latest Swift features
- Limited functionality compared to commercial weather apps
- Lacks advanced features like push notifications or widgets
- May require updates to work with the latest iOS versions
Code Examples
- Fetching weather data:
func fetchWeatherData(for city: String) {
    weatherService.getWeather(for: city) { [weak self] result in
        switch result {
        case .success(let weather):
            self?.updateUI(with: weather)
        case .failure(let error):
            self?.showError(error)
        }
    }
}
- Updating UI with weather information:
func updateUI(with weather: Weather) {
    DispatchQueue.main.async {
        self.cityLabel.text = weather.city
        self.temperatureLabel.text = "\(weather.temperature)°C"
        self.conditionImageView.image = UIImage(named: weather.conditionCode)
    }
}
- Configuring a custom table view cell:
class ForecastCell: UITableViewCell {
    @IBOutlet weak var dayLabel: UILabel!
    @IBOutlet weak var iconImageView: UIImageView!
    @IBOutlet weak var temperatureLabel: UILabel!

    func configure(with forecast: Forecast) {
        dayLabel.text = forecast.day
        iconImageView.image = UIImage(named: forecast.iconName)
        temperatureLabel.text = "\(forecast.temperature)°C"
    }
}
Getting Started
-
Clone the repository:
git clone https://github.com/JakeLin/SwiftLanguageWeather.git -
Open the project in Xcode:
cd SwiftLanguageWeather open SwiftLanguageWeather.xcodeproj -
Build and run the project in Xcode using a simulator or connected iOS device.
-
To use your own weather API, update the
WeatherServiceclass with your API credentials and endpoints.
Competitor Comparisons
KolodaView is a class designed to simplify the implementation of Tinder like cards on iOS.
Pros of Koloda
- More focused and specialized for card swiping UI, making it easier to implement Tinder-like interfaces
- Better documentation and examples, including a demo project
- More active development and community support
Cons of Koloda
- Limited to card swiping functionality, less versatile for other UI patterns
- Steeper learning curve for developers not familiar with custom UI components
- May require additional libraries for features like networking or data persistence
Code Comparison
SwiftLanguageWeather:
class WeatherView: UIView {
    @IBOutlet weak var locationLabel: UILabel!
    @IBOutlet weak var iconLabel: UILabel!
    @IBOutlet weak var temperatureLabel: UILabel!
}
Koloda:
class ExampleOverlayView: UIView {
    @IBOutlet weak var overlayImageView: UIImageView!

    override init(frame: CGRect) {
        super.init(frame: frame)
        self.commonInit()
    }
}
Both projects use Swift and UIKit, but Koloda focuses on creating custom overlay views for card swiping, while SwiftLanguageWeather implements a more traditional weather app UI. Koloda's code is more specialized for its specific use case, while SwiftLanguageWeather's code is more general-purpose for displaying weather information.
A very flexible message bar for UIKit and SwiftUI.
Pros of SwiftMessages
- More focused and specialized library for displaying various types of messages and alerts
- Highly customizable with numerous configuration options and styles
- Actively maintained with regular updates and improvements
Cons of SwiftMessages
- Limited to message and alert functionality, not a full-featured weather app
- May require more setup and configuration for basic use cases
- Larger codebase and potentially higher learning curve for beginners
Code Comparison
SwiftLanguageWeather:
struct ContentView: View {
    @ObservedObject var weatherVM: WeatherViewModel

    var body: some View {
        VStack {
            Text(weatherVM.temperature)
            Text(weatherVM.weatherIcon)
            Text(weatherVM.weatherDescription)
        }
    }
}
SwiftMessages:
SwiftMessages.show {
    let view = MessageView.viewFromNib(layout: .cardView)
    view.configureTheme(.success)
    view.configureContent(title: "Success", body: "The operation was successful!")
    view.button?.setTitle("OK", for: .normal)
    return view
}
SwiftLanguageWeather focuses on displaying weather information in a simple UI, while SwiftMessages provides a more flexible system for showing various types of messages and alerts with customizable layouts and themes.
The better way to deal with JSON data in Swift.
Pros of SwiftyJSON
- Focused library for JSON parsing and manipulation
- Extensive documentation and community support
- Lightweight and easy to integrate into existing projects
Cons of SwiftyJSON
- Limited to JSON handling, unlike SwiftLanguageWeather's broader scope
- May require additional libraries for complete app functionality
- Less suitable for beginners learning Swift through a complete app example
Code Comparison
SwiftyJSON:
let json = JSON(data: dataFromNetworking)
if let name = json[0]["name"].string {
    // Do something with name
}
SwiftLanguageWeather:
struct WeatherData: Codable {
    let name: String
    let temperature: Double
}
let weatherData = try JSONDecoder().decode(WeatherData.self, from: data)
SwiftyJSON provides a more flexible approach to JSON handling, allowing for easier access to nested values. SwiftLanguageWeather, being a complete app example, demonstrates the use of Swift's built-in Codable protocol for JSON parsing within a real-world context.
While SwiftyJSON excels in JSON manipulation, SwiftLanguageWeather offers a comprehensive learning experience for Swift developers, covering various aspects of iOS app development beyond just data handling.
Elegant HTTP Networking in Swift
Pros of Alamofire
- More comprehensive networking library with extensive features
- Actively maintained with frequent updates and large community support
- Robust error handling and request/response validation
Cons of Alamofire
- Larger codebase and potential overhead for simple networking tasks
- Steeper learning curve for beginners compared to SwiftLanguageWeather
- May be overkill for small projects or basic API requests
Code Comparison
SwiftLanguageWeather (basic URL request):
let url = URL(string: "https://api.example.com/weather")!
URLSession.shared.dataTask(with: url) { data, response, error in
    // Handle response
}.resume()
Alamofire (equivalent request):
AF.request("https://api.example.com/weather").responseJSON { response in
    switch response.result {
    case .success(let value):
        print("Success: \(value)")
    case .failure(let error):
        print("Error: \(error)")
    }
}
SwiftLanguageWeather is a simple weather app showcasing Swift language features, while Alamofire is a full-featured networking library. SwiftLanguageWeather is better for learning Swift basics and building a simple app, whereas Alamofire excels in handling complex networking scenarios and is more suitable for production-level applications requiring advanced HTTP networking capabilities.
Beautiful charts for iOS/tvOS/OSX! The Apple side of the crossplatform MPAndroidChart.
Pros of Charts
- Comprehensive charting library with a wide variety of chart types
- Highly customizable with extensive documentation
- Large community support and regular updates
Cons of Charts
- Steeper learning curve due to its extensive features
- Larger file size and potential performance impact for simple use cases
Code Comparison
SwiftLanguageWeather:
struct WeatherView: View {
    var body: some View {
        VStack {
            Text("Weather Forecast")
            // Weather display logic
        }
    }
}
Charts:
import Charts

struct ChartView: View {
    var body: some View {
        Chart {
            BarMark(
                x: .value("Day", "Mon"),
                y: .value("Temperature", 24)
            )
            // More data points...
        }
    }
}
Summary
SwiftLanguageWeather is a simple weather app showcasing Swift language features, while Charts is a powerful charting library. SwiftLanguageWeather is more focused on demonstrating Swift concepts, making it easier for beginners to understand. Charts, on the other hand, offers a robust solution for creating various types of charts but may be overkill for simple projects. The code comparison shows the difference in complexity, with Charts requiring more setup but providing more advanced visualization capabilities.
Convert  designs to code with AI

Introducing Visual Copilot: A new AI model to turn Figma designs to high quality code using your components.
Try Visual CopilotREADME
Swift Language Weather
![]()

SwiftWeather has renamed to Swift Language Weather. Because this repo is ranked number one in Google when we search "Swift Weather", I got an email from Swift Weather Company's lawyer to ask me to change the name because they said they are the owner of U.S. Trademark SWIFT WEATHER. After discussed with them, they were not happy with the name SwiftyWeather. Now the new project name is Swift Language Weather. More details can be found on Issue: Open source project using a registered trademark.
Swift Language Weather is an iOS weather app developed in Swift 4. The app has been actively upgrading to adopt the latest features of iOS and Swift language.
Notices
The current version is working with Xcode Version Xcode 9.1 (9B55). If you are using different Xcode version, please check out the previous releases.
Version 4
This version has been upgraded to support iOS 10+ only using Swift 4.
There is three major version of the app released before.
- V1.0 - Support iOS 7+ using CocoaPods and AFNetworking. README.v1.md and Release V1 - Using CocoaPods and AFNetworking
- V2.0 - Support iOS 8+ using Carthage, Alamofire, and SwiftyJSON. README.v2.md and Release V2.0
- V2.1 - Support iOS 8+ using Alamofire and SwiftyJSON. This version has removed Carthage because some developers don't have a paid Apple iOS developer account, and they have issues to build Carthage packages.
- V3.0 - Support iOS 9+ and Swift 3.
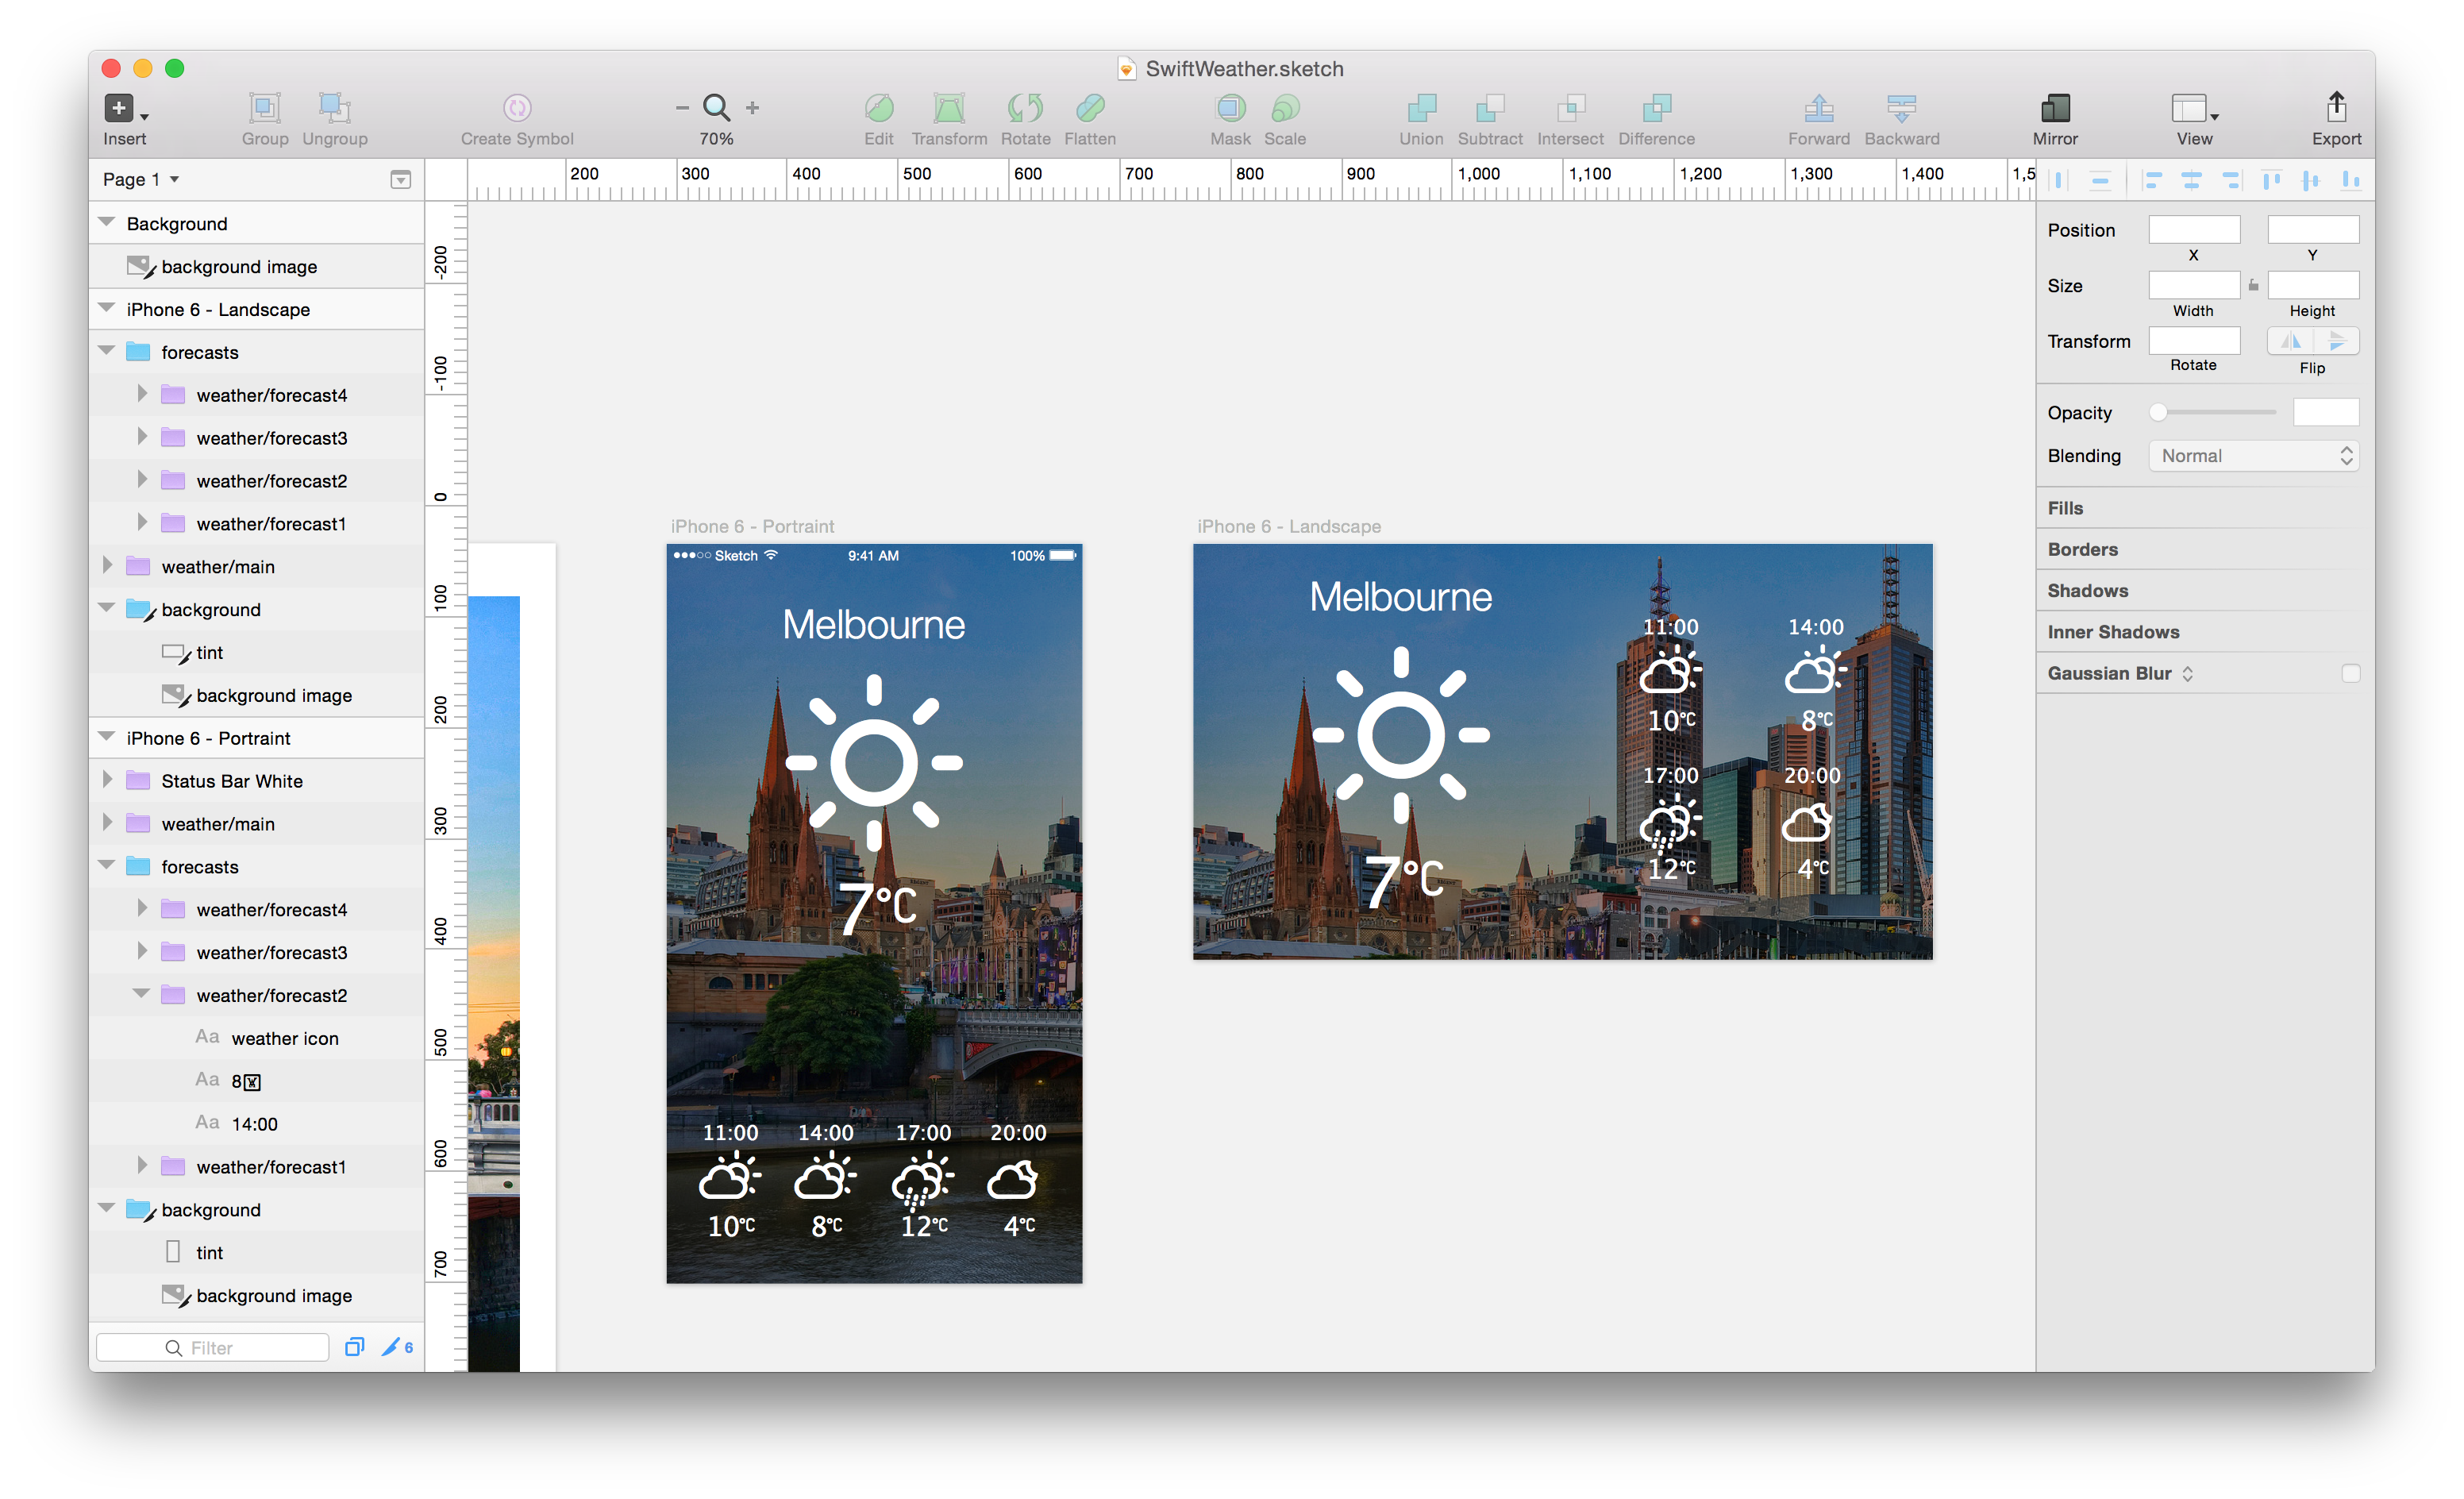
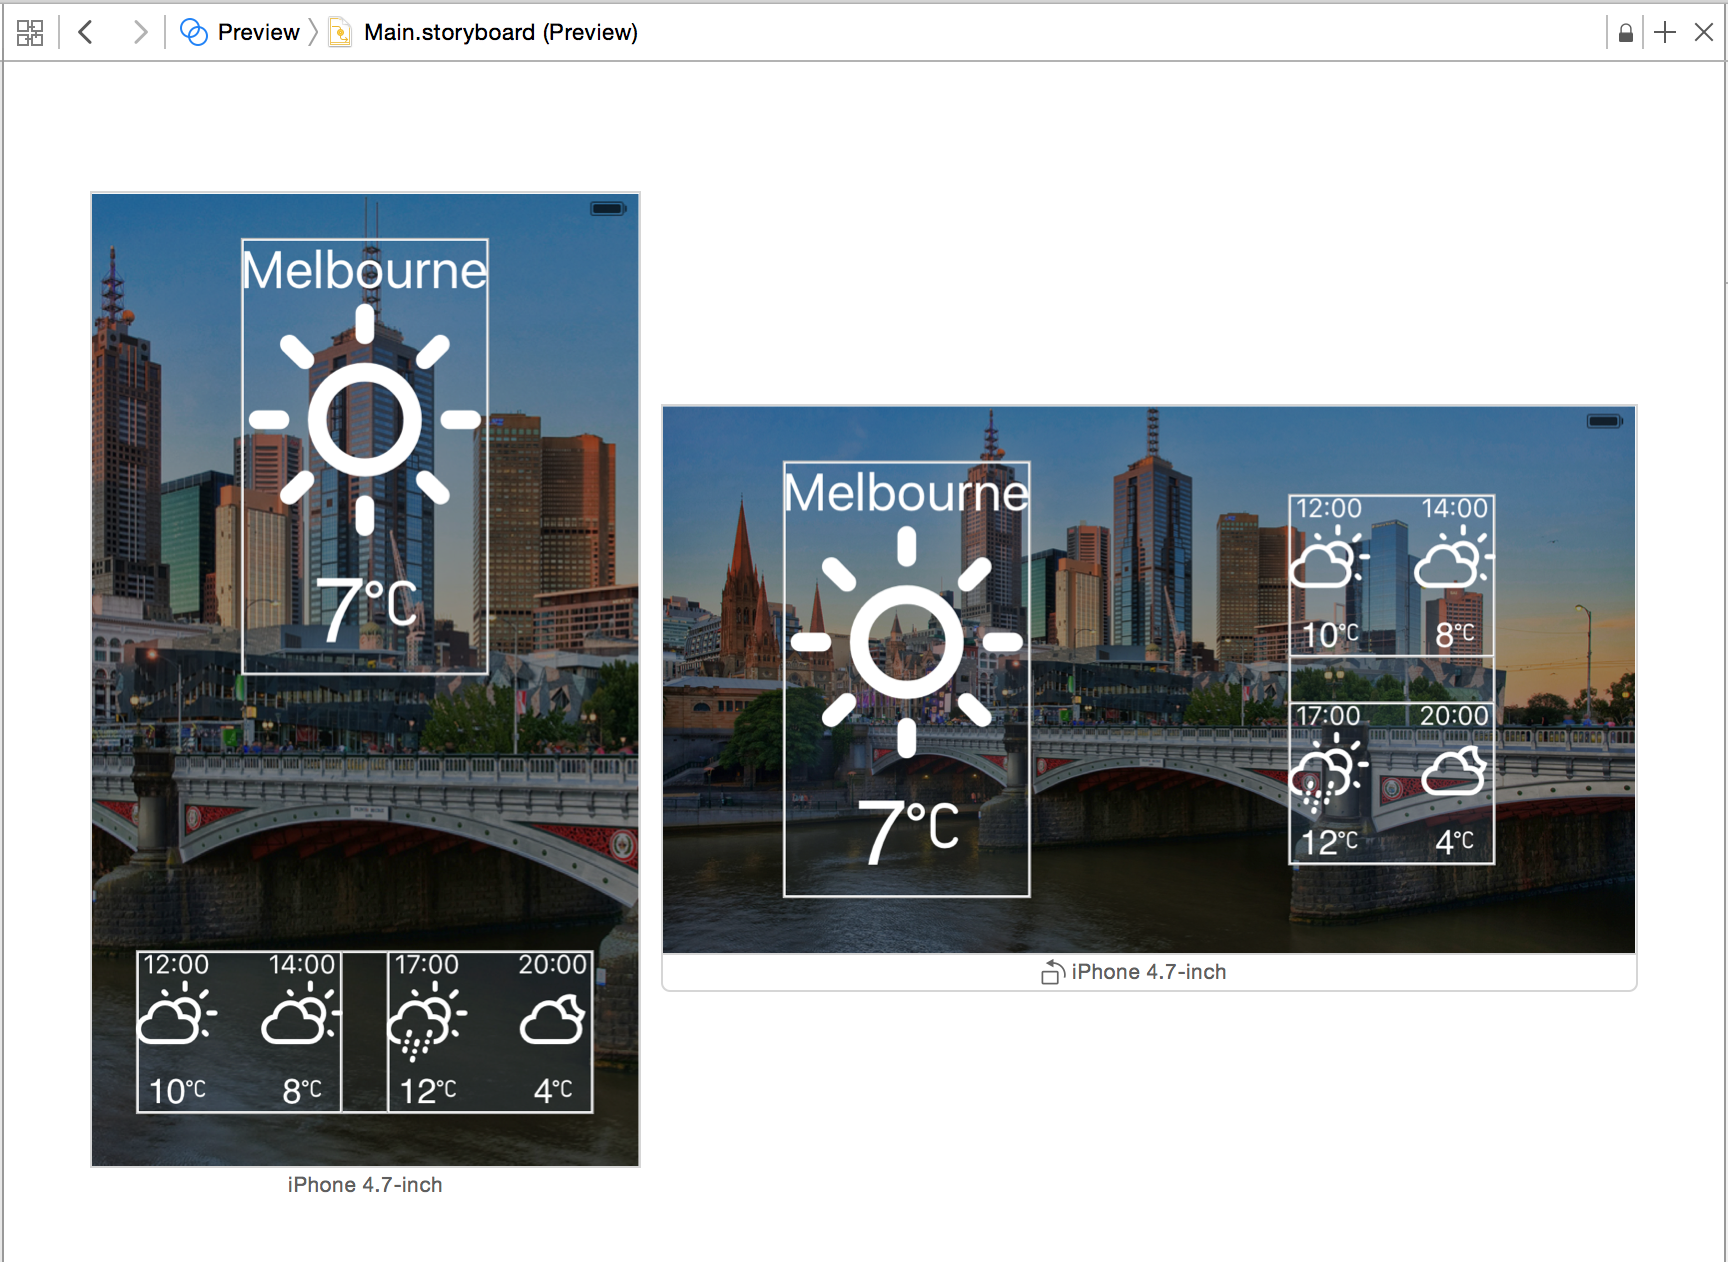
Screenshots
Features
- Swift Programming Language
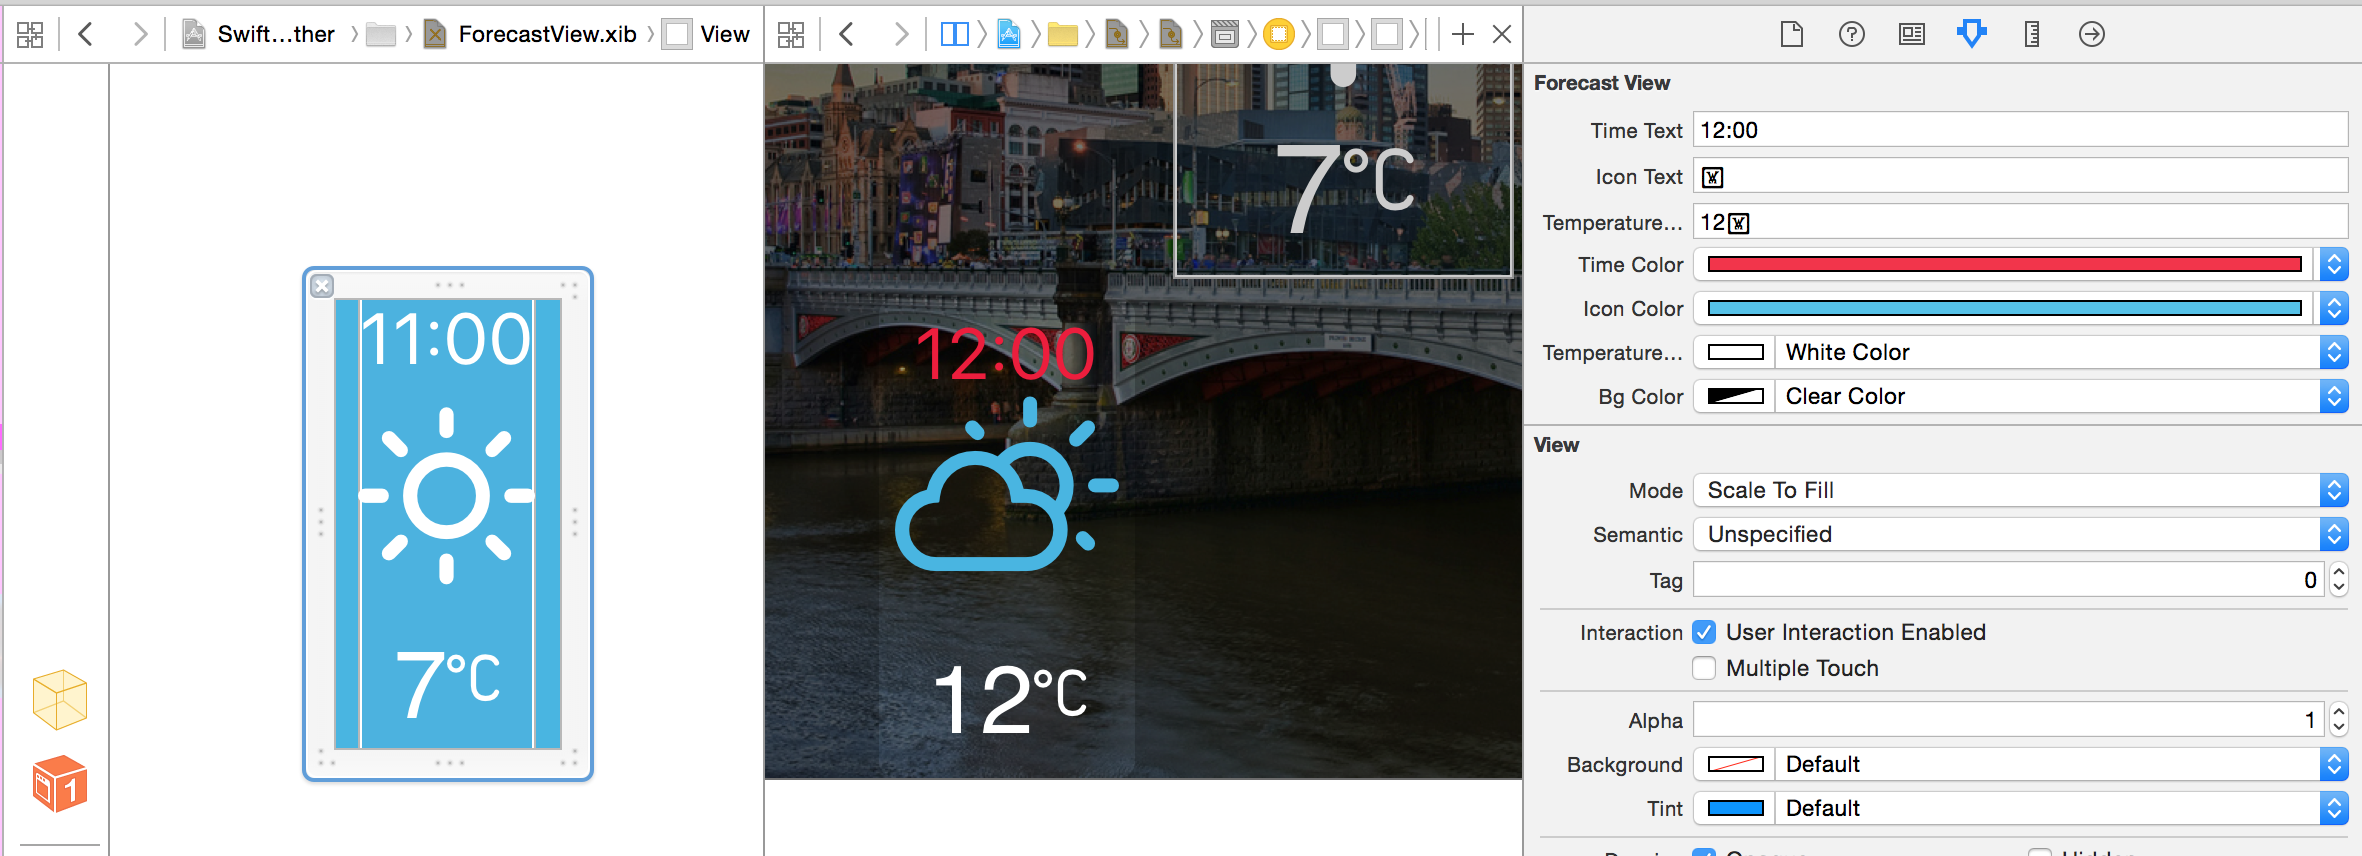
- Design-driven development - Sketch design file
- Custom UIView
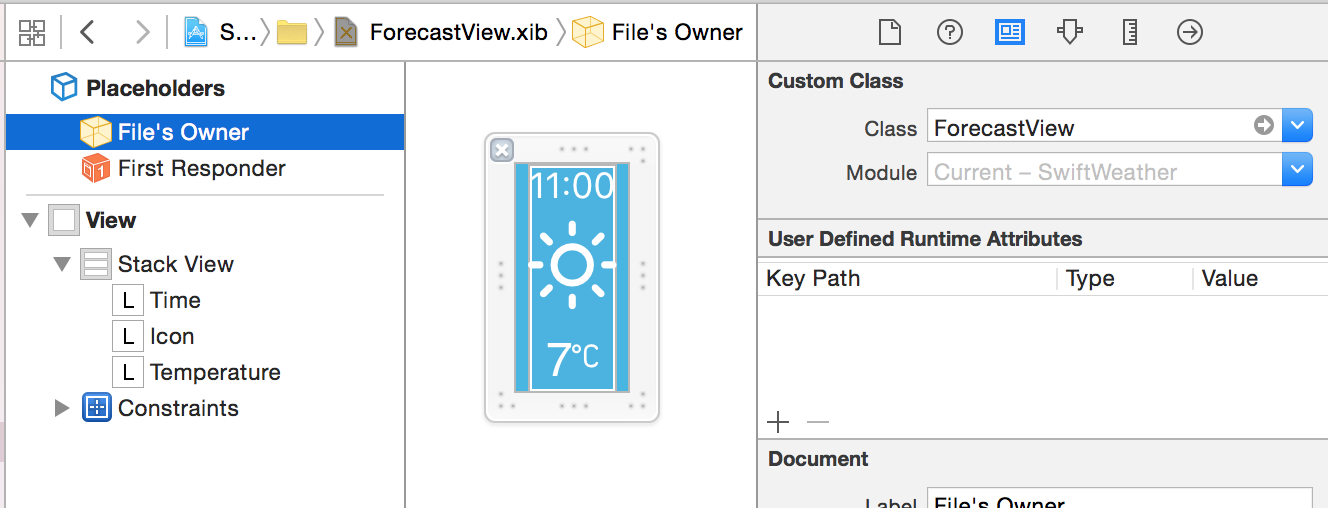
@IBDesignableand@IBInspectable- Reusable UI components
UIStackView
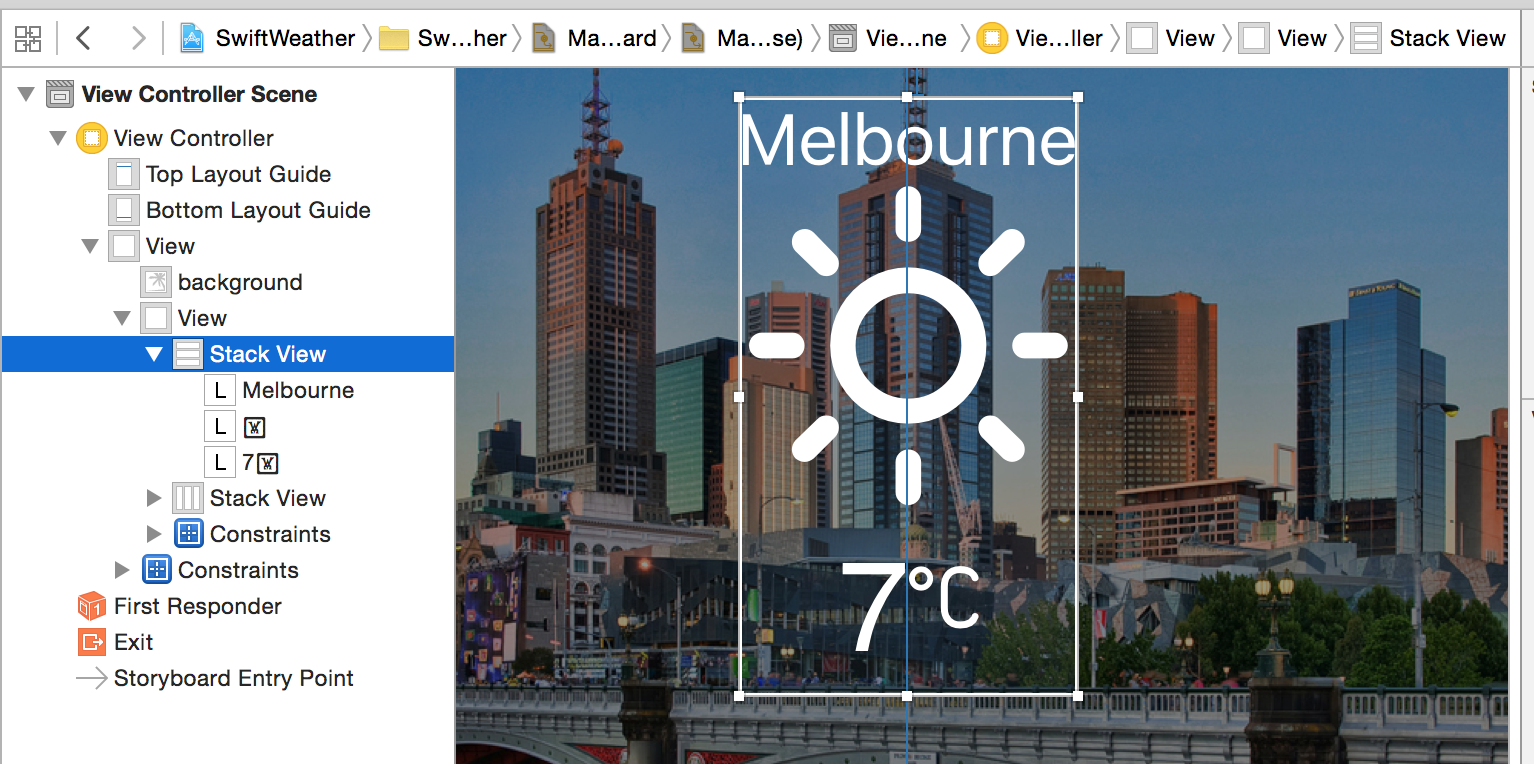
- Size Classes - Support different devices with adaptive layout
- MVVM - Reactively update
ViewControllerUI fromViewModel - Protocol-Oriented Programming - We use Protocol-Oriented Programming in IBAnimatable open source project.
- Value-based programming - Use immutable value anywhere.
- Icon fonts ï¼ Use Weather Icons
- SwiftyJSON
- Core Location
- App indexing like CoreSpotlight and
NSUserActivity - Unit Tests
- UI Tests
- Animations
How to build
- Clone the repository
$ git clone https://github.com/JakeLin/SwiftLanguageWeather.git
- Install pods
$ cd SwiftLanguageWeather
$ pod install
- Open the workspace in Xcode
$ open "SwiftWeather.xcworkspace"
- Sign up on openweathermap.org/appid to get an appid
$ mkdir .access_tokens
$ echo "your-openweathermap-appid" > .access_tokens/openweathermap
Please replace "your-openweathermap-appid" with your actual appid key.
-
Compile and run the app in your simulator
-
If you don't see any data, please check "Simulator" -> "Debug" -> "Location" to change the location.
Requirements
- Xcode 9
- iOS 10+
- Swift 4
Top Related Projects
KolodaView is a class designed to simplify the implementation of Tinder like cards on iOS.
A very flexible message bar for UIKit and SwiftUI.
The better way to deal with JSON data in Swift.
Elegant HTTP Networking in Swift
Beautiful charts for iOS/tvOS/OSX! The Apple side of the crossplatform MPAndroidChart.
Convert designs to code with AI
Introducing Visual Copilot: A new AI model to turn Figma designs to high quality code using your components.
Try Visual Copilot