
Top Related Projects

Image-to-Image Translation in PyTorch

Synthesizing and manipulating 2048x1024 images with conditional GANs

Image-to-image translation with conditional adversarial nets

Neural Style and MSG-Net

PyTorch implementations of Generative Adversarial Networks.
Quick Overview
SPADE (Semantic Image Synthesis with Spatially-Adaptive Normalization) is a powerful image synthesis model developed by NVIDIA. It allows for the generation of photorealistic images from semantic segmentation maps, offering fine-grained control over the output image's content and style. SPADE introduces a spatially-adaptive normalization technique that better preserves semantic information throughout the network.
Pros
- Produces high-quality, photorealistic images from semantic layouts
- Offers fine-grained control over generated content and style
- Supports various datasets and can be easily adapted to new domains
- Provides a user-friendly interface for image generation and manipulation
Cons
- Requires significant computational resources for training and inference
- May struggle with complex scenes or rare object categories
- Limited by the quality and diversity of the training dataset
- Potential ethical concerns regarding the creation of synthetic imagery
Code Examples
- Loading a pre-trained SPADE model:
from models.pix2pix_model import Pix2PixModel
import torch

opt = torch.load('checkpoints/coco_pretrained/opt.pkl')
model = Pix2PixModel(opt)
model.eval()
- Generating an image from a semantic layout:
import torch
from data.base_dataset import get_params, get_transform

# Load semantic layout
semantic_layout = torch.load('path/to/semantic_layout.pth')

# Set up transformation parameters
params = get_params(opt, semantic_layout.size)
transform_image = get_transform(opt, params)

# Transform and process input
input_semantics = transform_image(semantic_layout).unsqueeze(0)

# Generate image
with torch.no_grad():
    generated = model(input_semantics, mode='inference')
- Manipulating style of generated image:
import torch

# Load style image
style_image = torch.load('path/to/style_image.pth')

# Extract style code
style_code = model.encode_style(style_image)

# Generate image with new style
with torch.no_grad():
    generated = model(input_semantics, style_code=style_code, mode='inference')
Getting Started
-
Clone the repository:
git clone https://github.com/NVlabs/SPADE.git cd SPADE -
Install dependencies:
pip install -r requirements.txt -
Download pre-trained models:
python scripts/download_model.py -
Generate images using the demo script:
python test.py --name coco_pretrained --dataset_mode coco --dataroot datasets/coco_stuff/
Competitor Comparisons
Image-to-Image Translation in PyTorch
Pros of pytorch-CycleGAN-and-pix2pix
- Implements multiple image-to-image translation models (CycleGAN, pix2pix, etc.)
- Provides extensive documentation and tutorials for easy usage
- Supports both paired and unpaired image translation tasks
Cons of pytorch-CycleGAN-and-pix2pix
- Limited to 2D image-to-image translation tasks
- May produce less realistic results compared to SPADE for certain tasks
- Lacks advanced features like spatially-adaptive normalization
Code Comparison
SPADE:
class SPADE(nn.Module):
    def __init__(self, config_text, norm_nc, label_nc):
        super().__init__()
        self.param_free_norm = nn.InstanceNorm2d(norm_nc, affine=False)
        # ... (additional initialization code)
pytorch-CycleGAN-and-pix2pix:
class ResnetGenerator(nn.Module):
    def __init__(self, input_nc, output_nc, ngf=64, norm_layer=nn.BatchNorm2d, use_dropout=False, n_blocks=6, padding_type='reflect'):
        super(ResnetGenerator, self).__init__()
        # ... (generator initialization code)
The code snippets show different approaches to generator architecture. SPADE uses spatially-adaptive normalization, while pytorch-CycleGAN-and-pix2pix uses a more traditional ResNet-based generator.
Synthesizing and manipulating 2048x1024 images with conditional GANs
Pros of pix2pixHD
- Simpler architecture, potentially easier to implement and train
- Established method with extensive documentation and community support
- Effective for high-resolution image synthesis tasks
Cons of pix2pixHD
- Less flexible in handling diverse and complex scenes
- May struggle with generating fine details in some cases
- Limited ability to preserve semantic information in the generated images
Code Comparison
SPADE:
class SPADE(nn.Module):
    def __init__(self, config_text, norm_nc, label_nc):
        super().__init__()
        self.param_free_norm = nn.InstanceNorm2d(norm_nc, affine=False)
        self.mlp_shared = nn.Sequential(
            nn.Conv2d(label_nc, 128, kernel_size=3, padding=1),
            nn.ReLU()
        )
pix2pixHD:
class GlobalGenerator(nn.Module):
    def __init__(self, input_nc, output_nc, ngf=64, n_downsampling=3, n_blocks=9):
        super(GlobalGenerator, self).__init__()
        model = [nn.ReflectionPad2d(3), nn.Conv2d(input_nc, ngf, kernel_size=7, padding=0),
                 nn.InstanceNorm2d(ngf), nn.ReLU(True)]
SPADE introduces a spatially-adaptive normalization layer, allowing for more precise control over the generated content. pix2pixHD uses a more traditional convolutional architecture with instance normalization. SPADE's approach enables better preservation of semantic information and handling of diverse scenes, while pix2pixHD's simpler structure may be easier to implement and train for certain tasks.
Image-to-image translation with conditional adversarial nets
Pros of pix2pix
- Simpler architecture, making it easier to understand and implement
- Faster training and inference times due to less complex model
- Wider adoption and community support, with more resources available
Cons of pix2pix
- Lower image quality and less realistic outputs compared to SPADE
- Limited ability to handle complex scenes or diverse input conditions
- Less control over specific aspects of the generated images
Code Comparison
SPADE:
class SPADE(nn.Module):
    def __init__(self, config_text, norm_nc, label_nc):
        super().__init__()
        self.param_free_norm = nn.InstanceNorm2d(norm_nc, affine=False)
        self.mlp_shared = nn.Sequential(
            nn.Conv2d(label_nc, 128, kernel_size=3, padding=1),
            nn.ReLU()
        )
pix2pix:
class UnetGenerator(nn.Module):
    def __init__(self, input_nc, output_nc, num_downs, ngf=64):
        super(UnetGenerator, self).__init__()
        unet_block = UnetSkipConnectionBlock(ngf * 8, ngf * 8, input_nc=None, submodule=None, innermost=True)
        for i in range(num_downs - 5):
            unet_block = UnetSkipConnectionBlock(ngf * 8, ngf * 8, input_nc=None, submodule=unet_block)
Neural Style and MSG-Net
Pros of PyTorch-Multi-Style-Transfer
- Focuses specifically on multi-style transfer, allowing for more diverse artistic transformations
- Implements multiple style transfer algorithms, providing flexibility for different use cases
- Lighter weight and potentially easier to integrate into existing projects
Cons of PyTorch-Multi-Style-Transfer
- Less versatile than SPADE, which can handle various image synthesis tasks beyond style transfer
- May not produce as high-quality results for complex scene manipulations
- Lacks some of the advanced features and optimizations present in SPADE
Code Comparison
PyTorch-Multi-Style-Transfer:
style_model = Net(ngf=128)
style_model.load_state_dict(torch.load(args.model))
style_model.to(device)
SPADE:
netG = SPADEGenerator(opt)
netG.load_state_dict(torch.load(opt.checkpoints_dir))
netG.eval()
Both repositories use PyTorch for their implementations. PyTorch-Multi-Style-Transfer focuses on style transfer models, while SPADE uses a more complex generator architecture for various image synthesis tasks. The code snippets show how each project loads and initializes its respective models, with SPADE using a more specialized generator class.
PyTorch implementations of Generative Adversarial Networks.
Pros of PyTorch-GAN
- Comprehensive collection of various GAN implementations
- Well-organized codebase with consistent structure across models
- Easier to understand and experiment with different GAN architectures
Cons of PyTorch-GAN
- Less focused on a specific application or advanced technique
- May not include the latest state-of-the-art GAN models
- Limited documentation and explanations for each implementation
Code Comparison
SPADE (Semantic Image Synthesis):
class SPADE(nn.Module):
    def __init__(self, config_text, norm_nc, label_nc):
        super().__init__()
        self.param_free_norm = nn.InstanceNorm2d(norm_nc, affine=False)
        self.mlp_shared = nn.Sequential(
            nn.Conv2d(label_nc, 128, kernel_size=3, padding=1),
            nn.ReLU()
        )
PyTorch-GAN (DCGAN implementation):
class Generator(nn.Module):
    def __init__(self):
        super(Generator, self).__init__()
        self.init_size = opt.img_size // 4
        self.l1 = nn.Sequential(nn.Linear(opt.latent_dim, 128 * self.init_size ** 2))
        self.conv_blocks = nn.Sequential(
            nn.BatchNorm2d(128),
            nn.Upsample(scale_factor=2),
            nn.Conv2d(128, 128, 3, stride=1, padding=1),
        )
Convert  designs to code with AI

Introducing Visual Copilot: A new AI model to turn Figma designs to high quality code using your components.
Try Visual CopilotREADME
![]()
![]()
Semantic Image Synthesis with SPADE
New implementation available at imaginaire repository
We have a reimplementation of the SPADE method that is more performant. It is avaiable at Imaginaire
Project page | Paper | Online Interactive Demo of GauGAN | GTC 2019 demo | Youtube Demo of GauGAN
Semantic Image Synthesis with Spatially-Adaptive Normalization.
Taesung Park, Ming-Yu Liu, Ting-Chun Wang, and Jun-Yan Zhu.
In CVPR 2019 (Oral).
License
Copyright (C) 2019 NVIDIA Corporation.
All rights reserved. Licensed under the CC BY-NC-SA 4.0 (Attribution-NonCommercial-ShareAlike 4.0 International)
The code is released for academic research use only. For commercial use or business inquiries, please contact researchinquiries@nvidia.com.
For press and other inquiries, please contact Hector Marinez
Installation
Clone this repo.
git clone https://github.com/NVlabs/SPADE.git
cd SPADE/
This code requires PyTorch 1.0 and python 3+. Please install dependencies by
pip install -r requirements.txt
This code also requires the Synchronized-BatchNorm-PyTorch rep.
cd models/networks/
git clone https://github.com/vacancy/Synchronized-BatchNorm-PyTorch
cp -rf Synchronized-BatchNorm-PyTorch/sync_batchnorm .
cd ../../
To reproduce the results reported in the paper, you would need an NVIDIA DGX1 machine with 8 V100 GPUs.
Dataset Preparation
For COCO-Stuff, Cityscapes or ADE20K, the datasets must be downloaded beforehand. Please download them on the respective webpages. In the case of COCO-stuff, we put a few sample images in this code repo.
Preparing COCO-Stuff Dataset. The dataset can be downloaded here. In particular, you will need to download train2017.zip, val2017.zip, stuffthingmaps_trainval2017.zip, and annotations_trainval2017.zip. The images, labels, and instance maps should be arranged in the same directory structure as in datasets/coco_stuff/. In particular, we used an instance map that combines both the boundaries of "things instance map" and "stuff label map". To do this, we used a simple script datasets/coco_generate_instance_map.py. Please install pycocotools using pip install pycocotools and refer to the script to generate instance maps.
Preparing ADE20K Dataset. The dataset can be downloaded here, which is from MIT Scene Parsing BenchMark. After unzipping the datgaset, put the jpg image files ADEChallengeData2016/images/ and png label files ADEChallengeData2016/annotatoins/ in the same directory.
There are different modes to load images by specifying --preprocess_mode along with --load_size. --crop_size. There are options such as resize_and_crop, which resizes the images into square images of side length load_size and randomly crops to crop_size. scale_shortside_and_crop scales the image to have a short side of length load_size and crops to crop_size x crop_size square. To see all modes, please use python train.py --help and take a look at data/base_dataset.py. By default at the training phase, the images are randomly flipped horizontally. To prevent this use --no_flip.
Generating Images Using Pretrained Model
Once the dataset is ready, the result images can be generated using pretrained models.
-
Download the tar of the pretrained models from the Google Drive Folder, save it in 'checkpoints/', and run
cd checkpoints tar xvf checkpoints.tar.gz cd ../ -
Generate images using the pretrained model.
python test.py --name [type]_pretrained --dataset_mode [dataset] --dataroot [path_to_dataset][type]_pretrainedis the directory name of the checkpoint file downloaded in Step 1, which should be one ofcoco_pretrained,ade20k_pretrained, andcityscapes_pretrained.[dataset]can be one ofcoco,ade20k, andcityscapes, and[path_to_dataset], is the path to the dataset. If you are running on CPU mode, append--gpu_ids -1. -
The outputs images are stored at
./results/[type]_pretrained/by default. You can view them using the autogenerated HTML file in the directory.
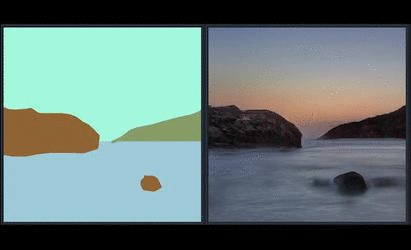
Generating Landscape Image using GauGAN
In the paper and the demo video, we showed GauGAN, our interactive app that generates realistic landscape images from the layout users draw. The model was trained on landscape images scraped from Flickr.com. We released an online demo that has the same features. Please visit https://www.nvidia.com/en-us/research/ai-playground/. The model weights are not released.
Training New Models
New models can be trained with the following commands.
-
Prepare dataset. To train on the datasets shown in the paper, you can download the datasets and use
--dataset_modeoption, which will choose which subclass ofBaseDatasetis loaded. For custom datasets, the easiest way is to use./data/custom_dataset.pyby specifying the option--dataset_mode custom, along with--label_dir [path_to_labels] --image_dir [path_to_images]. You also need to specify options such as--label_ncfor the number of label classes in the dataset,--contain_dontcare_labelto specify whether it has an unknown label, or--no_instanceto denote the dataset doesn't have instance maps. -
Train.
# To train on the Facades or COCO dataset, for example.
python train.py --name [experiment_name] --dataset_mode facades --dataroot [path_to_facades_dataset]
python train.py --name [experiment_name] --dataset_mode coco --dataroot [path_to_coco_dataset]

# To train on your own custom dataset
python train.py --name [experiment_name] --dataset_mode custom --label_dir [path_to_labels] -- image_dir [path_to_images] --label_nc [num_labels]
There are many options you can specify. Please use python train.py --help. The specified options are printed to the console. To specify the number of GPUs to utilize, use --gpu_ids. If you want to use the second and third GPUs for example, use --gpu_ids 1,2.
To log training, use --tf_log for Tensorboard. The logs are stored at [checkpoints_dir]/[name]/logs.
Testing
Testing is similar to testing pretrained models.
python test.py --name [name_of_experiment] --dataset_mode [dataset_mode] --dataroot [path_to_dataset]
Use --results_dir to specify the output directory. --how_many will specify the maximum number of images to generate. By default, it loads the latest checkpoint. It can be changed using --which_epoch.
Code Structure
train.py,test.py: the entry point for training and testing.trainers/pix2pix_trainer.py: harnesses and reports the progress of training.models/pix2pix_model.py: creates the networks, and compute the lossesmodels/networks/: defines the architecture of all modelsoptions/: creates option lists usingargparsepackage. More individuals are dynamically added in other files as well. Please see the section below.data/: defines the class for loading images and label maps.
Options
This code repo contains many options. Some options belong to only one specific model, and some options have different default values depending on other options. To address this, the BaseOption class dynamically loads and sets options depending on what model, network, and datasets are used. This is done by calling the static method modify_commandline_options of various classes. It takes in theparser of argparse package and modifies the list of options. For example, since COCO-stuff dataset contains a special label "unknown", when COCO-stuff dataset is used, it sets --contain_dontcare_label automatically at data/coco_dataset.py. You can take a look at def gather_options() of options/base_options.py, or models/network/__init__.py to get a sense of how this works.
VAE-Style Training with an Encoder For Style Control and Multi-Modal Outputs
To train our model along with an image encoder to enable multi-modal outputs as in Figure 15 of the paper, please use --use_vae. The model will create netE in addition to netG and netD and train with KL-Divergence loss.
Citation
If you use this code for your research, please cite our papers.
@inproceedings{park2019SPADE,
  title={Semantic Image Synthesis with Spatially-Adaptive Normalization},
  author={Park, Taesung and Liu, Ming-Yu and Wang, Ting-Chun and Zhu, Jun-Yan},
  booktitle={Proceedings of the IEEE Conference on Computer Vision and Pattern Recognition},
  year={2019}
}
Acknowledgments
This code borrows heavily from pix2pixHD. We thank Jiayuan Mao for his Synchronized Batch Normalization code.
Top Related Projects
Image-to-Image Translation in PyTorch
Synthesizing and manipulating 2048x1024 images with conditional GANs
Image-to-image translation with conditional adversarial nets
Neural Style and MSG-Net
PyTorch implementations of Generative Adversarial Networks.
Convert designs to code with AI
Introducing Visual Copilot: A new AI model to turn Figma designs to high quality code using your components.
Try Visual Copilot