 DCGAN-tensorflow
A tensorflow implementation of "Deep Convolutional Generative Adversarial Networks"
Top Related Projects

Image-to-Image Translation in PyTorch

Keras implementations of Generative Adversarial Networks.

starter from "How to Train a GAN?" at NIPS2016

Simplest working implementation of Stylegan2, state of the art generative adversarial network, in Pytorch. Enabling everyone to experience disentanglement

StyleGAN2 - Official TensorFlow Implementation
Quick Overview
DCGAN-tensorflow is a TensorFlow implementation of Deep Convolutional Generative Adversarial Networks (DCGANs). This project provides a framework for training and generating images using the DCGAN architecture, which is particularly effective for producing high-quality, realistic images.
Pros
- Implements the DCGAN architecture, known for generating high-quality images
- Supports multiple datasets, including MNIST, CIFAR-10, and custom datasets
- Provides visualization tools for monitoring training progress
- Well-documented codebase with clear instructions for setup and usage
Cons
- Based on an older version of TensorFlow (1.x), which may require updates for compatibility with newer TensorFlow versions
- Limited flexibility in model architecture customization
- May require significant computational resources for training on large datasets
- Lacks some modern GAN improvements and techniques
Code Examples
- Loading and preprocessing data:
def load_mnist(dataset_name):
    data_dir = os.path.join("./data", dataset_name)

    fd = open(os.path.join(data_dir,'train-images-idx3-ubyte'))
    loaded = np.fromfile(file=fd,dtype=np.uint8)
    trX = loaded[16:].reshape((60000,28,28,1)).astype(np.float)

    fd = open(os.path.join(data_dir,'train-labels-idx1-ubyte'))
    loaded = np.fromfile(file=fd,dtype=np.uint8)
    trY = loaded[8:].reshape((60000)).astype(np.float)

    return trX, trY
- Defining the generator network:
def generator(self, z, y=None):
    with tf.variable_scope("generator") as scope:
        s_h, s_w = self.output_height, self.output_width
        s_h2, s_w2 = conv_out_size_same(s_h, 2), conv_out_size_same(s_w, 2)
        s_h4, s_w4 = conv_out_size_same(s_h2, 2), conv_out_size_same(s_w2, 2)
        s_h8, s_w8 = conv_out_size_same(s_h4, 2), conv_out_size_same(s_w4, 2)
        s_h16, s_w16 = conv_out_size_same(s_h8, 2), conv_out_size_same(s_w8, 2)

        # project `z` and reshape
        self.z_, self.h0_w, self.h0_b = linear(
            z, self.gf_dim*8*s_h16*s_w16, 'g_h0_lin', with_w=True)

        self.h0 = tf.reshape(
            self.z_, [-1, s_h16, s_w16, self.gf_dim * 8])
        h0 = tf.nn.relu(self.g_bn0(self.h0))

        # ... (rest of the generator architecture)

        return tf.nn.tanh(h4)
- Training the DCGAN:
def train(self, config):
    d_optim = tf.train.AdamOptimizer(config.learning_rate, beta1=config.beta1) \
              .minimize(self.d_loss, var_list=self.d_vars)
    g_optim = tf.train.AdamOptimizer(config.learning_rate, beta1=config.beta1) \
              .minimize(self.g_loss, var_list=self.g_vars)

    # ... (initialization code)

    for epoch in range(config.epoch):
        # ... (training loop)

        self.save(config.checkpoint_dir, counter)
Getting Started
To get started with DCGAN-tensorflow:
- Clone the repository:
git clone https://github.com/carp
Competitor Comparisons
Image-to-Image Translation in PyTorch
Pros of pytorch-CycleGAN-and-pix2pix
- Implements multiple GAN architectures (CycleGAN, Pix2Pix) in a single repository
- Uses PyTorch, which offers dynamic computational graphs and easier debugging
- More actively maintained with recent updates and contributions
Cons of pytorch-CycleGAN-and-pix2pix
- Potentially more complex to use due to multiple architectures and options
- Requires familiarity with PyTorch, which may have a steeper learning curve for some users
Code Comparison
DCGAN-tensorflow:
def discriminator(image, reuse=False):
    with tf.variable_scope("discriminator") as scope:
        if reuse:
            scope.reuse_variables()
        # Discriminator architecture
pytorch-CycleGAN-and-pix2pix:
class Discriminator(nn.Module):
    def __init__(self, input_nc):
        super(Discriminator, self).__init__()
        # Discriminator architecture
The DCGAN-tensorflow repository uses TensorFlow's low-level API with explicit variable scopes, while pytorch-CycleGAN-and-pix2pix uses PyTorch's high-level nn.Module class for defining network architectures. This difference reflects the distinct approaches of the two frameworks, with PyTorch offering a more object-oriented and Pythonic style.
Keras implementations of Generative Adversarial Networks.
Pros of Keras-GAN
- Implements multiple GAN architectures, providing a diverse set of models
- Uses Keras, which offers a more user-friendly and high-level API
- More recently updated, potentially incorporating newer techniques and improvements
Cons of Keras-GAN
- May have less optimized performance compared to the TensorFlow implementation
- Potentially less flexible for low-level customizations due to Keras abstraction
Code Comparison
DCGAN-tensorflow:
def discriminator(image, reuse=False):
    with tf.variable_scope("discriminator") as scope:
        if reuse:
            scope.reuse_variables()
        # Discriminator implementation
Keras-GAN:
def build_discriminator():
    model = Sequential()
    # Discriminator layers
    return Model(img, validity)
The DCGAN-tensorflow implementation uses TensorFlow's lower-level API, allowing for more fine-grained control. Keras-GAN utilizes Keras' Sequential API, which is more concise and easier to read but may offer less flexibility for complex architectures.
starter from "How to Train a GAN?" at NIPS2016
Pros of ganhacks
- Provides a comprehensive list of tips and tricks for training GANs
- Offers general advice applicable to various GAN architectures
- Regularly updated with community contributions
Cons of ganhacks
- Lacks specific implementation details or code examples
- Not focused on a particular GAN architecture like DCGAN
Code comparison
DCGAN-tensorflow:
def discriminator(image, reuse=False):
    with tf.variable_scope("discriminator") as scope:
        if reuse:
            scope.reuse_variables()
        # Discriminator network implementation
ganhacks:
# No specific code implementation
# Provides general tips like:
# - Use a spherical Z
# - Use batch normalization
# - Use leaky ReLU
Summary
DCGAN-tensorflow is a specific implementation of the DCGAN architecture in TensorFlow, providing a complete codebase for training and generating images. On the other hand, ganhacks is a collection of best practices and tips for training GANs in general, without focusing on a particular architecture or implementation.
While DCGAN-tensorflow offers a concrete implementation, ganhacks provides valuable insights that can be applied to various GAN projects, including DCGAN. The choice between the two depends on whether you need a ready-to-use DCGAN implementation or general guidance for improving GAN training across different architectures.
Simplest working implementation of Stylegan2, state of the art generative adversarial network, in Pytorch. Enabling everyone to experience disentanglement
Pros of stylegan2-pytorch
- Implements the more advanced StyleGAN2 architecture, offering higher quality and more controllable image generation
- Written in PyTorch, which many researchers and developers find more intuitive and easier to use
- Includes additional features like progressive growing and style mixing
Cons of stylegan2-pytorch
- More complex architecture, requiring more computational resources and training time
- May be overkill for simpler image generation tasks where DCGAN could suffice
- Steeper learning curve for beginners due to its advanced features
Code Comparison
DCGAN-tensorflow:
def generator(z, y=None):
    with tf.variable_scope("generator") as scope:
        s_h, s_w = self.output_height, self.output_width
        s_h2, s_w2 = conv_out_size_same(s_h, 2), conv_out_size_same(s_w, 2)
        s_h4, s_w4 = conv_out_size_same(s_h2, 2), conv_out_size_same(s_w2, 2)
        s_h8, s_w8 = conv_out_size_same(s_h4, 2), conv_out_size_same(s_w4, 2)
stylegan2-pytorch:
class Generator(nn.Module):
    def __init__(self, size, style_dim, n_mlp, channel_multiplier=2, blur_kernel=[1, 3, 3, 1], lr_mlp=0.01):
        super().__init__()
        self.size = size
        self.style_dim = style_dim
        layers = [PixelNorm()]
        for i in range(n_mlp):
            layers.append(EqualLinear(style_dim, style_dim, lr_mul=lr_mlp, activation='fused_lrelu'))
StyleGAN2 - Official TensorFlow Implementation
Pros of StyleGAN2
- Produces higher quality and more realistic images
- Offers better control over generated features and styles
- Implements advanced techniques like adaptive discriminator augmentation
Cons of StyleGAN2
- More complex architecture and implementation
- Requires more computational resources and training time
- Less beginner-friendly due to its advanced nature
Code Comparison
DCGAN-tensorflow:
def generator(z, y=None):
    with tf.variable_scope("generator") as scope:
        s_h, s_w = self.output_height, self.output_width
        s_h2, s_w2 = conv_out_size_same(s_h, 2), conv_out_size_same(s_w, 2)
        s_h4, s_w4 = conv_out_size_same(s_h2, 2), conv_out_size_same(s_w2, 2)
StyleGAN2:
def G_synthesis(w, resolution=1024, **kwargs):
    with tf.variable_scope('G_synthesis', reuse=tf.AUTO_REUSE):
        # ...
        x = block(x, res=res, w=w[:, 2*res-4:2*res-2], **block_kwargs)
        images_out = torgb(x, w[:, 2*res-2:2*res], **torgb_kwargs)
The StyleGAN2 code showcases a more sophisticated architecture with style-based generation, while DCGAN-tensorflow uses a simpler convolutional approach. StyleGAN2's implementation allows for finer control over the generated images but requires more complex code structures.
Convert  designs to code with AI

Introducing Visual Copilot: A new AI model to turn Figma designs to high quality code using your components.
Try Visual CopilotREADME
DCGAN in Tensorflow
Tensorflow implementation of Deep Convolutional Generative Adversarial Networks which is a stabilize Generative Adversarial Networks. The referenced torch code can be found here.

- Brandon Amos wrote an excellent blog post and image completion code based on this repo.
- To avoid the fast convergence of D (discriminator) network, G (generator) network is updated twice for each D network update, which differs from original paper.
Online Demo
Prerequisites
- Python 2.7 or Python 3.3+
- Tensorflow 0.12.1
- SciPy
- pillow
- tqdm
- (Optional) moviepy (for visualization)
- (Optional) Align&Cropped Images.zip : Large-scale CelebFaces Dataset
Usage
First, download dataset with:
$ python download.py mnist celebA
To train a model with downloaded dataset:
$ python main.py --dataset mnist --input_height=28 --output_height=28 --train
$ python main.py --dataset celebA --input_height=108 --train --crop
To test with an existing model:
$ python main.py --dataset mnist --input_height=28 --output_height=28
$ python main.py --dataset celebA --input_height=108 --crop
Or, you can use your own dataset (without central crop) by:
$ mkdir data/DATASET_NAME
... add images to data/DATASET_NAME ...
$ python main.py --dataset DATASET_NAME --train
$ python main.py --dataset DATASET_NAME
$ # example
$ python main.py --dataset=eyes --input_fname_pattern="*_cropped.png" --train
If your dataset is located in a different root directory:
$ python main.py --dataset DATASET_NAME --data_dir DATASET_ROOT_DIR --train
$ python main.py --dataset DATASET_NAME --data_dir DATASET_ROOT_DIR
$ # example
$ python main.py --dataset=eyes --data_dir ../datasets/ --input_fname_pattern="*_cropped.png" --train
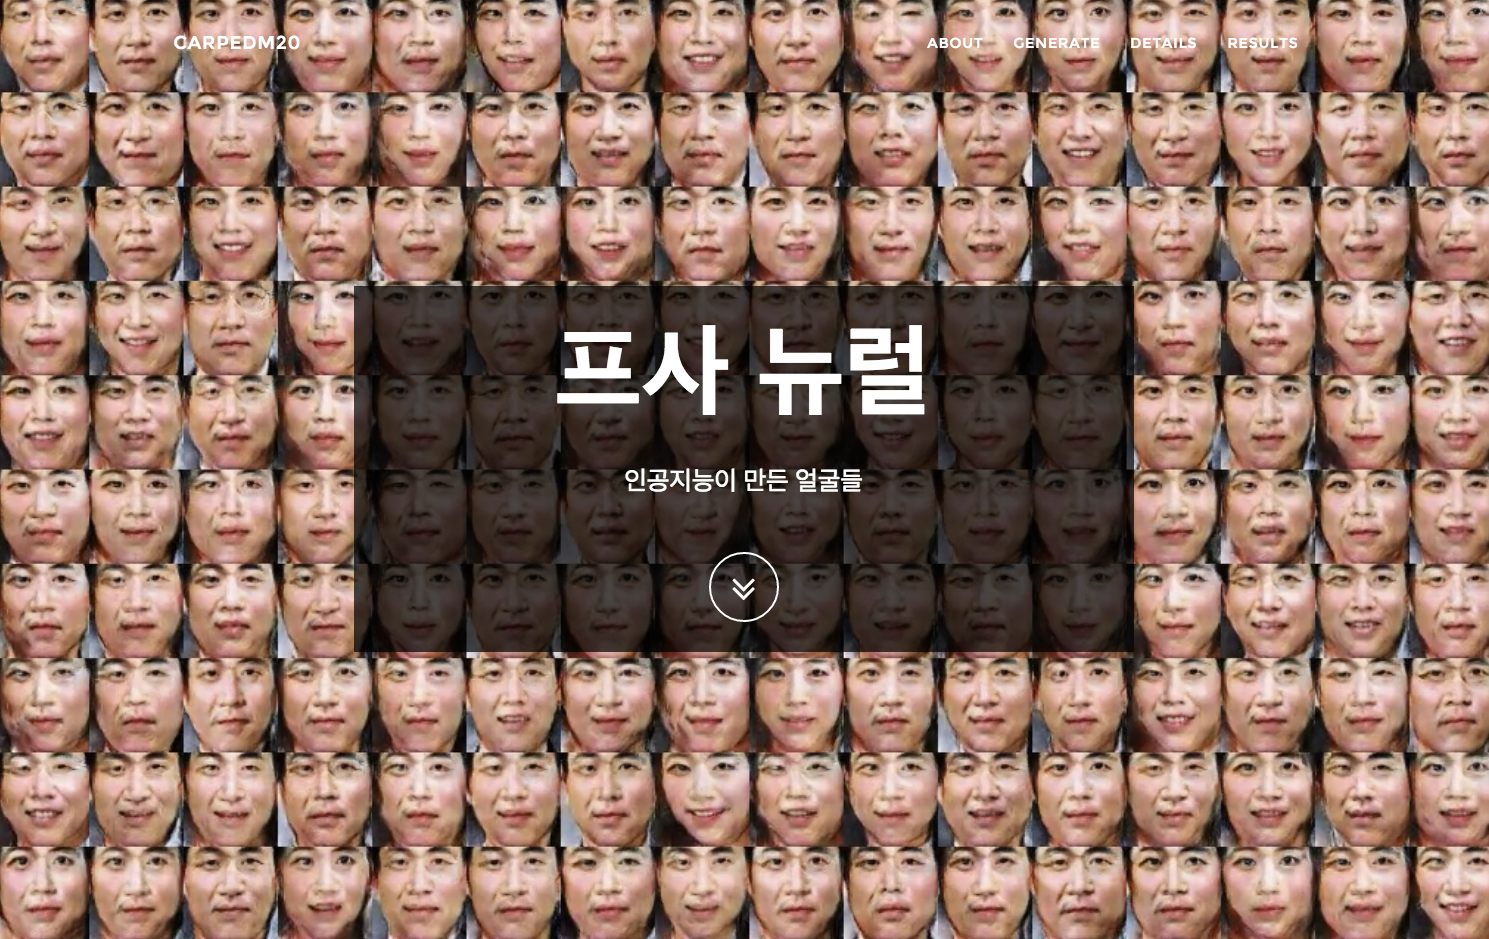
Results

celebA
After 6th epoch:

After 10th epoch:

Asian face dataset


MNIST
MNIST codes are written by @PhoenixDai.


More results can be found here and here.
Training details
Details of the loss of Discriminator and Generator (with custom dataset not celebA).


Details of the histogram of true and fake result of discriminator (with custom dataset not celebA).


Related works
Author
Taehoon Kim / @carpedm20
Top Related Projects
Image-to-Image Translation in PyTorch
Keras implementations of Generative Adversarial Networks.
starter from "How to Train a GAN?" at NIPS2016
Simplest working implementation of Stylegan2, state of the art generative adversarial network, in Pytorch. Enabling everyone to experience disentanglement
StyleGAN2 - Official TensorFlow Implementation
Convert designs to code with AI
Introducing Visual Copilot: A new AI model to turn Figma designs to high quality code using your components.
Try Visual Copilot