 drip-table
A tiny and powerful enterprise-class solution for building lowcode tables. 轻量、强大的企业级表格可视化搭建解决方案。
Top Related Projects
📱🚀 🧩 Cross Device & High Performance Normal Form/Dynamic(JSON Schema) Form/Form Builder -- Support React/React Native/Vue 2/Vue 3
🚴♀️ 阿里 - 很易用的中后台「表单 / 表格 / 图表」解决方案
👨🏻💻👩🏻💻 Use Ant Design like a Pro!
🤖 Headless UI for building powerful tables & datagrids for TS/JS - React-Table, Vue-Table, Solid-Table, Svelte-Table
The best JavaScript Data Table for building Enterprise Applications. Supports React / Angular / Vue / Plain JavaScript.
Quick Overview
Drip Table is an open-source React component library for building configurable and efficient tables. It provides a powerful and flexible solution for creating complex table layouts with features like drag-and-drop, custom rendering, and dynamic data handling.
Pros
- Highly customizable with a wide range of built-in components and layouts
- Supports drag-and-drop functionality for easy table reorganization
- Efficient rendering and performance optimization for large datasets
- Extensive documentation and examples for easy implementation
Cons
- Steep learning curve for advanced customizations
- Limited built-in theming options, requiring additional styling effort
- Dependency on React ecosystem may limit usage in other frameworks
- Some features may require additional configuration or plugins
Code Examples
- Basic table setup:
import { DripTable } from 'drip-table';

const columns = [
  { key: 'name', title: 'Name' },
  { key: 'age', title: 'Age' },
];

const dataSource = [
  { name: 'John Doe', age: 30 },
  { name: 'Jane Smith', age: 25 },
];

function MyTable() {
  return <DripTable columns={columns} dataSource={dataSource} />;
}
- Custom cell rendering:
import { DripTable } from 'drip-table';

const columns = [
  {
    key: 'name',
    title: 'Name',
    render: (text, record) => <a href={`/profile/${record.id}`}>{text}</a>,
  },
  { key: 'age', title: 'Age' },
];

function MyTableWithCustomCells() {
  return <DripTable columns={columns} dataSource={dataSource} />;
}
- Drag-and-drop functionality:
import { DripTable } from 'drip-table';

function DraggableTable() {
  return (
    <DripTable
      columns={columns}
      dataSource={dataSource}
      dragSortable
      onDragSortEnd={(newDataSource) => {
        // Handle the new order of data
        console.log(newDataSource);
      }}
    />
  );
}
Getting Started
To use Drip Table in your React project, follow these steps:
-
Install the package:
npm install drip-table -
Import and use the component in your React application:
import React from 'react';
import { DripTable } from 'drip-table';

const columns = [
  { key: 'name', title: 'Name' },
  { key: 'age', title: 'Age' },
];

const dataSource = [
  { name: 'John Doe', age: 30 },
  { name: 'Jane Smith', age: 25 },
];

function App() {
  return (
    <div>
      <h1>My Table</h1>
      <DripTable columns={columns} dataSource={dataSource} />
    </div>
  );
}

export default App;
This basic setup will render a simple table with the provided columns and data. You can further customize the table by adding more props and configurations as needed.
Competitor Comparisons
📱🚀 🧩 Cross Device & High Performance Normal Form/Dynamic(JSON Schema) Form/Form Builder -- Support React/React Native/Vue 2/Vue 3
Pros of Formily
- More comprehensive form solution with advanced features like dynamic fields and complex validations
- Larger community and ecosystem with extensive documentation and examples
- Better integration with popular UI libraries like Ant Design and Element
Cons of Formily
- Steeper learning curve due to its complexity and extensive API
- Potentially overkill for simpler form requirements
- Less focused on table-specific functionality compared to Drip Table
Code Comparison
Formily:
import { createForm } from '@formily/core'
import { Field } from '@formily/react'

const form = createForm()
<Field name="username" component="Input" />
Drip Table:
import { DripTable } from 'drip-table'

<DripTable
  schema={tableSchema}
  dataSource={dataSource}
/>
Summary
Formily is a more comprehensive form solution with advanced features and better integration with popular UI libraries. However, it has a steeper learning curve and may be overkill for simpler requirements. Drip Table, on the other hand, is more focused on table-specific functionality and may be easier to implement for basic table needs. The choice between the two depends on the specific requirements of your project and the complexity of the forms or tables you need to create.
🚴♀️ 阿里 - 很易用的中后台「表单 / 表格 / 图表」解决方案
Pros of x-render
- More comprehensive form rendering capabilities, including complex layouts and nested structures
- Extensive documentation and examples, making it easier for developers to get started
- Larger community and more frequent updates, potentially leading to better long-term support
Cons of x-render
- Steeper learning curve due to its more complex architecture and feature set
- Potentially heavier bundle size, which may impact performance in smaller applications
- Less focused on table-specific functionality compared to drip-table
Code Comparison
x-render:
import { FormRender, useForm } from 'form-render';

const schema = {
  type: 'object',
  properties: {
    name: { type: 'string', title: 'Name' },
    age: { type: 'number', title: 'Age' }
  }
};

const MyForm = () => {
  const form = useForm();
  return <FormRender form={form} schema={schema} />;
};
drip-table:
import { DripTable } from 'drip-table';

const schema = {
  columns: [
    { key: 'name', title: 'Name' },
    { key: 'age', title: 'Age' }
  ]
};

const MyTable = () => {
  return <DripTable schema={schema} dataSource={data} />;
};
👨🏻💻👩🏻💻 Use Ant Design like a Pro!
Pros of Ant Design Pro
- More comprehensive UI component library with a wider range of pre-built components
- Extensive documentation and community support
- Integrated with popular state management and routing solutions
Cons of Ant Design Pro
- Steeper learning curve due to its complexity and extensive features
- Potentially heavier bundle size for smaller projects
- Less flexibility for custom table configurations compared to Drip Table
Code Comparison
Ant Design Pro (Table component):
import { Table } from 'antd';

const columns = [
  { title: 'Name', dataIndex: 'name', key: 'name' },
  { title: 'Age', dataIndex: 'age', key: 'age' },
];

<Table columns={columns} dataSource={data} />
Drip Table:
import { DripTable } from 'drip-table';

const schema = {
  columns: [
    { key: 'name', title: 'Name' },
    { key: 'age', title: 'Age' },
  ],
};

<DripTable schema={schema} dataSource={data} />
Both libraries offer table components, but Drip Table focuses on providing a more flexible and customizable table solution, while Ant Design Pro offers a broader set of UI components and features for building complete admin interfaces.
🤖 Headless UI for building powerful tables & datagrids for TS/JS - React-Table, Vue-Table, Solid-Table, Svelte-Table
Pros of TanStack Table
- More flexible and customizable, allowing for complex table configurations
- Better performance for large datasets due to virtualization support
- Extensive documentation and community support
Cons of TanStack Table
- Steeper learning curve due to its advanced features
- Requires more setup and configuration for basic use cases
- Larger bundle size compared to simpler table libraries
Code Comparison
Drip Table:
<DripTable
  schema={schema}
  dataSource={dataSource}
  columns={columns}
/>
TanStack Table:
const table = useReactTable({
  data,
  columns,
  getCoreRowModel: getCoreRowModel(),
})

return <TableComponent table={table} />
Summary
TanStack Table offers more advanced features and flexibility, making it suitable for complex table requirements and large datasets. However, it comes with a steeper learning curve and requires more setup. Drip Table provides a simpler API for basic table needs, making it easier to implement quickly but potentially limiting for more advanced use cases.
The best JavaScript Data Table for building Enterprise Applications. Supports React / Angular / Vue / Plain JavaScript.
Pros of ag-grid
- More feature-rich with advanced functionalities like pivoting, grouping, and aggregation
- Extensive documentation and community support
- Better performance for handling large datasets
Cons of ag-grid
- Steeper learning curve due to its complexity
- Commercial license required for enterprise features
- Larger bundle size, which may impact initial load times
Code Comparison
ag-grid:
import { AgGridReact } from 'ag-grid-react';

<AgGridReact
  columnDefs={columnDefs}
  rowData={rowData}
  defaultColDef={defaultColDef}
  onGridReady={onGridReady}
/>
drip-table:
import { DripTable } from 'drip-table';

<DripTable
  schema={schema}
  dataSource={dataSource}
  components={components}
/>
Key Differences
- ag-grid offers more out-of-the-box features and customization options
- drip-table focuses on simplicity and ease of use
- ag-grid has a more mature ecosystem and wider adoption
- drip-table provides a more lightweight solution for basic table needs
Use Cases
- Choose ag-grid for complex data grids with advanced requirements
- Opt for drip-table when a simpler, more lightweight table solution is needed
Convert  designs to code with AI

Introducing Visual Copilot: A new AI model to turn Figma designs to high quality code using your components.
Try Visual CopilotREADME
 Drip Table
English | ç®ä½ä¸æ | Documentation | Discussionsï½Gitter | Official Wechat group
ð Introduction
Drip Tableis a dynamic table solution for enterprise level middle and background launched by JD retail. The project is based on React and JSON Schema . It aims to reduce the difficulty of developing table and improve work efficiency by simple configuration to quickly generate page dynamic table.
Drip Table contains serval sub projects: drip-table, drip-table-generator.
The introduction of each sub-project are as follows:
-
drip-table: the core library of the solution for building dynamic tables. It's main ability is to render a dynamic table automatically when received data which conforms to theJSON Schemastandard. -
drip-table-generator: a visual tool for producing configuration data that meets theJSON Schemastandard in order to sent toDripTablefor rendering a table and columns.
Features
- Basic table
- Compound table
- Toolbar
- Renderer
- Text component
- Number component
- Image component
- Link component
- Tag component
- Button component
- Select component
- DataPicker component
- PopUpPage component
- RichText component
- Group component
- Custom component
- Header slot
- Footer slot
- Pagination
- Virtual list
- Sticky
- Sub table
- Row selection
- Row draggable
- Fixed column
- Show/Hide column
- Edit data
- Stripe
- Table with border
- Column resizing
- Size
- Global styles
- Empty table prompt
- Loading
- Card layout
- Filter
â¬ï¸ Getting Start
Drip table is divided into two application scenarios: configuration end and application end. The configuration side is mainly responsible for generating JSON Schema standard data through visualization and low-code. The function of the application side is to render the JSON Schema standard configuration data into a dynamic table.
The configuration side
-
Install dependencies
The configuration side depend on the application side, please make sure that
drip-tablehas been installed before installing dependencies.yarn
yarn add drip-table-generatornpm
npm install --save drip-table-generator -
Import at the entrance of a file
import DripTableGenerator from "drip-table-generator"; import "drip-table-generator/dist/index.min.css"; -
Use components in pages
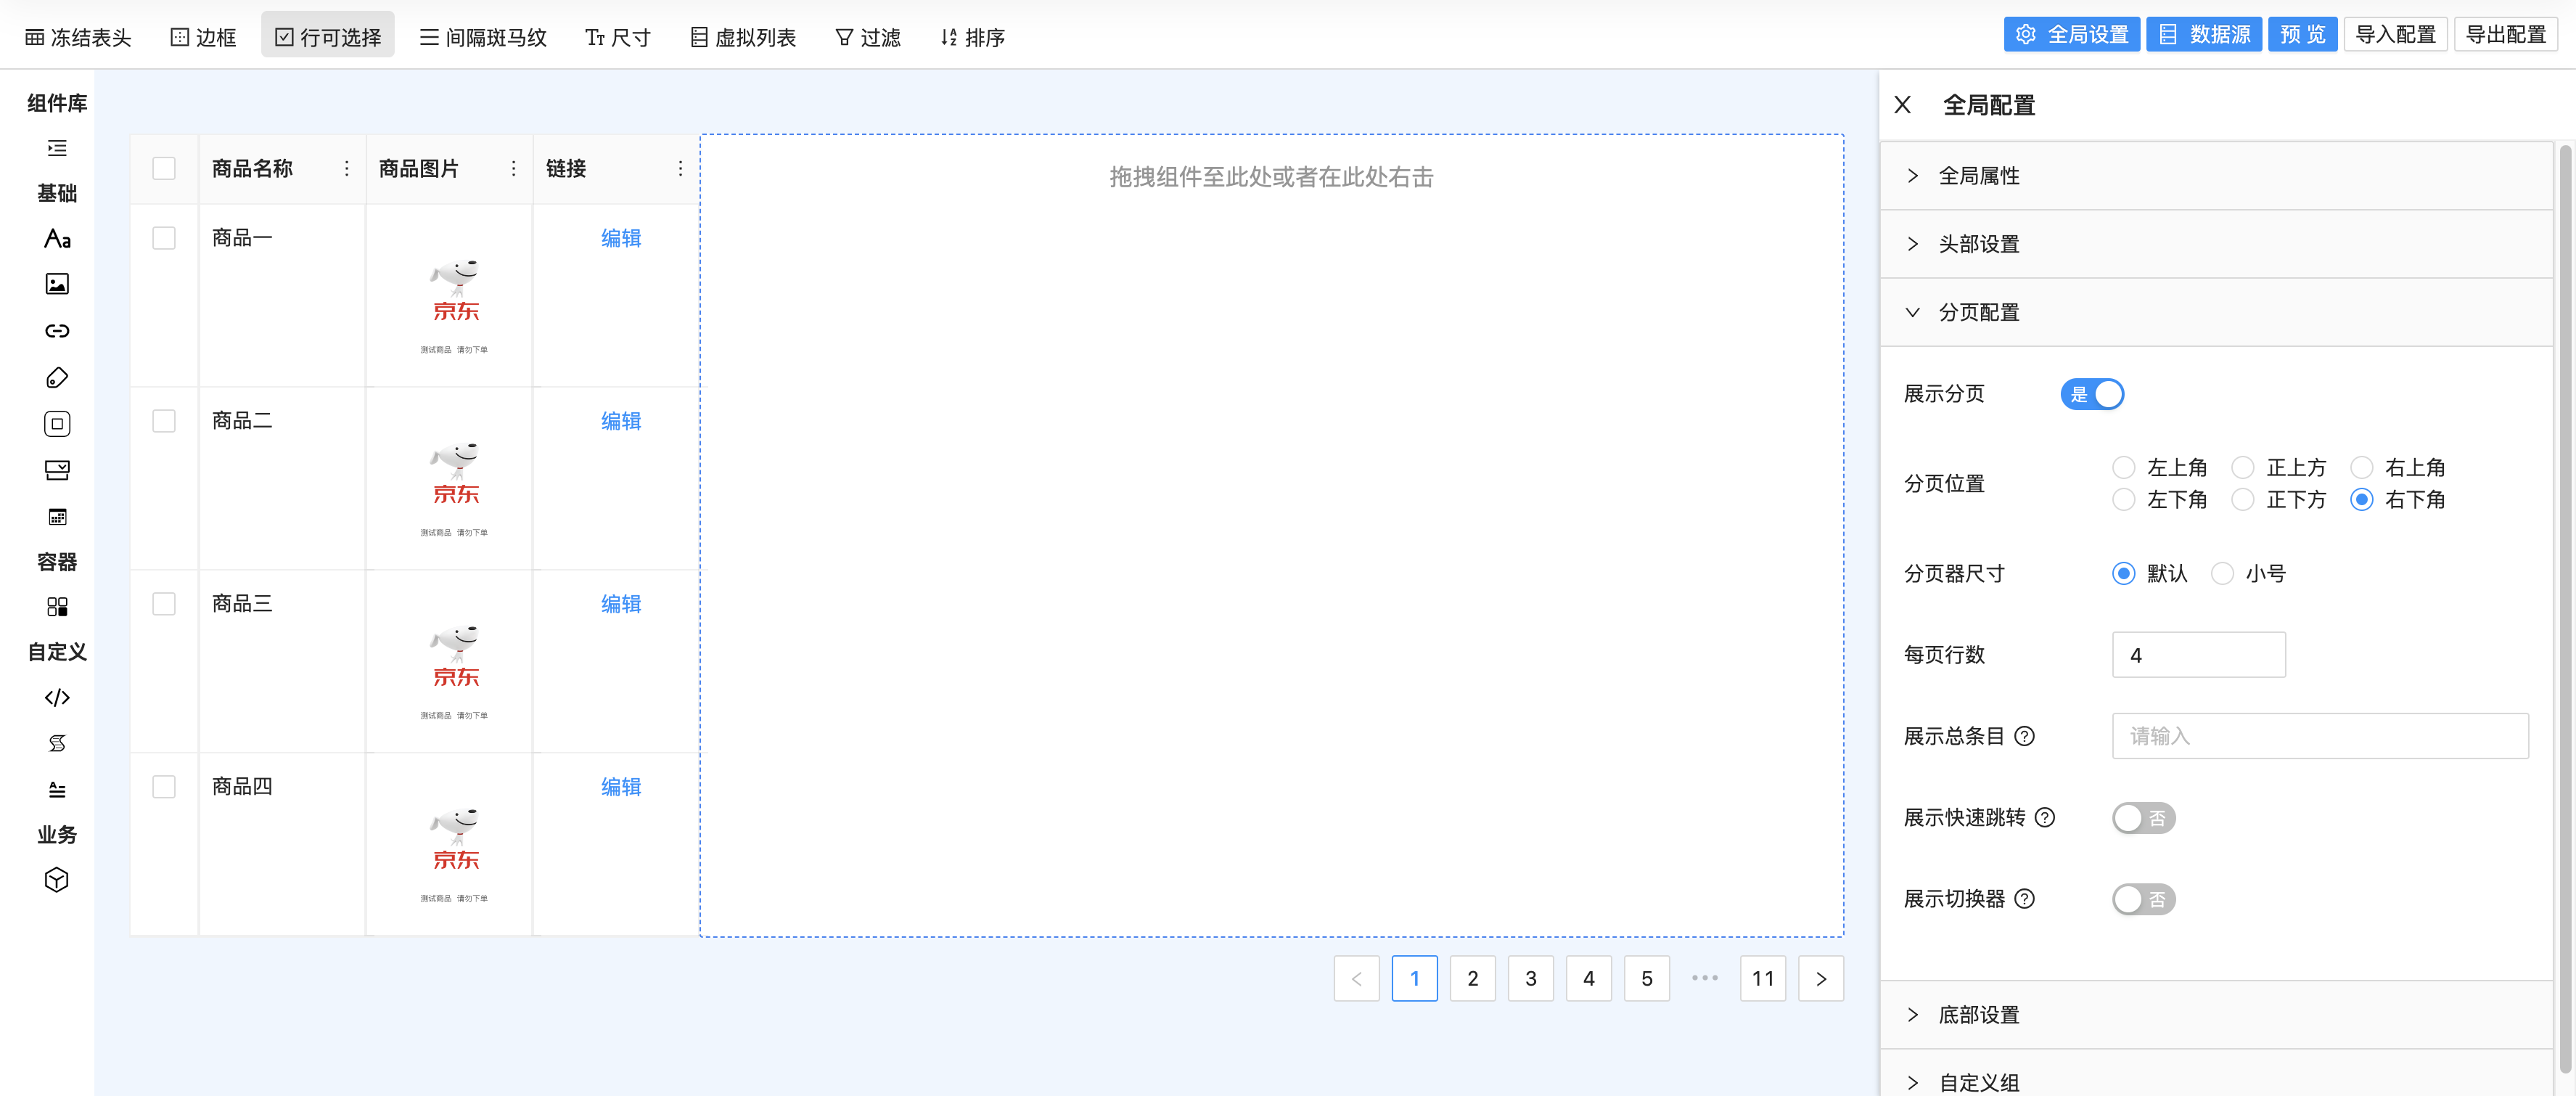
return <DripTableGenerator />;Then the configuration side can be rendered normally, as the sample screenshot below:

The application side
-
Install dependencies
Install the
drip-table:yarn
yarn add drip-tablenpm
npm install --save drip-table -
Import at the entrance of a file
// import drip-table import DripTable from "drip-table"; // import drip-table css import "drip-table/dist/index.min.css"; -
Use components in pages
const schema = {
  size: "middle",
  columns: [
    {
      key: "columnKey",
      title: "Column Title",
      dataIndex: "dataIndexName",
      component: "text",
      options: {
        mode: "single",
      },
    },
  ],
};
return (
  <DripTable
    schema={schema}
    dataSource={[]}
  />
);
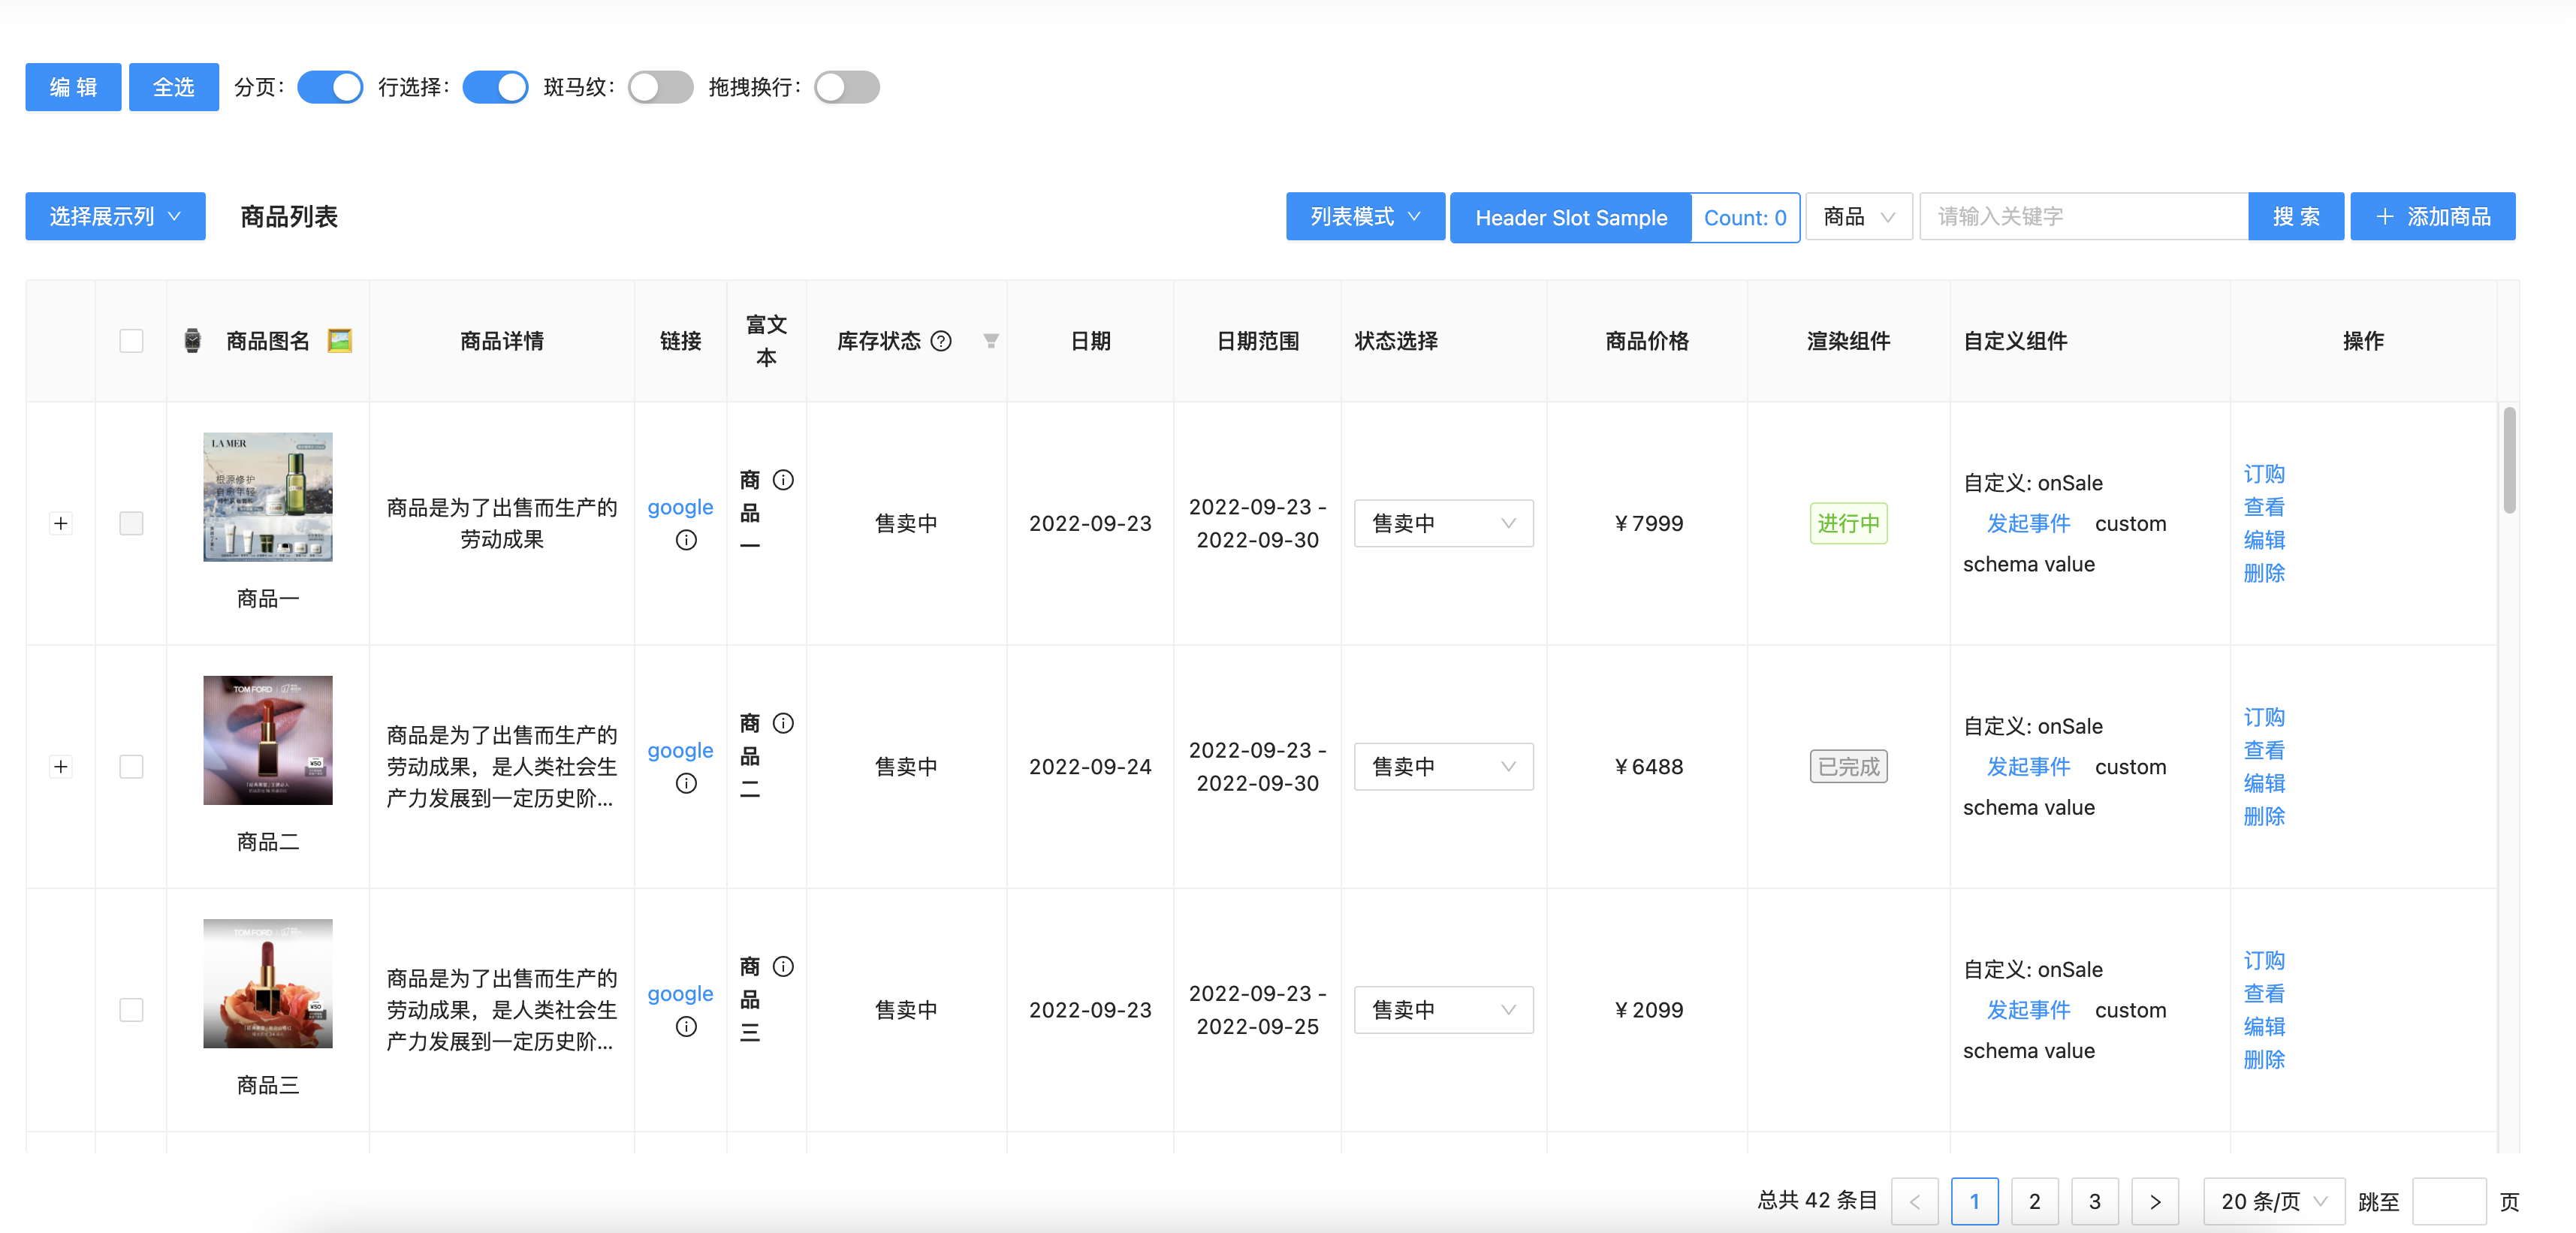
Then the application side can be rendered normally, as the sample screenshot below:

ð¤ Contribution
If you're interested in this project, you're welcome to create â¨issue. We are appreciated for your â¤ï¸star.
development
-
Clone
git clone https://github.com/JDFED/drip-table.git -
Install dependencies
lerna bootstrap -
build independecies
yarn
yarn run buildnpm
npm run build -
Run project
yarn start
- visit http://localhost:8000
drip-tabledemo page: /drip-table/guide/basic-demodrip-table-generatordemo page: /drip-table-generator/demo
For more commands, see DEVELOP . Please visit the official website address drip-table ã
Communication
License
Top Related Projects
📱🚀 🧩 Cross Device & High Performance Normal Form/Dynamic(JSON Schema) Form/Form Builder -- Support React/React Native/Vue 2/Vue 3
🚴♀️ 阿里 - 很易用的中后台「表单 / 表格 / 图表」解决方案
👨🏻💻👩🏻💻 Use Ant Design like a Pro!
🤖 Headless UI for building powerful tables & datagrids for TS/JS - React-Table, Vue-Table, Solid-Table, Svelte-Table
The best JavaScript Data Table for building Enterprise Applications. Supports React / Angular / Vue / Plain JavaScript.
Convert  designs to code with AI

Introducing Visual Copilot: A new AI model to turn Figma designs to high quality code using your components.
Try Visual Copilot


