 KeychainAccess
Simple Swift wrapper for Keychain that works on iOS, watchOS, tvOS and macOS.
Top Related Projects

Valet lets you securely store data in the iOS, tvOS, watchOS, or macOS Keychain without knowing a thing about how the Keychain works. It’s easy. We promise.

Helper functions for saving text in Keychain securely for iOS, OS X, tvOS and watchOS.

A powerful, protocol-oriented library for working with the keychain in Swift.

Simple Objective-C wrapper for the keychain that works on Mac and iOS

Convenient & secure logging during development & release in Swift 4 & 5
Quick Overview
KeychainAccess is a simple Swift wrapper for Keychain that provides a convenient and type-safe way to access the iOS Keychain. It allows developers to easily store and retrieve sensitive data such as passwords, tokens, and certificates in a secure manner.
Pros
- Easy to use with a clean, intuitive API
- Type-safe implementation, reducing the risk of runtime errors
- Supports both synchronous and asynchronous operations
- Comprehensive documentation and examples
Cons
- Limited to iOS, macOS, tvOS, and watchOS platforms
- May not be suitable for complex keychain operations or advanced security requirements
- Requires careful management of keychain items to avoid clutter
Code Examples
- Storing a password:
let keychain = Keychain(service: "com.example.app")
keychain["username"] = "john_doe"
keychain["password"] = "secret123"
- Retrieving a password:
let keychain = Keychain(service: "com.example.app")
if let password = try? keychain.get("password") {
    print("Password: \(password)")
}
- Deleting a keychain item:
let keychain = Keychain(service: "com.example.app")
try? keychain.remove("password")
- Using access options:
let keychain = Keychain(service: "com.example.app")
    .accessibility(.afterFirstUnlock)
    .synchronizable(true)

keychain["secure_token"] = "abc123xyz789"
Getting Started
-
Install KeychainAccess using Swift Package Manager, CocoaPods, or Carthage.
-
Import the library in your Swift file:
import KeychainAccess
- Create a Keychain instance:
let keychain = Keychain(service: "com.yourapp.identifier")
- Start using KeychainAccess to store and retrieve sensitive data:
// Store data
keychain["api_key"] = "your_api_key_here"

// Retrieve data
if let apiKey = try? keychain.get("api_key") {
    print("API Key: \(apiKey)")
}
Competitor Comparisons
Valet lets you securely store data in the iOS, tvOS, watchOS, or macOS Keychain without knowing a thing about how the Keychain works. It’s easy. We promise.
Pros of Valet
- Offers a more straightforward API for basic keychain operations
- Provides built-in support for iCloud keychain synchronization
- Includes additional security features like SecureEnclave integration
Cons of Valet
- Less flexible for advanced keychain operations
- Fewer options for customizing accessibility and synchronization settings
- Limited support for storing complex data types
Code Comparison
KeychainAccess:
let keychain = Keychain(service: "com.example.app")
keychain["username"] = "john_doe"
let password = keychain["password"]
Valet:
let valet = Valet.valet(with: Identifier(nonEmpty: "com.example.app")!, accessibility: .whenUnlocked)
valet.set(string: "john_doe", forKey: "username")
let password = valet.string(forKey: "password")
Both libraries provide simple APIs for storing and retrieving data from the keychain. KeychainAccess offers a more Swift-like syntax with subscript access, while Valet uses explicit method calls. KeychainAccess provides more granular control over keychain attributes, making it suitable for complex use cases. Valet, on the other hand, focuses on simplicity and includes built-in support for iCloud synchronization, making it a good choice for basic keychain operations in apps that require cloud syncing.
Helper functions for saving text in Keychain securely for iOS, OS X, tvOS and watchOS.
Pros of keychain-swift
- Lightweight and simple to use, with a more focused API
- Supports synchronization with iCloud out of the box
- Includes convenient methods for storing common data types (e.g., Bool, Data)
Cons of keychain-swift
- Less comprehensive documentation compared to KeychainAccess
- Fewer advanced features and customization options
- Smaller community and less frequent updates
Code Comparison
KeychainAccess:
let keychain = Keychain(service: "com.example.app")
keychain["username"] = "john_doe"
let username = keychain["username"]
keychain-swift:
let keychain = KeychainSwift()
keychain.set("john_doe", forKey: "username")
let username = keychain.get("username")
Both libraries offer similar basic functionality for storing and retrieving data from the keychain. KeychainAccess provides a more dictionary-like syntax, while keychain-swift uses explicit set and get methods. KeychainAccess offers more advanced options for configuring the keychain access, while keychain-swift focuses on simplicity and ease of use for common scenarios.
A powerful, protocol-oriented library for working with the keychain in Swift.
Pros of Locksmith
- Simpler API with a more intuitive syntax for basic operations
- Built-in support for asynchronous operations
- Includes convenience methods for common use cases
Cons of Locksmith
- Less actively maintained (last update was in 2019)
- Fewer advanced features compared to KeychainAccess
- Limited documentation and examples
Code Comparison
Locksmith:
try Locksmith.saveData(["name": "John"], forUserAccount: "myAccount")
let data = Locksmith.loadDataForUserAccount("myAccount")
KeychainAccess:
let keychain = Keychain(service: "com.example.app")
keychain["name"] = "John"
let name = keychain["name"]
Both libraries provide simple ways to interact with the iOS Keychain, but KeychainAccess offers a more concise syntax and broader feature set. While Locksmith has some advantages in terms of simplicity and built-in async support, KeychainAccess is more actively maintained and provides more comprehensive documentation and examples. The choice between the two depends on specific project requirements and preferences for API design.
Simple Objective-C wrapper for the keychain that works on Mac and iOS
Pros of SAMKeychain
- Simpler API with fewer methods, making it easier to learn and use for basic keychain operations
- Supports both Objective-C and Swift, providing flexibility for developers working with both languages
- Lightweight and focused solely on keychain access, potentially resulting in a smaller footprint
Cons of SAMKeychain
- Less actively maintained, with fewer recent updates compared to KeychainAccess
- Limited functionality compared to KeychainAccess, which offers more advanced features and options
- Lacks some modern Swift features and syntax optimizations found in KeychainAccess
Code Comparison
SAMKeychain:
SAMKeychain.setPassword("secret", forService: "MyService", account: "user@example.com")
let password = SAMKeychain.password(forService: "MyService", account: "user@example.com")
KeychainAccess:
let keychain = Keychain(service: "MyService")
try keychain.set("secret", key: "user@example.com")
let password = try keychain.get("user@example.com")
Both libraries provide simple ways to store and retrieve keychain items, but KeychainAccess offers a more Swift-like syntax with error handling and a fluent interface.
Convenient & secure logging during development & release in Swift 4 & 5
Pros of SwiftyBeaver
- Comprehensive logging system with multiple destinations (console, file, cloud)
- Customizable log formats and filtering options
- Built-in support for encryption and compression of log files
Cons of SwiftyBeaver
- Primarily focused on logging, not keychain access
- May require additional setup for cloud logging features
- Larger codebase and potential overhead for simple logging needs
Code Comparison
SwiftyBeaver:
import SwiftyBeaver
let log = SwiftyBeaver.self
log.addDestination(ConsoleDestination())
log.info("Hello, SwiftyBeaver!")
KeychainAccess:
import KeychainAccess
let keychain = Keychain(service: "com.example.app")
try keychain.set("secret_value", key: "api_key")
let apiKey = try keychain.get("api_key")
Summary
SwiftyBeaver is a powerful logging framework for Swift applications, offering multiple logging destinations and customization options. It excels in providing detailed logging capabilities but is not designed for keychain access. KeychainAccess, on the other hand, is specifically tailored for secure keychain operations in iOS and macOS applications. While SwiftyBeaver offers more comprehensive logging features, KeychainAccess provides a simpler and more focused solution for managing sensitive data in the keychain.
Convert  designs to code with AI

Introducing Visual Copilot: A new AI model to turn Figma designs to high quality code using your components.
Try Visual CopilotREADME
KeychainAccess

![]()
![]()


KeychainAccess is a simple Swift wrapper for Keychain that works on iOS and macOS. Makes using Keychain APIs extremely easy and much more palatable to use in Swift.
:bulb: Features
- Simple interface
- Support access group
- Support accessibility
- Support iCloud sharing
- Support TouchID and Keychain integration (iOS 8+)
- Support Shared Web Credentials (iOS 8+)
- Works on both iOS & macOS
- watchOS and tvOS are supported
- Mac Catalyst is supported
- Swift 3, 4 and 5 compatible
:book: Usage
:eyes: See also:
:key: Basics
Saving Application Password
let keychain = Keychain(service: "com.example.github-token")
keychain["kishikawakatsumi"] = "01234567-89ab-cdef-0123-456789abcdef"
Saving Internet Password
let keychain = Keychain(server: "https://github.com", protocolType: .https)
keychain["kishikawakatsumi"] = "01234567-89ab-cdef-0123-456789abcdef"
:key: Instantiation
Create Keychain for Application Password
let keychain = Keychain(service: "com.example.github-token")
let keychain = Keychain(service: "com.example.github-token", accessGroup: "12ABCD3E4F.shared")
Create Keychain for Internet Password
let keychain = Keychain(server: "https://github.com", protocolType: .https)
let keychain = Keychain(server: "https://github.com", protocolType: .https, authenticationType: .htmlForm)
:key: Adding an item
subscripting
for String
keychain["kishikawakatsumi"] = "01234567-89ab-cdef-0123-456789abcdef"
keychain[string: "kishikawakatsumi"] = "01234567-89ab-cdef-0123-456789abcdef"
for NSData
keychain[data: "secret"] = NSData(contentsOfFile: "secret.bin")
set method
keychain.set("01234567-89ab-cdef-0123-456789abcdef", key: "kishikawakatsumi")
error handling
do {
    try keychain.set("01234567-89ab-cdef-0123-456789abcdef", key: "kishikawakatsumi")
}
catch let error {
    print(error)
}
:key: Obtaining an item
subscripting
for String (If the value is NSData, attempt to convert to String)
let token = keychain["kishikawakatsumi"]
let token = keychain[string: "kishikawakatsumi"]
for NSData
let secretData = keychain[data: "secret"]
get methods
as String
let token = try? keychain.get("kishikawakatsumi")
let token = try? keychain.getString("kishikawakatsumi")
as NSData
let data = try? keychain.getData("kishikawakatsumi")
:key: Removing an item
subscripting
keychain["kishikawakatsumi"] = nil
remove method
do {
    try keychain.remove("kishikawakatsumi")
} catch let error {
    print("error: \(error)")
}
:key: Set Label and Comment
let keychain = Keychain(server: "https://github.com", protocolType: .https)
do {
    try keychain
        .label("github.com (kishikawakatsumi)")
        .comment("github access token")
        .set("01234567-89ab-cdef-0123-456789abcdef", key: "kishikawakatsumi")
} catch let error {
    print("error: \(error)")
}
:key: Obtaining Other Attributes
PersistentRef
let keychain = Keychain()
let persistentRef = keychain[attributes: "kishikawakatsumi"]?.persistentRef
...
Creation Date
let keychain = Keychain()
let creationDate = keychain[attributes: "kishikawakatsumi"]?.creationDate
...
All Attributes
let keychain = Keychain()
do {
    let attributes = try keychain.get("kishikawakatsumi") { $0 }
    print(attributes?.comment)
    print(attributes?.label)
    print(attributes?.creator)
    ...
} catch let error {
    print("error: \(error)")
}
subscripting
let keychain = Keychain()
if let attributes = keychain[attributes: "kishikawakatsumi"] {
    print(attributes.comment)
    print(attributes.label)
    print(attributes.creator)
}
:key: Configuration (Accessibility, Sharing, iCloud Sync)
Provides fluent interfaces
let keychain = Keychain(service: "com.example.github-token")
    .label("github.com (kishikawakatsumi)")
    .synchronizable(true)
    .accessibility(.afterFirstUnlock)
Accessibility
Default accessibility matches background application (=kSecAttrAccessibleAfterFirstUnlock)
let keychain = Keychain(service: "com.example.github-token")
For background application
Creating instance
let keychain = Keychain(service: "com.example.github-token")
    .accessibility(.afterFirstUnlock)

keychain["kishikawakatsumi"] = "01234567-89ab-cdef-0123-456789abcdef"
One-shot
let keychain = Keychain(service: "com.example.github-token")

do {
    try keychain
        .accessibility(.afterFirstUnlock)
        .set("01234567-89ab-cdef-0123-456789abcdef", key: "kishikawakatsumi")
} catch let error {
    print("error: \(error)")
}
For foreground application
Creating instance
let keychain = Keychain(service: "com.example.github-token")
    .accessibility(.whenUnlocked)

keychain["kishikawakatsumi"] = "01234567-89ab-cdef-0123-456789abcdef"
One-shot
let keychain = Keychain(service: "com.example.github-token")

do {
    try keychain
        .accessibility(.whenUnlocked)
        .set("01234567-89ab-cdef-0123-456789abcdef", key: "kishikawakatsumi")
} catch let error {
    print("error: \(error)")
}
:couple: Sharing Keychain items
let keychain = Keychain(service: "com.example.github-token", accessGroup: "12ABCD3E4F.shared")
:arrows_counterclockwise: Synchronizing Keychain items with iCloud
Creating instance
let keychain = Keychain(service: "com.example.github-token")
    .synchronizable(true)

keychain["kishikawakatsumi"] = "01234567-89ab-cdef-0123-456789abcdef"
One-shot
let keychain = Keychain(service: "com.example.github-token")

do {
    try keychain
        .synchronizable(true)
        .set("01234567-89ab-cdef-0123-456789abcdef", key: "kishikawakatsumi")
} catch let error {
    print("error: \(error)")
}
:cyclone: Touch ID (Face ID) integration
Any Operation that require authentication must be run in the background thread.
If you run in the main thread, UI thread will lock for the system to try to display the authentication dialog.
To use Face ID, add NSFaceIDUsageDescription key to your Info.plist
:closed_lock_with_key: Adding a Touch ID (Face ID) protected item
If you want to store the Touch ID protected Keychain item, specify accessibility and authenticationPolicy attributes.
let keychain = Keychain(service: "com.example.github-token")

DispatchQueue.global().async {
    do {
        // Should be the secret invalidated when passcode is removed? If not then use `.WhenUnlocked`
        try keychain
            .accessibility(.whenPasscodeSetThisDeviceOnly, authenticationPolicy: [.biometryAny])
            .set("01234567-89ab-cdef-0123-456789abcdef", key: "kishikawakatsumi")
    } catch let error {
        // Error handling if needed...
    }
}
:closed_lock_with_key: Updating a Touch ID (Face ID) protected item
The same way as when adding.
Do not run in the main thread if there is a possibility that the item you are trying to add already exists, and protected. Because updating protected items requires authentication.
Additionally, you want to show custom authentication prompt message when updating, specify an authenticationPrompt attribute.
If the item not protected, the authenticationPrompt parameter just be ignored.
let keychain = Keychain(service: "com.example.github-token")

DispatchQueue.global().async {
    do {
        // Should be the secret invalidated when passcode is removed? If not then use `.WhenUnlocked`
        try keychain
            .accessibility(.whenPasscodeSetThisDeviceOnly, authenticationPolicy: [.biometryAny])
            .authenticationPrompt("Authenticate to update your access token")
            .set("01234567-89ab-cdef-0123-456789abcdef", key: "kishikawakatsumi")
    } catch let error {
        // Error handling if needed...
    }
}
:closed_lock_with_key: Obtaining a Touch ID (Face ID) protected item
The same way as when you get a normal item. It will be displayed automatically Touch ID or passcode authentication If the item you try to get is protected.
If you want to show custom authentication prompt message, specify an authenticationPrompt attribute.
If the item not protected, the authenticationPrompt parameter just be ignored.
let keychain = Keychain(service: "com.example.github-token")

DispatchQueue.global().async {
    do {
        let password = try keychain
            .authenticationPrompt("Authenticate to login to server")
            .get("kishikawakatsumi")

        print("password: \(password)")
    } catch let error {
        // Error handling if needed...
    }
}
:closed_lock_with_key: Removing a Touch ID (Face ID) protected item
The same way as when you remove a normal item. There is no way to show Touch ID or passcode authentication when removing Keychain items.
let keychain = Keychain(service: "com.example.github-token")

do {
    try keychain.remove("kishikawakatsumi")
} catch let error {
    // Error handling if needed...
}
:key: Shared Web Credentials
Shared web credentials is a programming interface that enables native iOS apps to share credentials with their website counterparts. For example, a user may log in to a website in Safari, entering a user name and password, and save those credentials using the iCloud Keychain. Later, the user may run a native app from the same developer, and instead of the app requiring the user to reenter a user name and password, shared web credentials gives it access to the credentials that were entered earlier in Safari. The user can also create new accounts, update passwords, or delete her account from within the app. These changes are then saved and used by Safari.
https://developer.apple.com/library/ios/documentation/Security/Reference/SharedWebCredentialsRef/
let keychain = Keychain(server: "https://www.kishikawakatsumi.com", protocolType: .HTTPS)

let username = "kishikawakatsumi@mac.com"

// First, check the credential in the app's Keychain
if let password = try? keychain.get(username) {
    // If found password in the Keychain,
    // then log into the server
} else {
    // If not found password in the Keychain,
    // try to read from Shared Web Credentials
    keychain.getSharedPassword(username) { (password, error) -> () in
        if password != nil {
            // If found password in the Shared Web Credentials,
            // then log into the server
            // and save the password to the Keychain

            keychain[username] = password
        } else {
            // If not found password either in the Keychain also Shared Web Credentials,
            // prompt for username and password

            // Log into server

            // If the login is successful,
            // save the credentials to both the Keychain and the Shared Web Credentials.

            keychain[username] = inputPassword
            keychain.setSharedPassword(inputPassword, account: username)
        }
    }
}
Request all associated domain's credentials
Keychain.requestSharedWebCredential { (credentials, error) -> () in

}
Generate strong random password
Generate strong random password that is in the same format used by Safari autofill (xxx-xxx-xxx-xxx).
let password = Keychain.generatePassword() // => Nhu-GKm-s3n-pMx
How to set up Shared Web Credentials
Add a com.apple.developer.associated-domains entitlement to your app. This entitlement must include all the domains with which you want to share credentials.
Add an apple-app-site-association file to your website. This file must include application identifiers for all the apps with which the site wants to share credentials, and it must be properly signed.
When the app is installed, the system downloads and verifies the site association file for each of its associated domains. If the verification is successful, the app is associated with the domain.
More details:
https://developer.apple.com/library/ios/documentation/Security/Reference/SharedWebCredentialsRef/
:mag: Debugging
Display all stored items if print keychain object
let keychain = Keychain(server: "https://github.com", protocolType: .https)
print("\(keychain)")
=>
[
  [authenticationType: default, key: kishikawakatsumi, server: github.com, class: internetPassword, protocol: https]
  [authenticationType: default, key: hirohamada, server: github.com, class: internetPassword, protocol: https]
  [authenticationType: default, key: honeylemon, server: github.com, class: internetPassword, protocol: https]
]
Obtaining all stored keys
let keychain = Keychain(server: "https://github.com", protocolType: .https)

let keys = keychain.allKeys()
for key in keys {
  print("key: \(key)")
}
=>
key: kishikawakatsumi
key: hirohamada
key: honeylemon
Obtaining all stored items
let keychain = Keychain(server: "https://github.com", protocolType: .https)

let items = keychain.allItems()
for item in items {
  print("item: \(item)")
}
=>
item: [authenticationType: Default, key: kishikawakatsumi, server: github.com, class: InternetPassword, protocol: https]
item: [authenticationType: Default, key: hirohamada, server: github.com, class: InternetPassword, protocol: https]
item: [authenticationType: Default, key: honeylemon, server: github.com, class: InternetPassword, protocol: https]
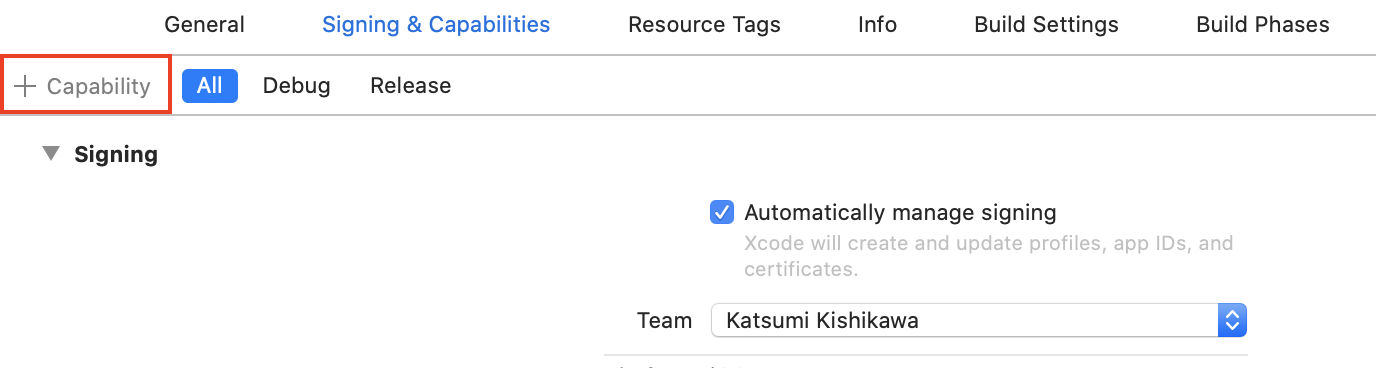
Keychain sharing capability
If you encounter the error below, you need to add an Keychain.entitlements.
OSStatus error:[-34018] Internal error when a required entitlement isn't present, client has neither application-identifier nor keychain-access-groups entitlements.

Requirements
| OS | Swift | |
|---|---|---|
| v1.1.x | iOS 7+, macOS 10.9+ | 1.1 |
| v1.2.x | iOS 7+, macOS 10.9+ | 1.2 |
| v2.0.x | iOS 7+, macOS 10.9+, watchOS 2+ | 2.0 |
| v2.1.x | iOS 7+, macOS 10.9+, watchOS 2+ | 2.0 |
| v2.2.x | iOS 8+, macOS 10.9+, watchOS 2+, tvOS 9+ | 2.0, 2.1 |
| v2.3.x | iOS 8+, macOS 10.9+, watchOS 2+, tvOS 9+ | 2.0, 2.1, 2.2 |
| v2.4.x | iOS 8+, macOS 10.9+, watchOS 2+, tvOS 9+ | 2.2, 2.3 |
| v3.0.x | iOS 8+, macOS 10.9+, watchOS 2+, tvOS 9+ | 3.x |
| v3.1.x | iOS 8+, macOS 10.9+, watchOS 2+, tvOS 9+ | 4.0, 4.1, 4.2 |
| v3.2.x | iOS 8+, macOS 10.9+, watchOS 2+, tvOS 9+ | 4.0, 4.1, 4.2, 5.0 |
| v4.0.x | iOS 8+, macOS 10.9+, watchOS 2+, tvOS 9+ | 4.0, 4.1, 4.2, 5.1 |
| v4.1.x | iOS 8+, macOS 10.9+, watchOS 3+, tvOS 9+, Mac Catalyst 13+ | 4.0, 4.1, 4.2, 5.1 |
Installation
CocoaPods
KeychainAccess is available through CocoaPods. To install it, simply add the following lines to your Podfile:
use_frameworks!
pod 'KeychainAccess'
Carthage
KeychainAccess is available through Carthage. To install it, simply add the following line to your Cartfile:
github "kishikawakatsumi/KeychainAccess"
Swift Package Manager
KeychainAccess is also available through Swift Package Manager.
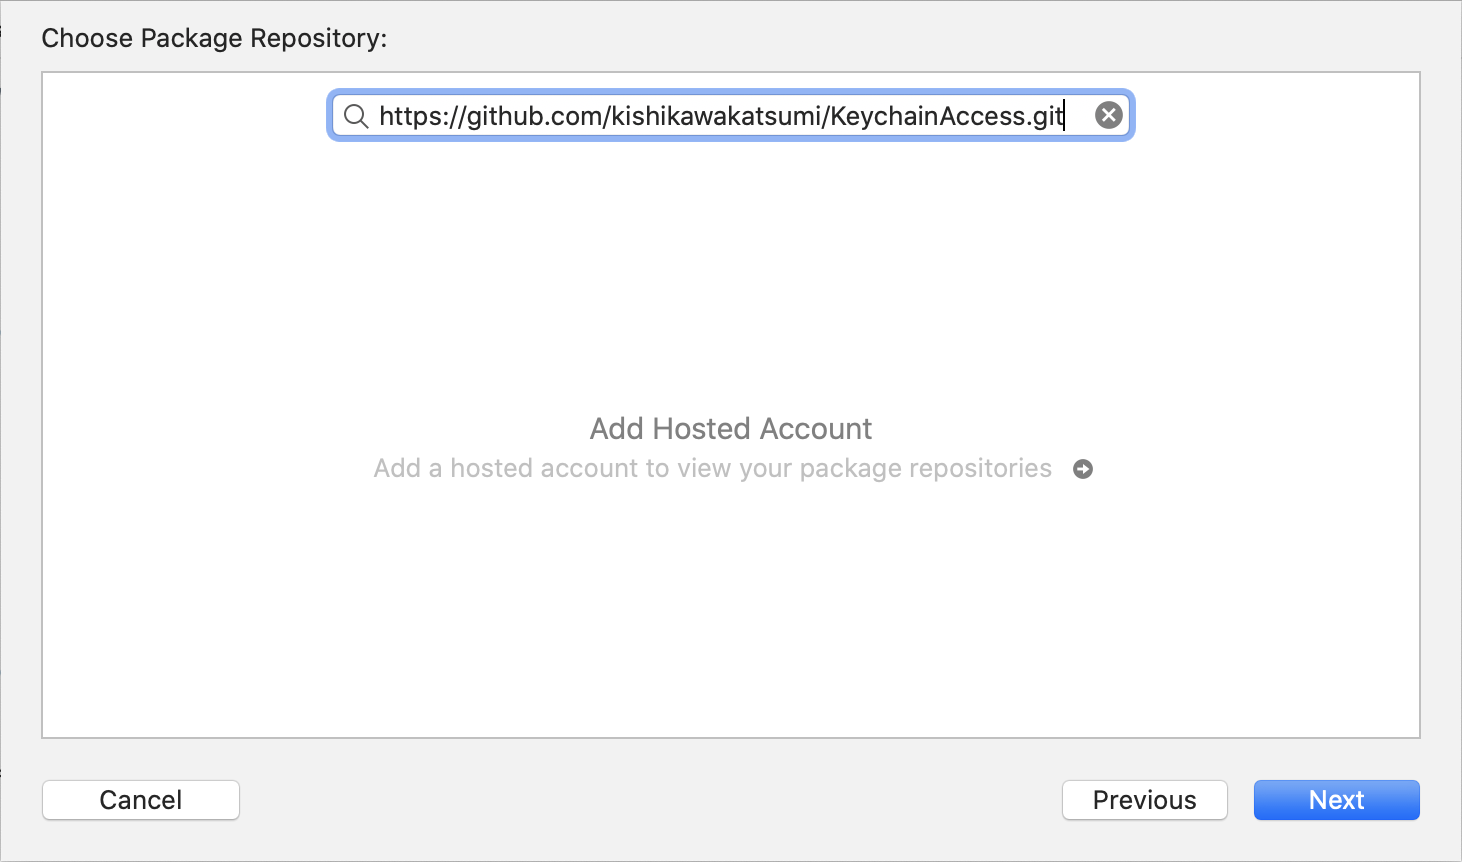
Xcode
Select File > Add Packages... > Add Package Dependency...,
CLI
First, create Package.swift that its package declaration includes:
// swift-tools-version:5.0
import PackageDescription

let package = Package(
    name: "MyLibrary",
    products: [
        .library(name: "MyLibrary", targets: ["MyLibrary"]),
    ],
    dependencies: [
        .package(url: "https://github.com/kishikawakatsumi/KeychainAccess.git", from: "3.0.0"),
    ],
    targets: [
        .target(name: "MyLibrary", dependencies: ["KeychainAccess"]),
    ]
)
Then, type
$ swift build
To manually add to your project
- Add
Lib/KeychainAccess.xcodeprojto your project - Link
KeychainAccess.frameworkwith your target - Add
Copy Files Build Phaseto include the framework to your application bundle
See iOS Example Project as reference.
Author
kishikawa katsumi, kishikawakatsumi@mac.com
License
KeychainAccess is available under the MIT license. See the LICENSE file for more info.
Top Related Projects
Valet lets you securely store data in the iOS, tvOS, watchOS, or macOS Keychain without knowing a thing about how the Keychain works. It’s easy. We promise.
Helper functions for saving text in Keychain securely for iOS, OS X, tvOS and watchOS.
A powerful, protocol-oriented library for working with the keychain in Swift.
Simple Objective-C wrapper for the keychain that works on Mac and iOS
Convenient & secure logging during development & release in Swift 4 & 5
Convert designs to code with AI
Introducing Visual Copilot: A new AI model to turn Figma designs to high quality code using your components.
Try Visual Copilot