
Top Related Projects

scikit-learn: machine learning in Python

The official Python library for the OpenAI API

An Open Source Machine Learning Framework for Everyone

Tensors and Dynamic neural networks in Python with strong GPU acceleration

Flexible and powerful data analysis / manipulation library for Python, providing labeled data structures similar to R data.frame objects, statistical functions, and much more

SciPy library main repository
Quick Overview
UMAP (Uniform Manifold Approximation and Projection) is a dimension reduction technique that can be used for visualization similar to t-SNE, but also for general non-linear dimension reduction. It is founded on rigorous mathematics derived from the work of Leland McInnes and John Healy. UMAP is implemented as a Python library that offers high performance and the ability to scale to large datasets.
Pros
- Fast performance, often outperforming t-SNE in terms of execution time
- Preserves more of the global structure of the data than t-SNE
- Scales well to larger datasets
- Can be used for general dimension reduction, not just visualization
Cons
- Can be sensitive to hyperparameter choices
- May require more tuning than simpler techniques like PCA
- The mathematical foundations can be complex for users to fully understand
- Results can sometimes be less visually appealing than t-SNE for certain datasets
Code Examples
- Basic UMAP usage:
import umap
import numpy as np

data = np.random.rand(1000, 20)
reducer = umap.UMAP()
embedding = reducer.fit_transform(data)
- UMAP with custom parameters:
reducer = umap.UMAP(n_neighbors=15, n_components=3, min_dist=0.1, metric='correlation')
embedding = reducer.fit_transform(data)
- Supervised UMAP:
import umap.supervised
labels = np.random.randint(0, 5, 1000)
supervised_reducer = umap.supervised.SupervisedUMAP()
supervised_embedding = supervised_reducer.fit_transform(data, labels)
Getting Started
To get started with UMAP:
- Install UMAP:
pip install umap-learn
- Import and use UMAP:
import umap
import numpy as np

# Generate sample data
data = np.random.rand(1000, 20)

# Create a UMAP reducer
reducer = umap.UMAP()

# Fit and transform the data
embedding = reducer.fit_transform(data)

# Plot the results (requires matplotlib)
import matplotlib.pyplot as plt
plt.scatter(embedding[:, 0], embedding[:, 1])
plt.show()
This will create a basic 2D UMAP embedding of your data and display it using matplotlib.
Competitor Comparisons
scikit-learn: machine learning in Python
Pros of scikit-learn
- Comprehensive machine learning library with a wide range of algorithms and tools
- Well-established, mature project with extensive documentation and community support
- Consistent API design across different algorithms, making it easy to use and switch between methods
Cons of scikit-learn
- Lacks specialized dimensionality reduction techniques like UMAP
- May be slower for certain operations compared to more specialized libraries
- Can be overwhelming for users who only need specific functionality
Code Comparison
UMAP:
import umap
reducer = umap.UMAP()
embedding = reducer.fit_transform(data)
scikit-learn (t-SNE as an example):
from sklearn.manifold import TSNE
tsne = TSNE(n_components=2)
embedding = tsne.fit_transform(data)
Both libraries offer similar ease of use for dimensionality reduction, but UMAP provides a more specialized and often faster solution for this specific task. scikit-learn, on the other hand, offers a broader range of machine learning tools and algorithms within a single package.
The official Python library for the OpenAI API
Pros of openai-python
- Provides direct access to OpenAI's powerful language models and APIs
- Regularly updated to support the latest OpenAI features and models
- Extensive documentation and examples for easy integration
Cons of openai-python
- Limited to OpenAI's specific services and models
- Requires an API key and may incur usage costs
- Less flexible for general-purpose machine learning tasks
Code Comparison
UMAP example:
import umap
import numpy as np

data = np.random.rand(100, 10)
reducer = umap.UMAP()
embedding = reducer.fit_transform(data)
openai-python example:
import openai

openai.api_key = "your-api-key"
response = openai.Completion.create(
  engine="text-davinci-002",
  prompt="Translate 'Hello' to French"
)
Summary
UMAP is a dimensionality reduction library for machine learning, while openai-python is a client library for accessing OpenAI's services. UMAP offers more flexibility for general machine learning tasks, whereas openai-python provides easy access to state-of-the-art language models and AI services. The choice between them depends on the specific requirements of your project and whether you need general-purpose machine learning capabilities or access to OpenAI's specialized services.
An Open Source Machine Learning Framework for Everyone
Pros of TensorFlow
- Comprehensive machine learning framework with broad capabilities
- Large community and extensive ecosystem of tools/libraries
- Supports distributed computing and GPU acceleration
Cons of TensorFlow
- Steeper learning curve for beginners
- Can be overkill for simpler ML tasks
- Larger footprint and slower startup time
Code Comparison
UMAP example:
import umap
reducer = umap.UMAP()
embedding = reducer.fit_transform(data)
TensorFlow example:
import tensorflow as tf
model = tf.keras.Sequential([
    tf.keras.layers.Dense(64, activation='relu'),
    tf.keras.layers.Dense(10, activation='softmax')
])
model.compile(optimizer='adam', loss='categorical_crossentropy')
Key Differences
- UMAP is focused on dimensionality reduction, while TensorFlow is a general-purpose ML framework
- UMAP is more lightweight and easier to use for specific tasks
- TensorFlow offers more flexibility and scalability for complex ML projects
Use Cases
- UMAP: Visualizing high-dimensional data, preprocessing for other ML algorithms
- TensorFlow: Deep learning, neural networks, large-scale ML deployments
Tensors and Dynamic neural networks in Python with strong GPU acceleration
Pros of PyTorch
- Comprehensive deep learning framework with extensive neural network capabilities
- Large, active community with frequent updates and extensive documentation
- Supports dynamic computational graphs, allowing for more flexible model architectures
Cons of PyTorch
- Steeper learning curve for beginners compared to UMAP's focused functionality
- Larger codebase and more dependencies, potentially leading to longer setup times
- May be overkill for projects solely focused on dimensionality reduction
Code Comparison
UMAP (Python):
import umap
reducer = umap.UMAP()
embedding = reducer.fit_transform(data)
PyTorch (Python):
import torch
import torch.nn as nn

model = nn.Sequential(
    nn.Linear(input_size, hidden_size),
    nn.ReLU(),
    nn.Linear(hidden_size, output_size)
)
Summary
While UMAP is a specialized tool for dimensionality reduction and visualization, PyTorch is a comprehensive deep learning framework. UMAP offers simplicity and ease of use for specific tasks, while PyTorch provides flexibility and power for a wide range of machine learning applications. The choice between them depends on the project's requirements and the user's expertise level.
Flexible and powerful data analysis / manipulation library for Python, providing labeled data structures similar to R data.frame objects, statistical functions, and much more
Pros of pandas
- Broader functionality for data manipulation and analysis
- Larger community and more extensive documentation
- Better integration with other data science libraries
Cons of pandas
- Steeper learning curve for beginners
- Higher memory usage for large datasets
- Slower performance for certain operations compared to specialized libraries
Code Comparison
pandas:
import pandas as pd

df = pd.read_csv('data.csv')
result = df.groupby('category').mean()
filtered = df[df['value'] > 100]
UMAP:
import umap

reducer = umap.UMAP()
embedding = reducer.fit_transform(data)
pandas is a comprehensive data manipulation library, while UMAP focuses specifically on dimensionality reduction. pandas offers a wide range of data handling capabilities, making it suitable for various data science tasks. UMAP, on the other hand, excels in creating low-dimensional embeddings of high-dimensional data, particularly useful for visualization and clustering tasks.
While pandas provides more general-purpose functionality, UMAP offers a specialized and efficient solution for dimensionality reduction, often outperforming other methods like t-SNE in terms of speed and preservation of global structure.
SciPy library main repository
Pros of SciPy
- Comprehensive scientific computing library with a wide range of functionality
- Well-established, mature project with extensive documentation and community support
- Integrated with other popular scientific Python libraries like NumPy
Cons of SciPy
- Can be complex for beginners due to its broad scope
- May have slower performance for specific tasks compared to specialized libraries
- Larger package size and potential for unnecessary dependencies
Code Comparison
UMAP example:
import umap
reducer = umap.UMAP()
embedding = reducer.fit_transform(data)
SciPy example (t-SNE as a dimensionality reduction alternative):
from scipy.spatial.distance import pdist
from scipy.manifold import TSNE
distances = pdist(data)
embedding = TSNE().fit_transform(distances)
Summary
UMAP is a specialized dimensionality reduction library, while SciPy is a comprehensive scientific computing toolkit. UMAP offers simpler API for specific tasks, while SciPy provides a broader range of tools but may require more setup for certain operations. Choose based on your specific needs and familiarity with the libraries.
Convert  designs to code with AI

Introducing Visual Copilot: A new AI model to turn Figma designs to high quality code using your components.
Try Visual CopilotREADME
.. -- mode: rst --
.. image:: doc/logo_large.png :width: 600 :alt: UMAP logo :align: center
|pypi_version|_ |pypi_downloads|_
|conda_version|_ |conda_downloads|_
|License|_ |build_status|_ |Coverage|_
|Docs|_ |joss_paper|_
.. |pypi_version| image:: https://img.shields.io/pypi/v/umap-learn.svg .. _pypi_version: https://pypi.python.org/pypi/umap-learn/
.. |pypi_downloads| image:: https://pepy.tech/badge/umap-learn/month .. _pypi_downloads: https://pepy.tech/project/umap-learn
.. |conda_version| image:: https://anaconda.org/conda-forge/umap-learn/badges/version.svg .. _conda_version: https://anaconda.org/conda-forge/umap-learn
.. |conda_downloads| image:: https://anaconda.org/conda-forge/umap-learn/badges/downloads.svg .. _conda_downloads: https://anaconda.org/conda-forge/umap-learn
.. |License| image:: https://img.shields.io/pypi/l/umap-learn.svg .. _License: https://github.com/lmcinnes/umap/blob/master/LICENSE.txt
.. |build_status| image:: https://dev.azure.com/TutteInstitute/build-pipelines/_apis/build/status/lmcinnes.umap?branchName=master .. _build_status: https://dev.azure.com/TutteInstitute/build-pipelines/_build/latest?definitionId=2&branchName=master
.. |Coverage| image:: https://coveralls.io/repos/github/lmcinnes/umap/badge.svg .. _Coverage: https://coveralls.io/github/lmcinnes/umap
.. |Docs| image:: https://readthedocs.org/projects/umap-learn/badge/?version=latest .. _Docs: https://umap-learn.readthedocs.io/en/latest/?badge=latest
.. |joss_paper| image:: http://joss.theoj.org/papers/10.21105/joss.00861/status.svg .. _joss_paper: https://doi.org/10.21105/joss.00861
==== UMAP
Uniform Manifold Approximation and Projection (UMAP) is a dimension reduction technique that can be used for visualisation similarly to t-SNE, but also for general non-linear dimension reduction. The algorithm is founded on three assumptions about the data:
- The data is uniformly distributed on a Riemannian manifold;
- The Riemannian metric is locally constant (or can be approximated as such);
- The manifold is locally connected.
From these assumptions it is possible to model the manifold with a fuzzy topological structure. The embedding is found by searching for a low dimensional projection of the data that has the closest possible equivalent fuzzy topological structure.
The details for the underlying mathematics can be found in
our paper on ArXiv <https://arxiv.org/abs/1802.03426>_:
McInnes, L, Healy, J, UMAP: Uniform Manifold Approximation and Projection for Dimension Reduction, ArXiv e-prints 1802.03426, 2018
A broader introduction to UMAP targetted the scientific community can be found
in our paper published in Nature Review Methods Primers <https://doi.org/10.1038/s43586-024-00363-x>_:
Healy, J., McInnes, L. Uniform manifold approximation and projection. Nat Rev Methods Primers 4, 82 (2024).
A read only version of this paper can accessed via link <https://rdcu.be/d0YZT>_
The important thing is that you don't need to worry about thatâyou can use UMAP right now for dimension reduction and visualisation as easily as a drop in replacement for scikit-learn's t-SNE.
Documentation is available via Read the Docs <https://umap-learn.readthedocs.io/>_.
New: this package now also provides support for densMAP. The densMAP algorithm augments UMAP
to preserve local density information in addition to the topological structure of the data.
Details of this method are described in the following paper <https://doi.org/10.1038/s41587-020-00801-7>_:
Narayan, A, Berger, B, Cho, H, Assessing Single-Cell Transcriptomic Variability through Density-Preserving Data Visualization, Nature Biotechnology, 2021
Installing
UMAP depends upon scikit-learn, and thus scikit-learn's dependencies
such as numpy and scipy. UMAP adds a requirement for numba for
performance reasons. The original version used Cython, but the improved code
clarity, simplicity and performance of Numba made the transition necessary.
Requirements:
- Python 3.6 or greater
- numpy
- scipy
- scikit-learn
- numba
- tqdm
pynndescent <https://github.com/lmcinnes/pynndescent>_
Recommended packages:
- For plotting
- matplotlib
- datashader
- holoviews
- for Parametric UMAP
- tensorflow > 2.0.0
Install Options
Conda install, via the excellent work of the conda-forge team:
.. code:: bash
conda install -c conda-forge umap-learn
The conda-forge packages are available for Linux, OS X, and Windows 64 bit.
PyPI install, presuming you have numba and sklearn and all its requirements (numpy and scipy) installed:
.. code:: bash
pip install umap-learn
If you wish to use the plotting functionality you can use
.. code:: bash
pip install umap-learn[plot]
to install all the plotting dependencies.
If you wish to use Parametric UMAP, you need to install Tensorflow, which can be installed either using the instructions at https://www.tensorflow.org/install (recommended) or using
.. code:: bash
pip install umap-learn[parametric_umap]
for a CPU-only version of Tensorflow.
If you're on an x86 processor, you can also optionally install tbb, which will
provide additional CPU optimizations:
.. code:: bash
pip install umap-learn[tbb]
If pip is having difficulties pulling the dependencies then we'd suggest installing the dependencies manually using anaconda followed by pulling umap from pip:
.. code:: bash
conda install numpy scipy
conda install scikit-learn
conda install numba
pip install umap-learn
For a manual install get this package:
.. code:: bash
wget https://github.com/lmcinnes/umap/archive/master.zip
unzip master.zip
rm master.zip
cd umap-master
Optionally, install the requirements through Conda:
.. code:: bash
conda install scikit-learn numba
Then install the package
.. code:: bash
python -m pip install -e .
How to use UMAP
The umap package inherits from sklearn classes, and thus drops in neatly next to other sklearn transformers with an identical calling API.
.. code:: python
import umap
from sklearn.datasets import load_digits

digits = load_digits()

embedding = umap.UMAP().fit_transform(digits.data)
There are a number of parameters that can be set for the UMAP class; the major ones are as follows:
-
n_neighbors: This determines the number of neighboring points used in local approximations of manifold structure. Larger values will result in more global structure being preserved at the loss of detailed local structure. In general this parameter should often be in the range 5 to 50, with a choice of 10 to 15 being a sensible default. -
min_dist: This controls how tightly the embedding is allowed compress points together. Larger values ensure embedded points are more evenly distributed, while smaller values allow the algorithm to optimise more accurately with regard to local structure. Sensible values are in the range 0.001 to 0.5, with 0.1 being a reasonable default. -
metric: This determines the choice of metric used to measure distance in the input space. A wide variety of metrics are already coded, and a user defined function can be passed as long as it has been JITd by numba.
An example of making use of these options:
.. code:: python
import umap
from sklearn.datasets import load_digits

digits = load_digits()

embedding = umap.UMAP(n_neighbors=5,
                      min_dist=0.3,
                      metric='correlation').fit_transform(digits.data)
UMAP also supports fitting to sparse matrix data. For more details
please see the UMAP documentation <https://umap-learn.readthedocs.io/>_
Benefits of UMAP
UMAP has a few signficant wins in its current incarnation.
First of all UMAP is fast. It can handle large datasets and high dimensional data without too much difficulty, scaling beyond what most t-SNE packages can manage. This includes very high dimensional sparse datasets. UMAP has successfully been used directly on data with over a million dimensions.
Second, UMAP scales well in embedding dimensionâit isn't just for
visualisation! You can use UMAP as a general purpose dimension reduction
technique as a preliminary step to other machine learning tasks. With a
little care it partners well with the hdbscan <https://github.com/scikit-learn-contrib/hdbscan>_ clustering library (for
more details please see Using UMAP for Clustering <https://umap-learn.readthedocs.io/en/latest/clustering.html>_).
Third, UMAP often performs better at preserving some aspects of global structure of the data than most implementations of t-SNE. This means that it can often provide a better "big picture" view of your data as well as preserving local neighbor relations.
Fourth, UMAP supports a wide variety of distance functions, including non-metric distance functions such as cosine distance and correlation distance. You can finally embed word vectors properly using cosine distance!
Fifth, UMAP supports adding new points to an existing embedding via
the standard sklearn transform method. This means that UMAP can be
used as a preprocessing transformer in sklearn pipelines.
Sixth, UMAP supports supervised and semi-supervised dimension reduction.
This means that if you have label information that you wish to use as
extra information for dimension reduction (even if it is just partial
labelling) you can do thatâas simply as providing it as the y
parameter in the fit method.
Seventh, UMAP supports a variety of additional experimental features including: an "inverse transform" that can approximate a high dimensional sample that would map to a given position in the embedding space; the ability to embed into non-euclidean spaces including hyperbolic embeddings, and embeddings with uncertainty; very preliminary support for embedding dataframes also exists.
Finally, UMAP has solid theoretical foundations in manifold learning
(see our paper on ArXiv <https://arxiv.org/abs/1802.03426>_).
This both justifies the approach and allows for further
extensions that will soon be added to the library.
Performance and Examples
UMAP is very efficient at embedding large high dimensional datasets. In
particular it scales well with both input dimension and embedding dimension.
For the best possible performance we recommend installing the nearest neighbor
computation library pynndescent <https://github.com/lmcinnes/pynndescent>_ .
UMAP will work without it, but if installed it will run faster, particularly on
multicore machines.
For a problem such as the 784-dimensional MNIST digits dataset with 70000 data samples, UMAP can complete the embedding in under a minute (as compared with around 45 minutes for scikit-learn's t-SNE implementation). Despite this runtime efficiency, UMAP still produces high quality embeddings.
The obligatory MNIST digits dataset, embedded in 42 seconds (with pynndescent installed and after numba jit warmup) using a 3.1 GHz Intel Core i7 processor (n_neighbors=10, min_dist=0.001):
.. image:: images/umap_example_mnist1.png :alt: UMAP embedding of MNIST digits
The MNIST digits dataset is fairly straightforward, however. A better test is the more recent "Fashion MNIST" dataset of images of fashion items (again 70000 data sample in 784 dimensions). UMAP produced this embedding in 49 seconds (n_neighbors=5, min_dist=0.1):
.. image:: images/umap_example_fashion_mnist1.png :alt: UMAP embedding of "Fashion MNIST"
The UCI shuttle dataset (43500 sample in 8 dimensions) embeds well under correlation distance in 44 seconds (note the longer time required for correlation distance computations):
.. image:: images/umap_example_shuttle.png :alt: UMAP embedding the UCI Shuttle dataset
The following is a densMAP visualization of the MNIST digits dataset with 784 features based on the same parameters as above (n_neighbors=10, min_dist=0.001). densMAP reveals that the cluster corresponding to digit 1 is noticeably denser, suggesting that there are fewer degrees of freedom in the images of 1 compared to other digits.
.. image:: images/densmap_example_mnist.png :alt: densMAP embedding of the MNIST dataset
Plotting
UMAP includes a subpackage umap.plot for plotting the results of UMAP embeddings.
This package needs to be imported separately since it has extra requirements
(matplotlib, datashader and holoviews). It allows for fast and simple plotting and
attempts to make sensible decisions to avoid overplotting and other pitfalls. An
example of use:
.. code:: python
import umap
import umap.plot
from sklearn.datasets import load_digits

digits = load_digits()

mapper = umap.UMAP().fit(digits.data)
umap.plot.points(mapper, labels=digits.target)
The plotting package offers basic plots, as well as interactive plots with hover tools and various diagnostic plotting options. See the documentation for more details.
Parametric UMAP
Parametric UMAP provides support for training a neural network to learn a UMAP based
transformation of data. This can be used to support faster inference of new unseen
data, more robust inverse transforms, autoencoder versions of UMAP and
semi-supervised classification (particularly for data well separated by UMAP and very
limited amounts of labelled data). See the
documentation of Parametric UMAP <https://umap-learn.readthedocs.io/en/0.5dev/parametric_umap.html>_
or the
example notebooks <https://github.com/lmcinnes/umap/tree/master/notebooks/Parametric_UMAP>_
for more.
densMAP
The densMAP algorithm augments UMAP to additionally preserve local density information
in addition to the topological structure captured by UMAP. One can easily run densMAP
using the umap package by setting the densmap input flag:
.. code:: python
embedding = umap.UMAP(densmap=True).fit_transform(data)
This functionality is built upon the densMAP implementation <https://github.com/hhcho/densvis>_ provided by the developers
of densMAP, who also contributed to integrating densMAP into the umap package.
densMAP inherits all of the parameters of UMAP. The following is a list of additional parameters that can be set for densMAP:
-
dens_frac: This determines the fraction of epochs (a value between 0 and 1) that will include the density-preservation term in the optimization objective. This parameter is set to 0.3 by default. Note that densMAP switches density optimization on after an initial phase of optimizing the embedding using UMAP. -
dens_lambda: This determines the weight of the density-preservation objective. Higher values prioritize density preservation, and lower values (closer to zero) prioritize the UMAP objective. Setting this parameter to zero reduces the algorithm to UMAP. Default value is 2.0. -
dens_var_shift: Regularization term added to the variance of local densities in the embedding for numerical stability. We recommend setting this parameter to 0.1, which consistently works well in many settings. -
output_dens: When this flag is True, the call tofit_transformreturns, in addition to the embedding, the local radii (inverse measure of local density defined in thedensMAP paper <https://doi.org/10.1101/2020.05.12.077776>_) for the original dataset and for the embedding. The output is a tuple(embedding, radii_original, radii_embedding). Note that the radii are log-transformed. If False, only the embedding is returned. This flag can also be used with UMAP to explore the local densities of UMAP embeddings. By default this flag is False.
For densMAP we recommend larger values of n_neighbors (e.g. 30) for reliable estimation of local density.
An example of making use of these options (based on a subsample of the mnist_784 dataset):
.. code:: python
import umap
from sklearn.datasets import fetch_openml
from sklearn.utils import resample

digits = fetch_openml(name='mnist_784')
subsample, subsample_labels = resample(digits.data, digits.target, n_samples=7000,
                                       stratify=digits.target, random_state=1)

embedding, r_orig, r_emb = umap.UMAP(densmap=True, dens_lambda=2.0, n_neighbors=30,
                                     output_dens=True).fit_transform(subsample)
See the documentation <https://umap-learn.readthedocs.io/en/0.5dev/densmap_demo.html>_ for more details.
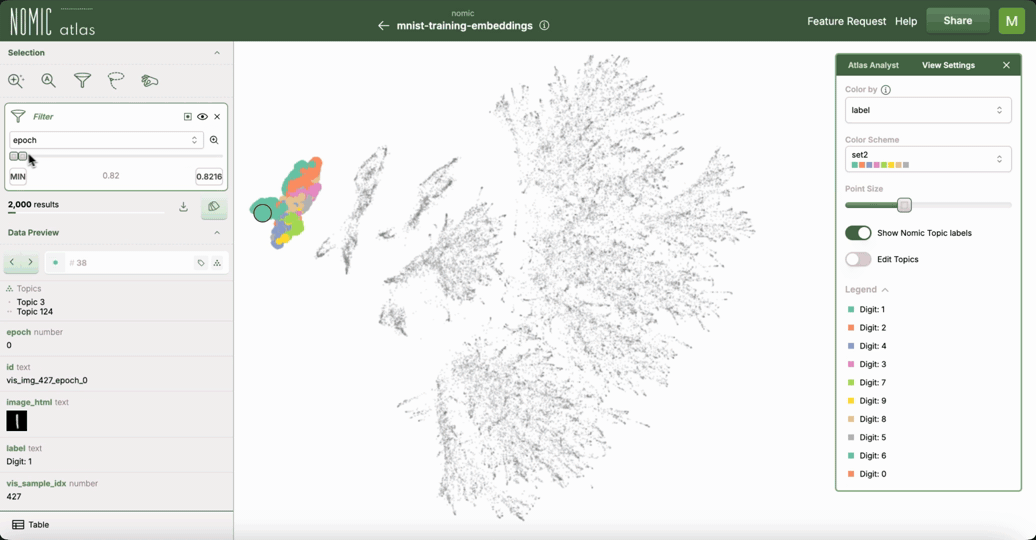
Interactive UMAP with Nomic Atlas
.. image:: https://assets.nomicatlas.com/mnist-training-embeddings-umap-short.gif :width: 600 :alt: MNIST UMAP visualization in Nomic Atlas
For interactive exploration of UMAP embeddings, especially for visualizing large datasets data over time/training epochs, you can use Nomic Atlas <https://atlas.nomic.ai/>_. Nomic Atlas is a platform for embedding generation, visualization, analysis, and retrieval that directly integrates UMAP as one of its projection models.
Using Nomic Atlas with UMAP is straightforward:
.. code:: python
from nomic import AtlasDataset
from nomic.data_inference import ProjectionOptions

# Create a dataset
dataset = AtlasDataset("my-dataset")

# data is a DataFrame or a list of dicts
dataset.add_data(data)

# Create an interactive UMAP in Atlas
atlas_map = dataset.create_index(
    indexed_field='text',
    projection=ProjectionOptions(
        model="umap",
        n_neighbors=15,
        min_dist=0.1,
        n_epochs=200
    )
)
# you can access your UMAP coordinates later on with
# atlas_map.maps[0].embeddings.projected
Nomic Atlas provides:
- In-browser analysis of your UMAP data with the
Atlas Analyst <https://docs.nomic.ai/atlas/data-maps/atlas-analyst>_ - Vector search over your UMAP data using the
Nomic API <https://docs.nomic.ai/atlas/data-maps/guides/vector-search-over-your-data>_ - Interactive features like zooming, recoloring, searching, and filtering in the
Nomic Atlas data map <https://docs.nomic.ai/atlas/data-maps/controls>_ - Scalability for millions of data points
- Rich information display on hover
- Shareable UMAPs via URL links to your embeddings and data maps in Atlas
GPU-Accelerated UMAP with torchdr
For GPU-accelerated UMAP computations, torchdr <https://github.com/TorchDR/TorchDR>_ provides a PyTorch-based implementation that significantly speed up the algorithm.
torchdr accelerates every step of the dimensionality reduction pipeline on GPU: kNN computation, affinity construction and embedding optimization.
Using torchdr with UMAP is straightforward:
.. code:: python
from torchdr import UMAP as torchdrUMAP

umap_gpu = torchdrUMAP(
    n_neighbors=15,
    min_dist=0.1,
    n_components=2,
    device='cuda'
)
embedding = umap_gpu.fit_transform(data-maps)
For more information and advanced usage, see the torchdr documentation <https://torchdr.github.io/index.html>_.
Help and Support
Documentation is at Read the Docs <https://umap-learn.readthedocs.io/>.
The documentation includes a FAQ <https://umap-learn.readthedocs.io/en/latest/faq.html> that
may answer your questions. If you still have questions then please
open an issue <https://github.com/lmcinnes/umap/issues/new>_
and I will try to provide any help and guidance that I can.
Citation
If you make use of this software for your work we would appreciate it if you would cite the paper from the Journal of Open Source Software:
.. code:: bibtex
@article{mcinnes2018umap-software,
  title={UMAP: Uniform Manifold Approximation and Projection},
  author={McInnes, Leland and Healy, John and Saul, Nathaniel and Grossberger, Lukas},
  journal={The Journal of Open Source Software},
  volume={3},
  number={29},
  pages={861},
  year={2018}
}
If you would like to cite this algorithm in your work the ArXiv paper is the current reference:
.. code:: bibtex
@article{2018arXivUMAP, author = {{McInnes}, L. and {Healy}, J. and {Melville}, J.}, title = "{UMAP: Uniform Manifold Approximation and Projection for Dimension Reduction}", journal = {ArXiv e-prints}, archivePrefix = "arXiv", eprint = {1802.03426}, primaryClass = "stat.ML", keywords = {Statistics - Machine Learning, Computer Science - Computational Geometry, Computer Science - Learning}, year = 2018, month = feb, }
If you found the Nature Primer introduction useful please cite the following reference:
.. code:: bibtex
@article{Healy2024,
  author={Healy, John
  and McInnes, Leland},
  title={Uniform manifold approximation and projection},
  journal={Nature Reviews Methods Primers},
  year={2024},
  month={Nov},
  day={21},
  volume={4},
  number={1},
  pages={82},
  abstract={Uniform manifold approximation and projection is a nonlinear dimension reduction method often used for visualizing data and as pre-processing for further machine-learning tasks such as clustering. In this Primer, we provide an introduction to the uniform manifold approximation and projection algorithm, the intuitions behind how it works, how best to apply it on data and how to interpret and understand results.},
  issn={2662-8449},
  doi={10.1038/s43586-024-00363-x},
  url={https://doi.org/10.1038/s43586-024-00363-x}
}
Additionally, if you use the densMAP algorithm in your work please cite the following reference:
.. code:: bibtex
@article {NBC2020,
    author = {Narayan, Ashwin and Berger, Bonnie and Cho, Hyunghoon},
    title = {Assessing Single-Cell Transcriptomic Variability through Density-Preserving Data Visualization},
    journal = {Nature Biotechnology},
    year = {2021},
    doi = {10.1038/s41587-020-00801-7},
    publisher = {Springer Nature},
    URL = {https://doi.org/10.1038/s41587-020-00801-7},
    eprint = {https://www.biorxiv.org/content/early/2020/05/14/2020.05.12.077776.full.pdf},
}
If you use the Parametric UMAP algorithm in your work please cite the following reference:
.. code:: bibtex
@article {SMG2020,
    author = {Sainburg, Tim and McInnes, Leland and Gentner, Timothy Q.},
    title = {Parametric UMAP: learning embeddings with deep neural networks for representation and semi-supervised learning},
    journal = {ArXiv e-prints},
    archivePrefix = "arXiv",
    eprint = {2009.12981},
    primaryClass = "stat.ML",
    keywords = {Statistics - Machine Learning,
                Computer Science - Computational Geometry,
                Computer Science - Learning},
    year = 2020,
    }
License
The umap package is 3-clause BSD licensed.
We would like to note that the umap package makes heavy use of
NumFOCUS sponsored projects, and would not be possible without
their support of those projects, so please consider contributing to NumFOCUS <https://www.numfocus.org/membership>_.
Contributing
Contributions are more than welcome! There are lots of opportunities
for potential projects, so please get in touch if you would like to
help out. Everything from code to notebooks to
examples and documentation are all equally valuable so please don't feel
you can't contribute. To contribute please
fork the project <https://github.com/lmcinnes/umap/issues#fork-destination-box>_
make your changes and
submit a pull request. We will do our best to work through any issues with
you and get your code merged into the main branch.
Top Related Projects
scikit-learn: machine learning in Python
The official Python library for the OpenAI API
An Open Source Machine Learning Framework for Everyone
Tensors and Dynamic neural networks in Python with strong GPU acceleration
Flexible and powerful data analysis / manipulation library for Python, providing labeled data structures similar to R data.frame objects, statistical functions, and much more
SciPy library main repository
Convert designs to code with AI
Introducing Visual Copilot: A new AI model to turn Figma designs to high quality code using your components.
Try Visual Copilot