
Top Related Projects
Fluent UI web represents a collection of utilities, React components, and web components for building web applications.

An enterprise-class UI design language and React UI library

Material UI: Comprehensive React component library that implements Google's Material Design. Free forever.

Chakra UI is a component system for building SaaS products with speed ⚡️

A utility-first CSS framework for rapid UI development.

Storybook is the industry standard workshop for building, documenting, and testing UI components in isolation
Quick Overview
Magnetic UI is an open-source project by Microsoft that provides a set of React components and hooks for building accessible and customizable user interfaces. It aims to offer a flexible and modern approach to UI development, with a focus on performance and ease of use.
Pros
- Highly customizable components with a focus on accessibility
- Built with TypeScript for improved type safety and developer experience
- Lightweight and performant, with a modular architecture
- Extensive documentation and examples
Cons
- Relatively new project, which may lead to potential instability or frequent changes
- Limited number of components compared to more established UI libraries
- May require a learning curve for developers unfamiliar with React hooks and modern patterns
Code Examples
Creating a custom button with Magnetic UI:
import { Button } from '@microsoft/magnetic-ui';

const CustomButton = () => (
  <Button variant="primary" size="large" onClick={() => console.log('Clicked!')}>
    Click me
  </Button>
);
Using the useToggle hook for managing state:
import { useToggle } from '@microsoft/magnetic-ui';

const ToggleExample = () => {
  const [isOn, toggle] = useToggle(false);

  return (
    <div>
      <p>Toggle is {isOn ? 'ON' : 'OFF'}</p>
      <button onClick={toggle}>Toggle</button>
    </div>
  );
};
Creating a responsive layout with the Grid component:
import { Grid, GridItem } from '@microsoft/magnetic-ui';

const ResponsiveLayout = () => (
  <Grid columns={{ base: 1, md: 2, lg: 3 }} gap={4}>
    <GridItem>Item 1</GridItem>
    <GridItem>Item 2</GridItem>
    <GridItem>Item 3</GridItem>
  </Grid>
);
Getting Started
To start using Magnetic UI in your React project, follow these steps:
-
Install the package:
npm install @microsoft/magnetic-ui -
Import and use components in your React application:
import React from 'react'; import { Button, TextField } from '@microsoft/magnetic-ui'; const App = () => ( <div> <TextField label="Name" placeholder="Enter your name" /> <Button variant="primary">Submit</Button> </div> ); export default App; -
Customize the theme (optional):
import { ThemeProvider, createTheme } from '@microsoft/magnetic-ui';

const customTheme = createTheme({
  colors: {
    primary: '#007bff',
    secondary: '#6c757d',
  },
});

const App = () => (
  <ThemeProvider theme={customTheme}>
    {/* Your app components */}
  </ThemeProvider>
);
Competitor Comparisons
Fluent UI web represents a collection of utilities, React components, and web components for building web applications.
Pros of Fluent UI
- More mature and widely adopted, with extensive documentation and community support
- Offers a comprehensive set of UI components and design system
- Provides better integration with Microsoft products and services
Cons of Fluent UI
- Larger bundle size and potentially higher learning curve
- Less flexibility for customization compared to more lightweight alternatives
- May have more opinionated design choices that don't fit all project styles
Code Comparison
Fluent UI (React):
import { DefaultButton } from '@fluentui/react';

const MyComponent = () => (
  <DefaultButton text="Click me" onClick={() => console.log('Clicked')} />
);
Magnetic UI:
import { Button } from '@microsoft/magnetic-ui-react';

const MyComponent = () => (
  <Button onClick={() => console.log('Clicked')}>Click me</Button>
);
Note: The code comparison is based on available information, but Magnetic UI's repository doesn't seem to be publicly accessible or may not exist. The comparison assumes a hypothetical implementation similar to other UI libraries.
An enterprise-class UI design language and React UI library
Pros of Ant Design
- Extensive component library with a wide range of UI elements
- Well-established and mature project with a large community
- Comprehensive documentation and examples
Cons of Ant Design
- Larger bundle size due to the extensive component set
- Opinionated design system may require more customization for unique designs
Code Comparison
Ant Design component usage:
import { Button } from 'antd';

const MyComponent = () => (
  <Button type="primary">Click me</Button>
);
Magnetic UI component usage (hypothetical, as the repository doesn't exist):
import { Button } from '@microsoft/magnetic-ui';

const MyComponent = () => (
  <Button variant="primary">Click me</Button>
);
Note: The comparison is limited as the microsoft/magentic-ui repository doesn't exist or is not publicly available. Ant Design is a well-known and widely used UI library for React applications, while there's no information available about Magnetic UI. The code comparison is based on typical React component library usage patterns and may not accurately represent Magnetic UI's actual implementation.
Material UI: Comprehensive React component library that implements Google's Material Design. Free forever.
Pros of Material-UI
- Extensive component library with a wide range of pre-built UI elements
- Strong community support and regular updates
- Comprehensive documentation and examples
Cons of Material-UI
- Larger bundle size due to the extensive component library
- Steeper learning curve for customization and theming
- Opinionated design system may not fit all project aesthetics
Code Comparison
Material-UI:
import { Button, TextField } from '@mui/material';

function MyComponent() {
  return (
    <>
      <TextField label="Name" variant="outlined" />
      <Button variant="contained" color="primary">Submit</Button>
    </>
  );
}
Magnetic-UI:
import { Button, TextInput } from '@microsoft/magnetic-ui';

function MyComponent() {
  return (
    <>
      <TextInput label="Name" />
      <Button appearance="primary">Submit</Button>
    </>
  );
}
Summary
Material-UI offers a comprehensive set of components and strong community support, making it suitable for large-scale projects. However, it may have a larger bundle size and a steeper learning curve. Magnetic-UI, being newer and less established, may offer a simpler API and potentially smaller bundle size, but with fewer components and less community support. The choice between the two depends on project requirements, team familiarity, and design preferences.
Chakra UI is a component system for building SaaS products with speed ⚡️
Pros of Chakra UI
- More mature and widely adopted, with a larger community and ecosystem
- Extensive documentation and examples available
- Highly customizable with a robust theming system
Cons of Chakra UI
- Larger bundle size, which may impact initial load times
- Steeper learning curve due to its extensive feature set
- Less opinionated, requiring more decisions from developers
Code Comparison
Chakra UI component:
import { Button } from "@chakra-ui/react"

function MyButton() {
  return <Button colorScheme="blue">Click me</Button>
}
Magnetic UI component (hypothetical, as the project is not publicly available):
import { Button } from "@microsoft/magnetic-ui"

function MyButton() {
  return <Button variant="primary">Click me</Button>
}
Note: The code comparison is speculative for Magnetic UI, as it's not publicly accessible. The actual implementation may differ.
It's important to note that Magnetic UI is not publicly available, making a comprehensive comparison challenging. Chakra UI is a well-established, open-source project with a proven track record, while Magnetic UI's features and capabilities are not publicly known. Developers should consider their specific project requirements and the availability of documentation and community support when choosing between these libraries.
A utility-first CSS framework for rapid UI development.
Pros of Tailwind CSS
- Larger community and ecosystem with extensive documentation
- More flexible and customizable for various design systems
- Broader browser and framework compatibility
Cons of Tailwind CSS
- Steeper learning curve for developers new to utility-first CSS
- Potentially larger CSS file size if not properly optimized
Code Comparison
Tailwind CSS:
<button class="bg-blue-500 hover:bg-blue-700 text-white font-bold py-2 px-4 rounded">
  Button
</button>
Magnetic UI:
<button class="button primary">
  Button
</button>
Key Differences
- Tailwind CSS uses utility classes for granular control, while Magnetic UI provides pre-designed components
- Tailwind CSS requires more class names but offers more flexibility, whereas Magnetic UI has a simpler syntax for common UI elements
- Tailwind CSS is framework-agnostic, while Magnetic UI is specifically designed for React applications
Use Cases
- Tailwind CSS: Ideal for projects requiring high customization and design flexibility
- Magnetic UI: Better suited for rapid prototyping and projects that align with Microsoft's design language
Community and Support
- Tailwind CSS has a larger community, more third-party resources, and frequent updates
- Magnetic UI, being newer, has a smaller but growing community backed by Microsoft
Storybook is the industry standard workshop for building, documenting, and testing UI components in isolation
Pros of Storybook
- Mature and widely adopted tool with extensive documentation and community support
- Supports a wide range of frameworks and libraries, including React, Vue, Angular, and more
- Offers advanced features like addons, testing utilities, and design system integration
Cons of Storybook
- Can be complex to set up and configure, especially for larger projects
- May introduce additional build overhead and increase project size
- Learning curve can be steep for newcomers, particularly when using advanced features
Code Comparison
Storybook component story:
import { Button } from './Button';

export default {
  title: 'Example/Button',
  component: Button,
};

const Template = (args) => <Button {...args} />;

export const Primary = Template.bind({});
Primary.args = {
  primary: true,
  label: 'Button',
};
Magnetic UI component (hypothetical, as the repository doesn't exist):
import { MagneticButton } from '@microsoft/magnetic-ui';

const MyButton = () => (
  <MagneticButton variant="primary">
    Click me
  </MagneticButton>
);
Note: The comparison is limited as the microsoft/magentic-ui repository doesn't exist or is not publicly available. The code example for Magnetic UI is hypothetical and based on common UI library patterns.
Convert  designs to code with AI

Introducing Visual Copilot: A new AI model to turn Figma designs to high quality code using your components.
Try Visual CopilotREADME
Automate your web tasks while you stay in control


Magentic-UI is a research prototype of a human-centered interface powered by a multi-agent system that can browse and perform actions on the web, generate and execute code, and generate and analyze files.
https://github.com/user-attachments/assets/7975fc26-1a18-4acb-8bf9-321171eeade7
Here's how you can get started with Magentic-UI:
Note: Before installing, please read the pre-requisites carefully. Magentic-UI requires Docker to run, and if you are on Windows, you will need WSL2. We recommend using uv for a quicker installation. If you are using Mac or Linux, you can skip the WSL2 step.
python3 -m venv .venv
source .venv/bin/activate
pip install magentic-ui --upgrade
# export OPENAI_API_KEY=<YOUR API KEY>
magentic-ui --port 8081
If your port is 8081, you can then access Magentic-UI at http://localhost:8081.
If you are not able to setup Docker, you can run a limited version of Magentic-UI which does not have the ability to execute code, navigate files or display the browser in the interface with the command:
magentic-ui --run-without-docker --port 8081
You can also run Magentic-UI in a command-line-interface:
magentic-cli --work-dir PATH/TO/STORE/DATA
To use Azure models or Ollama please install with the optional dependencies:
# for Azure
pip install magentic-ui[azure]
# for Ollama
pip install magentic-ui[ollama]
For further details on installation please read the ð ï¸ Installation section. For common installation issues and their solutions, please refer to the troubleshooting document.
Quick Navigation:
ðª How it Works | ð ï¸ Installation | â ï¸ Troubleshooting | ð¤ Contributing | ð License
ðª How it Works

Magentic-UI is especially useful for web tasks that require actions on the web (e.g., filling a form, customizing a food order), deep navigation through websites not indexed by search engines (e.g., filtering flights, finding a link from a personal site) or tasks that need web navigation and code execution (e.g., generate a chart from online data).
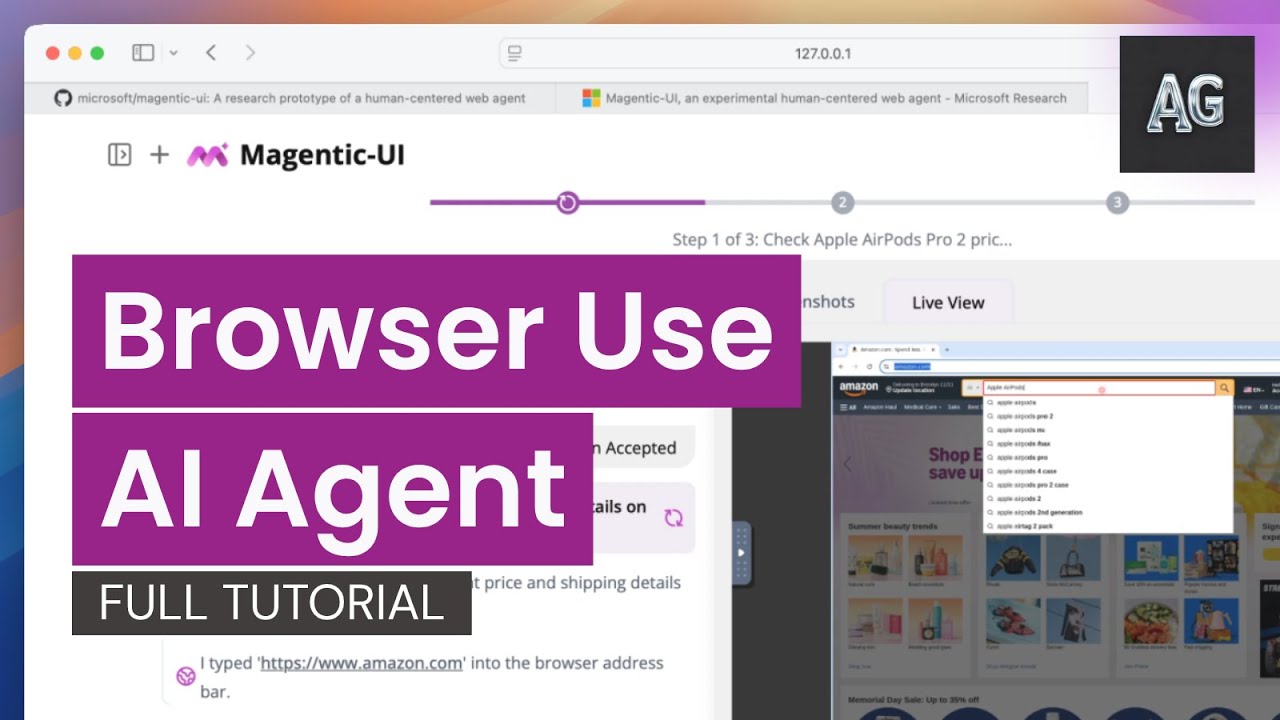
The interface of Magentic-UI is displayed in the screenshot above and consists of two panels. The left side panel is the sessions navigator where users can create new sessions to solve new tasks, switch between sessions and check on session progress with the session status indicators (ð´ needs input, â task done, ⺠task in progress).
The right-side panel displays the session selected. This is where you can type your query to Magentic-UI alongside text and image attachments and observe detailed task progress as well as interact with the agents. The session display itself is split in two panels: the left side is where Magentic-UI presents the plan, task progress and asks for action approvals, the right side is a browser view where you can see web agent actions in real time and interact with the browser. Finally, at the top of the session display is a progress bar that updates as Magentic-UI makes progress.
The example below shows a step by step user interaction with Magentic-UI:


What differentiates Magentic-UI from other browser use offerings is its transparent and controllable interface that allows for efficient human-in-the-loop involvement. Magentic-UI is built using AutoGen and provides a platform to study human-agent interaction and experiment with web agents. Key features include:
- ð§âð¤âð§ Co-Planning: Collaboratively create and approve step-by-step plans using chat and the plan editor.
- ð¤ Co-Tasking: Interrupt and guide the task execution using the web browser directly or through chat. Magentic-UI can also ask for clarifications and help when needed.
- ð¡ï¸ Action Guards: Sensitive actions are only executed with explicit user approvals.
- ð§ Plan Learning and Retrieval: Learn from previous runs to improve future task automation and save them in a plan gallery. Automatically or manually retrieve saved plans in future tasks.
- ð Parallel Task Execution: You can run multiple tasks in parallel and session status indicators will let you know when Magentic-UI needs your input or has completed the task.
â¶ï¸ Click to watch a video and learn more about Magentic-UI
â¹ï¸ Agentic Workflow
Magentic-UI's underlying system is a team of specialized agents adapted from AutoGen's Magentic-One system illustrated in the figure below.

The agents work together to create a modular system:
- ð§âð¼ Orchestrator is the lead agent, powered by a large language model (LLM), that performs co-planning with the user, decides when to ask the user for feedback, and delegates sub-tasks to the remaining agents to complete.
- ð WebSurfer is an LLM agent equipped with a web browser that it can control. Given a request by the Orchestrator, it can click, type, scroll, and visit pages in multiple rounds to complete the request from the Orchestrator. This agent is a significant improvement over the AutoGen
MultimodalWebSurferin terms of the actions it can do (tab management, select options, file upload, multimodal queries). To learn more how this agent is built, follow along this Tutorial: Building a Browser Use Agent From Scratch and with Magentic-UI . - ð» Coder is an LLM agent equipped with a Docker code-execution container. It can write and execute Python and shell commands and provide a response back to the Orchestrator.
- ð FileSurfer is an LLM agent equipped with a Docker code-execution container and file-conversion tools from the MarkItDown package. It can locate files in the directory controlled by Magentic-UI, convert files to markdown, and answer questions about them.
- ð§ UserProxy is an agent that represents the user interacting with Magentic-UI. The Orchestrator can delegate work to the user instead of the other agents.
To interact with Magentic-UI, users can enter a text message and attach images. In response, Magentic-UI creates a natural-language step-by-step plan with which users can interact through a plan-editing interface. Users can add, delete, edit, regenerate steps, and write follow-up messages to iterate on the plan. While the user editing the plan adds an upfront cost to the interaction, it can potentially save a significant amount of time in the agent executing the plan and increase its chance at success.
The plan is stored inside the Orchestrator and is used to execute the task. For each step of the plan, the Orchestrator determines which of the agents (WebSurfer, Coder, FileSurfer) or the user should complete the step. Once that decision is made, the Orchestrator sends a request to one of the agents or the user and waits for a response. After the response is received, the Orchestrator decides whether that step is complete. If the step is complete, the Orchestrator moves on to the following step.
Once all steps are completed, the Orchestrator generates a final answer that is presented to the user. If, while executing any of the steps, the Orchestrator decides that the plan is inadequate (for example, because a certain website is unreachable), the Orchestrator can replan with user permission and execute a new plan.
All intermediate progress steps are clearly displayed to the user. Furthermore, the user can pause the execution of the plan and send additional requests or feedback. The user can also configure through the interface whether agent actions (e.g., clicking a button) require approval.
Autonomous Evaluation
To evaluate its autonomous capabilities, Magentic-UI has been tested against several benchmarks when running with o4-mini: GAIA test set (42.52%), which assesses general AI assistants across reasoning, tool use, and web interaction tasks ; AssistantBench test set (27.60%), focusing on realistic, time-consuming web tasks; WebVoyager (82.2%), measuring end-to-end web navigation in real-world scenarios; and WebGames (45.5%), evaluating general-purpose web-browsing agents through interactive challenges. To reproduce these experimental results, please see the following instructions.
If you're interested in reading more checkout our blog post.
ð ï¸ Installation
ð Pre-Requisites
Note: If you're using Windows, we highly recommend using WSL2 (Windows Subsystem for Linux).
- If running on Windows or Mac you should use Docker Desktop or if inside WSL2 you can install Docker directly inside WSL docker in WSL2 guide. If running on Linux, you should use Docker Engine.
If using Docker Desktop, make sure it is set up to use WSL2: - Go to Settings > Resources > WSL Integration - Enable integration with your development distro You can find more detailed instructions about this step here.
-
During the Installation step, you will need to set up your
OPENAI_API_KEY. To use other models, review the Custom Client Configuration section below. -
You need at least Python 3.10 installed.
If you are on Windows, we recommend to run Magentic-UI inside WSL2 (Windows Subsystem for Linux) for correct Docker and file path compatibility.
PyPI Installation
Magentic-UI is available on PyPI. We recommend using a virtual environment to avoid conflicts with other packages.
python3 -m venv .venv
source .venv/bin/activate
pip install magentic-ui
Alternatively, if you use uv for dependency management, you can install Magentic-UI with:
uv venv --python=3.12 .venv
. .venv/bin/activate
uv pip install magentic-ui
Running Magentic-UI
To run Magentic-UI, make sure that Docker is running, then run the following command:
magentic-ui --port 8081
The first time that you run this command, it will take a while to build the Docker images -- go grab a coffee or something. The next time you run it, it will be much faster as it doesn't have to build the Docker again.
If you have trouble building the dockers, please try to rebuild them with the command:
magentic-ui --rebuild-docker --port 8081
If you face further issues, please refer to the TROUBLESHOOTING.md document.
Once the server is running, you can access the UI at http://localhost:8081.
You can also run a command line interface (CLI) for Magentic-UI with the command:
magentic-cli --work-dir PATH_TO_STORE_LOGS
Configuration
Model Client Configuration
If you want to use a different OpenAI key, or if you want to configure use with Azure OpenAI or Ollama, you can do so inside the UI by navigating to settings (top right icon) and changing model configuration with the format of the config.yaml file below. You can also create a config.yaml and import it inside the UI or point Magentic-UI to its path at startup time:
magentic-ui --config path/to/config.yaml
An example config.yaml for OpenAI is given below:
# config.yaml

######################################
# Default OpenAI model configuration #
######################################
model_config: &client
  provider: autogen_ext.models.openai.OpenAIChatCompletionClient
  config:
    model: gpt-4o
    api_key: <YOUR API KEY>
    max_retries: 10

##########################
# Clients for each agent #
##########################
orchestrator_client: *client
coder_client: *client
web_surfer_client: *client
file_surfer_client: *client
action_guard_client: *client
The corresponding configuration for Azure OpenAI is:
# config.yaml

######################################
# Azure model configuration          #
######################################
model_config: &client
  provider: AzureOpenAIChatCompletionClient
  config:
    model: gpt-4o
    azure_endpoint: "<YOUR ENDPOINT>"
    azure_deployment: "<YOUR DEPLOYMENT>"
    api_version: "2024-10-21"
    azure_ad_token_provider:
      provider: autogen_ext.auth.azure.AzureTokenProvider
      config:
        provider_kind: DefaultAzureCredential
        scopes:
          - https://cognitiveservices.azure.com/.default
    max_retries: 10

##########################
# Clients for each agent #
##########################
orchestrator_client: *client
coder_client: *client
web_surfer_client: *client
file_surfer_client: *client
action_guard_client: *client
MCP Server Configuration
You can also extend Magentic-UI's capabilities by adding custom "McpAgents" to the multi-agent team. Each McpAgent can have access to one or more MCP Servers. You can specify these agents via the mcp_agent_configs parameter in your config.yaml.
For example, here's an agent called "airbnb_surfer" that has access to the OpenBnb MCP Server running locally via Stdio.
mcp_agent_configs:
  - name: airbnb_surfer
    description: "The airbnb_surfer has direct access to AirBnB."
    model_client:
      provider: OpenAIChatCompletionClient
      config:
        model: gpt-4.1-2025-04-14
      max_retries: 10
    system_message: |-
      You are AirBnb Surfer, a helpful digital assistant that can help users acces AirBnB.

      You have access to a suite of tools provided by the AirBnB API. Use those tools to satisfy the users requests.
    reflect_on_tool_use: false
    mcp_servers:
      - server_name: AirBnB
        server_params:
          type: StdioServerParams
          command: npx
          args:
            - -y
            - "@openbnb/mcp-server-airbnb"
            - --ignore-robots-txt
Under the hood, each McpAgent is just a autogen_agentchat.agents.AssistantAgent with the set of MCP Servers exposed as an AggregateMcpWorkbench which is simply a named collection of autogen_ext.tools.mcp.McpWorkbench objects (one per MCP Server).
Currently the supported MCP Server types are autogen_ext.tools.mcp.StdioServerParams and autogen_ext.tools.mcp.SseServerParams.
Building Magentic-UI from source
This step is primarily for users seeking to make modifications to the code, are having trouble with the pypi installation or want the latest code before a pypi version release.
1. Make sure the above prerequisites are installed, and that Docker is running.
2. Clone the repository to your local machine:
git clone https://github.com/microsoft/magentic-ui.git
cd magentic-ui
3. Install Magentic-UI's dependencies with uv:
# install uv through https://docs.astral.sh/uv/getting-started/installation/
uv venv --python=3.12 .venv
uv sync --all-extras
source .venv/bin/activate
4. Build the frontend:
First make sure to install node:
# install nvm to install node
curl -o- https://raw.githubusercontent.com/nvm-sh/nvm/v0.40.1/install.sh | bash
nvm install node
Then install the frontend:
cd frontend
npm install -g gatsby-cli
npm install --global yarn
yarn install
yarn build
5. Run Magentic-UI, as usual.
magentic-ui --port 8081
Note: Running this command for the first time will build two docker containers required for the Magentic-UI agents. If you encounter problems, you can build them directly with the following commands from inside the repository:
docker build -t magentic-ui-vnc-browser:latest ./src/magentic_ui/docker/magentic-ui-browser-docker

docker build -t magentic-ui-python-env:latest ./src/magentic_ui/docker/magentic-ui-python-env
Running the UI from source
If you are making changes to the source code of the UI, you can run the frontend in development mode so that it will automatically update when you make changes for faster development.
- Open a separate terminal and change directory to the frontend
cd frontend
- Create a
.env.developmentfile.
cp .env.default .env.development
- Launch frontend server
npm run start
- Then run the UI:
magentic-ui --port 8081
The frontend from source will be available at http://localhost:8000, and the compiled frontend will be available at http://localhost:8081.
â ï¸ Troubleshooting
If you were unable to get Magentic-UI running, do not worry! The first step is to make sure you have followed the steps outlined above, particularly with the pre-requisites.
For common issues and their solutions, please refer to the TROUBLESHOOTING.md file in this repository. If you do not see your problem there, please open a GitHub Issue.
ð¤ Contributing
This project welcomes contributions and suggestions. For information about contributing to Magentic-UI, please see our CONTRIBUTING.md guide, which includes current issues to be resolved and other forms of contributing.
This project has adopted the Microsoft Open Source Code of Conduct. For more information, see the Code of Conduct FAQ or contact opencode@microsoft.com with any additional questions or comments.
ð License
Microsoft, and any contributors, grant you a license to any code in the repository under the MIT License. See the LICENSE file.
Microsoft, Windows, Microsoft Azure, and/or other Microsoft products and services referenced in the documentation may be either trademarks or registered trademarks of Microsoft in the United States and/or other countries. The licenses for this project do not grant you rights to use any Microsoft names, logos, or trademarks. Microsoft's general trademark guidelines can be found at http://go.microsoft.com/fwlink/?LinkID=254653.
Any use of third-party trademarks or logos are subject to those third-party's policies.
Privacy information can be found at https://go.microsoft.com/fwlink/?LinkId=521839
Microsoft and any contributors reserve all other rights, whether under their respective copyrights, patents, or trademarks, whether by implication, estoppel, or otherwise.
Top Related Projects
Fluent UI web represents a collection of utilities, React components, and web components for building web applications.
An enterprise-class UI design language and React UI library
Material UI: Comprehensive React component library that implements Google's Material Design. Free forever.
Chakra UI is a component system for building SaaS products with speed ⚡️
A utility-first CSS framework for rapid UI development.
Storybook is the industry standard workshop for building, documenting, and testing UI components in isolation
Convert designs to code with AI
Introducing Visual Copilot: A new AI model to turn Figma designs to high quality code using your components.
Try Visual Copilot