
Top Related Projects

A Ruby gem to load environment variables from `.env`.

Loads environment variables from `.env` to `getenv()`, `$_ENV` and `$_SERVER` automagically.

Reads key-value pairs from a .env file and can set them as environment variables. It helps in developing applications following the 12-factor principles.

A Go port of Ruby's dotenv library (Loads environment variables from .env files)

unclutter your .profile
Quick Overview
Dotenv is a zero-dependency module that loads environment variables from a .env file into process.env. It simplifies the management of configuration settings in Node.js applications, allowing developers to keep sensitive information separate from the codebase.
Pros
- Easy to use and integrate into existing projects
- Supports multiple environments (development, staging, production)
- Enhances security by keeping sensitive data out of version control
- Compatible with various Node.js frameworks and libraries
Cons
- Can lead to configuration sprawl if not managed properly
- Potential security risk if
.envfiles are accidentally committed to version control - Limited to string values for environment variables
- May require additional setup for more complex configuration scenarios
Code Examples
- Basic usage:
require('dotenv').config();

console.log(process.env.DB_HOST);
console.log(process.env.API_KEY);
This example loads environment variables from a .env file and accesses them through process.env.
- Custom path for
.envfile:
require('dotenv').config({ path: '/custom/path/to/.env' });
This code specifies a custom path for the .env file instead of using the default location.
- Preload dotenv:
node -r dotenv/config your_script.js
This command preloads dotenv before running your script, eliminating the need to call require('dotenv').config() in your code.
Getting Started
-
Install dotenv:
npm install dotenv -
Create a
.envfile in the root of your project:DB_HOST=localhost DB_USER=root DB_PASS=s1mpl3 -
Add this line as early as possible in your application:
require('dotenv').config(); -
Use environment variables in your code:
const db = require('db');
db.connect({
  host: process.env.DB_HOST,
  username: process.env.DB_USER,
  password: process.env.DB_PASS
});
Competitor Comparisons
A Ruby gem to load environment variables from `.env`.
Pros of dotenv (bkeepers)
- Supports Rails and other Ruby frameworks out of the box
- Offers more advanced features like environment-specific files (e.g.,
.env.development) - Provides a CLI tool for managing environment variables
Cons of dotenv (bkeepers)
- Limited to Ruby ecosystems
- Less actively maintained compared to the Node.js version
- Fewer integrations with other tools and frameworks
Code Comparison
dotenv (motdotla):
require('dotenv').config()
console.log(process.env.DB_HOST)
dotenv (bkeepers):
require 'dotenv/load'
puts ENV['DB_HOST']
Summary
Both dotenv projects serve the same purpose of loading environment variables from a .env file. The main difference lies in their target ecosystems: motdotla's dotenv is primarily for Node.js, while bkeepers' dotenv is for Ruby. The Ruby version offers some additional features like environment-specific files and a CLI tool, but it's limited to Ruby projects and has less active maintenance. The Node.js version is more widely used and has broader language support through community-maintained ports.
Loads environment variables from `.env` to `getenv()`, `$_ENV` and `$_SERVER` automagically.
Pros of phpdotenv
- Specifically designed for PHP environments, offering better integration with PHP projects
- Supports multiple file formats (.env, .env.php, .env.dist)
- Provides type-casting for environment variables
Cons of phpdotenv
- Limited to PHP ecosystems, not as versatile for other languages or platforms
- May have a steeper learning curve for developers not familiar with PHP
Code Comparison
dotenv (JavaScript):
require('dotenv').config();
const dbUser = process.env.DB_USER;
const dbPass = process.env.DB_PASS;
phpdotenv (PHP):
$dotenv = Dotenv\Dotenv::createImmutable(__DIR__);
$dotenv->load();
$dbUser = $_ENV['DB_USER'];
$dbPass = $_ENV['DB_PASS'];
Key Differences
- Language: dotenv is for JavaScript/Node.js, while phpdotenv is for PHP
- Usage: dotenv uses
process.env, phpdotenv uses$_ENVorgetenv() - Configuration: dotenv has simpler setup, phpdotenv requires more explicit initialization
- Features: phpdotenv offers more PHP-specific features like type-casting and multiple file support
Conclusion
Choose dotenv for JavaScript projects or cross-language compatibility. Opt for phpdotenv in PHP-specific environments or when advanced PHP features are needed.
Reads key-value pairs from a .env file and can set them as environment variables. It helps in developing applications following the 12-factor principles.
Pros of python-dotenv
- Native Python implementation, making it more suitable for Python projects
- Supports loading environment variables from multiple files
- Includes CLI tool for setting and getting environment variables
Cons of python-dotenv
- Limited to Python ecosystem, unlike dotenv which supports multiple languages
- May have slower performance compared to dotenv's C++ implementation
- Less widely adopted compared to dotenv
Code Comparison
python-dotenv:
from dotenv import load_dotenv
load_dotenv()
import os
secret_key = os.getenv("SECRET_KEY")
dotenv:
require('dotenv').config()
const secretKey = process.env.SECRET_KEY
Both libraries serve similar purposes, allowing developers to load environment variables from .env files. However, python-dotenv is specifically designed for Python projects, while dotenv is more versatile and can be used in various programming languages and environments.
python-dotenv offers additional features like loading from multiple files and a CLI tool, which may be beneficial for complex Python projects. On the other hand, dotenv has a larger user base and potentially better performance due to its C++ implementation.
The choice between the two largely depends on the project's requirements, programming language, and ecosystem preferences.
A Go port of Ruby's dotenv library (Loads environment variables from .env files)
Pros of godotenv
- Written in Go, making it ideal for Go projects and offering better performance in Go environments
- Supports loading environment variables from multiple files
- Provides a command-line interface for running commands with loaded environment variables
Cons of godotenv
- Limited functionality compared to dotenv (e.g., no built-in variable expansion)
- Less widely adopted and may have fewer community contributions
- Primarily focused on Go, while dotenv is more language-agnostic
Code Comparison
dotenv (Node.js):
require('dotenv').config()
console.log(process.env.DB_HOST)
godotenv (Go):
import "github.com/joho/godotenv"

godotenv.Load()
fmt.Println(os.Getenv("DB_HOST"))
Both libraries serve the purpose of loading environment variables from .env files, but they cater to different programming languages and ecosystems. dotenv is more feature-rich and widely used across various languages, while godotenv is tailored specifically for Go projects. The choice between the two depends on the programming language and specific requirements of your project.
unclutter your .profile
Pros of direnv
- Language-agnostic, works with any shell and programming language
- Automatically loads/unloads environment variables when entering/leaving directories
- Supports more complex environment setups, including running scripts
Cons of direnv
- Requires installation and shell integration
- Steeper learning curve due to more advanced features
- May introduce security risks if not properly configured
Code Comparison
dotenv:
require('dotenv').config();
console.log(process.env.DB_HOST);
direnv:
# .envrc file
export DB_HOST=localhost
# In shell
cd project_directory
echo $DB_HOST
Key Differences
- Setup: dotenv is a library imported into your project, while direnv is a system-wide tool.
- Activation: dotenv loads variables when explicitly called in code, direnv activates automatically when entering a directory.
- Scope: dotenv is primarily for Node.js projects, direnv works with any shell or language.
- Functionality: dotenv focuses on loading .env files, direnv offers more advanced environment management features.
Both tools serve the purpose of managing environment variables, but cater to different use cases and development workflows. Choose based on your specific project requirements and team preferences.
Convert  designs to code with AI

Introducing Visual Copilot: A new AI model to turn Figma designs to high quality code using your components.
Try Visual CopilotREADME
dotenv 

Dotenv is a zero-dependency module that loads environment variables from a .env file into process.env. Storing configuration in the environment separate from code is based on The Twelve-Factor App methodology.
![]()

![]()
- ð± Install
- ðï¸ Usage (.env)
- ð´ Multiple Environments ð
- ð Deploying (encryption) ð
- ð Examples
- ð Docs
- â FAQ
- â±ï¸ Changelog
ð± Install
npm install dotenv --save
You can also use an npm-compatible package manager like yarn, bun or pnpm:
yarn add dotenv
bun add dotenv
pnpm add dotenv
ðï¸ Usage
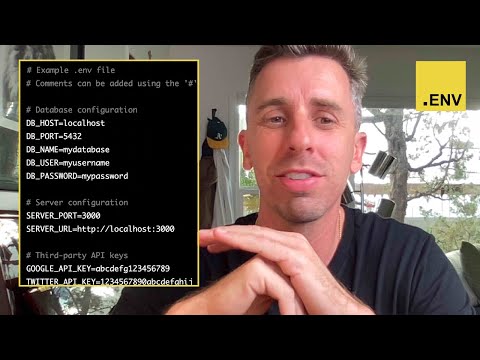
Create a .env file in the root of your project (if using a monorepo structure like apps/backend/app.js, put it in the root of the folder where your app.js process runs):
S3_BUCKET="YOURS3BUCKET"
SECRET_KEY="YOURSECRETKEYGOESHERE"
As early as possible in your application, import and configure dotenv:
require('dotenv').config()
console.log(process.env) // remove this after you've confirmed it is working
import 'dotenv/config'
That's it. process.env now has the keys and values you defined in your .env file:
require('dotenv').config()
// or import 'dotenv/config' if you're using ES6

...

s3.getBucketCors({Bucket: process.env.S3_BUCKET}, function(err, data) {})
Multiline values
If you need multiline variables, for example private keys, those are now supported (>= v15.0.0) with line breaks:
PRIVATE_KEY="-----BEGIN RSA PRIVATE KEY-----
...
Kh9NV...
...
-----END RSA PRIVATE KEY-----"
Alternatively, you can double quote strings and use the \n character:
PRIVATE_KEY="-----BEGIN RSA PRIVATE KEY-----\nKh9NV...\n-----END RSA PRIVATE KEY-----\n"
Comments
Comments may be added to your file on their own line or inline:
# This is a comment
SECRET_KEY=YOURSECRETKEYGOESHERE # comment
SECRET_HASH="something-with-a-#-hash"
Comments begin where a # exists, so if your value contains a # please wrap it in quotes. This is a breaking change from >= v15.0.0 and on.
Parsing
The engine which parses the contents of your file containing environment variables is available to use. It accepts a String or Buffer and will return an Object with the parsed keys and values.
const dotenv = require('dotenv')
const buf = Buffer.from('BASIC=basic')
const config = dotenv.parse(buf) // will return an object
console.log(typeof config, config) // object { BASIC : 'basic' }
Preload
Note: Consider using
dotenvxinstead of preloading. I am now doing (and recommending) so.It serves the same purpose (you do not need to require and load dotenv), adds better debugging, and works with ANY language, framework, or platform. â motdotla
You can use the --require (-r) command line option to preload dotenv. By doing this, you do not need to require and load dotenv in your application code.
$ node -r dotenv/config your_script.js
The configuration options below are supported as command line arguments in the format dotenv_config_<option>=value
$ node -r dotenv/config your_script.js dotenv_config_path=/custom/path/to/.env dotenv_config_debug=true
Additionally, you can use environment variables to set configuration options. Command line arguments will precede these.
$ DOTENV_CONFIG_<OPTION>=value node -r dotenv/config your_script.js
$ DOTENV_CONFIG_ENCODING=latin1 DOTENV_CONFIG_DEBUG=true node -r dotenv/config your_script.js dotenv_config_path=/custom/path/to/.env
Variable Expansion
You need to add the value of another variable in one of your variables? Use dotenv-expand.
Command Substitution
Use dotenvx to use command substitution.
Add the output of a command to one of your variables in your .env file.
# .env
DATABASE_URL="postgres://$(whoami)@localhost/my_database"
// index.js
console.log('DATABASE_URL', process.env.DATABASE_URL)
$ dotenvx run --debug -- node index.js
[dotenvx@0.14.1] injecting env (1) from .env
DATABASE_URL postgres://yourusername@localhost/my_database
Syncing
You need to keep .env files in sync between machines, environments, or team members? Use dotenvx to encrypt your .env files and safely include them in source control. This still subscribes to the twelve-factor app rules by generating a decryption key separate from code.
Multiple Environments
Use dotenvx to generate .env.ci, .env.production files, and more.
Deploying
You need to deploy your secrets in a cloud-agnostic manner? Use dotenvx to generate a private decryption key that is set on your production server.
ð´ Manage Multiple Environments
Use dotenvx
Run any environment locally. Create a .env.ENVIRONMENT file and use --env-file to load it. It's straightforward, yet flexible.
$ echo "HELLO=production" > .env.production
$ echo "console.log('Hello ' + process.env.HELLO)" > index.js

$ dotenvx run --env-file=.env.production -- node index.js
Hello production
> ^^
or with multiple .env files
$ echo "HELLO=local" > .env.local
$ echo "HELLO=World" > .env
$ echo "console.log('Hello ' + process.env.HELLO)" > index.js

$ dotenvx run --env-file=.env.local --env-file=.env -- node index.js
Hello local
ð Deploying
Use dotenvx.
Add encryption to your .env files with a single command. Pass the --encrypt flag.
$ dotenvx set HELLO Production --encrypt -f .env.production
$ echo "console.log('Hello ' + process.env.HELLO)" > index.js

$ DOTENV_PRIVATE_KEY_PRODUCTION="<.env.production private key>" dotenvx run -- node index.js
[dotenvx] injecting env (2) from .env.production
Hello Production
ð Examples
See examples of using dotenv with various frameworks, languages, and configurations.
- nodejs
- nodejs (debug on)
- nodejs (override on)
- nodejs (processEnv override)
- esm
- esm (preload)
- typescript
- typescript parse
- typescript config
- webpack
- webpack (plugin)
- react
- react (typescript)
- express
- nestjs
- fastify
ð Documentation
Dotenv exposes four functions:
configparsepopulatedecrypt
Config
config will read your .env file, parse the contents, assign it to
process.env,
and return an Object with a parsed key containing the loaded content or an error key if it failed.
const result = dotenv.config()

if (result.error) {
  throw result.error
}

console.log(result.parsed)
You can additionally, pass options to config.
Options
path
Default: path.resolve(process.cwd(), '.env')
Specify a custom path if your file containing environment variables is located elsewhere.
require('dotenv').config({ path: '/custom/path/to/.env' })
By default, config will look for a file called .env in the current working directory.
Pass in multiple files as an array, and they will be parsed in order and combined with process.env (or option.processEnv, if set). The first value set for a variable will win, unless the options.override flag is set, in which case the last value set will win. If a value already exists in process.env and the options.override flag is NOT set, no changes will be made to that value.
require('dotenv').config({ path: ['.env.local', '.env'] })
quiet
Default: false
Suppress runtime logging message.
// index.js
require('dotenv').config({ quiet: false }) // change to true to suppress
console.log(`Hello ${process.env.HELLO}`)
# .env
.env
$ node index.js
[dotenv@17.0.0] injecting env (1) from .env
Hello World
encoding
Default: utf8
Specify the encoding of your file containing environment variables.
require('dotenv').config({ encoding: 'latin1' })
debug
Default: false
Turn on logging to help debug why certain keys or values are not being set as you expect.
require('dotenv').config({ debug: process.env.DEBUG })
override
Default: false
Override any environment variables that have already been set on your machine with values from your .env file(s). If multiple files have been provided in option.path the override will also be used as each file is combined with the next. Without override being set, the first value wins. With override set the last value wins.
require('dotenv').config({ override: true })
processEnv
Default: process.env
Specify an object to write your environment variables to. Defaults to process.env environment variables.
const myObject = {}
require('dotenv').config({ processEnv: myObject })

console.log(myObject) // values from .env
console.log(process.env) // this was not changed or written to
Parse
The engine which parses the contents of your file containing environment variables is available to use. It accepts a String or Buffer and will return an Object with the parsed keys and values.
const dotenv = require('dotenv')
const buf = Buffer.from('BASIC=basic')
const config = dotenv.parse(buf) // will return an object
console.log(typeof config, config) // object { BASIC : 'basic' }
Options
debug
Default: false
Turn on logging to help debug why certain keys or values are not being set as you expect.
const dotenv = require('dotenv')
const buf = Buffer.from('hello world')
const opt = { debug: true }
const config = dotenv.parse(buf, opt)
// expect a debug message because the buffer is not in KEY=VAL form
Populate
The engine which populates the contents of your .env file to process.env is available for use. It accepts a target, a source, and options. This is useful for power users who want to supply their own objects.
For example, customizing the source:
const dotenv = require('dotenv')
const parsed = { HELLO: 'world' }

dotenv.populate(process.env, parsed)

console.log(process.env.HELLO) // world
For example, customizing the source AND target:
const dotenv = require('dotenv')
const parsed = { HELLO: 'universe' }
const target = { HELLO: 'world' } // empty object

dotenv.populate(target, parsed, { override: true, debug: true })

console.log(target) // { HELLO: 'universe' }
options
Debug
Default: false
Turn on logging to help debug why certain keys or values are not being populated as you expect.
override
Default: false
Override any environment variables that have already been set.
â FAQ
Why is the .env file not loading my environment variables successfully?
Most likely your .env file is not in the correct place. See this stack overflow.
Turn on debug mode and try again..
require('dotenv').config({ debug: true })
You will receive a helpful error outputted to your console.
Should I commit my .env file?
No. We strongly recommend against committing your .env file to version
control. It should only include environment-specific values such as database
passwords or API keys. Your production database should have a different
password than your development database.
Should I have multiple .env files?
We recommend creating one .env file per environment. Use .env for local/development, .env.production for production and so on. This still follows the twelve factor principles as each is attributed individually to its own environment. Avoid custom set ups that work in inheritance somehow (.env.production inherits values form .env for example). It is better to duplicate values if necessary across each .env.environment file.
In a twelve-factor app, env vars are granular controls, each fully orthogonal to other env vars. They are never grouped together as âenvironmentsâ, but instead are independently managed for each deploy. This is a model that scales up smoothly as the app naturally expands into more deploys over its lifetime.
What rules does the parsing engine follow?
The parsing engine currently supports the following rules:
BASIC=basicbecomes{BASIC: 'basic'}- empty lines are skipped
- lines beginning with
#are treated as comments #marks the beginning of a comment (unless when the value is wrapped in quotes)- empty values become empty strings (
EMPTY=becomes{EMPTY: ''}) - inner quotes are maintained (think JSON) (
JSON={"foo": "bar"}becomes{JSON:"{\"foo\": \"bar\"}") - whitespace is removed from both ends of unquoted values (see more on
trim) (FOO= some valuebecomes{FOO: 'some value'}) - single and double quoted values are escaped (
SINGLE_QUOTE='quoted'becomes{SINGLE_QUOTE: "quoted"}) - single and double quoted values maintain whitespace from both ends (
FOO=" some value "becomes{FOO: ' some value '}) - double quoted values expand new lines (
MULTILINE="new\nline"becomes
{MULTILINE: 'new
line'}
- backticks are supported (
BACKTICK_KEY=`This has 'single' and "double" quotes inside of it.`)
What happens to environment variables that were already set?
By default, we will never modify any environment variables that have already been set. In particular, if there is a variable in your .env file which collides with one that already exists in your environment, then that variable will be skipped.
If instead, you want to override process.env use the override option.
require('dotenv').config({ override: true })
How come my environment variables are not showing up for React?
Your React code is run in Webpack, where the fs module or even the process global itself are not accessible out-of-the-box. process.env can only be injected through Webpack configuration.
If you are using react-scripts, which is distributed through create-react-app, it has dotenv built in but with a quirk. Preface your environment variables with REACT_APP_. See this stack overflow for more details.
If you are using other frameworks (e.g. Next.js, Gatsby...), you need to consult their documentation for how to inject environment variables into the client.
Can I customize/write plugins for dotenv?
Yes! dotenv.config() returns an object representing the parsed .env file. This gives you everything you need to continue setting values on process.env. For example:
const dotenv = require('dotenv')
const variableExpansion = require('dotenv-expand')
const myEnv = dotenv.config()
variableExpansion(myEnv)
How do I use dotenv with import?
Simply..
// index.mjs (ESM)
import 'dotenv/config' // see https://github.com/motdotla/dotenv#how-do-i-use-dotenv-with-import
import express from 'express'
A little background..
When you run a module containing an
importdeclaration, the modules it imports are loaded first, then each module body is executed in a depth-first traversal of the dependency graph, avoiding cycles by skipping anything already executed.
What does this mean in plain language? It means you would think the following would work but it won't.
errorReporter.mjs:
class Client {
  constructor (apiKey) {
    console.log('apiKey', apiKey)

    this.apiKey = apiKey
  }
}

export default new Client(process.env.API_KEY)
index.mjs:
// Note: this is INCORRECT and will not work
import * as dotenv from 'dotenv'
dotenv.config()

import errorReporter from './errorReporter.mjs' // process.env.API_KEY will be blank!
process.env.API_KEY will be blank.
Instead, index.mjs should be written as..
import 'dotenv/config'

import errorReporter from './errorReporter.mjs'
Does that make sense? It's a bit unintuitive, but it is how importing of ES6 modules work. Here is a working example of this pitfall.
There are two alternatives to this approach:
- Preload with dotenvx:
dotenvx run -- node index.js(Note: you do not need toimportdotenv with this approach) - Create a separate file that will execute
configfirst as outlined in this comment on #133
Why am I getting the error Module not found: Error: Can't resolve 'crypto|os|path'?
You are using dotenv on the front-end and have not included a polyfill. Webpack < 5 used to include these for you. Do the following:
npm install node-polyfill-webpack-plugin
Configure your webpack.config.js to something like the following.
require('dotenv').config()

const path = require('path');
const webpack = require('webpack')

const NodePolyfillPlugin = require('node-polyfill-webpack-plugin')

module.exports = {
  mode: 'development',
  entry: './src/index.ts',
  output: {
    filename: 'bundle.js',
    path: path.resolve(__dirname, 'dist'),
  },
  plugins: [
    new NodePolyfillPlugin(),
    new webpack.DefinePlugin({
      'process.env': {
        HELLO: JSON.stringify(process.env.HELLO)
      }
    }),
  ]
};
Alternatively, just use dotenv-webpack which does this and more behind the scenes for you.
What about variable expansion?
Try dotenv-expand
What about syncing and securing .env files?
Use dotenvx
What if I accidentally commit my .env file to code?
Remove it, remove git history and then install the git pre-commit hook to prevent this from ever happening again.
brew install dotenvx/brew/dotenvx
dotenvx precommit --install
How can I prevent committing my .env file to a Docker build?
Use the docker prebuild hook.
# Dockerfile
...
RUN curl -fsS https://dotenvx.sh/ | sh
...
RUN dotenvx prebuild
CMD ["dotenvx", "run", "--", "node", "index.js"]
Contributing Guide
See CONTRIBUTING.md
CHANGELOG
See CHANGELOG.md
Who's using dotenv?
These npm modules depend on it.
Projects that expand it often use the keyword "dotenv" on npm.
Top Related Projects
A Ruby gem to load environment variables from `.env`.
Loads environment variables from `.env` to `getenv()`, `$_ENV` and `$_SERVER` automagically.
Reads key-value pairs from a .env file and can set them as environment variables. It helps in developing applications following the 12-factor principles.
A Go port of Ruby's dotenv library (Loads environment variables from .env files)
unclutter your .profile
Convert designs to code with AI
Introducing Visual Copilot: A new AI model to turn Figma designs to high quality code using your components.
Try Visual Copilot