
Top Related Projects

🇨🇭 A React renderer for Three.js

JavaScript 3D Library.

Babylon.js is a powerful, beautiful, simple, and open game and rendering engine packed into a friendly JavaScript framework.

Powerful web graphics runtime built on WebGL, WebGPU, WebXR and glTF

The HTML5 Creation Engine: Create beautiful digital content with the fastest, most flexible 2D WebGL renderer.
Quick Overview
React-Spline is a React component library for integrating Spline 3D scenes into React applications. It provides a seamless way to embed interactive 3D content created with Spline into React projects, allowing developers to enhance their web applications with immersive 3D experiences.
Pros
- Easy integration of Spline 3D scenes into React applications
- Supports interactive 3D content with minimal setup
- Provides a responsive and performant 3D rendering solution
- Offers customization options for scene loading and interaction
Cons
- Limited documentation and examples available
- Requires familiarity with Spline for creating 3D content
- May have performance issues with complex 3D scenes on low-end devices
- Dependency on external Spline services for content creation and hosting
Code Examples
Loading a Spline scene:
import Spline from '@splinetool/react-spline';

function App() {
  return (
    <Spline scene="https://prod.spline.design/example-scene-id" />
  );
}
Handling scene load events:
import Spline from '@splinetool/react-spline';

function App() {
  const onLoad = (splineApp) => {
    console.log('Spline scene loaded:', splineApp);
  };

  return (
    <Spline scene="https://prod.spline.design/example-scene-id" onLoad={onLoad} />
  );
}
Interacting with Spline objects:
import Spline from '@splinetool/react-spline';

function App() {
  const onMouseDown = (e) => {
    if (e.target.name === 'Cube') {
      console.log('Cube clicked!');
    }
  };

  return (
    <Spline
      scene="https://prod.spline.design/example-scene-id"
      onMouseDown={onMouseDown}
    />
  );
}
Getting Started
To use React-Spline in your project, follow these steps:
-
Install the package:
npm install @splinetool/react-spline -
Import and use the Spline component in your React application:
import React from 'react'; import Spline from '@splinetool/react-spline'; function App() { return ( <div> <h1>My 3D Scene</h1> <Spline scene="https://prod.spline.design/your-scene-id" /> </div> ); } export default App; -
Replace
'your-scene-id'with the actual ID of your Spline scene.
Competitor Comparisons
🇨🇭 A React renderer for Three.js
Pros of react-three-fiber
- More flexible and customizable for complex 3D scenes
- Larger community and ecosystem with extensive documentation
- Direct integration with Three.js, allowing for more advanced features
Cons of react-three-fiber
- Steeper learning curve, especially for those new to 3D graphics
- Requires more manual setup and configuration
- Performance may be less optimized for simpler scenes compared to react-spline
Code Comparison
react-three-fiber:
import { Canvas } from '@react-three/fiber'
import { Box } from '@react-three/drei'

function Scene() {
  return (
    <Canvas>
      <Box position={[0, 0, 0]} />
    </Canvas>
  )
}
react-spline:
import Spline from '@splinetool/react-spline';

function Scene() {
  return (
    <Spline scene="https://prod.spline.design/example-scene.splinecode" />
  )
}
react-three-fiber offers more granular control over scene elements, while react-spline provides a simpler API for importing pre-designed Spline scenes. react-three-fiber is better suited for developers who need full control over their 3D environments, while react-spline is ideal for quickly integrating ready-made 3D designs into React applications.
JavaScript 3D Library.
Pros of three.js
- More mature and widely adopted, with a larger community and ecosystem
- Offers greater flexibility and control over 3D rendering and interactions
- Supports a wider range of 3D features and capabilities
Cons of three.js
- Steeper learning curve, requiring more in-depth knowledge of 3D graphics
- More complex setup and configuration for basic scenes
- Requires more code to achieve similar results compared to React Spline
Code Comparison
three.js:
const scene = new THREE.Scene();
const camera = new THREE.PerspectiveCamera(75, window.innerWidth / window.innerHeight, 0.1, 1000);
const renderer = new THREE.WebGLRenderer();
renderer.setSize(window.innerWidth, window.innerHeight);
document.body.appendChild(renderer.domElement);
React Spline:
import Spline from '@splinetool/react-spline';

export default function App() {
  return (
    <Spline scene="https://prod.spline.design/example-scene.splinecode" />
  );
}
The three.js example shows the basic setup for a 3D scene, while the React Spline example demonstrates how easily a pre-designed 3D scene can be integrated into a React application. three.js offers more control but requires more code, while React Spline provides a simpler integration at the cost of flexibility.
Babylon.js is a powerful, beautiful, simple, and open game and rendering engine packed into a friendly JavaScript framework.
Pros of Babylon.js
- More mature and feature-rich 3D engine with extensive documentation
- Larger community and ecosystem, providing better support and resources
- Supports a wider range of platforms and use cases beyond web applications
Cons of Babylon.js
- Steeper learning curve due to its comprehensive feature set
- Potentially heavier and more complex for simple 3D scenes or interactions
- Requires more setup and configuration compared to React-Spline
Code Comparison
Babylon.js:
const canvas = document.getElementById("renderCanvas");
const engine = new BABYLON.Engine(canvas, true);
const scene = new BABYLON.Scene(engine);
const camera = new BABYLON.FreeCamera("camera", new BABYLON.Vector3(0, 5, -10), scene);
engine.runRenderLoop(() => scene.render());
React-Spline:
import Spline from '@splinetool/react-spline';

function App() {
  return <Spline scene="https://prod.spline.design/example-scene-url" />;
}
React-Spline offers a more straightforward integration for React applications, while Babylon.js provides greater control and flexibility for complex 3D scenes and interactions. The choice between the two depends on the specific project requirements, desired level of customization, and developer expertise.
Powerful web graphics runtime built on WebGL, WebGPU, WebXR and glTF
Pros of PlayCanvas Engine
- More comprehensive 3D engine with broader capabilities for game development
- Larger community and ecosystem, providing better support and resources
- Better performance for complex 3D scenes and games
Cons of PlayCanvas Engine
- Steeper learning curve due to its more extensive feature set
- Potentially overkill for simple 3D web experiences
- Less seamless integration with React compared to React Spline
Code Comparison
React Spline:
import Spline from '@splinetool/react-spline';

export default function App() {
  return (
    <Spline scene="https://prod.spline.design/example.splinecode" />
  );
}
PlayCanvas Engine:
var canvas = document.getElementById('application');
var app = new pc.Application(canvas);

app.start();

var box = new pc.Entity('cube');
box.addComponent('model', { type: 'box' });
app.root.addChild(box);
The React Spline example shows how easily a 3D scene can be embedded in a React application. In contrast, the PlayCanvas Engine code demonstrates the more low-level approach to creating a 3D scene, offering greater control but requiring more setup.
The HTML5 Creation Engine: Create beautiful digital content with the fastest, most flexible 2D WebGL renderer.
Pros of PixiJS
- Mature and widely adopted 2D rendering engine with extensive documentation
- Excellent performance for complex 2D graphics and animations
- Large ecosystem of plugins and community support
Cons of PixiJS
- Steeper learning curve for beginners compared to React Spline
- Primarily focused on 2D graphics, while React Spline offers 3D capabilities
- Requires more manual setup and configuration for basic scenes
Code Comparison
React Spline:
import Spline from '@splinetool/react-spline';

export default function App() {
  return (
    <Spline scene="https://prod.spline.design/example.splinecode" />
  );
}
PixiJS:
import * as PIXI from 'pixi.js';

const app = new PIXI.Application({ width: 800, height: 600 });
document.body.appendChild(app.view);

const sprite = PIXI.Sprite.from('image.png');
app.stage.addChild(sprite);
React Spline offers a more straightforward integration with React applications, requiring minimal setup for 3D scenes. PixiJS provides greater control and flexibility for 2D graphics but requires more code to set up a basic scene. While React Spline focuses on easy 3D integration, PixiJS excels in high-performance 2D rendering and complex animations.
Convert  designs to code with AI

Introducing Visual Copilot: A new AI model to turn Figma designs to high quality code using your components.
Try Visual CopilotREADME
react-spline
react-spline allows you to export and use Spline scenes directly in your React websites.
ð Spline is a friendly 3d collaborative design tool for the web.
Website — Twitter — Community — Documentation
Table of Contents
Install
yarn add @splinetool/react-spline @splinetool/runtime
or
npm install @splinetool/react-spline @splinetool/runtime
Usage
To use react-spline, first you have to go to the Spline editor, click on the Export button, select "Code" and then "React".
You should see this:
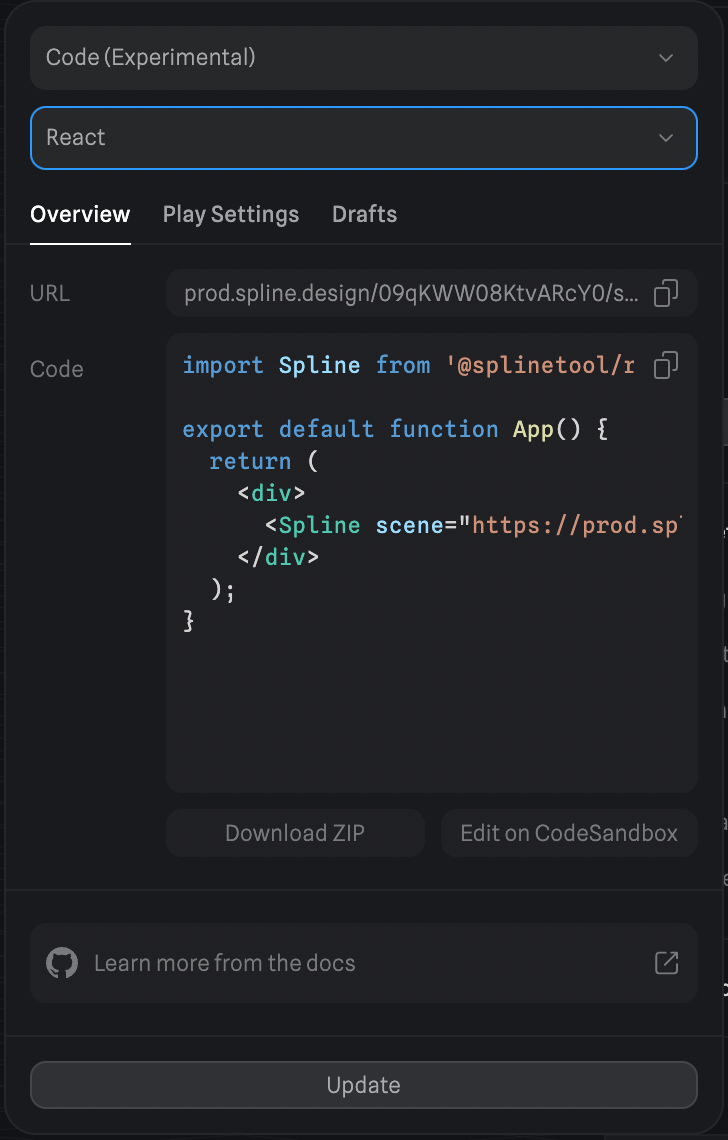
You can copy the URL and pass it to the <Spline /> component in react:
import Spline from '@splinetool/react-spline';

export default function App() {
  return (
    <div>
      <Spline scene="https://prod.spline.design/6Wq1Q7YGyM-iab9i/scene.splinecode" />
    </div>
  );
}
You should be able to see the scene you exported in your React app.
NOTE: If you are experiencing CORS issues, you can download the .splinecode file and self-host it; this will fix any CORS issue. To download, go to Spline's code export panel and click on the download icon visible in the prod.spline textarea.
Next.js
You can use this library in Next.js as well to take advantage of Server Side Rendering. By default the library will render on the client only, but if you use the import @splinetool/react/next the server will render an autogenerated blurred placeholder.
Here is an example. Export as Next.js from the Spline editor to autogenerate the placeholder.
import Spline from '@splinetool/react-spline/next';

export default function App() {
  return (
    <div>
      <Spline scene="https://prod.spline.design/KFonZGtsoUXP-qx7/scene.splinecode" />
    </div>
  );
}
Read and modify Spline objects
You can query any Spline object via findObjectByName or findObjectById.
(You can get the ID of the object by right-clicking on it and selecting Copy Development Object ID).
import { useRef } from 'react';
import Spline from '@splinetool/react-spline';

export default function App() {
  const cube = useRef();

  function onLoad(spline) {
    const obj = spline.findObjectByName('Cube');
    // or
    // const obj = spline.findObjectById('8E8C2DDD-18B6-4C54-861D-7ED2519DE20E');

    // save it in a ref for later use
    cube.current = obj;
  }

  function moveObj() {
    console.log(cube.current); // Spline Object => { name: 'Cube', id: '8E8C2DDD-18B6-4C54-861D-7ED2519DE20E', position: {}, ... }

    // move the object in 3D space
    cube.current.position.x += 10;
  }

  return (
    <div>
      <Spline
        scene="https://prod.spline.design/6Wq1Q7YGyM-iab9i/scene.splinecode"
        onLoad={onLoad}
      />
      <button type="button" onClick={moveObj}>
        Move Cube
      </button>
    </div>
  );
}
Listen to Spline Events
You can listen to any Spline Event you set in the Events panel of the editor by attaching a listener to the Spline component.
import Spline from '@splinetool/react-spline';

export default function App() {
  function onSplineMouseDown(e) {
    if (e.target.name === 'Cube') {
      console.log('I have been clicked!');
    }
  }

  return (
    <div>
      <Spline
        scene="https://prod.spline.design/6Wq1Q7YGyM-iab9i/scene.splinecode"
        onSplineMouseDown={onSplineMouseDown}
      />
    </div>
  );
}
You can find a list of all of the Spline Event listeners in the Spline Component Props section.
Trigger Spline events from outside
You can trigger any animation Event you set in the Events panel in the Spline Editor.
You can use the emitEvent function via the spline ref, passing the event type and the ID of your object.
(You can get the ID of the object in the Develop pane of the right sidebar).
import { useRef } from 'react';
import Spline from '@splinetool/react-spline';

export default function App() {
  const spline = useRef();

  function onLoad(splineApp) {
    // save the app in a ref for later use
    spline.current = splineApp;
  }

  function triggerAnimation() {
    spline.current.emitEvent('mouseHover', 'Cube');
  }

  return (
    <div>
      <Spline
        scene="https://prod.spline.design/6Wq1Q7YGyM-iab9i/scene.splinecode"
        onLoad={onLoad}
      />
      <button type="button" onClick={triggerAnimation}>
        Trigger Spline Animation
      </button>
    </div>
  );
}
Or you can query the spline object first, and then trigger the event:
import { useRef } from 'react';
import Spline from '@splinetool/react-spline';

export default function App() {
  const objectToAnimate = useRef();

  function onLoad(spline) {
    const obj = spline.findObjectByName('Cube');
    // save the object in a ref for later use
    objectToAnimate.current = obj;
  }

  function triggerAnimation() {
    objectToAnimate.current.emitEvent('mouseHover');
  }

  return (
    <div>
      <Spline
        scene="https://prod.spline.design/6Wq1Q7YGyM-iab9i/scene.splinecode"
        onLoad={onLoad}
      />
      <button type="button" onClick={triggerAnimation}>
        Trigger Spline Animation
      </button>
    </div>
  );
}
You can find a list of all of the Spline Events you can pass to the emitEvent function in the Spline Events section.
Lazy loading
To start loading react-spline after the whole website has finished loading, we can use lazy-loading. This technique can be achieved using React.lazy() in combination with dynamic imports:
import React, { Suspense } from 'react';

const Spline = React.lazy(() => import('@splinetool/react-spline'));

export default function App() {
  return (
    <div>
      <Suspense fallback={<div>Loading...</div>}>
        <Spline scene="https://prod.spline.design/6Wq1Q7YGyM-iab9i/scene.splinecode" />
      </Suspense>
    </div>
  );
}
More info in the relative React documentation.
API
Spline Component Props
These are all the props you can pass to the <Spline /> component.
| Name | Type | Description |
|---|---|---|
scene | string | Scene file |
onLoad? | (spline: Application) => void | Gets called once the scene has loaded. The spline parameter is an instance of the Spline Application |
renderOnDemand? | boolean | Wether or not to enable on demand rendering. Default true. |
className? | string | CSS classes |
style? | object | CSS style |
id? | string | Canvas id |
ref? | React.Ref<HTMLDivElement> | A ref pointing to div container element. |
onSplineMouseDown? | (e: SplineEvent) => void | Gets called once a Spline Mouse Down event is fired |
onSplineMouseHover? | (e: SplineEvent) => void | Gets called once a Spline Mouse Hover event is fired |
onSplineMouseUp? | (e: SplineEvent) => void | Gets called once a Spline Mouse Up event is fired |
onSplineKeyDown? | (e: SplineEvent) => void | Gets called once a Spline Key Down event is fired |
onSplineKeyUp? | (e: SplineEvent) => void | Gets called once a Spline Key Up event is fired |
onSplineStart? | (e: SplineEvent) => void | Gets called once a Spline Start event is fired |
onSplineLookAt? | (e: SplineEvent) => void | Gets called once a Spline Look At event is fired |
onSplineFollow? | (e: SplineEvent) => void | Gets called once a Spline Mouse Up event is fired |
onSplineScroll? | (e: SplineEvent) => void | Gets called once a Spline Scroll event is fired |
Spline App Methods
The object exposed as a first argument of the onLoad function, is a Spline Application. You can call all these different methods on it.
| Name | Type | Description |
|---|---|---|
emitEvent | (eventName: SplineEventName, nameOrUuid: string) => void | Triggers a Spline event associated to an object with provided name or uuid. |
emitEventReverse | (eventName: SplineEventName, nameOrUuid: string) => void | Triggers a Spline event associated to an object with provided uuid in reverse order. Starts from last state to first state. |
findObjectById | (uuid: string) => SPEObject | Searches through scene's children and returns the object with that uuid. |
findObjectByName | (name: string) => SPEObject | Searches through scene's children and returns the first object with that name. |
setZoom | (zoom: number) => void | Sets the initial zoom of the scene. |
Spline Events
These are all the Spline event types that you can pass to the emitEvent or emitEventReverse function.
| Name | Description |
|---|---|
mouseDown | Refers to the Spline Mouse Down event type |
mouseHover | Refers to the Spline Mouse Hover event type |
mouseUp | Refers to the Spline Mouse Up event type |
keyDown | Refers to the Spline Key Down event type |
keyUp | Refers to the Spline Key Up event type |
start | Refers to the Spline Start event type |
lookAt | Refers to the Spline Look At event type |
follow | Refers to the Spline Mouse Up event type |
Contributing
We use yarn, install the dependencies like this:
yarn
Development
Serve the example folder at localhost:3000
yarn dev
Build Library
yarn build
Publish on npm
yarn publish
Top Related Projects
🇨🇭 A React renderer for Three.js
JavaScript 3D Library.
Babylon.js is a powerful, beautiful, simple, and open game and rendering engine packed into a friendly JavaScript framework.
Powerful web graphics runtime built on WebGL, WebGPU, WebXR and glTF
The HTML5 Creation Engine: Create beautiful digital content with the fastest, most flexible 2D WebGL renderer.
Convert designs to code with AI
Introducing Visual Copilot: A new AI model to turn Figma designs to high quality code using your components.
Try Visual Copilot