
Top Related Projects

Instant neural graphics primitives: lightning fast NeRF and more

A Code Release for Mip-NeRF 360, Ref-NeRF, and RawNeRF

This repository contains the code for the paper "Occupancy Networks - Learning 3D Reconstruction in Function Space"

A collaboration friendly studio for NeRFs
Quick Overview
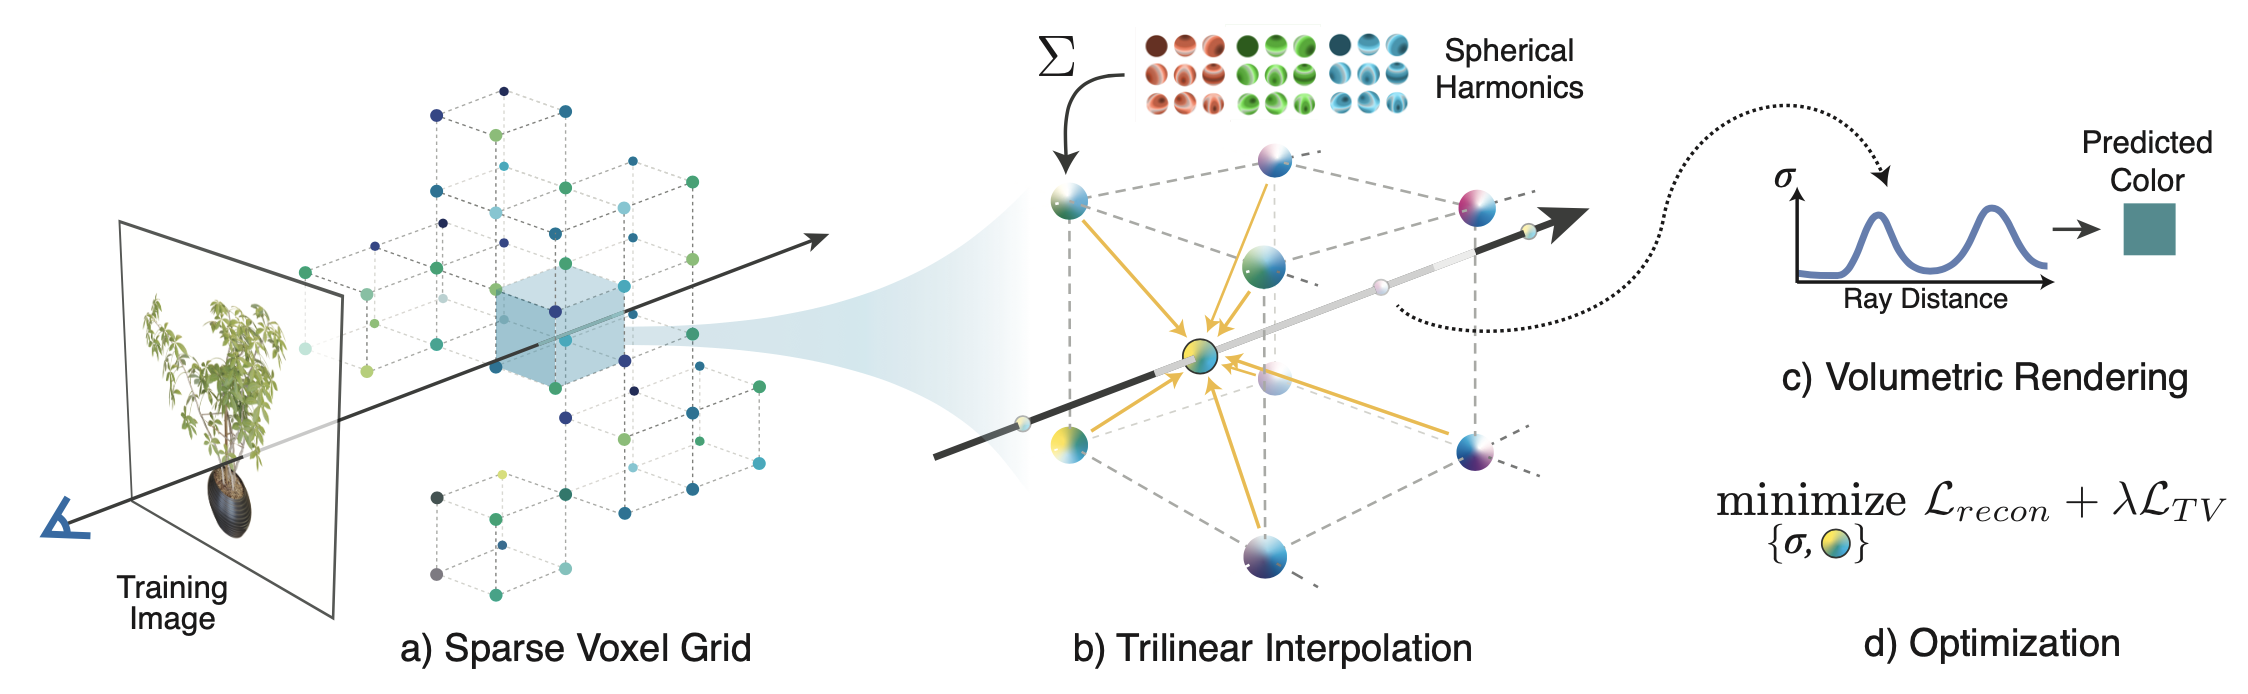
SVOX2 is an open-source project for fast neural volumetric rendering. It implements a novel method for accelerating neural radiance fields (NeRF) using a sparse voxel octree structure, resulting in significantly faster rendering and training times compared to traditional NeRF approaches.
Pros
- Significantly faster rendering and training times compared to traditional NeRF methods
- Supports both bounded and unbounded scenes
- Includes a Python API for easy integration into existing projects
- Provides pre-trained models for quick experimentation
Cons
- Requires a CUDA-capable GPU for optimal performance
- May have higher memory requirements compared to some other NeRF implementations
- Limited documentation for advanced usage and customization
- Dependency on specific versions of libraries may cause compatibility issues
Code Examples
- Loading a pre-trained model and rendering an image:
import svox2
import torch

# Load a pre-trained model
grid = svox2.SparseGrid.load("path/to/model.npz")

# Set up camera parameters
c2w = torch.eye(4)  # Camera-to-world transform
intrinsics = torch.tensor([fx, fy, cx, cy])

# Render an image
image = grid.volume_render(c2w, intrinsics, height, width)
- Training a new model:
import svox2

# Create a new sparse grid
grid = svox2.SparseGrid(
    reso=128,
    center=[0.0, 0.0, 0.0],
    radius=1.0,
    basis_dim=9,
    use_sphere_bound=True
)

# Set up optimizer
opt = torch.optim.Adam(grid.opt_params(), lr=1e-2)

# Training loop
for epoch in range(num_epochs):
    for batch in dataloader:
        loss = grid.train_step(opt, batch)
        print(f"Epoch {epoch}, Loss: {loss.item()}")
- Exporting a trained model for web visualization:
import svox2

# Load or train your model
grid = svox2.SparseGrid.load("path/to/model.npz")

# Export for web visualization
grid.export_web("output_directory")
Getting Started
- Install SVOX2:
pip install svox2
-
Download a pre-trained model or prepare your own dataset.
-
Use the Python API to load and render images:
import svox2
import torch

grid = svox2.SparseGrid.load("path/to/model.npz")
c2w = torch.eye(4)
intrinsics = torch.tensor([fx, fy, cx, cy])
image = grid.volume_render(c2w, intrinsics, height, width)
- For training, refer to the examples in the repository's
optdirectory.
Competitor Comparisons
Instant neural graphics primitives: lightning fast NeRF and more
Pros of instant-ngp
- Faster rendering and training times due to its optimized CUDA implementation
- Supports a wider range of applications, including 3D object reconstruction and volumetric rendering
- More active development and community support
Cons of instant-ngp
- Higher hardware requirements, specifically NVIDIA GPUs with CUDA support
- More complex setup and installation process
- Less flexibility in terms of customization and integration with other frameworks
Code Comparison
instant-ngp:
// Optimized CUDA kernel for density calculation
__global__ void density_kernel(const uint32_t n_elements, const uint32_t roi_size[3], const float* __restrict__ grid, float* __restrict__ density) {
    const uint32_t i = threadIdx.x + blockIdx.x * blockDim.x;
    if (i >= n_elements) return;
    // ... (density calculation)
}
svox2:
# Python implementation of density calculation
def compute_density(grid, roi_size):
    density = np.zeros(roi_size, dtype=np.float32)
    for i in range(roi_size[0]):
        for j in range(roi_size[1]):
            for k in range(roi_size[2]):
                # ... (density calculation)
    return density
The code comparison highlights the performance difference between instant-ngp's CUDA implementation and svox2's Python-based approach, showcasing the trade-off between speed and ease of use/customization.
A Code Release for Mip-NeRF 360, Ref-NeRF, and RawNeRF
Pros of multinerf
- More comprehensive and feature-rich implementation of NeRF techniques
- Includes advanced methods like Mip-NeRF 360 and RawNeRF
- Backed by Google Research, potentially offering better long-term support
Cons of multinerf
- Higher computational requirements due to more complex models
- Steeper learning curve for users new to NeRF technologies
- Less focus on real-time rendering compared to svox2
Code Comparison
multinerf:
def render_image(render_fn, rays, config):
  height, width = rays.shape[:2]
  num_rays = height * width
  rays = rays.reshape((num_rays, -1))
  chunks = []
  for i in range(0, num_rays, config.chunk):
    chunk = render_fn(rays[i:i+config.chunk])
    chunks.append(chunk)
  return jax.tree_map(lambda *args: jnp.concatenate(args).reshape((height, width, -1)), *chunks)
svox2:
def render_rays(model, rays, opt):
    rays_o, rays_d = rays[:, :3], rays[:, 3:6]
    viewdirs = rays_d / rays_d.norm(dim=-1, keepdim=True)
    rgb, depth, extras = model(rays_o, rays_d, viewdirs, opt.white_bkgd)
    return rgb, depth, extras
This repository contains the code for the paper "Occupancy Networks - Learning 3D Reconstruction in Function Space"
Pros of Occupancy Networks
- Focuses on 3D reconstruction and shape representation using implicit functions
- Provides a more general approach for various 3D tasks (e.g., single-view reconstruction, shape completion)
- Supports multiple input types (voxels, point clouds, meshes)
Cons of Occupancy Networks
- May require more computational resources for training and inference
- Less specialized for novel view synthesis compared to SVOX2
- Potentially slower rendering times for complex scenes
Code Comparison
Occupancy Networks:
def compute_occupancy(self, p):
    c = self.encode_inputs(p)
    logits = self.decode(c).squeeze(1)
    p_r = dist.Bernoulli(logits=logits)
    return p_r
SVOX2:
def forward(self, rays):
    density, rgb = self.sample_ray(rays)
    weights = self.compute_weights(density)
    rgb_final = torch.sum(weights * rgb, dim=-2)
    return rgb_final
Both repositories focus on 3D representation and rendering, but Occupancy Networks provides a more general approach for various 3D tasks, while SVOX2 specializes in efficient novel view synthesis using sparse voxel octrees.
A collaboration friendly studio for NeRFs
Pros of nerfstudio
- More comprehensive and feature-rich framework for NeRF development
- Better documentation and tutorials for easier onboarding
- Active community and frequent updates
Cons of nerfstudio
- Potentially slower rendering times due to more complex architecture
- Steeper learning curve for beginners compared to svox2's simplicity
Code Comparison
svox2:
from svox2 import SVox2
model = SVox2(...)
model.train(...)
model.render(...)
nerfstudio:
from nerfstudio.models.nerfacto import NerfactoModel
from nerfstudio.pipelines.base_pipeline import VanillaPipeline
model = NerfactoModel(...)
pipeline = VanillaPipeline(model=model, ...)
pipeline.train()
Summary
nerfstudio offers a more comprehensive framework with better documentation and community support, making it suitable for complex NeRF projects. However, svox2 provides a simpler, more lightweight approach that may be faster for basic implementations. The choice between the two depends on the project's requirements and the user's experience level with NeRF technologies.
Convert  designs to code with AI

Introducing Visual Copilot: A new AI model to turn Figma designs to high quality code using your components.
Try Visual CopilotREADME
Plenoxels: Radiance Fields without Neural Networks
Alex Yu*, Sara Fridovich-Keil*, Matthew Tancik, Qinhong Chen, Benjamin Recht, Angjoo Kanazawa
UC Berkeley
Website and video: https://alexyu.net/plenoxels
arXiv: https://arxiv.org/abs/2112.05131
Featured at Two Minute Papers YouTube 2022-01-11
Despite the name, it's not strictly intended to be a successor of svox
Citation:
@inproceedings{yu2022plenoxels,
      title={Plenoxels: Radiance Fields without Neural Networks},
      author={Sara Fridovich-Keil and Alex Yu and Matthew Tancik and Qinhong Chen and Benjamin Recht and Angjoo Kanazawa},
      year={2022},
      booktitle={CVPR},
}
Note that the joint first-authors decided to swap the order of names between arXiv and CVPR proceedings.
This contains the official optimization code. A JAX implementation is also available at https://github.com/sarafridov/plenoxels. However, note that the JAX version is currently feature-limited, running in about 1 hour per epoch and only supporting bounded scenes (at present).

Examples use cases
Check out PeRFCeption [Jeong, Shin, Lee, et al], which uses Plenoxels with tuned parameters to generate a large dataset of radiance fields: https://github.com/POSTECH-CVLab/PeRFception
Artistic Radiance Fields by Kai Zhang et al https://github.com/Kai-46/ARF-svox2
Setup
Windows is not officially supported, and we have only tested with Linux. Adding support would be welcome.
First create the virtualenv; we recommend using conda:
conda env create -f environment.yml
conda activate plenoxel
Then clone the repo and install the library at the root (svox2), which includes a CUDA extension.
If and only if your CUDA toolkit is older than 11, you will need to install CUB as follows:
conda install -c bottler nvidiacub.
Since CUDA 11, CUB is shipped with the toolkit and installing this may lead to build errors.
To install the main library, simply run
pip install -e . --verbose
In the repo root directory.
Getting datasets
We have backends for NeRF-Blender, LLFF, NSVF, and CO3D dataset formats, and the dataset will be auto-detected.
Please get the NeRF-synthetic and LLFF datasets from:
https://drive.google.com/drive/folders/128yBriW1IG_3NJ5Rp7APSTZsJqdJdfc1
(nerf_synthetic.zip and nerf_llff_data.zip).
We provide a processed Tanks and temples dataset (with background) in NSVF format at: https://drive.google.com/file/d/1PD4oTP4F8jTtpjd_AQjCsL4h8iYFCyvO/view?usp=sharing
Note this data should be identical to that in NeRF++
Finally, the real Lego capture can be downloaded from: https://drive.google.com/file/d/1PG-KllCv4vSRPO7n5lpBjyTjlUyT8Nag/view?usp=sharing
Note: we currently do not support the instant-ngp format data (since the project was released before NGP). Using it will trigger the nerf-synthetic (Blender) data loader due to similarity, but will not train properly. For real data we use the NSVF format.
To convert instant-ngp data, please try our script
cd opt/scripts
python ingp2nsvf.py <ingp_data_dir> <output_data_dir>
Optimization
For training a single scene, see opt/opt.py. The launch script makes this easier.
Inside opt/, run
./launch.sh <exp_name> <GPU_id> <data_dir> -c <config>
Where <config> should be configs/syn.json for NeRF-synthetic scenes,
configs/llff.json
for forward-facing scenes, and
configs/tnt.json for tanks and temples scenes, for example.
The dataset format will be auto-detected from data_dir.
Checkpoints will be in ckpt/exp_name.
For pretrained checkpoints please see: https://drive.google.com/drive/folders/1SOEJDw8mot7kf5viUK9XryOAmZGe_vvE?usp=sharing
Evaluation
Use opt/render_imgs.py
Usage,
(in opt/)
python render_imgs.py <CHECKPOINT.npz> <data_dir>
By default this saves all frames, which is very slow. Add --no_imsave to avoid this.
Rendering a spiral
Use opt/render_imgs_circle.py
Usage,
(in opt/)
python render_imgs_circle.py <CHECKPOINT.npz> <data_dir>
Parallel task executor
We provide a parallel task executor based on the task manager from PlenOctrees to automatically
schedule many tasks across sets of scenes or hyperparameters.
This is used for evaluation, ablations, and hypertuning
See opt/autotune.py. Configs in opt/tasks/*.json
For example, to automatically train and eval all synthetic scenes:
you will need to change train_root and data_root in tasks/eval.json, then run:
python autotune.py -g '<space delimited GPU ids>' tasks/eval.json
For forward-facing scenes
python autotune.py -g '<space delimited GPU ids>' tasks/eval_ff.json
For Tanks and Temples scenes
python autotune.py -g '<space delimited GPU ids>' tasks/eval_tnt.json
Using a custom image set (360)
Please take images all around the object and try to take images at different elevations. First make sure you have colmap installed. Then
(in opt/scripts)
bash proc_colmap.sh <img_dir> --noradial
Where <img_dir> should be a directory directly containing png/jpg images from a
normal perspective camera.
UPDATE: --noradial is recommended since otherwise, the script performs undistortion, which seems to not work well and make results blurry.
Support for the complete OPENCV camera model which has been used by more recent projects would be welcome
https://github.com/google-research/multinerf/blob/1c8b1c552133cdb2de1c1f3c871b2813f6662265/internal/camera_utils.py#L477.
For custom datasets we adopt a data format similar to that in NSVF
https://github.com/facebookresearch/NSVF
You should be able to use this dataset directly afterwards. The format will be auto-detected.
To view the data (and check the scene normalization) use:
python view_data.py <img_dir>
You will need nerfvis: pip install nerfvis
This should launch a server at localhost:8889
Now follow the "Voxel Optimization (aka Training)" section to train:
./launch.sh <exp_name> <GPU_id> <data_dir> -c configs/custom.json
custom.json was used for the real lego bulldozer scene.
You can also try configs/custom_alt.json which has some minor differences especially that near_clip is eliminated. If the scene's central object is totally messed up, this might be due to the aggressive near clip, and the alt config fixes it.
You may need to tune the TV and sparsity loss for best results.
To render a video, please see the "rendering a spiral" section.
To convert to a svox1-compatible PlenOctree (not perfect quality since interpolation is not implemented)
you can try to_svox1.py <ckpt>
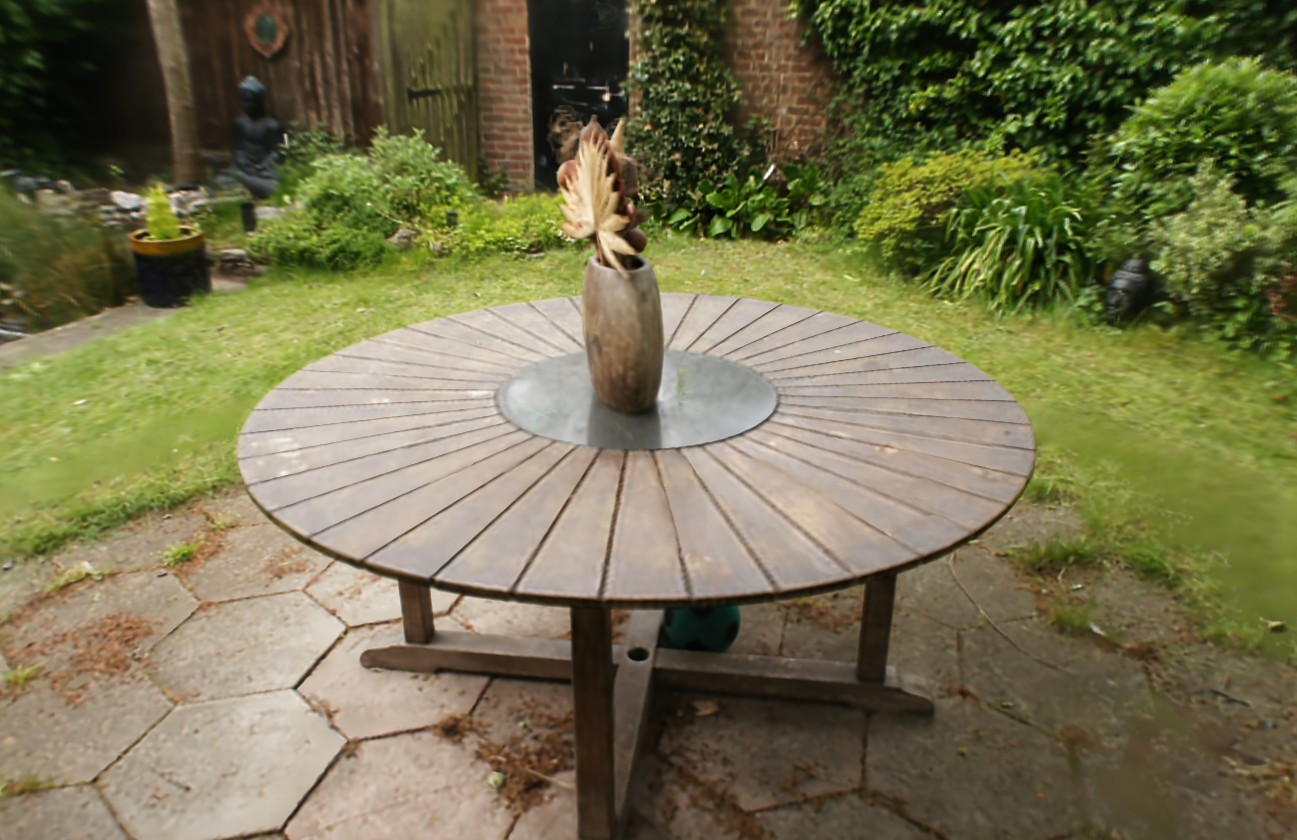
Example result with the mip-nerf-360 garden data (using custom_alt config as provided)
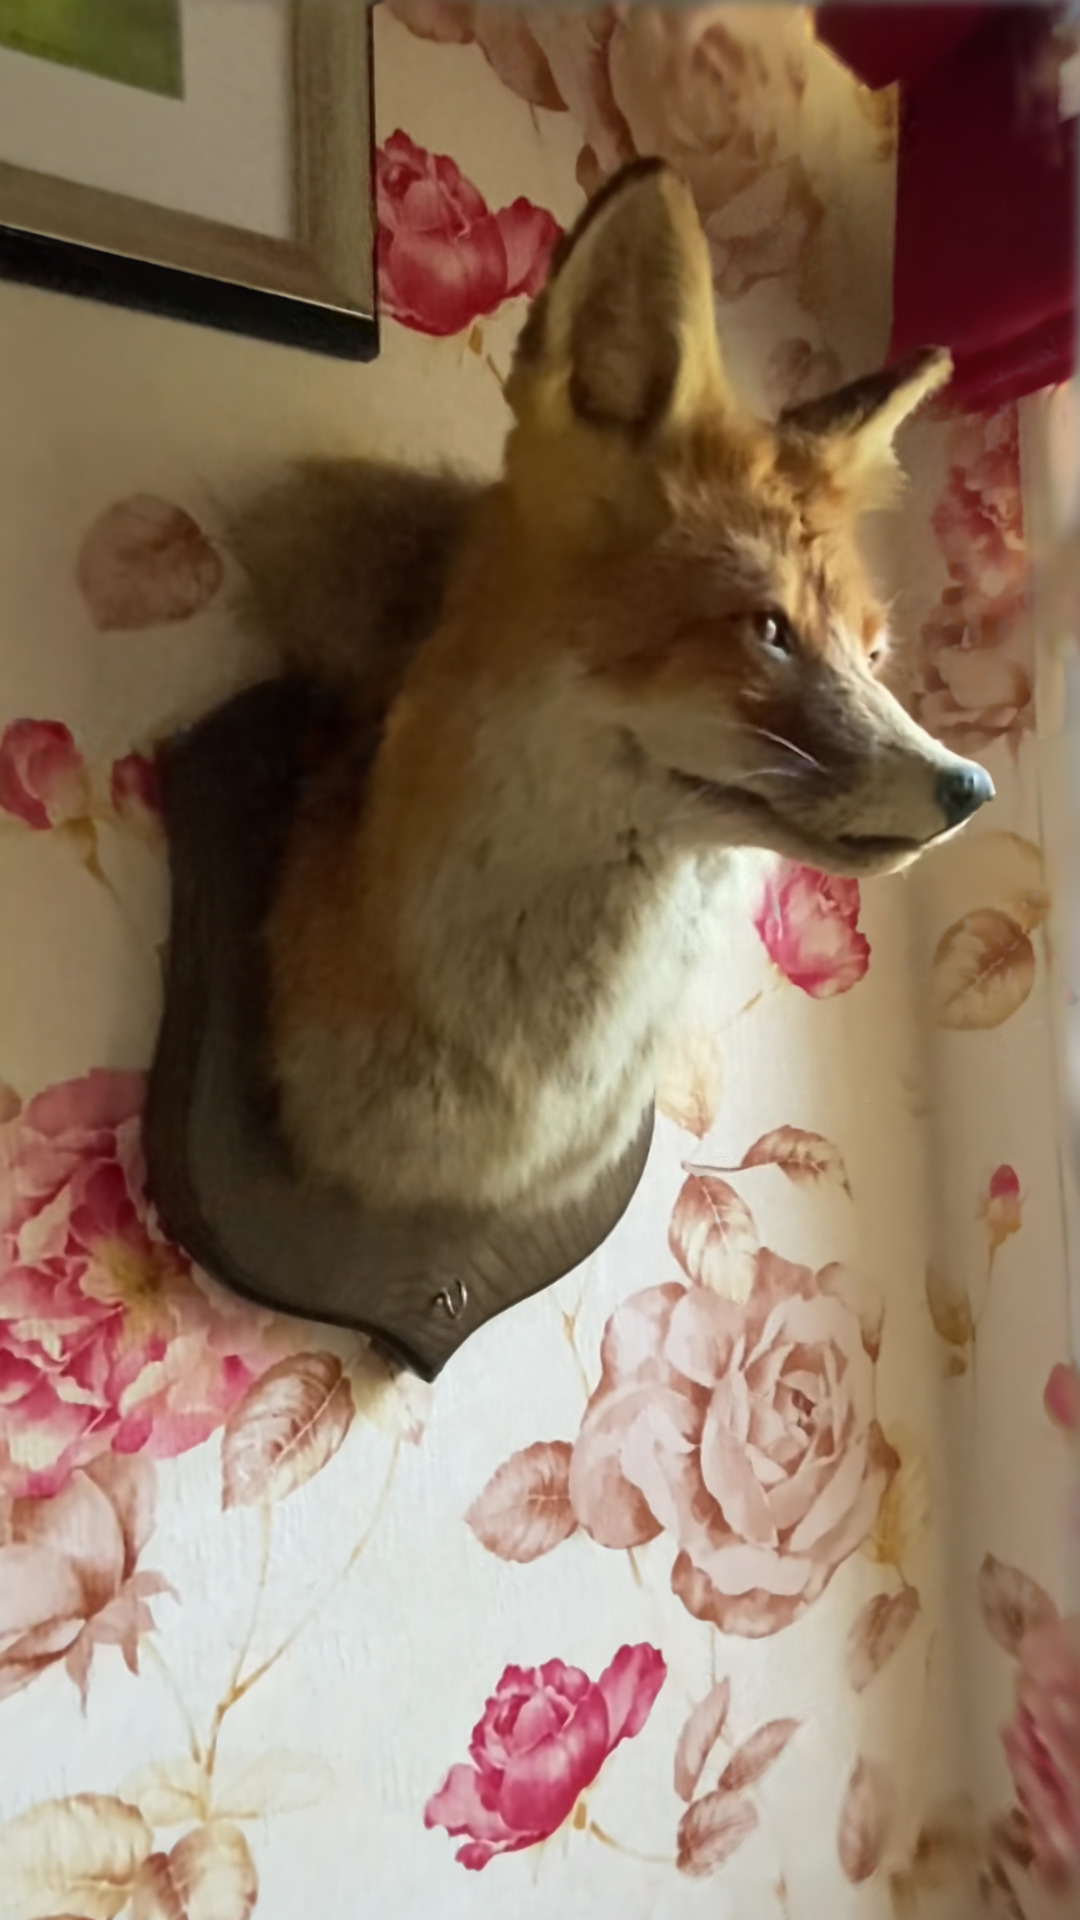
Fox data (converted with the script opt/scripts/ingp2nsvf.py)
Common Capture Tips
Floaters and poor quality surfaces can be caused by the following reasons
- Dynamic objects. Dynamic object modelling is not supported in this repo, and if anything moves it will probably lead to floaters
- Specularity. Very shiny surfaces will lead to floaters and/or poor surfaces
- Exposure variations. Please lock the exposure when recording a video if possible
- Lighting variations. Sometimes the clouds move when capturing outdoors.. Try to capture within a short time frame
- Motion blur and DoF blur. Try to move slowly and make sure the object is in focus. For small objects, DoF tends to be a substantial issue
- Image quality. Images may have severe JPEG compression artifacts for example
Potential extensions
Due to limited time we did not make the follow extensions which should make the quality and speed better.
- Use exp activation instead of ReLU. May help with the semi-transparent look issue
- Add mip-nerf 360 distortion loss to reduce floaters. PeRFCeption also tuned some parameters to help with the quality
- Exposure modelling
- Use FP16 training. This codebase uses FP32 still. This should improve speed and memory use
- Add a GUI viewer
Random tip: how to make pip install faster for native extensions
You may notice that this CUDA extension takes forever to install.
A suggestion is using ninja. On Ubuntu,
install it with sudo apt install ninja-build.
This will enable parallel compilation and significantly improve iteration speed.
Top Related Projects
Instant neural graphics primitives: lightning fast NeRF and more
A Code Release for Mip-NeRF 360, Ref-NeRF, and RawNeRF
This repository contains the code for the paper "Occupancy Networks - Learning 3D Reconstruction in Function Space"
A collaboration friendly studio for NeRFs
Convert designs to code with AI
Introducing Visual Copilot: A new AI model to turn Figma designs to high quality code using your components.
Try Visual Copilot