
Top Related Projects

ViewAnimator brings your UI to life with just one line

A UIKit custom transition that simulates an elastic drag. Written in Swift.

A library to recreate the iOS Apple Music now playing transition

:octocat: 📃 FoldingCell is an expanding content cell with animation made by @Ramotion
:octocat: ExpandingCollection is an animated material design UI card peek/pop controller. iOS library made by @Ramotion
Quick Overview
Hero is an elegant transition library for iOS & tvOS, designed to simplify the process of building custom view controller transitions. It provides a declarative way to define transitions between view controllers, making complex animations easier to implement and maintain.
Pros
- Easy to use with a declarative API
- Supports both custom transitions and interactive gestures
- Compatible with UIKit and SwiftUI
- Extensive documentation and examples
Cons
- Limited to iOS and tvOS platforms
- May have a learning curve for developers new to custom transitions
- Can potentially impact performance if overused or implemented incorrectly
- Requires careful management of view hierarchies for complex transitions
Code Examples
- Basic usage with UIKit:
// In the source view controller
override func prepare(for segue: UIStoryboardSegue, sender: Any?) {
    let destinationVC = segue.destination
    destinationVC.hero.isEnabled = true
    destinationVC.hero.modalAnimationType = .zoom
}
- Custom transition with SwiftUI:
struct ContentView: View {
    @State private var showDetail = false

    var body: some View {
        Button("Show Detail") {
            showDetail.toggle()
        }
        .heroID("detailButton")
        .sheet(isPresented: $showDetail) {
            DetailView()
                .heroID("detailView")
        }
    }
}
- Interactive dismissal:
class DetailViewController: UIViewController {
    override func viewDidLoad() {
        super.viewDidLoad()
        hero.isEnabled = true

        let panGesture = UIPanGestureRecognizer(target: self, action: #selector(handlePan))
        view.addGestureRecognizer(panGesture)
    }

    @objc func handlePan(_ gesture: UIPanGestureRecognizer) {
        let translation = gesture.translation(in: nil)
        let progress = translation.y / 200

        switch gesture.state {
        case .began:
            hero.dismissViewController()
        case .changed:
            Hero.shared.update(progress)
        case .ended:
            if progress + gesture.velocity(in: nil).y / 200 > 0.3 {
                Hero.shared.finish()
            } else {
                Hero.shared.cancel()
            }
        default:
            break
        }
    }
}
Getting Started
- Install Hero using Swift Package Manager, CocoaPods, or Carthage.
- Import Hero in your Swift file:
import Hero - Enable Hero for your view controllers:
class ViewController: UIViewController { override func viewDidLoad() { super.viewDidLoad() hero.isEnabled = true } } - Define transitions using the
hero.idproperty on views:sourceView.hero.id = "shared" destinationView.hero.id = "shared"
For more advanced usage and customization, refer to the official documentation.
Competitor Comparisons
ViewAnimator brings your UI to life with just one line
Pros of ViewAnimator
- Simpler API and easier to use for basic animations
- Supports chaining multiple animations together
- Lightweight and focused specifically on view animations
Cons of ViewAnimator
- Less powerful for complex transitions between view controllers
- Limited support for interactive transitions
- Fewer built-in animation types compared to Hero
Code Comparison
ViewAnimator:
view.animate(animations: [
    AnimationType.from(direction: .bottom, offset: 30),
    AnimationType.zoom(scale: 0.5)
])
Hero:
view.hero.id = "heroID"
view.hero.modifiers = [
    .translate(y: 100),
    .scale(0.5)
]
ViewAnimator focuses on simple, declarative animations for individual views, while Hero provides more comprehensive transition capabilities between entire view controllers. ViewAnimator is easier to use for basic animations, but Hero offers more flexibility and power for complex transitions. Hero also includes features like interactive transitions and more advanced animation types, which are not available in ViewAnimator. Choose ViewAnimator for quick, simple animations within a single view, and Hero for more elaborate transitions between different screens or complex view hierarchies.
A UIKit custom transition that simulates an elastic drag. Written in Swift.
Pros of ElasticTransition
- Focuses specifically on elastic, bouncy transitions
- Simpler API for basic elastic transitions
- Lightweight and easy to integrate for projects needing only elastic effects
Cons of ElasticTransition
- Limited to elastic-style transitions only
- Less actively maintained compared to Hero
- Fewer customization options and transition types
Code Comparison
ElasticTransition:
let transition = ElasticTransition()
transition.edge = .right
transition.sticky = true
transition.showInitialTransition = true
transition.presentViewController(viewController, animated: true, completion: nil)
Hero:
viewController.hero.isEnabled = true
viewController.hero.modalAnimationType = .zoom
sourceView.hero.id = "heroID"
destinationView.hero.id = "heroID"
present(viewController, animated: true, completion: nil)
Summary
ElasticTransition is a specialized library for creating elastic transitions in iOS apps. It offers a simpler API for basic elastic effects but is limited in scope compared to Hero. Hero, on the other hand, provides a more comprehensive set of transition options and is more actively maintained. ElasticTransition may be suitable for projects specifically requiring elastic transitions, while Hero offers greater flexibility and customization for a wider range of transition types.
A library to recreate the iOS Apple Music now playing transition
Pros of DeckTransition
- Specifically designed for card-like transitions, offering a more focused and tailored solution
- Simpler implementation for card-based interfaces, requiring less configuration
- Lightweight and easy to integrate into existing projects
Cons of DeckTransition
- Limited to card-style transitions, less versatile for other types of animations
- Fewer customization options compared to Hero's extensive feature set
- Smaller community and less frequent updates
Code Comparison
Hero:
Hero.shared.containerColor = .white
Hero.shared.defaultAnimation = .fade
Hero.shared.isEnabled = true

sourceViewController.hero.isEnabled = true
destinationViewController.hero.isEnabled = true
DeckTransition:
let transition = DeckTransition()
viewController.modalPresentationStyle = .custom
viewController.transitioningDelegate = transition
present(viewController, animated: true, completion: nil)
Both libraries aim to simplify view controller transitions in iOS apps, but they serve different purposes. Hero is a more comprehensive animation library with a wide range of transition effects, while DeckTransition focuses specifically on card-like transitions. Hero offers greater flexibility and customization options, making it suitable for various animation needs. DeckTransition, on the other hand, provides a simpler implementation for card-based interfaces, making it easier to use for specific use cases.
:octocat: 📃 FoldingCell is an expanding content cell with animation made by @Ramotion
Pros of folding-cell
- Specialized for creating expandable cell animations in iOS
- Simpler implementation for specific folding cell effects
- Lightweight and focused on a single animation style
Cons of folding-cell
- Limited to folding cell animations, less versatile than Hero
- Fewer customization options for transitions
- Less active development and community support
Code Comparison
folding-cell:
let cell = FoldingCell()
cell.itemCount = 2
cell.setup(name: "Cell", duration: 0.8, backViewColor: .red)
cell.selectedAnimation(duration: 0.8, animated: true)
Hero:
view.hero.id = "heroID"
view.hero.modifiers = [.fade, .scale(0.5)]
navigationController?.hero.isEnabled = true
Hero.shared.containerColor = .white
Summary
While folding-cell excels at creating specific folding cell animations for iOS, Hero offers a more comprehensive solution for view controller transitions and custom animations. folding-cell is easier to implement for its specific use case, but Hero provides greater flexibility and customization options for a wider range of transition effects across an entire app.
:octocat: ExpandingCollection is an animated material design UI card peek/pop controller. iOS library made by @Ramotion
Pros of expanding-collection
- Specialized for card-based UI with expanding animations
- Provides a complete, ready-to-use collection view
- Includes customizable card layouts and transitions
Cons of expanding-collection
- Limited to a specific UI pattern (expanding cards)
- Less flexible for general-purpose view transitions
- Smaller community and fewer updates compared to Hero
Code Comparison
expanding-collection:
let expandingCollection = ExpandingCollection(collectionViewLayout: layout)
expandingCollection.collectionView?.register(DemoCollectionViewCell.self, forCellWithReuseIdentifier: String(describing: DemoCollectionViewCell.self))
expandingCollection.delegate = self
Hero:
view.hero.isEnabled = true
view.hero.modifiers = [.fade, .scale(0.5)]
navigationController?.hero.isEnabled = true
expanding-collection focuses on creating and configuring a specific collection view, while Hero provides a more general-purpose animation system that can be applied to various UI elements. Hero's syntax is more concise and can be easily added to existing views, whereas expanding-collection requires more setup but offers a complete solution for card-based interfaces.
Convert  designs to code with AI

Introducing Visual Copilot: A new AI model to turn Figma designs to high quality code using your components.
Try Visual CopilotREADME

Hero is a library for building iOS view controller transitions. It provides a declarative layer on top of the UIKit's cumbersome transition APIsâmaking custom transitions an easy task for developers.
![]()
![]()
![]()


![]()
![]()
![]()
![]()
![]()
![]()
![]()


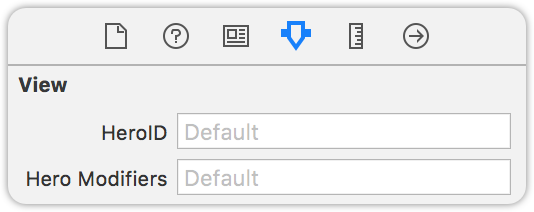
Hero is similar to Keynote's Magic Move. It checks the heroID property on all source and destination views. Every matched view pair is then automatically transitioned from its old state to its new state.
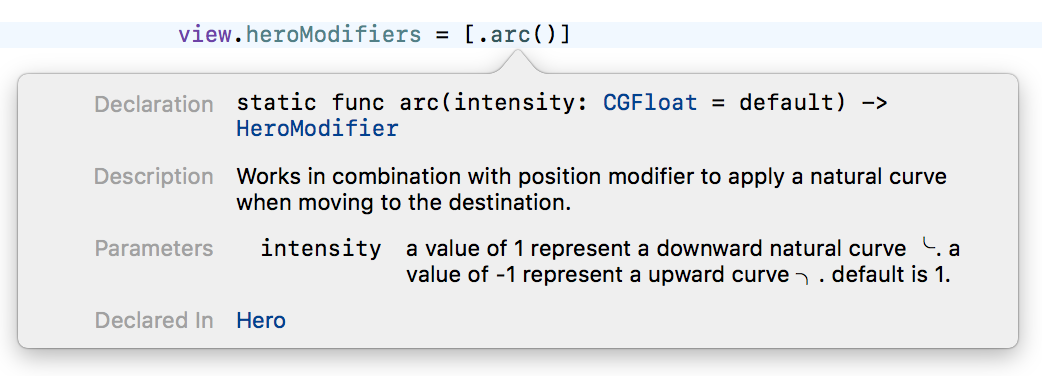
Hero can also construct animations for unmatched views. It is easy to define these animations via the heroModifiers property. Hero will run these animations alongside the Magic Move animations. All of these animations can be interactively controlled by user gestures.
At view controller level, Hero provides several template transitions that you can set through heroModalAnimationType, heroNavigationAnimationType, and heroTabBarAnimationType. These can be used as the foundation of your custom transitions. Combine with heroID & heroModifiers to make your own unique transitions.


By default, Hero provides dynamic duration based on the Material Design Motion Guide. Duration is automatically determined by changes to distance and sizeâsaving you the hassle, while providing consistent and delightful animations.
Hero doesn't make any assumptions about how the view is built or structured. It won't modify any of your views' states other than hiding them during the animation. This makes it work with Auto Layout, programmatic layout, UICollectionView (without modifying its layout object), UITableView, UINavigationController, UITabBarController, etc...
Usage Example 1

View Controller 1
redView.hero.id = "ironMan"
blackView.hero.id = "batMan"
View Controller 2
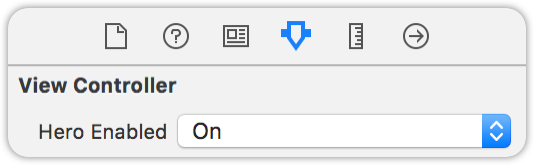
self.hero.isEnabled = true
redView.hero.id = "ironMan"
blackView.hero.id = "batMan"
whiteView.hero.modifiers = [.translate(y:100)]
Usage Example 2

View Controller 1
greyView.hero.id = "skyWalker"
View Controller 2
self.hero.isEnabled = true
greyView.hero.id = "skyWalker"

// collectionView is the parent view of all red cells
collectionView.hero.modifiers = [.cascade]
for cell in redCells {
    cell.hero.modifiers = [.fade, .scale(0.5)]
}
You can do these in the storyboard too!
Installation
CocoaPods
Add the following entry to your Podfile:
pod 'Hero'
Then run pod install.
Don't forget to import Hero in every file you'd like to use Hero.
Carthage
Add the following entry to your Cartfile:
github "HeroTransitions/Hero"
Then run carthage update.
If this is your first time using Carthage in the project, you'll need to go through some additional steps as explained over at Carthage.
Accio
Add the following to your Package.swift:
.package(url: "https://github.com/HeroTransitions/Hero.git", .upToNextMajor(from: "1.4.0")),
Next, add Hero to your App targets dependencies like so:
.target(
    name: "App",
    dependencies: [
        "Hero",
    ]
),
Then run accio update.
Swift Package Manager
To integrate using Apple's Swift package manager, add the following as a dependency to your Package.swift:
.package(url: "https://github.com/HeroTransitions/Hero.git", .upToNextMajor(from: "1.3.0"))
and then specify "Hero" as a dependency of the Target in which you wish to use Hero.
Here's an example PackageDescription:
// swift-tools-version:4.0
import PackageDescription

let package = Package(
    name: "MyPackage",
    products: [
        .library(
            name: "MyPackage",
            targets: ["MyPackage"]),
    ],
    dependencies: [
        .package(url: "https://github.com/HeroTransitions/Hero.git", .upToNextMajor(from: "1.6.3"))
    ],
    targets: [
        .target(
            name: "MyPackage",
            dependencies: ["Hero"])
    ]
)
Manually
- Drag the Sources folder anywhere in your project.
Documentations
Checkout the WIKI PAGES (Usage Guide) for documentations.
For more up-to-date ones, please see the header-doc. (use alt+click in Xcode)
Dash compatible API docs: https://HeroTransitions.github.io/Hero/
Interactive Transition Tutorials
Interactive transitions with Hero (Part 1)
FAQ
Not able to use Hero transition even when self.hero.isEnabled is set to true
Make sure that you have also enabled self.hero.isEnabled on the navigation controller if you are doing a push/pop inside the navigation controller.
Views being covered by another matched view during the transition
Matched views use global coordinate space while unmatched views use local coordinate space by default. Local coordinate spaced views might be covered by other global coordinate spaced views. To solve this, use the useGlobalCoordinateSpace modifier on the views being covered. Checkout Coordinate Space Wiki page for details.
Push animation is shown along side my custom animation
This is the default animation for navigation controller provided by Hero. To disable the push animation, set self.hero.navigationAnimationType to .fade or .none on the navigation controller.
How do I use a different default animation when dismissing
You can use the animation type .selectBy(presenting:dismissing) to specify a different default animation for dismiss.
For example:
self.hero.modalAnimationType = .selectBy(presenting:.zoom, dismissing:.zoomOut)
Contribute
We welcome any contributions. Please read the Contribution Guide.
Top Related Projects
ViewAnimator brings your UI to life with just one line
A UIKit custom transition that simulates an elastic drag. Written in Swift.
A library to recreate the iOS Apple Music now playing transition
:octocat: 📃 FoldingCell is an expanding content cell with animation made by @Ramotion
:octocat: ExpandingCollection is an animated material design UI card peek/pop controller. iOS library made by @Ramotion
Convert designs to code with AI
Introducing Visual Copilot: A new AI model to turn Figma designs to high quality code using your components.
Try Visual Copilot