 MCSwipeTableViewCell
:point_up_2: Convenient UITableViewCell subclass that implements a swippable content to trigger actions (similar to the Mailbox app).
Top Related Projects

An easy-to-use UITableViewCell subclass that implements a swippable content view which exposes utility buttons (similar to iOS 7 Mail Application)

An easy to use UITableViewCell subclass that allows to display swippable buttons with a variety of transitions.

Swipeable UITableViewCell/UICollectionViewCell based on the stock Mail.app, implemented in Swift.

Swipe to "like" or "dislike" any view, just like Tinder.app. Build a flashcard app, a photo viewer, and more, in minutes, not hours!

Custom transition between viewcontrollers holding tableviews
Quick Overview
MCSwipeTableViewCell is a custom UITableViewCell subclass that implements a swipe-to-reveal interface for iOS applications. It allows users to swipe left or right on a table view cell to reveal custom actions, providing an intuitive and interactive user experience.
Pros
- Highly customizable with support for different colors, icons, and animations
- Smooth and responsive swipe gestures
- Compatible with both Objective-C and Swift projects
- Easy to integrate into existing UITableView implementations
Cons
- Last updated in 2017, which may indicate lack of recent maintenance
- Limited documentation and examples available
- May require additional effort to adapt to modern iOS design guidelines
- Potential performance issues with large table views
Code Examples
- Creating a MCSwipeTableViewCell:
let cell = MCSwipeTableViewCell(style: .default, reuseIdentifier: "MyCell")
- Adding swipe actions to the cell:
cell.setSwipeGestureWithView(view: UIImageView(image: UIImage(named: "check")),
                             color: .green,
                             mode: .exit,
                             state: .state1,
                             completionBlock: { cell, state, mode in
    print("Did swipe in state: \(state) with mode: \(mode)")
})
- Customizing swipe behavior:
cell.firstTrigger = 0.25
cell.secondTrigger = 0.5
cell.threshold = 100.0
Getting Started
- Add MCSwipeTableViewCell to your project using CocoaPods:
pod 'MCSwipeTableViewCell'
- Import the library in your Swift file:
import MCSwipeTableViewCell
- Create and configure a MCSwipeTableViewCell in your UITableViewDataSource:
func tableView(_ tableView: UITableView, cellForRowAt indexPath: IndexPath) -> UITableViewCell {
    let cell = MCSwipeTableViewCell(style: .default, reuseIdentifier: "MyCell")
    cell.textLabel?.text = "Swipe me"

    cell.setSwipeGestureWithView(view: UIImageView(image: UIImage(named: "check")),
                                 color: .green,
                                 mode: .exit,
                                 state: .state1,
                                 completionBlock: { cell, state, mode in
        print("Did swipe in state: \(state) with mode: \(mode)")
    })

    return cell
}
Competitor Comparisons
An easy-to-use UITableViewCell subclass that implements a swippable content view which exposes utility buttons (similar to iOS 7 Mail Application)
Pros of SWTableViewCell
- More customizable with multiple buttons and configurable layouts
- Supports both left and right swipe actions
- Actively maintained with regular updates and bug fixes
Cons of SWTableViewCell
- Slightly more complex implementation due to increased customization options
- May have a steeper learning curve for beginners
- Potentially higher memory usage due to additional features
Code Comparison
MCSwipeTableViewCell:
MCSwipeTableViewCell *cell = [tableView dequeueReusableCellWithIdentifier:@"cell"];
[cell setSwipeGestureWithView:crossView color:[UIColor redColor] mode:MCSwipeTableViewCellModeExit state:MCSwipeTableViewCellState1 completionBlock:^(MCSwipeTableViewCell *cell, MCSwipeTableViewCellState state, MCSwipeTableViewCellMode mode) {
    // Handle swipe action
}];
SWTableViewCell:
SWTableViewCell *cell = [tableView dequeueReusableCellWithIdentifier:@"cell"];
[cell setRightUtilityButtons:[self rightButtons] WithButtonWidth:80.0f];
[cell setLeftUtilityButtons:[self leftButtons] WithButtonWidth:80.0f];
cell.delegate = self;
The code comparison shows that SWTableViewCell offers more flexibility in button configuration, allowing both left and right utility buttons to be set separately. MCSwipeTableViewCell focuses on a simpler swipe gesture implementation with a single view and color.
An easy to use UITableViewCell subclass that allows to display swippable buttons with a variety of transitions.
Pros of MGSwipeTableCell
- More customizable with various button types and configurations
- Supports both left and right swipe actions simultaneously
- Allows for dynamic button content updates
Cons of MGSwipeTableCell
- Slightly more complex implementation due to increased flexibility
- May require more setup code for basic use cases
Code Comparison
MGSwipeTableCell:
let cell = MGSwipeTableCell()
cell.leftButtons = [MGSwipeButton(title: "Delete", backgroundColor: .red)]
cell.rightButtons = [MGSwipeButton(title: "More", backgroundColor: .blue)]
MCSwipeTableViewCell:
let cell = MCSwipeTableViewCell()
cell.setSwipeGestureWithView(UIImageView(image: UIImage(named: "check")),
                             color: UIColor.green,
                             mode: .exit,
                             state: .state1,
                             completionBlock: { cell, state, mode in
    // Handle swipe action
})
MGSwipeTableCell offers more flexibility in button configuration, while MCSwipeTableViewCell provides a simpler API for basic swipe actions. MGSwipeTableCell supports multiple buttons on both sides, whereas MCSwipeTableViewCell focuses on single-action swipes with customizable views. The choice between the two depends on the specific requirements of your project, with MGSwipeTableCell being more suitable for complex swipe interactions and MCSwipeTableViewCell for simpler, visually-driven swipe actions.
Swipeable UITableViewCell/UICollectionViewCell based on the stock Mail.app, implemented in Swift.
Pros of SwipeCellKit
- More actively maintained with recent updates
- Supports both leading and trailing swipe actions
- Offers more customization options for swipe actions
Cons of SwipeCellKit
- Slightly more complex setup and configuration
- Larger codebase, which may impact app size
Code Comparison
MCSwipeTableViewCell:
cell.setSwipeGestureWithView(view: deleteView, color: UIColor.red, mode: .exit, state: .state1, completionBlock: { (cell, state, mode) in
    // Handle swipe action
})
SwipeCellKit:
cell.delegate = self
cell.leadingSwipeActionsConfiguration = UISwipeActionsConfiguration(actions: [
    UIContextualAction(style: .destructive, title: "Delete", handler: { (action, view, completion) in
        // Handle swipe action
        completion(true)
    })
])
Both libraries provide swipeable cell functionality for iOS table views, but SwipeCellKit offers more features and customization options. MCSwipeTableViewCell is simpler to implement but has fewer options for customization. SwipeCellKit supports both leading and trailing swipe actions, while MCSwipeTableViewCell primarily focuses on trailing actions. SwipeCellKit is more actively maintained, which may be crucial for long-term project support. However, its larger codebase and more complex setup might be considerations for smaller projects or those with strict size constraints.
Swipe to "like" or "dislike" any view, just like Tinder.app. Build a flashcard app, a photo viewer, and more, in minutes, not hours!
Pros of MDCSwipeToChoose
- More versatile, can be used with any UIView, not just table view cells
- Supports both horizontal and vertical swiping
- Includes a built-in view controller for quick implementation
Cons of MDCSwipeToChoose
- Less customizable for table view specific interactions
- May require more setup for simple table view swipe actions
- Potentially higher learning curve for basic use cases
Code Comparison
MCSwipeTableViewCell:
cell.setSwipeGestureWithView(view: crossView, color: redColor, mode: .exit, state: .state1, completionBlock: { (cell, state, mode) in
    // Handle swipe action
})
MDCSwipeToChoose:
let options = MDCSwipeToChooseViewOptions()
options.delegate = self
let swipeView = MDCSwipeToChooseView(frame: frame, options: options)
view.addSubview(swipeView)
Summary
MDCSwipeToChoose offers more flexibility for general UI interactions, supporting various view types and swipe directions. It's well-suited for complex swipe-based interfaces like dating apps or card-style UIs. However, for simple table view swipe actions, MCSwipeTableViewCell might be more straightforward and easier to implement. The choice between the two depends on the specific requirements of your project and the level of customization needed for swipe interactions.
Custom transition between viewcontrollers holding tableviews
Pros of AMWaveTransition
- Offers a unique and visually appealing wave-like transition effect
- Provides customization options for wave color, duration, and completion blocks
- Supports both push and pop transitions in navigation controllers
Cons of AMWaveTransition
- Limited to a specific transition style, whereas MCSwipeTableViewCell offers more versatile swipe actions
- May not be suitable for all types of apps or user interfaces
- Requires more setup and configuration compared to MCSwipeTableViewCell's simpler implementation
Code Comparison
AMWaveTransition:
let waveTransition = AMWaveTransition()
navigationController?.delegate = waveTransition
waveTransition.waveColor = .blue
waveTransition.duration = 0.5
MCSwipeTableViewCell:
cell.setSwipeGestureWithView(view: deleteView, color: .red, mode: .exit, state: .state1, completionBlock: { (cell, state, mode) in
    // Handle swipe action
})
AMWaveTransition focuses on creating a wave-like transition effect between view controllers, while MCSwipeTableViewCell provides swipe actions for table view cells. The code snippets demonstrate the different purposes and implementations of these libraries.
Convert  designs to code with AI

Introducing Visual Copilot: A new AI model to turn Figma designs to high quality code using your components.
Try Visual CopilotREADME
MCSwipeTableViewCell
An effort to show how one would implement a UITableViewCell like the one we can see in the very well executed Mailbox iOS app.
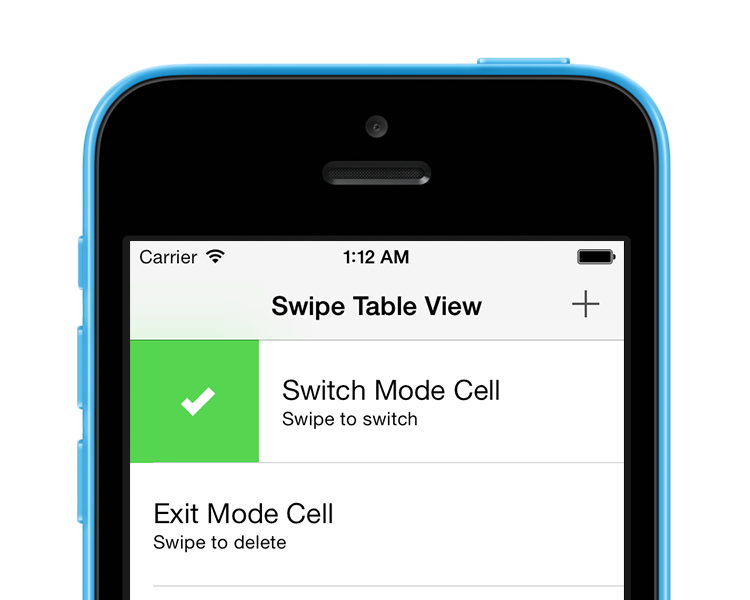
Preview
Exit Mode
The exit mode MCSwipeTableViewCellModeExit is the original behavior we can see in the Mailbox app. Swiping the cell should make it disappear. Convenient in destructive modes.

Switch Mode
The switch mode MCSwipeTableViewCellModeSwitch is a new behavior I'm introducing. The cell will bounce back after selecting a state, this allows you to keep the cell. Convenient to switch an option quickly.

API Reference
Please refer to the header file MCSwipeTableViewCell.h for a complete overview of the capabilities of the class.
Usage
- (UITableViewCell *)tableView:(UITableView *)tableView cellForRowAtIndexPath:(NSIndexPath *)indexPath {
    static NSString *CellIdentifier = @"Cell";

    MCSwipeTableViewCell *cell = [tableView dequeueReusableCellWithIdentifier:CellIdentifier];

    if (!cell) {
        cell = [[MCSwipeTableViewCell alloc] initWithStyle:UITableViewCellStyleSubtitle reuseIdentifier:CellIdentifier];

        // Remove inset of iOS 7 separators.
        if ([cell respondsToSelector:@selector(setSeparatorInset:)]) {
            cell.separatorInset = UIEdgeInsetsZero;
        }

        [cell setSelectionStyle:UITableViewCellSelectionStyleGray];

        // Setting the background color of the cell.
        cell.contentView.backgroundColor = [UIColor whiteColor];
    }

    // Configuring the views and colors.
    UIView *checkView = [self viewWithImageName:@"check"];
    UIColor *greenColor = [UIColor colorWithRed:85.0 / 255.0 green:213.0 / 255.0 blue:80.0 / 255.0 alpha:1.0];

    UIView *crossView = [self viewWithImageName:@"cross"];
    UIColor *redColor = [UIColor colorWithRed:232.0 / 255.0 green:61.0 / 255.0 blue:14.0 / 255.0 alpha:1.0];

    UIView *clockView = [self viewWithImageName:@"clock"];
    UIColor *yellowColor = [UIColor colorWithRed:254.0 / 255.0 green:217.0 / 255.0 blue:56.0 / 255.0 alpha:1.0];

    UIView *listView = [self viewWithImageName:@"list"];
    UIColor *brownColor = [UIColor colorWithRed:206.0 / 255.0 green:149.0 / 255.0 blue:98.0 / 255.0 alpha:1.0];

    // Setting the default inactive state color to the tableView background color.
    [cell setDefaultColor:self.tableView.backgroundView.backgroundColor];

    [cell.textLabel setText:@"Switch Mode Cell"];
    [cell.detailTextLabel setText:@"Swipe to switch"];

    // Adding gestures per state basis.
    [cell setSwipeGestureWithView:checkView color:greenColor mode:MCSwipeTableViewCellModeSwitch state:MCSwipeTableViewCellState1 completionBlock:^(MCSwipeTableViewCell *cell, MCSwipeTableViewCellState state, MCSwipeTableViewCellMode mode) {
        NSLog(@"Did swipe \"Checkmark\" cell");
    }];

    [cell setSwipeGestureWithView:crossView color:redColor mode:MCSwipeTableViewCellModeSwitch state:MCSwipeTableViewCellState2 completionBlock:^(MCSwipeTableViewCell *cell, MCSwipeTableViewCellState state, MCSwipeTableViewCellMode mode) {
        NSLog(@"Did swipe \"Cross\" cell");
    }];

    [cell setSwipeGestureWithView:clockView color:yellowColor mode:MCSwipeTableViewCellModeSwitch state:MCSwipeTableViewCellState3 completionBlock:^(MCSwipeTableViewCell *cell, MCSwipeTableViewCellState state, MCSwipeTableViewCellMode mode) {
        NSLog(@"Did swipe \"Clock\" cell");
    }];

    [cell setSwipeGestureWithView:listView color:brownColor mode:MCSwipeTableViewCellModeSwitch state:MCSwipeTableViewCellState4 completionBlock:^(MCSwipeTableViewCell *cell, MCSwipeTableViewCellState state, MCSwipeTableViewCellMode mode) {
        NSLog(@"Did swipe \"List\" cell");
    }];

    return cell;
}
Delegate
MCSwipeTableViewCell has a set of delegate methods in order to track the user behaviors. Take a look at the header file to be aware of all the methods provided by MCSwipeTableViewCellDelegate.
@interface MCTableViewController () <MCSwipeTableViewCellDelegate>
#pragma mark - MCSwipeTableViewCellDelegate

// Called when the user starts swiping the cell.
- (void)swipeTableViewCellDidStartSwiping:(MCSwipeTableViewCell *)cell;

// Called when the user ends swiping the cell.
- (void)swipeTableViewCellDidEndSwiping:(MCSwipeTableViewCell *)cell;

// Called during a swipe.
- (void)swipeTableViewCell:(MCSwipeTableViewCell *)cell didSwipeWithPercentage:(CGFloat)percentage;
Cell Deletion
In MCSwipeTableViewCellModeExit mode you may want to delete the cell with a nice fading animation, the following lines will give you an idea how to execute it:
[cell setSwipeGestureWithView:crossView color:redColor mode:MCSwipeTableViewCellModeExit state:MCSwipeTableViewCellState2 completionBlock:^(MCSwipeTableViewCell *cell, MCSwipeTableViewCellState state, MCSwipeTableViewCellMode mode) {
    NSLog(@"Did swipe \"Cross\" cell");

    // Code to delete your cell...

}];
You can also ask for a confirmation before deleting a cell:
__weak MCTableViewController *weakSelf = self;

[cell setSwipeGestureWithView:crossView color:redColor mode:MCSwipeTableViewCellModeExit state:MCSwipeTableViewCellState1 completionBlock:^(MCSwipeTableViewCell *cell, MCSwipeTableViewCellState state, MCSwipeTableViewCellMode mode) {
    NSLog(@"Did swipe \"Cross\" cell");

    __strong MCTableViewController *strongSelf = weakSelf;
    strongSelf.cellToDelete = cell;

    UIAlertView *alertView = [[UIAlertView alloc] initWithTitle:@"Delete?"
                                                        message:@"Are you sure your want to delete the cell?"
                                                       delegate:self
                                              cancelButtonTitle:@"No"
                                              otherButtonTitles:@"Yes", nil];
    [alertView show];
}];
Then handle the UIAlertView action:
#pragma mark - UIAlertViewDelegate

- (void)alertView:(UIAlertView *)alertView clickedButtonAtIndex:(NSInteger)buttonIndex {

    // No
    if (buttonIndex == 0) {
        [_cellToDelete swipeToOriginWithCompletion:^{
            NSLog(@"Swiped back");
        }];
        _cellToDelete = nil;
    }

    // Yes
    else {
        // Code to delete your cell...
    }
}
There is also an example in the demo project, I recommend to take a look at it.
Changing the trigger percentage
If the default trigger limits do not fit to your needs you can change them with the firstTrigger (default: 25%) and secondTrigger (Default: 75%) properties.
cell.firstTrigger = 0.1;
cell.secondTrigger = 0.5;
Reseting cell position
It is possible to put the cell back to it's position when using the MCSwipeTableViewCellModeExit mode with the -swipeToOriginWithCompletion: method:
[cell swipeToOriginWithCompletion:^{
    NSLog(@"Cell swiped back!");
}];
Installation
CocoaPods
CocoaPods is a dependency manager for Cocoa projects.
$ gem install cocoapods
To integrate MCSwipeTableViewCell into your Xcode project using CocoaPods, specify it in your Podfile:
pod 'MCSwipeTableViewCell', '~> 2.1.4'
Then, run the following command:
$ pod install
Carthage
Carthage is a decentralized dependency manager that automates the process of adding frameworks to your Cocoa application.
You can install Carthage with Homebrew using the following command:
$ brew update
$ brew install carthage
To integrate MCSwipeTableViewCell into your Xcode project using Carthage, specify it in your Cartfile:
github "alikaragoz/MCSwipeTableViewCell" >= 2.1.4
Compatibility
This library is not compatible with auto-layout so you will need to disable auto-layout in your xib properties.
Requirements
- iOS >= 5.0
- ARC
Contact
Ali Karagoz
License
MCSwipeTableViewCell is available under the MIT license. See the LICENSE file for more info.
Top Related Projects
An easy-to-use UITableViewCell subclass that implements a swippable content view which exposes utility buttons (similar to iOS 7 Mail Application)
An easy to use UITableViewCell subclass that allows to display swippable buttons with a variety of transitions.
Swipeable UITableViewCell/UICollectionViewCell based on the stock Mail.app, implemented in Swift.
Swipe to "like" or "dislike" any view, just like Tinder.app. Build a flashcard app, a photo viewer, and more, in minutes, not hours!
Custom transition between viewcontrollers holding tableviews
Convert designs to code with AI
Introducing Visual Copilot: A new AI model to turn Figma designs to high quality code using your components.
Try Visual Copilot