 authorizer
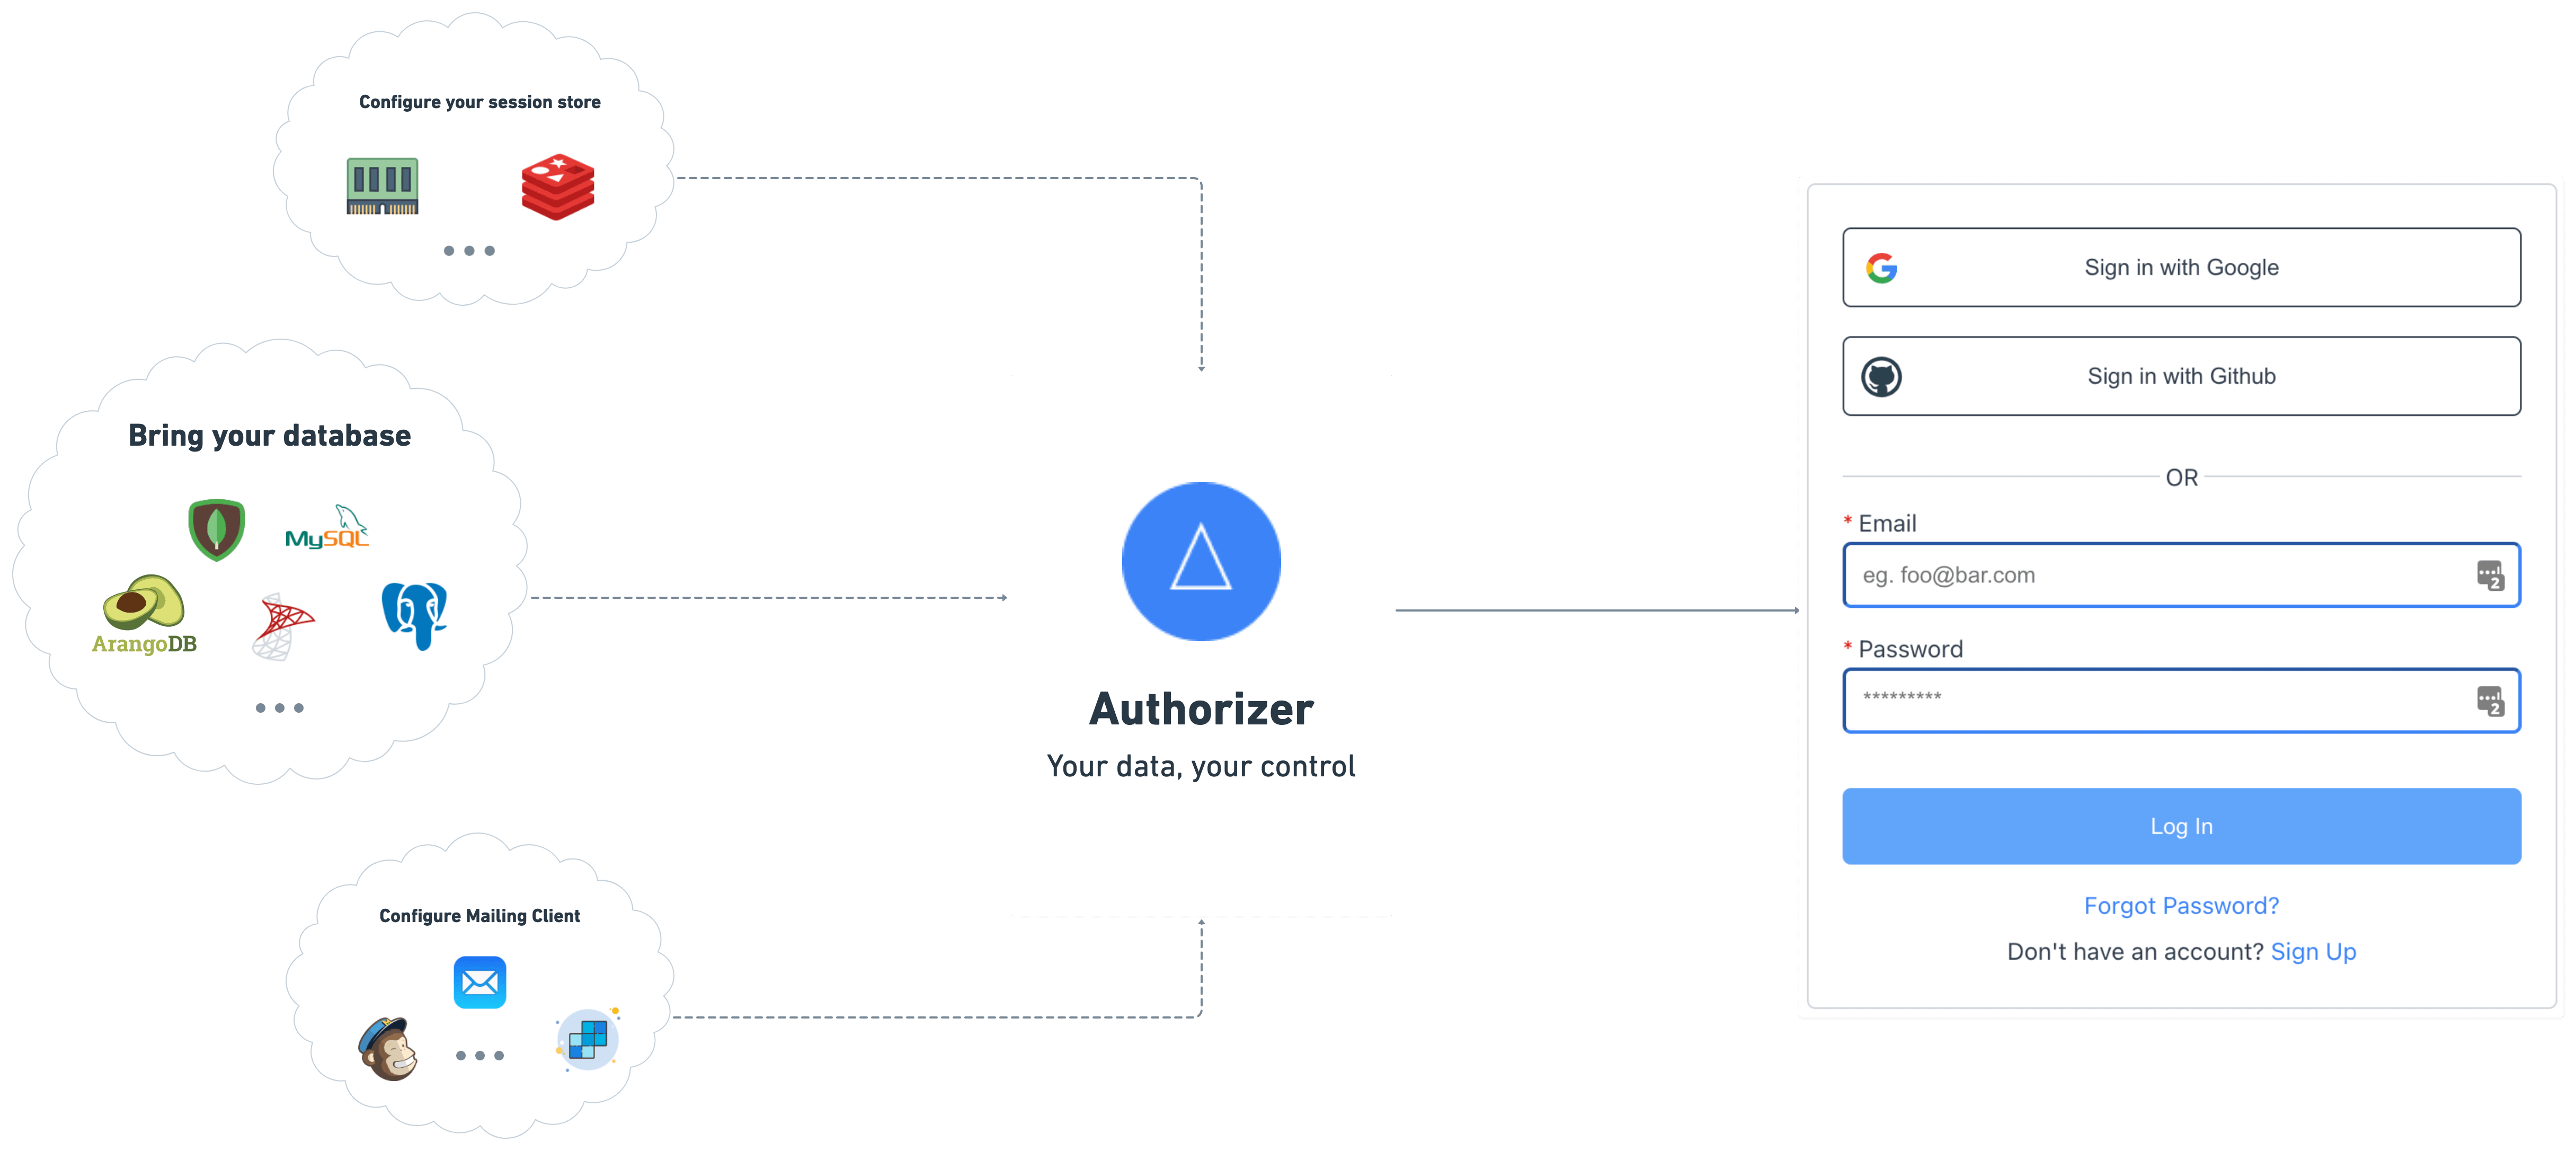
Your data, your control. Fully open source, authentication and authorization. No lock-ins. Deployment in Railway in 120 seconds || Spin a docker image as a micro-service in your infra. Built in login page and Admin panel out of the box.
Top Related Projects

Open source alternative to Auth0 / Firebase Auth / AWS Cognito

Headless cloud-native authentication and identity management written in Go. Scales to a billion+ users. Replace Homegrown, Auth0, Okta, Firebase with better UX and DX. Passkeys, Social Sign In, OIDC, Magic Link, Multi-Factor Auth, SMS, SAML, TOTP, and more. Runs everywhere, runs best on Ory Network.

🧑🚀 Authentication and authorization infrastructure for SaaS and AI apps, built on OIDC and OAuth 2.1 with multi-tenancy, SSO, and RBAC.

Open Source Identity and Access Management For Modern Applications and Services

Authentication for the Web.
Quick Overview
Authorizer is an open-source authentication and authorization solution. It provides a complete user management system with features like login, signup, and profile management, supporting various authentication methods including email/password, magic link, and social logins. Authorizer can be self-hosted and easily integrated into applications.
Pros
- Comprehensive authentication solution with multiple login options
- Self-hostable, giving users full control over their data
- Easy integration with existing applications
- Supports both web and mobile applications
Cons
- Requires setup and maintenance of a separate service
- May have a steeper learning curve compared to managed auth solutions
- Limited documentation for advanced use cases
- Smaller community compared to some popular alternatives
Code Examples
- Initializing the Authorizer client:
import { Authorizer } from '@authorizerdev/authorizer-js';

const authorizer = new Authorizer({
  authorizerURL: 'https://your-authorizer-instance.com',
  redirectURL: 'https://your-app.com/callback',
  clientID: 'your-client-id'
});
- Signing up a new user:
const signupResponse = await authorizer.signup({
  email: 'user@example.com',
  password: 'securePassword123',
  firstName: 'John',
  lastName: 'Doe'
});
- Logging in a user:
const loginResponse = await authorizer.login({
  email: 'user@example.com',
  password: 'securePassword123'
});
- Getting the current user's profile:
const profile = await authorizer.getProfile();
console.log(profile);
Getting Started
-
Install Authorizer:
npm install @authorizerdev/authorizer-js -
Initialize the Authorizer client in your app:
import { Authorizer } from '@authorizerdev/authorizer-js'; const authorizer = new Authorizer({ authorizerURL: 'https://your-authorizer-instance.com', redirectURL: 'https://your-app.com/callback', clientID: 'your-client-id' }); -
Use Authorizer methods to handle authentication:
// Sign up await authorizer.signup({ email, password }); // Log in await authorizer.login({ email, password }); // Get user profile const profile = await authorizer.getProfile(); -
Implement logout and token refresh as needed:
// Logout
await authorizer.logout();

// Refresh token
await authorizer.getToken();
Competitor Comparisons
Open source alternative to Auth0 / Firebase Auth / AWS Cognito
Pros of SuperTokens
- More extensive documentation and guides
- Wider range of supported programming languages and frameworks
- Active community and regular updates
Cons of SuperTokens
- More complex setup and configuration
- Steeper learning curve for beginners
- Requires running a separate core service
Code Comparison
Authorizer (Node.js):
const { Authorizer } = require('@authorizerdev/authorizer-js');

const authorizer = new Authorizer({
  authorizerURL: 'https://auth.example.com',
  clientID: 'your-client-id'
});
SuperTokens (Node.js):
const supertokens = require('supertokens-node');
const Session = require('supertokens-node/recipe/session');

supertokens.init({
  supertokens: { connectionURI: "https://try.supertokens.com" },
  appInfo: { apiDomain: "http://localhost:3001", appName: "MyApp" },
  recipeList: [Session.init()]
});
Both Authorizer and SuperTokens offer robust authentication and authorization solutions, but they differ in complexity and scope. Authorizer provides a simpler setup and is more suitable for smaller projects or those new to authentication systems. SuperTokens, on the other hand, offers more features and flexibility, making it a better choice for larger, more complex applications with specific authentication requirements. The code examples demonstrate the initialization process for each library, highlighting the difference in complexity and configuration options.
Headless cloud-native authentication and identity management written in Go. Scales to a billion+ users. Replace Homegrown, Auth0, Okta, Firebase with better UX and DX. Passkeys, Social Sign In, OIDC, Magic Link, Multi-Factor Auth, SMS, SAML, TOTP, and more. Runs everywhere, runs best on Ory Network.
Pros of Kratos
- More comprehensive identity and user management features
- Highly customizable and extensible architecture
- Strong focus on security and compliance (e.g., GDPR)
Cons of Kratos
- Steeper learning curve due to its complexity
- Requires more setup and configuration compared to Authorizer
- May be overkill for smaller projects or simpler authentication needs
Code Comparison
Kratos (configuration example):
selfservice:
  strategies:
    password:
      enabled: true
    oidc:
      enabled: true
      config:
        providers:
          - id: google
            provider: google
            client_id: ...
            client_secret: ...
Authorizer (configuration example):
const authorizer = new Authorizer({
  authorizerURL: 'https://auth.yourdomain.com',
  redirectURL: 'https://yourdomain.com/callback',
  clientID: 'your-client-id',
});
Both Kratos and Authorizer are open-source identity and access management solutions, but they cater to different needs and complexity levels. Kratos offers a more robust and feature-rich platform suitable for large-scale applications with complex identity requirements. Authorizer, on the other hand, provides a simpler and more straightforward approach to authentication, making it easier to integrate into smaller projects or those with basic auth needs.
🧑🚀 Authentication and authorization infrastructure for SaaS and AI apps, built on OIDC and OAuth 2.1 with multi-tenancy, SSO, and RBAC.
Pros of Logto
- More comprehensive feature set, including user management, access control, and multi-tenancy
- Better documentation and user guides, making it easier for developers to integrate and use
- Active community and regular updates, ensuring ongoing support and improvements
Cons of Logto
- Steeper learning curve due to its more complex architecture and feature set
- Potentially higher resource requirements for deployment and maintenance
- Less flexibility for customization compared to Authorizer's modular approach
Code Comparison
Logto (TypeScript):
import { LogtoClient } from '@logto/browser';

const logto = new LogtoClient({
  endpoint: 'https://your-logto-endpoint',
  appId: 'your-application-id',
});

await logto.signIn('http://localhost:3000/callback');
Authorizer (JavaScript):
import Authorizer from '@authorizerdev/authorizer-js';

const authorizerRef = new Authorizer({
  authorizerURL: 'https://your-authorizer-instance.com',
  redirectURL: 'http://localhost:3000/callback',
});

await authorizerRef.signInWithOtp({ email: 'user@example.com' });
Both repositories offer authentication solutions, but Logto provides a more comprehensive identity platform with additional features, while Authorizer focuses on simplicity and ease of integration. The code examples demonstrate the basic setup and sign-in process for each library, highlighting their different approaches to authentication.
Open Source Identity and Access Management For Modern Applications and Services
Pros of Keycloak
- More mature and feature-rich, with extensive enterprise-level capabilities
- Supports a wider range of protocols and standards (e.g., SAML, OpenID Connect)
- Larger community and ecosystem, with better documentation and support
Cons of Keycloak
- Heavier and more complex to set up and maintain
- Requires more resources to run, which can be overkill for smaller projects
- Steeper learning curve for developers and administrators
Code Comparison
Keycloak (Java):
KeycloakBuilder.builder()
    .serverUrl("https://auth-server/auth")
    .realm("myrealm")
    .clientId("myclient")
    .clientSecret("secret")
    .build();
Authorizer (Go):
authorizer.New(authorizer.Config{
    DatabaseURL: "postgres://user:pass@host:5432/db",
    JwtSecret:   "your-jwt-secret",
    Port:        "8080",
})
Summary
Keycloak is a more comprehensive and enterprise-ready solution, offering a wide range of features and protocols. It's ideal for large-scale applications and organizations with complex authentication needs. However, it comes with increased complexity and resource requirements.
Authorizer, on the other hand, is a lighter and more straightforward option, better suited for smaller projects or those requiring a simpler authentication setup. It's easier to integrate and manage but may lack some of the advanced features found in Keycloak.
Authentication for the Web.
Pros of Next-Auth
- Extensive provider support with 50+ built-in authentication providers
- Seamless integration with Next.js applications
- Active community and regular updates
Cons of Next-Auth
- Limited to Next.js framework, not as versatile for other platforms
- Requires more setup for custom authentication flows
- Less focus on advanced security features like MFA
Code Comparison
Next-Auth:
import NextAuth from "next-auth"
import Providers from "next-auth/providers"

export default NextAuth({
  providers: [
    Providers.Google({
      clientId: process.env.GOOGLE_ID,
      clientSecret: process.env.GOOGLE_SECRET
    }),
  ],
})
Authorizer:
import { Authorizer } from '@authorizerdev/authorizer-js'

const authorizer = new Authorizer({
  authorizerURL: 'https://auth.yourdomain.com',
  redirectURL: window.location.origin,
  clientID: 'YOUR_CLIENT_ID'
})
Next-Auth is tailored for Next.js applications, offering a wide range of pre-configured providers and seamless integration. It's ideal for rapid development in the Next.js ecosystem but may be less suitable for other frameworks or custom authentication needs.
Authorizer, on the other hand, provides a more flexible and framework-agnostic approach. It offers advanced security features and can be easily integrated into various platforms, making it a versatile choice for developers seeking more control over their authentication process.
Convert  designs to code with AI

Introducing Visual Copilot: A new AI model to turn Figma designs to high quality code using your components.
Try Visual CopilotREADME
![]()
Authorizer
Authorizer is an open-source authentication and authorization solution for your applications. Bring your database and have complete control over the user information. You can self-host authorizer instances and connect to any database (Currently supports 11+ databases including Postgres, MySQL, SQLite, SQLServer, YugaByte, MariaDB, PlanetScale, CassandraDB, ScyllaDB, MongoDB, ArangoDB).
For more information check:
Introduction
We offer the following functionality
- â Sign-in / Sign-up with email ID and password
- â Secure session management
- â Email verification
- â OAuth2 and OpenID compatible APIs
- â APIs to update profile securely
- â Forgot password flow using email
- â Social logins (Google, Github, Facebook, LinkedIn, Apple more coming soon)
- â Role-based access management
- â Password-less login with magic link login
- â Multi factor authentication
- â Email templating
- â Webhooks
Roadmap
- VueJS SDK
- Svelte SDK
- Golang SDK
- React Native SDK
- Flutter SDK
- Android Native SDK
- iOS native SDK
- Python SDK
- PHP SDK
- WordPress plugin
- Kubernetes Helm Chart
- Local Stack
- AMI
- Digital Ocean Droplet
- Azure
- Render
- Edge Deployment using Fly.io
- Password-less login with mobile number and OTP SMS
Getting Started
Step 1: Get Authorizer Instance
Deploy Production Ready Instance
Deploy production ready Authorizer instance using one click deployment options available below
| Infra provider | One-click link | Additional information |
|---|---|---|
| Railway.app |  | docs |
| Heroku |  | docs |
| Render |  | docs |
| Koyeb |  | docs |
| RepoCloud |  | docs |
| Alibaba Cloud |  | docs |
Deploy Authorizer Using Source Code
This guide helps you practice using Authorizer to evaluate it before you use it in a production environment. It includes instructions for installing the Authorizer server in local or standalone mode.
Install using source code
Prerequisites
- OS: Linux or macOS or windows
- Go: (Golang)(https://golang.org/dl/) >= v1.15
Project Setup
- Fork the authorizer repository (Skip this step if you have access to repo)
- Clone repo:
git clone https://github.com/authorizerdev/authorizer.gitor use the forked url from step 1 - Change directory to authorizer:
cd authorizer - Create Env file
cp .env.sample .env. Check all the supported env here - Build Dashboard
make build-dashboard - Build App
make build-app - Build Server
make clean && makeNote: if you don't have
make, you cancdintoserverdir and build using thego buildcommand. In that case you will have to builddashboard&appmanually usingnpm run buildon both dirs. - Run binary
./build/server
Deploy Authorizer using binaries
Deploy / Try Authorizer using binaries. With each Authorizer Release binaries are baked with required deployment files and bundled. You can download a specific version of it for the following operating systems:
- Mac OSX
- Linux
Download and unzip bundle
- Download the Bundle for the specific OS from the release page
Note: For windows, we recommend running using docker image to run authorizer.
-
Unzip using following command
- Mac / Linux
tar -zxf AUTHORIZER_VERSION -c authorizer -
Change directory to
authorizercd authorizer
Step 3: Start Authorizer
-
Run following command to start authorizer
- For Mac / Linux users
./build/server
Note: For mac users, you might have to give binary the permission to execute. Here is the command you can use to grant permission
xattr -d com.apple.quarantine build/server
Step 2: Setup Instance
- Open authorizer instance endpoint in browser
- Sign up as an admin with a secure password
- Configure environment variables from authorizer dashboard. Check env docs for more information
Note:
DATABASE_URL,DATABASE_TYPEandDATABASE_NAMEare only configurable via platform envs
Things to consider
- For social logins, you will need respective social platform key and secret
- For having verified users, you will need an SMTP server with an email address and password using which system can send emails. The system will send a verification link to an email address. Once an email is verified then, only able to access it.
Note: One can always disable the email verification to allow open sign up, which is not recommended for production as anyone can use anyone's email address ð
- For persisting user sessions, you will need Redis URL (not in case of railway app). If you do not configure a Redis server, sessions will be persisted until the instance is up or not restarted. For better response time on authorization requests/middleware, we recommend deploying Redis on the same infra/network as your authorizer server.
Testing
- Check the testing instructions here
Integrating into your website
This example demonstrates how you can use @authorizerdev/authorizer-js CDN version and have login ready for your site in few seconds. You can also use the ES module version of @authorizerdev/authorizer-js or framework-specific versions like @authorizerdev/authorizer-react
Copy the following code in html file
Note: Change AUTHORIZER_URL in the below code with your authorizer URL. Also, you can change the logout button component
<script src="https://unpkg.com/@authorizerdev/authorizer-js/lib/authorizer.min.js"></script>
<script type="text/javascript">
const authorizerRef = new authorizerdev.Authorizer({
authorizerURL: `YOUR_AUTHORIZER_INSTANCE_URL`,
redirectURL: window.location.origin,
clientID: 'YOUR_CLIENT_ID', // obtain your client id from authorizer dashboard
});
// use the button selector as per your application
const logoutBtn = document.getElementById('logout');
logoutBtn.addEventListener('click', async function () {
await authorizerRef.logout();
window.location.href = '/';
});
async function onLoad() {
const res = await authorizerRef.authorize({
response_type: 'code',
use_refresh_token: false,
});
if (res && res.access_token) {
// you can use user information here, eg:
const user = await authorizerRef.getProfile({
Authorization: `Bearer ${res.access_token}`,
});
const userSection = document.getElementById('user');
const logoutSection = document.getElementById('logout-section');
logoutSection.classList.toggle('hide');
userSection.innerHTML = ``;
}
}
onLoad();
</script>
Support my work

Top Related Projects
Open source alternative to Auth0 / Firebase Auth / AWS Cognito
Headless cloud-native authentication and identity management written in Go. Scales to a billion+ users. Replace Homegrown, Auth0, Okta, Firebase with better UX and DX. Passkeys, Social Sign In, OIDC, Magic Link, Multi-Factor Auth, SMS, SAML, TOTP, and more. Runs everywhere, runs best on Ory Network.
🧑🚀 Authentication and authorization infrastructure for SaaS and AI apps, built on OIDC and OAuth 2.1 with multi-tenancy, SSO, and RBAC.
Open Source Identity and Access Management For Modern Applications and Services
Authentication for the Web.
Convert designs to code with AI
Introducing Visual Copilot: A new AI model to turn Figma designs to high quality code using your components.
Try Visual Copilot