
Top Related Projects

A monitor of resources

🖼️ A command-line system information tool written in bash 3.2+

Wow such top. So stats. More better than regular top.

Glances an Eye on your system. A top/htop alternative for GNU/Linux, BSD, Mac OS and Windows operating systems.

System monitoring dashboard for terminal

Very resourcefriendly and feature-rich replacement for i3status, written in pure Rust
Quick Overview
Conky is a highly configurable system monitor for X11-based systems. It displays various system information such as CPU usage, memory usage, network statistics, and more directly on the desktop. Conky is lightweight, customizable, and can be extended with Lua scripting.
Pros
- Highly customizable with a wide range of built-in objects and Lua scripting support
- Low resource usage, making it suitable for both modern and older systems
- Large and active community with numerous pre-made configurations available
- Supports a variety of data sources and can display information from external commands
Cons
- Configuration can be complex for beginners due to its extensive options
- Documentation can be overwhelming and sometimes outdated
- May require some tweaking to work properly with certain desktop environments or window managers
- Limited support for non-X11 systems (e.g., Wayland)
Code Examples
Here are a few examples of Conky configuration snippets:
- Basic system information display:
conky.config = {
    alignment = 'top_right',
    background = false,
    border_width = 1,
    cpu_avg_samples = 2,
    default_color = 'white',
    double_buffer = true,
    font = 'Dejavu Sans Mono:size=12',
    gap_x = 25,
    gap_y = 13,
    minimum_width = 200,
    no_buffers = true,
    own_window = true,
    own_window_type = 'desktop',
    update_interval = 1.0,
    use_xft = true,
}

conky.text = [[
${color grey}Info:$color ${scroll 32 Conky $conky_version - $sysname $nodename $kernel $machine}
$hr
${color grey}Uptime:$color $uptime
${color grey}Frequency (in MHz):$color $freq
${color grey}RAM Usage:$color $mem/$memmax - $memperc% ${membar 4}
${color grey}CPU Usage:$color $cpu% ${cpubar 4}
${color grey}Processes:$color $processes  ${color grey}Running:$color $running_processes
$hr
]]
- Network information display:
conky.text = [[
${color grey}Networking:
Up:$color ${upspeed eth0} ${color grey} - Down:$color ${downspeed eth0}
]]
- Disk usage information:
conky.text = [[
${color grey}File systems:
 / $color${fs_used /}/${fs_size /} ${fs_bar 6 /}
 /home $color${fs_used /home}/${fs_size /home} ${fs_bar 6 /home}
]]
Getting Started
To get started with Conky:
- Install Conky using your distribution's package manager (e.g.,
sudo apt install conkyfor Ubuntu). - Create a configuration file at
~/.config/conky/conky.conf. - Copy and paste a basic configuration (like the first example above) into the file.
- Run Conky by executing
conkyin the terminal. - Customize the configuration file to suit your needs and preferences.
For more advanced usage, refer to the Conky documentation and explore community-created configurations.
Competitor Comparisons
A monitor of resources
Pros of btop
- More modern and visually appealing interface with graphs and charts
- Cross-platform support (Linux, macOS, FreeBSD, OpenBSD)
- Easy to install and use out of the box
Cons of btop
- Less customizable than Conky
- Requires more system resources to run
- Limited to terminal/CLI environments
Code Comparison
Conky configuration example:
conky.config = {
    alignment = 'top_right',
    background = false,
    border_width = 1,
    cpu_avg_samples = 2,
    default_color = 'white',
    double_buffer = true,
}
btop configuration example:
{
    "color_theme": "Default",
    "theme_background": false,
    "truecolor": true,
    "shown_boxes": ["cpu", "mem", "net", "proc"],
    "update_ms": 2000
}
Both projects allow for customization, but Conky offers more flexibility through its Lua-based configuration. btop uses a simpler JSON configuration format, which may be easier for some users but less powerful overall.
Conky is highly customizable and can display a wide range of system information on the desktop, while btop focuses on providing a comprehensive system monitor in the terminal with a more polished, modern look. The choice between the two depends on user preferences for desktop vs. terminal monitoring and the level of customization required.
🖼️ A command-line system information tool written in bash 3.2+
Pros of Neofetch
- Lightweight and fast system information tool
- Cross-platform support (Linux, macOS, Windows)
- Highly customizable output with ASCII art logos
Cons of Neofetch
- Limited real-time monitoring capabilities
- Less extensive system information compared to Conky
- Primarily designed for static system information display
Code Comparison
Neofetch (bash):
#!/usr/bin/env bash
# Neofetch main script
get_distro() {
    [[ -f /etc/os-release ]] && . /etc/os-release
    distro="$NAME $VERSION_ID"
}
Conky (Lua):
conky.config = {
    update_interval = 1,
    double_buffer = true,
    alignment = 'top_right',
}

conky.text = [[
${color grey}CPU Usage:$color $cpu%
${color grey}RAM Usage:$color $memperc%
]]
Neofetch is a lightweight system information tool that provides a quick snapshot of system details with customizable ASCII art logos. It's cross-platform and easy to use but lacks real-time monitoring capabilities. Conky, on the other hand, offers more extensive system monitoring and customization options, making it better suited for continuous display of system information and resource usage. Neofetch is written in bash, while Conky uses Lua for configuration and scripting, allowing for more complex and dynamic displays.
Wow such top. So stats. More better than regular top.
Pros of vtop
- Lightweight and easy to install via npm
- Interactive interface with mouse support
- Cross-platform compatibility (Windows, macOS, Linux)
Cons of vtop
- Limited customization options compared to Conky
- Fewer data sources and less detailed system information
- Requires Node.js runtime
Code Comparison
vtop (JavaScript):
var drawChart = function() {
  var chart = contrib.line({
    style: {
      line: "yellow",
      text: "green",
      baseline: "black"
    },
    xLabelPadding: 3,
    xPadding: 5,
    showLegend: true,
    wholeNumbersOnly: false
  });
  screen.append(chart);
};
Conky (Lua):
conky.config = {
    alignment = 'top_right',
    background = false,
    border_width = 1,
    cpu_avg_samples = 2,
    default_color = 'white',
    default_outline_color = 'white',
    default_shade_color = 'white',
    double_buffer = true,
    draw_borders = false,
    draw_graph_borders = true,
    draw_outline = false,
    draw_shades = false,
    use_xft = true,
    font = 'DejaVu Sans Mono:size=12',
    gap_x = 5,
    gap_y = 60,
    minimum_height = 5,
    minimum_width = 5,
    net_avg_samples = 2,
    no_buffers = true,
    out_to_console = false,
    out_to_ncurses = false,
    out_to_stderr = false,
    out_to_x = true,
    extra_newline = false,
    own_window = true,
    own_window_class = 'Conky',
    own_window_type = 'desktop',
    stippled_borders = 0,
    update_interval = 1.0,
    uppercase = false,
    use_spacer = 'none',
    show_graph_scale = false,
    show_graph_range = false
}
Glances an Eye on your system. A top/htop alternative for GNU/Linux, BSD, Mac OS and Windows operating systems.
Pros of Glances
- Cross-platform support (Linux, macOS, Windows)
- Web-based interface for remote monitoring
- Extensive plugin system for customization
Cons of Glances
- Higher resource usage due to Python implementation
- Less flexible in terms of visual customization
- Requires Python installation and dependencies
Code Comparison
Glances (Python):
from glances_plugins import GlancesPlugin

class Plugin(GlancesPlugin):
    def update(self):
        self.stats = self.get_stats()
Conky (Lua):
conky.config = {
    alignment = 'top_right',
    background = false,
    border_width = 1,
    cpu_avg_samples = 2,
}
Summary
Glances offers a more modern, cross-platform approach with a web interface and extensive plugin system. It's easier to set up for remote monitoring but consumes more resources. Conky provides greater visual customization and lower resource usage but is primarily designed for Unix-like systems. Glances uses Python for its implementation, while Conky relies on Lua for configuration and scripting. Choose Glances for cross-platform compatibility and web-based monitoring, or Conky for a lightweight, highly customizable desktop widget on Unix-like systems.
System monitoring dashboard for terminal
Pros of gtop
- Simpler setup and usage, requiring no configuration files
- Modern, interactive terminal-based interface with real-time updates
- Cross-platform compatibility (Linux, macOS, Windows)
Cons of gtop
- Less customizable compared to Conky's extensive configuration options
- Limited to terminal display, lacking Conky's desktop integration capabilities
- Fewer system metrics and data points available for monitoring
Code Comparison
gtop (JavaScript):
const si = require('systeminformation');
const blessed = require('blessed');
const contrib = require('blessed-contrib');

// Main application logic
Conky (C++):
#include <conky.h>
#include <config.h>
#include <lua.h>

// Main application logic
gtop uses Node.js and relies on external libraries for system information and terminal UI rendering. Conky is written in C++ and has a more low-level approach, integrating directly with system APIs and supporting Lua for scripting.
Both projects aim to provide system monitoring capabilities, but gtop focuses on a user-friendly terminal interface, while Conky offers extensive customization and desktop integration. gtop is easier to set up and use out of the box, whereas Conky provides more flexibility and depth in monitoring capabilities at the cost of a steeper learning curve.
Very resourcefriendly and feature-rich replacement for i3status, written in pure Rust
Pros of i3status-rust
- Written in Rust, offering better performance and memory safety
- Specifically designed for i3 and sway window managers
- More modern codebase with active development
Cons of i3status-rust
- Limited to i3 and sway, less versatile than Conky
- Fewer customization options and widgets compared to Conky
- Steeper learning curve for users not familiar with Rust
Code Comparison
i3status-rust configuration (TOML):
[[block]]
block = "cpu"
interval = 1
format = "{utilization}% {frequency}GHz"

[[block]]
block = "memory"
format_mem = "{mem_used_percents}"
format_swap = "{swap_used_percents}"
Conky configuration (Lua):
conky.config = {
    cpu_avg_samples = 2,
    net_avg_samples = 2,
    update_interval = 1.0,
}

conky.text = [[
CPU: ${cpu}% ${freq_g}GHz
RAM: ${memperc}%
]]
Both projects offer system monitoring capabilities, but they cater to different use cases. i3status-rust is tailored for i3 and sway users, providing a modern, performant solution with a focus on these specific window managers. Conky, on the other hand, offers greater flexibility and customization options, making it suitable for a wider range of desktop environments and window managers. The choice between the two depends on the user's specific needs, preferred window manager, and desired level of customization.
Convert  designs to code with AI

Introducing Visual Copilot: A new AI model to turn Figma designs to high quality code using your components.
Try Visual CopilotREADME
![]()
![]()
![]()
![]()
![]()
Conky is a free, light-weight system monitor for X, that displays any kind of information on your desktop. It can also run on Wayland (with caveats), macOS, output to your console, a file, or even HTTP (oh my!).
ð Grab the latest release from GitHub.
ð¹ An introduction to Conky (YouTube).
Features
Conky can display more than 300 built-in objects, including support for:
- A plethora of OS stats (uname, uptime, CPU usage, mem usage, disk usage, "top" like process stats, and network monitoring, just to name a few).
- Built-in IMAP and POP3 support.
- Built-in support for many popular music players (MPD, XMMS2, Audacious).
- Can be extended using built-in Lua support, or any of your own scripts and programs (more).
- Built-in Imlib2 and Cairo bindings for arbitrary drawing with Lua (more).
- Runs on Linux, FreeBSD, OpenBSD, DragonFlyBSD, NetBSD, Solaris, Haiku, and macOS!
- Docker image available for amd64, armv7, and aarch64 (aka armv8)
... and much much more.
Conky can display information either as text, or using simple progress bars and graph widgets, with different fonts and colours, as well as handle mouse events.
Screenshots
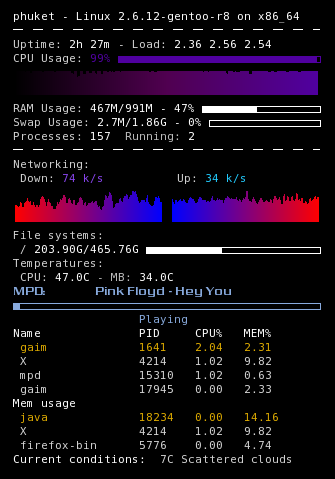
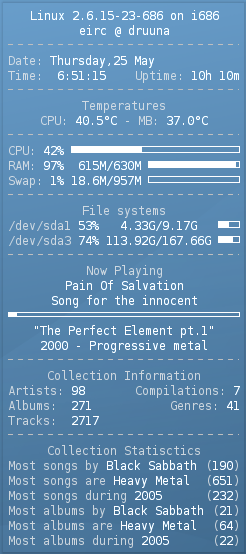
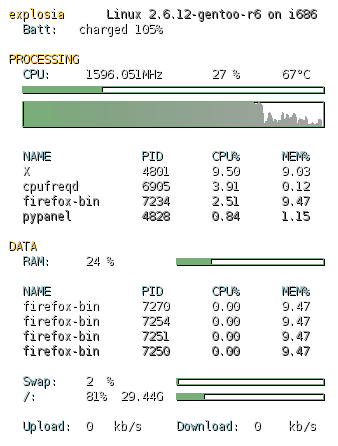
See the User Configs below for more screenshots and associated config files.
Installing Conky
Many package managers already include Conky. However, if you'd like to try the latest version of Conky, you can use the AppImage or the Nix flake.
AppImage
To try the AppImage, head to https://github.com/brndnmtthws/conky/releases/latest and fetch the latest AppImage. You'll need to set the executable bit, then you can create a conkyrc, and run it as follows:
chmod +x ./conky-*.AppImage        # make it executable
./conky-*.AppImage -C > ~/.conkyrc # create a default config
./conky-*.AppImage                 # run
And that's it! Check out the Wiki for more details on configuring Conky.
NOTE: To use the AppImage, you may need to install additional runtime libraries.
Nix flake
As of Conky v1.17.0, there's a Nix flake available in addition to the upstream Nix package. You can include it as an input as follows:
{
  inputs = {
    conky.url = "github:brndnmtthws/conky";
  };
}
And use inputs.conky.packages.${system}.default (or
inputs.conky.packages.${system}.conky for versions <=v1.19.8) to include the
package. To use a specific version, add the git tag to the URL, such as
github:brndnmtthws/conky?ref=refs/tags/v1.19.8.
Note that a Nix package exists in nixpkgs, and although it's not always up-to-date with the bleeding edge, it does offer more configuration options.
Documentation
The Conky Wiki also serves as a central hub for Conky. Some resources from the Wiki include:
License
Conky is licensed under the terms of the GPLv3 license.
Contributing
Contributions are welcome from anyone.
Please read Contributing page on wiki for guidelines on contributing to Conky.
Supporting this project
Conky exists only through the hard work of a collection of volunteers. Please consider sponsoring the project's developers if you get value out of Conky.
Stargazers over time

Top Related Projects
A monitor of resources
🖼️ A command-line system information tool written in bash 3.2+
Wow such top. So stats. More better than regular top.
Glances an Eye on your system. A top/htop alternative for GNU/Linux, BSD, Mac OS and Windows operating systems.
System monitoring dashboard for terminal
Very resourcefriendly and feature-rich replacement for i3status, written in pure Rust
Convert designs to code with AI
Introducing Visual Copilot: A new AI model to turn Figma designs to high quality code using your components.
Try Visual Copilot