
Top Related Projects

Render After Effects animations natively on Android and iOS, Web, and React Native

A curated list of awesome Android UI/UX libraries

A fluent Android animation library

Cute view animation collection.

An Android app which provides design news & inspiration as well as being an example of implementing material design.
Quick Overview
Material-Animations is an Android project that demonstrates various animation techniques using the Material Design guidelines. It showcases transitions between activities, shared element transitions, and circular reveal animations, providing developers with practical examples of how to implement these effects in their own Android applications.
Pros
- Comprehensive collection of Material Design animation examples
- Well-documented code with clear explanations for each animation type
- Easy to understand and implement in other Android projects
- Demonstrates best practices for creating smooth, visually appealing animations
Cons
- Some examples may be outdated as Android and Material Design guidelines evolve
- Limited to specific animation types, may not cover all possible animation scenarios
- Requires a good understanding of Android development to fully utilize
- Not actively maintained, with the last update being several years ago
Code Examples
- Shared Element Transition:
// In the source activity
val intent = Intent(this, TargetActivity::class.java)
val options = ActivityOptionsCompat.makeSceneTransitionAnimation(
    this,
    imageView,
    ViewCompat.getTransitionName(imageView)!!
)
startActivity(intent, options.toBundle())
- Circular Reveal Animation:
private fun animateRevealShow(viewRoot: View) {
    val cx = (viewRoot.left + viewRoot.right) / 2
    val cy = (viewRoot.top + viewRoot.bottom) / 2
    val finalRadius = viewRoot.width.coerceAtLeast(viewRoot.height)

    ViewAnimationUtils.createCircularReveal(viewRoot, cx, cy, 0f, finalRadius.toFloat()).apply {
        duration = 1000
        start()
    }
}
- Fade Transition:
private fun setupWindowAnimations() {
    with(window) {
        requestFeature(Window.FEATURE_CONTENT_TRANSITIONS)
        enterTransition = Fade()
        exitTransition = Fade()
    }
}
Getting Started
To use Material-Animations in your project:
-
Clone the repository:
git clone https://github.com/lgvalle/Material-Animations.git -
Open the project in Android Studio.
-
Run the app on an emulator or device to see the animations in action.
-
Study the code in the various activity files to understand how each animation is implemented.
-
Copy the relevant code snippets and adapt them to your own project as needed.
Competitor Comparisons
Render After Effects animations natively on Android and iOS, Web, and React Native
Pros of Lottie
- Supports complex, high-quality animations created in Adobe After Effects
- Extensive documentation and community support
- Cross-platform compatibility (Android, iOS, Web)
Cons of Lottie
- Steeper learning curve for designers and developers
- Larger file sizes for complex animations
- Requires external tools (Adobe After Effects) for creating animations
Code Comparison
Material-Animations:
ActivityOptionsCompat options = ActivityOptionsCompat.makeSceneTransitionAnimation(
    this, transitionView, TRANSITION_NAME);
ActivityCompat.startActivity(this, intent, options.toBundle());
Lottie:
val animationView = findViewById<LottieAnimationView>(R.id.animation_view)
animationView.setAnimation(R.raw.animation)
animationView.playAnimation()
Key Differences
- Material-Animations focuses on Android's built-in Material Design transitions
- Lottie enables more complex, custom animations across multiple platforms
- Material-Animations is more lightweight and easier to implement for simple transitions
- Lottie offers more flexibility and creative freedom for designers
Use Cases
Material-Animations:
- Simple, standard Material Design transitions
- Quick implementation of basic animations
Lottie:
- Complex, custom animations
- Cross-platform projects requiring consistent animations
- Projects with dedicated design teams creating custom animations
A curated list of awesome Android UI/UX libraries
Pros of awesome-android-ui
- Comprehensive collection of UI/UX libraries and resources
- Regularly updated with new contributions from the community
- Covers a wide range of UI components and design patterns
Cons of awesome-android-ui
- Not focused on a specific aspect of Android UI development
- Lacks in-depth explanations or tutorials for individual libraries
- May overwhelm beginners with the sheer number of options
Code comparison
Material-Animations:
ActivityOptionsCompat options = ActivityOptionsCompat.makeSceneTransitionAnimation(
    this, transitionView, TRANSITION_NAME);
ActivityCompat.startActivity(this, intent, options.toBundle());
awesome-android-ui (example from a listed library):
ViewAnimator
    .animate(view)
    .fadeIn()
    .scale(1f, 1.5f)
    .duration(1000)
    .start();
Summary
Material-Animations focuses specifically on material design animations and transitions, providing detailed examples and explanations. awesome-android-ui, on the other hand, is a curated list of various Android UI/UX libraries, offering a broader scope but less depth in any particular area. While Material-Animations is ideal for developers looking to implement specific material design animations, awesome-android-ui serves as a comprehensive resource for discovering and exploring a wide range of UI components and libraries.
A fluent Android animation library
Pros of ViewAnimator
- Simpler API with a fluent interface for chaining animations
- Supports a wider range of animation types out of the box
- Easier to create complex multi-step animations
Cons of ViewAnimator
- Less focus on Material Design specific animations
- May require more code for simple transitions
- Lacks some of the pre-built activity transitions found in Material-Animations
Code Comparison
Material-Animations:
ActivityOptionsCompat options = ActivityOptionsCompat.makeSceneTransitionAnimation(
    this, fab, getString(R.string.transition_fab));
startActivity(intent, options.toBundle());
ViewAnimator:
ViewAnimator
    .animate(view)
    .scale(0, 1)
    .duration(1000)
    .thenAnimate(otherView)
    .fadeIn()
    .duration(500)
    .start();
Material-Animations focuses on Activity transitions and Material Design principles, offering pre-built animations that adhere to Google's design guidelines. It's ideal for developers looking to implement Material Design transitions with minimal code.
ViewAnimator, on the other hand, provides a more flexible and extensive animation framework. It allows for easy creation of complex, multi-step animations on any view, making it suitable for a wider range of animation needs beyond just Material Design transitions.
Cute view animation collection.
Pros of AndroidViewAnimations
- Extensive library of pre-built animations
- Easy-to-use API for applying animations to views
- Supports chaining multiple animations together
Cons of AndroidViewAnimations
- Focuses primarily on view-level animations, less emphasis on material design transitions
- May require more code for complex, custom animations
- Less integration with Android's native animation framework
Code Comparison
AndroidViewAnimations:
YoYo.with(Techniques.FadeIn)
    .duration(700)
    .playOn(findViewById(R.id.textView));
Material-Animations:
TransitionManager.beginDelayedTransition(container, new Fade());
textView.setVisibility(View.VISIBLE);
Key Differences
- AndroidViewAnimations provides a wide range of pre-defined animations, making it easier to quickly implement common effects
- Material-Animations focuses on material design principles and seamless transitions between activities and views
- AndroidViewAnimations uses a custom animation engine, while Material-Animations leverages Android's native transition framework
- Material-Animations offers more control over complex, multi-view transitions and scene changes
- AndroidViewAnimations is better suited for simple, single-view animations, while Material-Animations excels in creating cohesive, app-wide animation experiences
Both libraries have their strengths, and the choice between them depends on the specific needs of your project and the desired animation complexity.
An Android app which provides design news & inspiration as well as being an example of implementing material design.
Pros of Plaid
- More comprehensive showcase of Material Design principles and components
- Actively maintained with regular updates and improvements
- Demonstrates real-world app architecture and best practices
Cons of Plaid
- Larger and more complex codebase, potentially harder for beginners to grasp
- Focuses on a specific app use case (design news), which may not be relevant for all developers
- Requires more setup and dependencies to run and explore
Code Comparison
Material-Animations:
override fun onCreate(savedInstanceState: Bundle?) {
    super.onCreate(savedInstanceState)
    setContentView(R.layout.activity_transition)
    setupWindowAnimations()
}
Plaid:
override fun onCreate(savedInstanceState: Bundle?) {
    super.onCreate(savedInstanceState)
    setContentView(R.layout.activity_home)
    setupToolbar()
    setupViewPager()
}
Both repositories showcase Material Design animations and transitions, but Plaid offers a more comprehensive and real-world example. Material-Animations focuses specifically on animations and transitions, making it easier to understand these concepts in isolation. Plaid, on the other hand, demonstrates how to implement these animations within a fully-functional app, providing context for their usage in a production environment.
While Material-Animations is excellent for learning specific animation techniques, Plaid offers a broader perspective on modern Android development practices, including architecture, data management, and UI design. However, this added complexity may make Plaid more challenging for beginners to navigate and understand.
Convert  designs to code with AI

Introducing Visual Copilot: A new AI model to turn Figma designs to high quality code using your components.
Try Visual CopilotREADME
UNMAINTAINED
No maintainance is intended. The content is still valid as a reference but it won't contain the latest new stuff
![]()
Android Transition Framework can be used for three main things:
- Animate activity layout content when transitioning from one activity to another.
- Animate shared elements (Hero views) in transitions between activities.
- Animate view changes within same activity.
1. Transitions between Activities
Animate existing activity layout content
When transitioning from Activity A to Activity B content layout is animated according to defined transition. There are three predefined transitions available on android.transition.Transition you can use: Explode, Slide and Fade.
All these transitions track changes to the visibility of target views in activity layout and animate those views to follow transition rules.
| Explode | Slide | Fade |
|---|---|---|
 |  |  |
You can define these transitions declarative using XML or programmatically. For the Fade Transition sample, it would look like this:
Declarative
Transitions are defined on XML files in res/transition
res/transition/activity_fade.xml
<?xml version="1.0" encoding="utf-8"?>
<fade xmlns:android="http://schemas.android.com/apk/res/"
    android:duration="1000"/>
res/transition/activity_slide.xml
<?xml version="1.0" encoding="utf-8"?>
<slide xmlns:android="http://schemas.android.com/apk/res/"
    android:duration="1000"/>
To use these transitions you need to inflate them using TransitionInflater
MainActivity.java
	@Override
    protected void onCreate(Bundle savedInstanceState) {
        super.onCreate(savedInstanceState);
        setContentView(R.layout.activity_transition);
        setupWindowAnimations();
    }

    private void setupWindowAnimations() {
        Slide slide = TransitionInflater.from(this).inflateTransition(R.transition.activity_slide);
        getWindow().setExitTransition(slide);
    }
TransitionActivity.java
	@Override
    protected void onCreate(Bundle savedInstanceState) {
        super.onCreate(savedInstanceState);
        setContentView(R.layout.activity_transition);
        setupWindowAnimations();
    }

    private void setupWindowAnimations() {
        Fade fade = TransitionInflater.from(this).inflateTransition(R.transition.activity_fade);
        getWindow().setEnterTransition(fade);
    }
Programmatically
MainActivity.java
	@Override
    protected void onCreate(Bundle savedInstanceState) {
        super.onCreate(savedInstanceState);
        setContentView(R.layout.activity_transition);
        setupWindowAnimations();
    }

    private void setupWindowAnimations() {
        Slide slide = new Slide();
        slide.setDuration(1000);
        getWindow().setExitTransition(slide);
    }
TransitionActivity.java
	@Override
    protected void onCreate(Bundle savedInstanceState) {
        super.onCreate(savedInstanceState);
        setContentView(R.layout.activity_transition);
        setupWindowAnimations();
    }

    private void setupWindowAnimations() {
        Fade fade = new Fade();
        fade.setDuration(1000);
        getWindow().setEnterTransition(fade);
    }
Any of those produce this result:
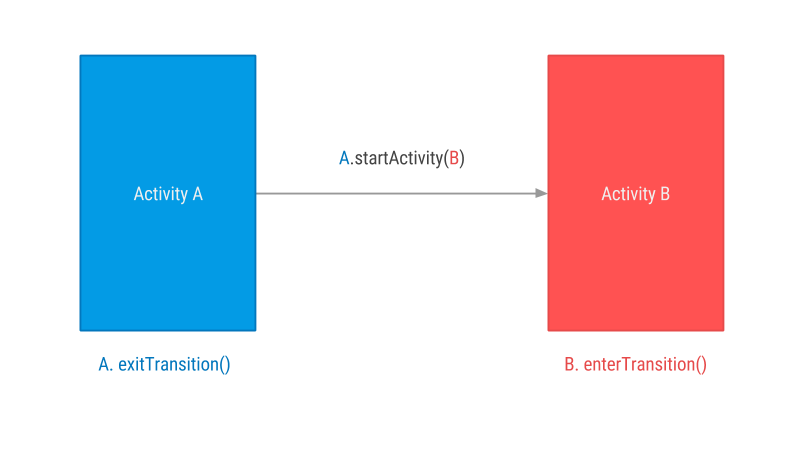
What is happening step by step:
-
Activity A starts Activity B
-
Transition Framework finds A Exit Transition (slide) and apply it to all visible views.
-
Transition Framework finds B Enter Transition (fade) and apply it to all visible views.
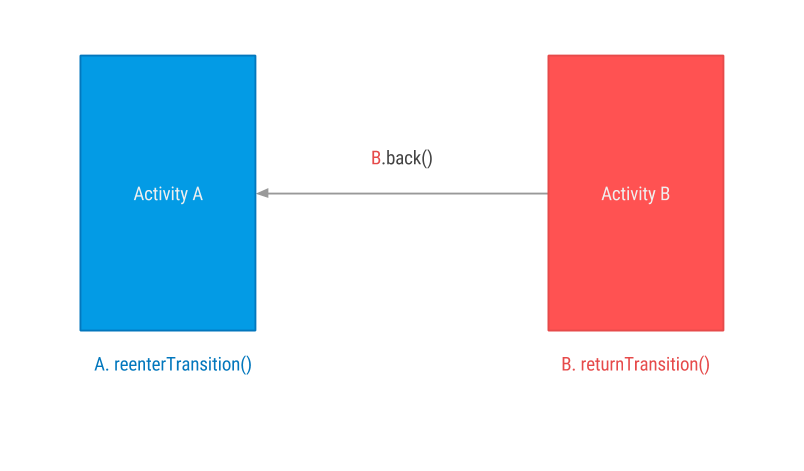
-
On Back Pressed Transition Framework executes Enter and Exit reverse animations respectively (If we had defined output
returnTransitionandreenterTransition, these have been executed instead)
ReturnTransition & ReenterTransition
Return and Reenter Transitions are the reverse animations for Enter and Exit respectively.
- EnterTransition <--> ReturnTransition
- ExitTransition <--> ReenterTransition
If Return or Reenter are not defined, Android will execute a reversed version of Enter and Exit Transitions. But if you do define them, you can have different transitions for entering and exiting an activity.
We can modify previous Fade sample and define a ReturnTransition for TransitionActivity, in this case, a Slide transition. This way, when returning from B to A, instead of seeing a Fade out (reversed Enter Transition) we will see a Slide out transition
TransitionActivity.java
	@Override
    protected void onCreate(Bundle savedInstanceState) {
        super.onCreate(savedInstanceState);
        setContentView(R.layout.activity_transition);
        setupWindowAnimations();
    }

    private void setupWindowAnimations() {
        Fade fade = new Fade();
        fade.setDuration(1000);
        getWindow().setEnterTransition(fade);

        Slide slide = new Slide();
        slide.setDuration(1000);
        getWindow().setReturnTransition(slide);
    }
Observe that if no Return Transition is defined then a reversed Enter Transition is executed. If a Return Transition is defined that one is executed instead.
| Without Return Transition | With Return Transition |
|---|---|
Enter: Fade In | Enter: Fade In |
Exit: Fade Out | Exit: Slide out |
|  |
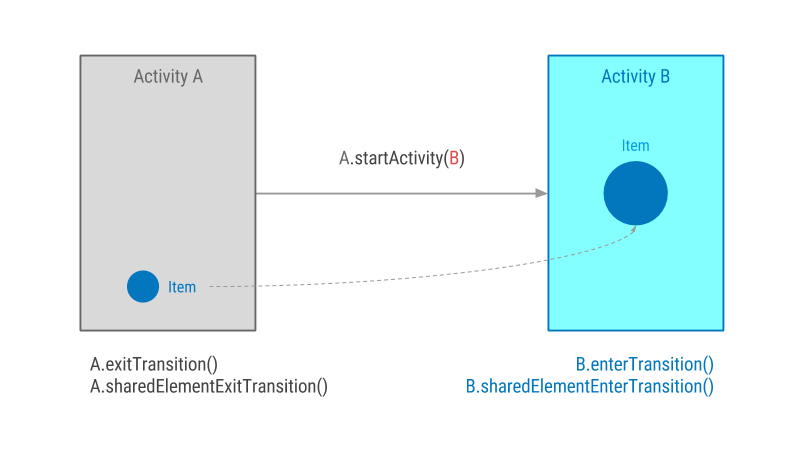
2. Shared elements between Activities
The idea behind this is having two different views in two different layouts and link them somehow with an animation.
Transition framework will then do whatever animations it consider necessary to show the user a transition from one view to another.
Keep this always in mind: the view is not really moving from one layout to another. They are two independent views.
a) Enable Window Content Transition
This is something you need to set up once on your app styles.xml.
values/styles.xml
<style name="MaterialAnimations" parent="@style/Theme.AppCompat.Light.NoActionBar">
    ...
    <item name="android:windowContentTransitions">true</item
    ...
</style>
Here you can also specify default enter, exit and shared element transitions for the whole app if you want
<style name="MaterialAnimations" parent="@style/Theme.AppCompat.Light.NoActionBar">
    ...
    <!-- specify enter and exit transitions -->
    <item name="android:windowEnterTransition">@transition/explode</item>
    <item name="android:windowExitTransition">@transition/explode</item>

    <!-- specify shared element transitions -->
    <item name="android:windowSharedElementEnterTransition">@transition/changebounds</item>
    <item name="android:windowSharedElementExitTransition">@transition/changebounds</item>
    ...
</style>
b) Define a common transition name
To make the trick you need to give both, origin and target views, the same android:transitionName. They may have different ids or properties, but android:transitionName must be the same.
layout/activity_a.xml
<ImageView
        android:id="@+id/small_blue_icon"
        style="@style/MaterialAnimations.Icon.Small"
        android:src="@drawable/circle"
        android:transitionName="@string/blue_name" />
layout/activity_b.xml
<ImageView
        android:id="@+id/big_blue_icon"
        style="@style/MaterialAnimations.Icon.Big"
        android:src="@drawable/circle"
        android:transitionName="@string/blue_name" />
c) Start an activity with a shared element
Use the ActivityOptions.makeSceneTransitionAnimation() method to define shared element origin view and transition name.
MainActivity.java
blueIconImageView.setOnClickListener(new View.OnClickListener() {
    @Override
    public void onClick(View v) {
        Intent i = new Intent(MainActivity.this, SharedElementActivity.class);

        View sharedView = blueIconImageView;
        String transitionName = getString(R.string.blue_name);

        ActivityOptions transitionActivityOptions = ActivityOptions.makeSceneTransitionAnimation(MainActivity.this, sharedView, transitionName);
        startActivity(i, transitionActivityOptions.toBundle());
    }
});
Just that code will produce this beautiful transition animation:
As you can see, Transition framework is creating and executing an animation to create the illusion that views are moving and changing shape from one activity to the other
Shared elements between fragments
Shared element transition works with Fragments in a very similar way as it does with activities.
Steps a) and b) are exactly the same. Only c) changes
a) Enable Window Content Transition
values/styles.xml
<style name="MaterialAnimations" parent="@style/Theme.AppCompat.Light.NoActionBar">
    ...
    <item name="android:windowContentTransitions">true</item>
    ...
</style>
b) Define a common transition name
layout/fragment_a.xml
<ImageView
        android:id="@+id/small_blue_icon"
        style="@style/MaterialAnimations.Icon.Small"
        android:src="@drawable/circle"
        android:transitionName="@string/blue_name" />
layout/fragment_b.xml
<ImageView
        android:id="@+id/big_blue_icon"
        style="@style/MaterialAnimations.Icon.Big"
        android:src="@drawable/circle"
        android:transitionName="@string/blue_name" />
c) Start a fragment with a shared element
To do this you need to include shared element transition information as part of the FragmentTransaction process.
FragmentB fragmentB = FragmentB.newInstance(sample);

// Defines enter transition for all fragment views
Slide slideTransition = new Slide(Gravity.RIGHT);
slideTransition.setDuration(1000);
sharedElementFragment2.setEnterTransition(slideTransition);

// Defines enter transition only for shared element
ChangeBounds changeBoundsTransition = TransitionInflater.from(this).inflateTransition(R.transition.change_bounds);
fragmentB.setSharedElementEnterTransition(changeBoundsTransition);

getFragmentManager().beginTransaction()
        .replace(R.id.content, fragmentB)
        .addSharedElement(blueView, getString(R.string.blue_name))
        .commit();
And this is the final result:

Allow Transition Overlap
You can define if enter and exit transitions can overlap each other.
From Android documentation:
When true, the enter transition will start as soon as possible.
When false, the enter transition will wait until the exit transition completes before starting.
This works for both Fragments and Activities shared element transitions.
FragmentB fragmentB = FragmentB.newInstance(sample);

// Defines enter transition for all fragment views
Slide slideTransition = new Slide(Gravity.RIGHT);
slideTransition.setDuration(1000);
sharedElementFragment2.setEnterTransition(slideTransition);

// Defines enter transition only for shared element
ChangeBounds changeBoundsTransition = TransitionInflater.from(this).inflateTransition(R.transition.change_bounds);
fragmentB.setSharedElementEnterTransition(changeBoundsTransition);

// Prevent transitions for overlapping
fragmentB.setAllowEnterTransitionOverlap(overlap);
fragmentB.setAllowReturnTransitionOverlap(overlap);

getFragmentManager().beginTransaction()
        .replace(R.id.content, fragmentB)
        .addSharedElement(blueView, getString(R.string.blue_name))
        .commit();
It is very easy to spot the difference in this example:
| Overlap True | Overlap False |
|---|---|
| Fragment_2 appears on top of Fragment_1 | Fragment_2 waits until Fragment_1 is gone |
 | |
3. Animate view layout elements
Scenes
Transition Framework can also be used to animate element changes within current activity layout.
Transitions happen between scenes. A scene is just a regular layout which defines a static state of our UI. You can transition from one scene to another and Transition Framework will animate views in between.
scene1 = Scene.getSceneForLayout(sceneRoot, R.layout.activity_animations_scene1, this);
scene2 = Scene.getSceneForLayout(sceneRoot, R.layout.activity_animations_scene2, this);
scene3 = Scene.getSceneForLayout(sceneRoot, R.layout.activity_animations_scene3, this);
scene4 = Scene.getSceneForLayout(sceneRoot, R.layout.activity_animations_scene4, this);

(...)

@Override
public void onClick(View v) {
    switch (v.getId()) {
        case R.id.button1:
            TransitionManager.go(scene1, new ChangeBounds());
            break;
        case R.id.button2:
            TransitionManager.go(scene2, TransitionInflater.from(this).inflateTransition(R.transition.slide_and_changebounds));
            break;
        case R.id.button3:
            TransitionManager.go(scene3, TransitionInflater.from(this).inflateTransition(R.transition.slide_and_changebounds_sequential));
            break;
        case R.id.button4:
            TransitionManager.go(scene4, TransitionInflater.from(this).inflateTransition(R.transition.slide_and_changebounds_sequential_with_interpolators));
            break;
    }
}
That code would produce transition between four scenes in the same activity. Each transition has a different animation defined.
Transition Framework will take all visible views in current scene and calculate whatever necessary animations are needed to arrange those views according to next scene.
Layout changes
Transition Framework can also be used to animate layout property changes in a view. You just need to make whatever changes you want and it will perform necessary animations for you
a) Begin Delayed Transition
With just this line of code we are telling the framework we are going to perform some UI changes that it will need to animate.
TransitionManager.beginDelayedTransition(sceneRoot);
b) Change view layout properties
ViewGroup.LayoutParams params = greenIconView.getLayoutParams();
params.width = 200;
greenIconView.setLayoutParams(params);
Changing view width attribute to make it smaller will trigger a layoutMeasure. At that point the Transition framework will record start and ending values and will create an animation to transition from one to another.
4. (Bonus) Shared elements + Circular Reveal
Circular Reveal is just an animation to show or hide a group of UI elements. It is available since API 21 in ViewAnimationUtils class.
Circular Reveal animation can be used in combination of Shared Element Transition to create meaningful animations that smoothly teach the user what is happening in the app.

What is happening in this example step by step is:
- Orange circle is a shared element transitioning from
MainActivitytoRevealActivity. - On
RevealActivitythere is a listener to listen for shared element transition end. When that happens it does two things:- Execute a Circular Reveal animation for the Toolbar
- Execute a scale up animation on
RevealActivityviews using plain oldViewPropertyAnimator
Listen to shared element enter transition end
Transition transition = TransitionInflater.from(this).inflateTransition(R.transition.changebounds_with_arcmotion);
getWindow().setSharedElementEnterTransition(transition);
transition.addListener(new Transition.TransitionListener() {
    @Override
    public void onTransitionEnd(Transition transition) {
        animateRevealShow(toolbar);
        animateButtonsIn();
    }

    (...)

});
Reveal Toolbar
private void animateRevealShow(View viewRoot) {
    int cx = (viewRoot.getLeft() + viewRoot.getRight()) / 2;
    int cy = (viewRoot.getTop() + viewRoot.getBottom()) / 2;
    int finalRadius = Math.max(viewRoot.getWidth(), viewRoot.getHeight());

    Animator anim = ViewAnimationUtils.createCircularReveal(viewRoot, cx, cy, 0, finalRadius);
    viewRoot.setVisibility(View.VISIBLE);
    anim.setDuration(1000);
    anim.setInterpolator(new AccelerateInterpolator());
    anim.start();
}
Scale up activity layout views
private void animateButtonsIn() {
    for (int i = 0; i < bgViewGroup.getChildCount(); i++) {
        View child = bgViewGroup.getChildAt(i);
        child.animate()
                .setStartDelay(100 + i * DELAY)
                .setInterpolator(interpolator)
                .alpha(1)
                .scaleX(1)
                .scaleY(1);
    }
}
More circular reveal animations
There are many different ways you can create a reveal animation. The important thing is to use the animation to help the user understand what is happening in the app.
Circular Reveal from the middle of target view
int cx = (viewRoot.getLeft() + viewRoot.getRight()) / 2;
int cy = viewRoot.getTop();
int finalRadius = Math.max(viewRoot.getWidth(), viewRoot.getHeight());

Animator anim = ViewAnimationUtils.createCircularReveal(viewRoot, cx, cy, 0, finalRadius);
viewRoot.setBackgroundColor(color);
anim.start();
Circular Reveal from top of target view + animations

int cx = (viewRoot.getLeft() + viewRoot.getRight()) / 2;
int cy = (viewRoot.getTop() + viewRoot.getBottom()) / 2;
int finalRadius = Math.max(viewRoot.getWidth(), viewRoot.getHeight());

Animator anim = ViewAnimationUtils.createCircularReveal(viewRoot, cx, cy, 0, finalRadius);
viewRoot.setBackgroundColor(color);
anim.addListener(new AnimatorListenerAdapter() {
    @Override
    public void onAnimationEnd(Animator animation) {
        animateButtonsIn();
    }
});
anim.start();
Circular Reveal from touch point

@Override
public boolean onTouch(View view, MotionEvent motionEvent) {
    if (motionEvent.getAction() == MotionEvent.ACTION_DOWN) {
        if (view.getId() == R.id.square_yellow) {
            revealFromCoordinates(motionEvent.getRawX(), motionEvent.getRawY());
        }
    }
    return false;
}
private Animator animateRevealColorFromCoordinates(int x, int y) {
    float finalRadius = (float) Math.hypot(viewRoot.getWidth(), viewRoot.getHeight());

    Animator anim = ViewAnimationUtils.createCircularReveal(viewRoot, x, y, 0, finalRadius);
    viewRoot.setBackgroundColor(color);
    anim.start();
}
Animate and Reveal

Transition transition = TransitionInflater.from(this).inflateTransition(R.transition.changebounds_with_arcmotion);
transition.addListener(new Transition.TransitionListener() {
    @Override
    public void onTransitionEnd(Transition transition) {
        animateRevealColor(bgViewGroup, R.color.red);
    }
    (...)

});
TransitionManager.beginDelayedTransition(bgViewGroup, transition);
RelativeLayout.LayoutParams layoutParams = new RelativeLayout.LayoutParams(RelativeLayout.LayoutParams.WRAP_CONTENT, RelativeLayout.LayoutParams.WRAP_CONTENT);
layoutParams.addRule(RelativeLayout.CENTER_IN_PARENT);
btnRed.setLayoutParams(layoutParams);
Sample source code
https://github.com/lgvalle/Material-Animations
More information
- Alex Lockwood posts about Transition Framework. A great in deep into this topic: http://www.androiddesignpatterns.com/2014/12/activity-fragment-transitions-in-android-lollipop-part1.html
- Amazing repository with lot of Material Design samples by Saul Molinero: https://github.com/saulmm/Android-Material-Examples
- Chet Hasse video explaining Transition framework: https://www.youtube.com/watch?v=S3H7nJ4QaD8
Top Related Projects
Render After Effects animations natively on Android and iOS, Web, and React Native
A curated list of awesome Android UI/UX libraries
A fluent Android animation library
Cute view animation collection.
An Android app which provides design news & inspiration as well as being an example of implementing material design.
Convert designs to code with AI
Introducing Visual Copilot: A new AI model to turn Figma designs to high quality code using your components.
Try Visual Copilot