 colorization
Automatic colorization using deep neural networks. "Colorful Image Colorization." In ECCV, 2016.
Top Related Projects

Image-to-Image Translation in PyTorch

A Deep Learning based project for colorizing and restoring old images (and video!)

PyTorch implementations of Generative Adversarial Networks.

Torch implementation of neural style algorithm
The world's simplest facial recognition api for Python and the command line

Code and data for paper "Deep Photo Style Transfer": https://arxiv.org/abs/1703.07511
Quick Overview
The richzhang/colorization repository is a deep learning-based image colorization project that aims to automatically add color to grayscale images. The project provides pre-trained models and code for both interactive and batch colorization of images.
Pros
- Impressive Colorization Quality: The project's deep learning models are capable of producing high-quality, realistic colorized images from grayscale inputs.
- Flexible Usage: The project supports both interactive and batch colorization, allowing users to colorize individual images or process large datasets.
- Extensive Documentation: The repository includes detailed documentation, including instructions for installation, usage, and model training.
- Active Development: The project is actively maintained, with regular updates and improvements to the models and codebase.
Cons
- Computational Complexity: The deep learning models used in this project can be computationally intensive, requiring powerful hardware (e.g., GPU) for efficient processing.
- Limited Customization: While the project provides pre-trained models, the ability to fine-tune or customize the models for specific use cases may be limited.
- Potential Bias in Colorization: As with any machine learning-based system, the colorization results may exhibit biases present in the training data, which could lead to inaccuracies or undesirable outcomes in certain cases.
- Dependency on External Libraries: The project relies on several external libraries and frameworks, which may introduce additional complexity in terms of installation and configuration.
Code Examples
The richzhang/colorization project is a deep learning-based library, and the following code examples demonstrate its usage:
- Interactive Colorization:
from colorization.models import load_model
from colorization.utils import load_image, save_image

# Load the pre-trained model
model = load_model()

# Load a grayscale image
gray_image = load_image('input_image.jpg')

# Colorize the image
colorized_image = model.colorize(gray_image)

# Save the colorized image
save_image('colorized_image.jpg', colorized_image)
This code demonstrates how to load a pre-trained colorization model, load a grayscale image, and use the model to colorize the image, which is then saved to a file.
- Batch Colorization:
from colorization.models import load_model
from colorization.utils import load_image, save_image
import os

# Load the pre-trained model
model = load_model()

# Specify the input and output directories
input_dir = 'input_images'
output_dir = 'colorized_images'

# Create the output directory if it doesn't exist
os.makedirs(output_dir, exist_ok=True)

# Colorize all images in the input directory
for filename in os.listdir(input_dir):
    if filename.endswith('.jpg') or filename.endswith('.png'):
        input_path = os.path.join(input_dir, filename)
        output_path = os.path.join(output_dir, filename)
        gray_image = load_image(input_path)
        colorized_image = model.colorize(gray_image)
        save_image(output_path, colorized_image)
This code demonstrates how to use the colorization model to process a directory of grayscale images and save the colorized versions to a separate directory.
- Model Training:
from colorization.models import ColorizationModel
from colorization.datasets import load_dataset

# Load the training dataset
train_dataset = load_dataset('train_data')

# Create the colorization model
model = ColorizationModel()

# Train the model
model.train(train_dataset, epochs=10, batch_size=32)

# Save the trained model
model.save('trained_model.pth')
This code demonstrates how to create a ColorizationModel instance, load a training dataset, train the model, and save the trained model to a file.
Getting Started
To get started with the richzhang/colorization project, follow these steps:
- Clone the repository:
git clone https://github.com/richzhang/colorization.git
- Install the require
Competitor Comparisons
Image-to-Image Translation in PyTorch
Pros of pytorch-CycleGAN-and-pix2pix
- Supports multiple image-to-image translation tasks, including colorization
- Implements both CycleGAN and pix2pix architectures
- Provides a more flexible and extensible framework for various translation tasks
Cons of pytorch-CycleGAN-and-pix2pix
- May require more computational resources due to its broader scope
- Potentially more complex to set up and use for specific colorization tasks
- Less specialized for colorization compared to the dedicated colorization repository
Code Comparison
colorization:
colorizer = eccv16(pretrained=True).eval()
result = colorizer(img_l)
pytorch-CycleGAN-and-pix2pix:
model = create_model(opt)
model.setup(opt)
result = model.netG(data['A'])
The colorization repository offers a more straightforward API for colorization tasks, while pytorch-CycleGAN-and-pix2pix provides a more general-purpose framework that requires additional setup but offers greater flexibility for various image translation tasks.
A Deep Learning based project for colorizing and restoring old images (and video!)
Pros of DeOldify
- Uses more advanced deep learning techniques, including GANs and self-attention
- Produces more vibrant and realistic colorization results
- Offers video colorization in addition to images
Cons of DeOldify
- Requires more computational resources due to complex model architecture
- May introduce artifacts or unnatural colors in some cases
- Less straightforward implementation for beginners
Code Comparison
DeOldify:
colorizer = get_video_colorizer()
render_factor = 21
colorizer.get_transformed_image("input.jpg", render_factor)
Colorization:
colorizer = eccv16(pretrained=True).eval()
img = load_img("input.jpg")
output = colorizer(img)
Both projects aim to colorize black and white images, but DeOldify generally produces higher quality results at the cost of increased complexity. Colorization offers a simpler implementation and may be more suitable for resource-constrained environments or quick prototyping. DeOldify's advanced techniques make it better suited for professional-grade colorization tasks and video processing.
PyTorch implementations of Generative Adversarial Networks.
Pros of PyTorch-GAN
- Comprehensive collection of GAN implementations
- Well-organized codebase with modular structure
- Supports multiple GAN architectures and variations
Cons of PyTorch-GAN
- Focused solely on GANs, less versatile for other tasks
- May require more computational resources for training
- Steeper learning curve for beginners
Code Comparison
PyTorch-GAN:
class Generator(nn.Module):
    def __init__(self):
        super(Generator, self).__init__()
        self.init_size = opt.img_size // 4
        self.l1 = nn.Sequential(nn.Linear(opt.latent_dim, 128 * self.init_size ** 2))
        self.conv_blocks = nn.Sequential(
            nn.BatchNorm2d(128),
            nn.Upsample(scale_factor=2),
            nn.Conv2d(128, 128, 3, stride=1, padding=1),
Colorization:
class SIGGRAPHGenerator(BaseColor):
    def __init__(self, norm_layer=nn.BatchNorm2d, classes=529):
        super(SIGGRAPHGenerator, self).__init__()
        # Conv1
        model1=[nn.Conv2d(4, 64, kernel_size=3, stride=1, padding=1, bias=True),]
        model1+=[nn.ReLU(True),]
        model1+=[nn.Conv2d(64, 64, kernel_size=3, stride=1, padding=1, bias=True),]
The PyTorch-GAN repository offers a wide range of GAN implementations, making it ideal for experimenting with different architectures. However, it may be more complex for beginners and requires more computational power. The Colorization repository, on the other hand, is more focused on a specific task but may be easier to understand and implement for those interested in image colorization.
Torch implementation of neural style algorithm
Pros of neural-style
- Offers artistic style transfer, allowing for creative image transformations
- Provides fine-grained control over stylization parameters
- Supports multiple style images for blended effects
Cons of neural-style
- Slower processing time compared to colorization
- Requires more computational resources
- Limited to style transfer, not applicable for colorization tasks
Code Comparison
neural-style:
local content_image = image.load(params.content_image, 3)
local style_image = image.load(params.style_image, 3)
local opt_img = torch.randn(content_image:size()):float()
colorization:
img = load_img(img_path)
(tens_l_orig, tens_l_rs) = preprocess_img(img, HW=(256,256))
out_img = postprocess_tens(tens_l_orig, out_ab)
The neural-style code focuses on loading content and style images, while colorization preprocesses and postprocesses images for colorization. neural-style uses Torch, whereas colorization uses Python, reflecting different approaches to image processing tasks.
The world's simplest facial recognition api for Python and the command line
Pros of face_recognition
- Easier to use with a high-level Python API
- More versatile, supporting multiple face-related tasks (detection, recognition, landmarks)
- Better documentation and examples for quick integration
Cons of face_recognition
- Less focused on a specific task compared to colorization
- May require more computational resources for real-time applications
- Limited customization options for advanced users
Code Comparison
face_recognition:
import face_recognition
image = face_recognition.load_image_file("image.jpg")
face_locations = face_recognition.face_locations(image)
face_encodings = face_recognition.face_encodings(image, face_locations)
colorization:
import colorizers
colorizer = colorizers.siggraph17(pretrained=True).eval()
img = load_img("path/to/img.jpg")
(tens_l_orig, tens_l_rs) = preprocess_img(img)
out_img = postprocess_tens(tens_l_orig, out_ab)
Summary
face_recognition is a more versatile library for face-related tasks with an easy-to-use API, while colorization focuses specifically on image colorization. face_recognition offers broader functionality but may require more resources, whereas colorization provides a specialized solution for a single task. The code examples demonstrate the simplicity of face_recognition's API compared to the more specialized approach of colorization.
Code and data for paper "Deep Photo Style Transfer": https://arxiv.org/abs/1703.07511
Pros of deep-photo-styletransfer
- Focuses on photorealistic style transfer, maintaining the structure and details of the original image
- Allows for more artistic and creative transformations of photos
- Provides control over the style transfer process through various parameters
Cons of deep-photo-styletransfer
- More complex to use and requires more computational resources
- Limited to style transfer applications, not suitable for general image colorization
- May produce artifacts or unrealistic results in certain scenarios
Code Comparison
deep-photo-styletransfer:
content_image = load_image(args.content_image)
style_image = load_image(args.style_image)
content_seg = load_seg(args.content_seg)
style_seg = load_seg(args.style_seg)
output = stylize(content_image, style_image, content_seg, style_seg)
colorization:
img = load_img(args.img_path)
(tens_l_orig, tens_l_rs) = preprocess_img(img)
out_img = postprocess_tens(tens_l_orig, net_out)
The code snippets show that deep-photo-styletransfer requires more inputs and parameters for the style transfer process, while colorization focuses on a simpler colorization task with fewer inputs.
Convert  designs to code with AI

Introducing Visual Copilot: A new AI model to turn Figma designs to high quality code using your components.
Try Visual CopilotREADME
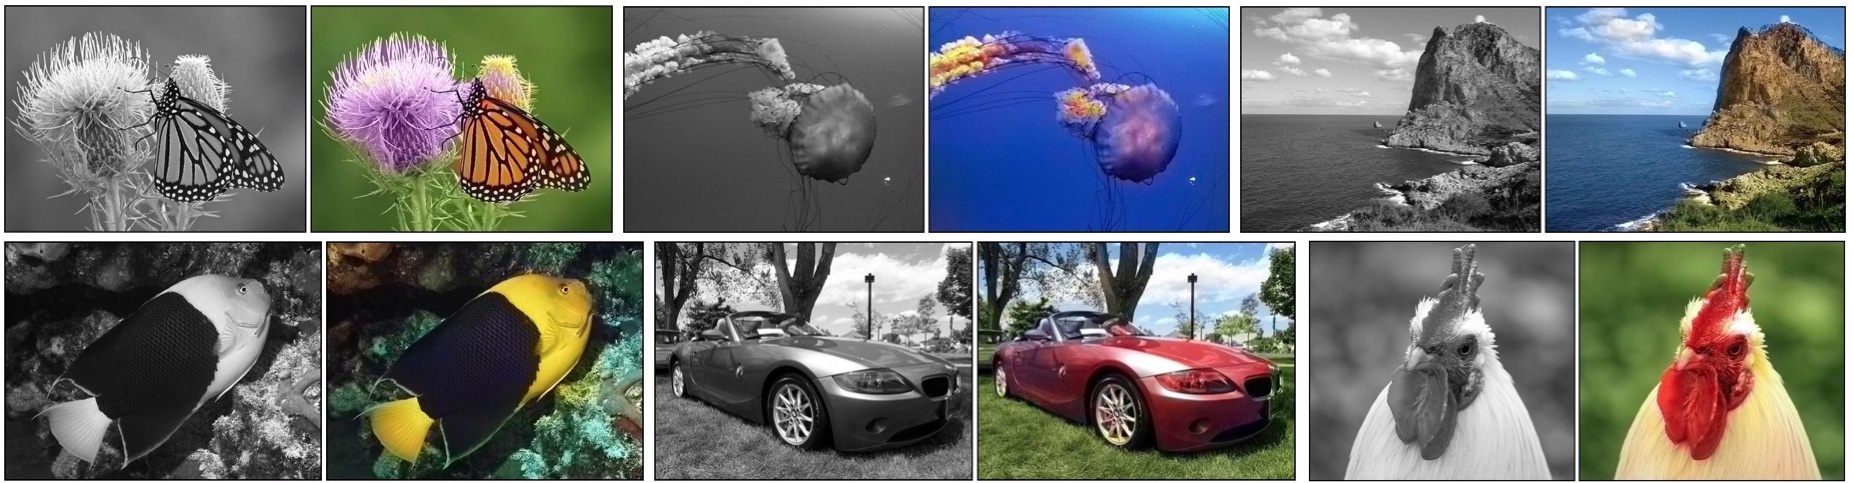
Colorful Image Colorization [Project Page]
Richard Zhang, Phillip Isola, Alexei A. Efros. In ECCV, 2016.
+ automatic colorization functionality for Real-Time User-Guided Image Colorization with Learned Deep Priors, SIGGRAPH 2017!
[Sept20 Update] Since it has been 3-4 years, I converted this repo to support minimal test-time usage in PyTorch. I also added our SIGGRAPH 2017 (it's an interactive method but can also do automatic). See the Caffe branch for the original release.
Clone the repository; install dependencies
git clone https://github.com/richzhang/colorization.git
pip install requirements.txt
Colorize! This script will colorize an image. The results should match the images in the imgs_out folder.
python demo_release.py -i imgs/ansel_adams3.jpg
Model loading in Python The following loads pretrained colorizers. See demo_release.py for some details on how to run the model. There are some pre and post-processing steps: convert to Lab space, resize to 256x256, colorize, and concatenate to the original full resolution, and convert to RGB.
import colorizers
colorizer_eccv16 = colorizers.eccv16().eval()
colorizer_siggraph17 = colorizers.siggraph17().eval()
Original implementation (Caffe branch)
The original implementation contained train and testing, our network and AlexNet (for representation learning tests), as well as representation learning tests. It is in Caffe and is no longer supported. Please see the caffe branch for it.
Citation
If you find these models useful for your resesarch, please cite with these bibtexs.
@inproceedings{zhang2016colorful,
  title={Colorful Image Colorization},
  author={Zhang, Richard and Isola, Phillip and Efros, Alexei A},
  booktitle={ECCV},
  year={2016}
}

@article{zhang2017real,
  title={Real-Time User-Guided Image Colorization with Learned Deep Priors},
  author={Zhang, Richard and Zhu, Jun-Yan and Isola, Phillip and Geng, Xinyang and Lin, Angela S and Yu, Tianhe and Efros, Alexei A},
  journal={ACM Transactions on Graphics (TOG)},
  volume={9},
  number={4},
  year={2017},
  publisher={ACM}
}
Misc
Contact Richard Zhang at rich.zhang at eecs.berkeley.edu for any questions or comments.
Top Related Projects
Image-to-Image Translation in PyTorch
A Deep Learning based project for colorizing and restoring old images (and video!)
PyTorch implementations of Generative Adversarial Networks.
Torch implementation of neural style algorithm
The world's simplest facial recognition api for Python and the command line
Code and data for paper "Deep Photo Style Transfer": https://arxiv.org/abs/1703.07511
Convert designs to code with AI
Introducing Visual Copilot: A new AI model to turn Figma designs to high quality code using your components.
Try Visual Copilot