 nerf-pytorch
A PyTorch implementation of NeRF (Neural Radiance Fields) that reproduces the results.
Top Related Projects

NeRF (Neural Radiance Fields) and NeRF in the Wild using pytorch-lightning

Code release for NeRF (Neural Radiance Fields)

Instant neural graphics primitives: lightning fast NeRF and more

PyTorch3D is FAIR's library of reusable components for deep learning with 3D data

Google Research

Plenoxels: Radiance Fields without Neural Networks
Quick Overview
yenchenlin/nerf-pytorch is a PyTorch implementation of Neural Radiance Fields (NeRF). It allows for the synthesis of novel views of complex scenes using a fully-connected deep network trained on a sparse set of input views. This project provides a clean and efficient codebase for researchers and developers to experiment with NeRF.
Pros
- Clean and well-organized PyTorch implementation of NeRF
- Includes pre-trained models and datasets for easy experimentation
- Supports both coarse and fine network training
- Provides visualization tools for rendered results
Cons
- Limited documentation and explanations of the implementation details
- May require significant computational resources for training on large datasets
- Does not include more recent NeRF extensions or optimizations
- Dependency on specific versions of libraries may cause compatibility issues
Code Examples
- Loading a dataset and creating a NeRF model:
from nerf.provider import NeRFDataset
from nerf.network import NeRF

# Load dataset
dataset = NeRFDataset(root_dir='path/to/dataset', type='train')

# Create NeRF model
model = NeRF()
- Training the NeRF model:
from nerf.trainer import Trainer

trainer = Trainer(model, dataset,
                  workspace='results',
                  num_epochs=30,
                  batch_size=4096,
                  lr=5e-4)
trainer.train()
- Rendering a novel view:
import torch
from nerf.utils import get_rays

# Generate rays for the novel view
poses = torch.rand(1, 7) # Example pose
rays_o, rays_d = get_rays(poses, intrinsics, H, W, N)

# Render the novel view
with torch.no_grad():
    outputs = model(rays_o, rays_d)
    rgb_map = outputs['rgb_map'].reshape(H, W, 3).cpu().numpy()
Getting Started
-
Clone the repository:
git clone https://github.com/yenchenlin/nerf-pytorch.git cd nerf-pytorch -
Install dependencies:
pip install -r requirements.txt -
Download a dataset (e.g., LLFF):
bash download_example_data.sh -
Train the model:
python run_nerf.py --config configs/lego.txt -
View results:
tensorboard --logdir logs/lego
Competitor Comparisons
NeRF (Neural Radiance Fields) and NeRF in the Wild using pytorch-lightning
Pros of nerf_pl
- Utilizes PyTorch Lightning, offering better organization and scalability
- Includes more advanced features like depth supervision and dynamic batch size
- Provides comprehensive documentation and examples for easier usage
Cons of nerf_pl
- May have a steeper learning curve due to PyTorch Lightning integration
- Potentially higher computational requirements for some advanced features
- Less suitable for users seeking a minimal, vanilla NeRF implementation
Code Comparison
nerf-pytorch:
rays_o, rays_d = get_rays(H, W, K, c2w)
rgb, disp, acc, extras = render(H, W, K, chunk=chunk, rays=rays,
                                verbose=i < 10, retraw=True,
                                **render_kwargs)
nerf_pl:
rays = get_rays(directions, c2w)
results = self(rays, img_idx, **kwargs)
rgb, depth, opacity = results[:3]
extras = results[3:]
The nerf_pl implementation leverages PyTorch Lightning's modular structure, while nerf-pytorch uses a more traditional approach. nerf_pl's code is generally more concise and organized due to its use of PyTorch Lightning's conventions.
Code release for NeRF (Neural Radiance Fields)
Pros of nerf
- Original implementation by the NeRF authors, ensuring high fidelity to the paper
- Includes additional features like depth rendering and view interpolation
- Comprehensive documentation and explanations in the README
Cons of nerf
- Written in TensorFlow, which may be less familiar to some researchers
- Potentially slower training and inference compared to PyTorch implementations
- Less active maintenance and updates compared to community-driven implementations
Code Comparison
nerf (TensorFlow):
def create_nerf(args):
    """Instantiate NeRF's MLP model."""
    embed_fn, input_ch = get_embedder(args.multires, args.i_embed)
    embeddirs_fn, input_ch_views = get_embedder(args.multires_views, args.i_embed)
    output_ch = 5 if args.N_importance > 0 else 4
    skips = [4]
nerf-pytorch (PyTorch):
class NeRF(nn.Module):
    def __init__(self, D=8, W=256, input_ch=3, input_ch_views=3, output_ch=4, skips=[4], use_viewdirs=False):
        super(NeRF, self).__init__()
        self.D = D
        self.W = W
        self.input_ch = input_ch
        self.input_ch_views = input_ch_views
        self.skips = skips
        self.use_viewdirs = use_viewdirs
Instant neural graphics primitives: lightning fast NeRF and more
Pros of instant-ngp
- Significantly faster training and rendering times
- Supports real-time rendering and interactive visualization
- Implements advanced techniques like hash encoding and multi-resolution hierarchies
Cons of instant-ngp
- More complex implementation, potentially harder to understand and modify
- Requires CUDA-capable GPU for optimal performance
- Less flexible in terms of customization compared to nerf-pytorch
Code Comparison
nerf-pytorch:
def render_rays(ray_batch,
                network_fn,
                network_query_fn,
                N_samples,
                retraw=False,
                lindisp=False,
                perturb=0.,
                N_importance=0,
                network_fine=None,
                white_bkgd=False,
                raw_noise_std=0.,
                verbose=False):
    # ... (implementation details)
instant-ngp:
__global__ void training_kernel(
    const uint32_t n_rays,
    BoundingBox aabb,
    const uint32_t n_rays_total,
    default_rng_t rng,
    const uint32_t max_samples_compacted,
    const uint32_t padded_output_width,
    const uint32_t n_training_images,
    const TrainingImageMetadata* __restrict__ metadata,
    // ... (more parameters)
) {
    // ... (implementation details)
}
The code comparison shows that instant-ngp uses CUDA kernels for performance optimization, while nerf-pytorch uses standard Python functions. This reflects the focus on speed and real-time rendering in instant-ngp, compared to the more straightforward implementation in nerf-pytorch.
PyTorch3D is FAIR's library of reusable components for deep learning with 3D data
Pros of pytorch3d
- Broader scope: Offers a comprehensive suite of 3D vision tools beyond NeRF
- Active development: Regularly updated with new features and improvements
- Extensive documentation: Well-documented with tutorials and examples
Cons of pytorch3d
- Steeper learning curve: More complex due to its broader feature set
- Heavier resource requirements: May need more computational power for some operations
Code Comparison
nerf-pytorch:
rays_o, rays_d = get_rays(H, W, K, c2w)
rgb, disp, acc, extras = render(H, W, K, chunk=chunk, rays=rays,
                                verbose=i < 10, retraw=True,
                                **render_kwargs)
pytorch3d:
cameras = PerspectiveCameras(device=device, R=R, T=T)
renderer = MeshRenderer(
    rasterizer=MeshRasterizer(cameras=cameras),
    shader=SoftPhongShader(device=device, cameras=cameras)
)
images = renderer(meshes, cameras=cameras, lights=lights)
Both repositories provide implementations for 3D rendering, but pytorch3d offers a more generalized approach with its camera and renderer classes, while nerf-pytorch focuses specifically on Neural Radiance Fields.
Google Research
Pros of google-research
- Broader scope, covering various research projects and topics
- Regularly updated with new research and implementations
- Backed by Google, ensuring high-quality and cutting-edge research
Cons of google-research
- Less focused on NeRF specifically, making it harder to find relevant code
- May be more complex to navigate due to the wide range of projects
- Potentially steeper learning curve for beginners in specific areas
Code comparison
nerf-pytorch:
def get_rays(H, W, K, c2w):
    i, j = torch.meshgrid(torch.linspace(0, W-1, W), torch.linspace(0, H-1, H))
    i = i.t()
    j = j.t()
    dirs = torch.stack([(i-K[0][2])/K[0][0], -(j-K[1][2])/K[1][1], -torch.ones_like(i)], -1)
    rays_d = torch.sum(dirs[..., np.newaxis, :] * c2w[:3,:3], -1)
    rays_o = c2w[:3,-1].expand(rays_d.shape)
    return rays_o, rays_d
google-research (NeRF-related code):
def get_rays(height, width, focal, pose):
    """Compute the ray origins and directions for all pixels."""
    x, y = np.meshgrid(
        np.arange(width, dtype=np.float32),
        np.arange(height, dtype=np.float32),
        indexing='xy')
    directions = np.stack(
        [(x - width * 0.5) / focal,
         -(y - height * 0.5) / focal,
         -np.ones_like(x)], axis=-1)
    ray_directions = np.sum(directions[..., np.newaxis, :] * pose[:3, :3], axis=-1)
    ray_origins = np.broadcast_to(pose[:3, -1], ray_directions.shape)
    return ray_origins, ray_directions
Plenoxels: Radiance Fields without Neural Networks
Pros of svox2
- Faster rendering and training times due to its voxel-based approach
- Better handling of large-scale scenes with improved memory efficiency
- Supports both bounded and unbounded scenes
Cons of svox2
- More complex implementation compared to the simpler NeRF approach
- May require more parameter tuning for optimal results
- Potential loss of fine details in some cases due to voxelization
Code Comparison
svox2:
render_opts = RenderOptions(
    step_size=step_size,
    sigma_thresh=1e-8,
    stop_thresh=1e-7
)
rgb, depth, _ = model.volume_render(rays, render_opts)
nerf-pytorch:
raw = network_query_fn(pts, viewdirs, network_fn)
rgb, disp, acc, weights, depth = raw2outputs(raw, z_vals, rays_d, raw_noise_std, white_bkgd)
Both repositories implement neural radiance fields, but svox2 uses a voxel-based approach for improved efficiency, while nerf-pytorch follows the original NeRF implementation more closely. svox2 offers faster rendering and better scalability, but may require more setup and tuning. nerf-pytorch provides a simpler implementation that closely adheres to the original NeRF paper, making it easier to understand and modify.
Convert  designs to code with AI

Introducing Visual Copilot: A new AI model to turn Figma designs to high quality code using your components.
Try Visual CopilotREADME
NeRF-pytorch
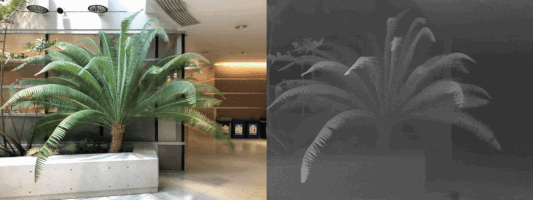
NeRF (Neural Radiance Fields) is a method that achieves state-of-the-art results for synthesizing novel views of complex scenes. Here are some videos generated by this repository (pre-trained models are provided below):


This project is a faithful PyTorch implementation of NeRF that reproduces the results while running 1.3 times faster. The code is based on authors' Tensorflow implementation here, and has been tested to match it numerically.
Installation
git clone https://github.com/yenchenlin/nerf-pytorch.git
cd nerf-pytorch
pip install -r requirements.txt
Dependencies (click to expand)
Dependencies
- PyTorch 1.4
- matplotlib
- numpy
- imageio
- imageio-ffmpeg
- configargparse
The LLFF data loader requires ImageMagick.
You will also need the LLFF code (and COLMAP) set up to compute poses if you want to run on your own real data.
How To Run?
Quick Start
Download data for two example datasets: lego and fern
bash download_example_data.sh
To train a low-res lego NeRF:
python run_nerf.py --config configs/lego.txt
After training for 100k iterations (~4 hours on a single 2080 Ti), you can find the following video at logs/lego_test/lego_test_spiral_100000_rgb.mp4.

To train a low-res fern NeRF:
python run_nerf.py --config configs/fern.txt
After training for 200k iterations (~8 hours on a single 2080 Ti), you can find the following video at logs/fern_test/fern_test_spiral_200000_rgb.mp4 and logs/fern_test/fern_test_spiral_200000_disp.mp4
More Datasets
To play with other scenes presented in the paper, download the data here. Place the downloaded dataset according to the following directory structure:
âââ configs
â  âââ ...
â Â
âââ data
â  âââ nerf_llff_data
â  â  âââ fern
â  â âââ flower # downloaded llff dataset
â  â âââ horns # downloaded llff dataset
| | âââ ...
| âââ nerf_synthetic
| | âââ lego
| | âââ ship # downloaded synthetic dataset
| | âââ ...
To train NeRF on different datasets:
python run_nerf.py --config configs/{DATASET}.txt
replace {DATASET} with trex | horns | flower | fortress | lego | etc.
To test NeRF trained on different datasets:
python run_nerf.py --config configs/{DATASET}.txt --render_only
replace {DATASET} with trex | horns | flower | fortress | lego | etc.
Pre-trained Models
You can download the pre-trained models here. Place the downloaded directory in ./logs in order to test it later. See the following directory structure for an example:
âââ logs
â  âââ fern_test
â  âââ flower_test # downloaded logs
â âââ trex_test # downloaded logs
Reproducibility
Tests that ensure the results of all functions and training loop match the official implentation are contained in a different branch reproduce. One can check it out and run the tests:
git checkout reproduce
py.test
Method
NeRF: Representing Scenes as Neural Radiance Fields for View Synthesis
Ben Mildenhall*1,
Pratul P. Srinivasan*1,
Matthew Tancik*1,
Jonathan T. Barron2,
Ravi Ramamoorthi3,
Ren Ng1
1UC Berkeley, 2Google Research, 3UC San Diego
*denotes equal contribution

A neural radiance field is a simple fully connected network (weights are ~5MB) trained to reproduce input views of a single scene using a rendering loss. The network directly maps from spatial location and viewing direction (5D input) to color and opacity (4D output), acting as the "volume" so we can use volume rendering to differentiably render new views
Citation
Kudos to the authors for their amazing results:
@misc{mildenhall2020nerf,
    title={NeRF: Representing Scenes as Neural Radiance Fields for View Synthesis},
    author={Ben Mildenhall and Pratul P. Srinivasan and Matthew Tancik and Jonathan T. Barron and Ravi Ramamoorthi and Ren Ng},
    year={2020},
    eprint={2003.08934},
    archivePrefix={arXiv},
    primaryClass={cs.CV}
}
However, if you find this implementation or pre-trained models helpful, please consider to cite:
@misc{lin2020nerfpytorch,
  title={NeRF-pytorch},
  author={Yen-Chen, Lin},
  publisher = {GitHub},
  journal = {GitHub repository},
  howpublished={\url{https://github.com/yenchenlin/nerf-pytorch/}},
  year={2020}
}
Top Related Projects
NeRF (Neural Radiance Fields) and NeRF in the Wild using pytorch-lightning
Code release for NeRF (Neural Radiance Fields)
Instant neural graphics primitives: lightning fast NeRF and more
PyTorch3D is FAIR's library of reusable components for deep learning with 3D data
Google Research
Plenoxels: Radiance Fields without Neural Networks
Convert designs to code with AI
Introducing Visual Copilot: A new AI model to turn Figma designs to high quality code using your components.
Try Visual Copilot